使用卷积神经网络预防疲劳驾驶事故
Posted AI科技大本营
tags:
篇首语:本文由小常识网(cha138.com)小编为大家整理,主要介绍了使用卷积神经网络预防疲劳驾驶事故相关的知识,希望对你有一定的参考价值。

作者|小白
来源|小白学视觉
疲劳驾驶:一个严重的问题
美国国家公路交通安全管理局估计,每年有 91,000 起车祸涉及疲劳驾驶的司机,造成约50,000 人受伤和近 800 人死亡。此外,每 24 名成年司机中就有 1 人报告在过去 30 天内在驾驶时睡着了。研究甚至发现,超过20个小时不睡觉相当于血液酒精浓度为0.08%——美国的法律规定的上限。
由于这个严重的问题,我和一组其他数据科学家开始开发一种神经网络,可以检测眼睛是否闭着,当与计算机视觉结合使用时,可以检测活人是否闭着眼睛超过一秒钟。这种技术对于任何对提高驾驶安全性感兴趣的人都很有用,包括商业和日常司机、汽车公司和汽车保险公司。
目录
构建卷积神经网络
网络摄像头应用程序
数据采集
我们使用了多个来源的完整面部数据,即麻省大学阿默斯特分校的睁眼面部数据和南京大学的闭眼面部数据。
然后,我们使用一个简单的 Python 函数从这个数据集中裁剪出眼睛,只剩下 30,000 多张裁剪后的眼睛图像。我们为每个图像裁剪添加了一个缓冲区,不仅可以获取眼睛,还可以获取眼睛周围的区域。此裁剪功能稍后将重新用于网络摄像头部分。
# installations fr
om command line
# brew install cmake # dlib requirement
# pip install dlib # face_recognition requirement
# pip install face_recognition # library for detecting eye location
# imports:
from PIL import Image, ImageDraw
import face_recognition
import os
def eye_cropper(folders):
# Establish count for iterative file saving
count = 0
# For loop going through each image file
for folder in os.listdir(folders):
for file in os.listdir(folders + '/' + folder):
# Using Facial Recognition Library on Image
image = face_recognition.load_image_file(folders + '/' + folder + '/' + file)
# create a variable for the facial feature coordinates
face_landmarks_list = face_recognition.face_landmarks(image)
# create a placeholder list for the eye coordinates
eyes = []
try:
eyes.append(face_landmarks_list[0]['left_eye'])
eyes.append(face_landmarks_list[0]['right_eye'])
except:
continue
# establish the max x and y coordinates of the eye
for eye in eyes:
x_max = max([coordinate[0] for coordinate in eye])
x_min = min([coordinate[0] for coordinate in eye])
y_max = max([coordinate[1] for coordinate in eye])
y_min = min([coordinate[1] for coordinate in eye])
# establish the range of x and y coordinates
x_range = x_max - x_min
y_range = y_max - y_min
# to make sure the full eye is captured,
# calculate the coordinates of a square that has 50%
# cushion added to the axis with a larger range
if x_range > y_range:
right = round(.5*x_range) + x_max
left = x_min - round(.5*x_range)
bottom = round(((right-left) - y_range))/2 + y_max
top = y_min - round(((right-left) - y_range))/2
else:
bottom = round(.5*y_range) + y_max
top = y_min - round(.5*y_range)
right = round(((bottom-top) - x_range))/2 + x_max
left = x_min - round(((bottom-top) - x_range))/2
#crop original image using the cushioned coordinates
im = Image.open(folders + '/' + folder + '/' + file)
im = im.crop((left, top, right, bottom))
# resize image for input into our model
im = im.resize((80,80))
# save file to output folder
im.save('yourfolderforcroppedeyes')
# increase count for iterative file saving
count += 1
# print count every 200 photos to monitor progress
if count % 200 == 0:
print(count)
# Call function to crop full-face eye images
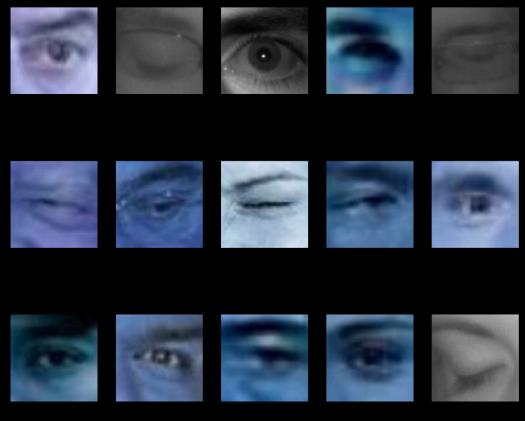
eye_cropper('yourfullfaceimagefolder')以下是我们用来训练模型的数据示例:
创建卷积神经网络
确定指标
因为预测正面类别(熟睡的司机)对我们来说比预测负面类别(清醒的司机)更重要,所以我们最重要的指标是召回率(敏感性)。召回率越高,模型错误地预测清醒(假阴性)的睡眠驱动程序的数量就越少。
这里唯一的问题是我们的正面类别明显多于我们的负面类别。因此,最好使用F1 分数或 Precision-Recall AUC 分数,因为它们还考虑了我们猜测驾驶员睡着但实际上清醒(精确)的次数。否则我们的模型将始终预测我们处于睡眠状态,无法使用。另一种我们在处理不平衡图像数据时没有使用的方法是使用图像增强,我没有在这里使用它,但是 Jason Brownlee 在解释如何在这里使用它方面做得很好。
准备图像数据
下一步是导入图像并用模型进行预处理。
本节所需的导入:
import cv2
import  tensorflow  as  tf
from  tensorflow  import keras
from  sklearn.model_selection  import train_test_split
from  tensorflow.keras.wrappers.scikit_learn  import KerasClassifier
from  keras.models  import Sequential
from  keras.layers  import Dense,Flatten,Conv2D,MaxPooling2D,
导入我们之前创建的图像并调整图像大小,使它们全部匹配,对于这个项目,我们将大小调整为 80x80 像素。这是一个使用 OS 库的简单导入函数:
def load_images_from_folder(folder, eyes = 0):
    count = 0
    error_count = 0
    images = []
    for filename in os.listdir(folder):
        try:
            img = cv2.imread(os.path.join(folder,filename))
            img = cv2.resize(img, (80,80)) ## Resizing the images
            ## for eyes if it is 0: open, 1: close
            images.append([img, eyes])
        except:
            error_count += 1
            print('ErrorCount = ' + str(error_count))
            continue


        count += 1
        if count % 500 == 0:
            print('Succesful Image Import Count = ' + str(count))


    return images


folder="../data/train/new_open_eyes"
open_eyes = load_images_from_folder(folder, 0)


folder="../data/train/New_Closed_Eyes"
closed_eyes = load_images_from_folder(folder, 1)
eyes = close_eyes + open_eyes
设置变量,独立的 X 是图像,依赖的 y 是相应的标签(1 表示闭眼,0 表示睁眼):
X = []
y = []
for features, label in eyes:
     X.append(features)
     y.append(label)
将图像转换为数组,以便它可以进入模型。此外,将数据除以255进行缩放。
X = np.array(X).reshape(-1, 80, 80, 3)
y = np.array(y)
X = X/255.0
使用scikit learn的train_test_Split将数据拆分为训练集和验证集。重要提示:确保分层,因为我们有不平衡的类。
X_train, X_test, y_train, y_test = train_test_split(X, y, stratify = y)创建模型架构

卷积层:
该层创建像素子集而不是完整图像,并允许更快的模型。根据设置的过滤器数量,这可能比原始图像的密度更高或更低,但它们将使模型能够使用更少的资源了解更复杂的关系。我们使用 32 个过滤器,使用至少一个卷积层,通常需要两个或更多。对我们来说,最佳设置是将两个3x3组合在一起,然后将三个3x3组合在一起。CNN 的总体趋势是使用较小的滤波器尺寸。事实上,双3x3层与5x5层基本相同,但速度更快,通常会产生更好的分数。
压平
确保展平图像阵列,以便它可以进入密集层。
密集层
层越密集,我们的模型训练所需的时间就越长,随着这些层中神经元数量的增加,网络学习到的关系的复杂性也会增加。一般来说,通常卷积层的想法是为了避免产生过深的密集层方案。在我们的模型中我们使用了三层,神经元的relu激活率呈下降趋势(256、128、64)。我们还在每一层之后使用了 30% 的dropout。
输出层
最后,因为这是一个二进制分类问题,请确保对外层使用 sigmoid 激活。
编译模型
在 model.compile()中,我们需要将指标设置为 PR AUC(tf.keras.metrics.AUC (curve = 'PR')在 tensorflow 中)或召回率(tf.keras.metrics.recall在 tensorflow 中)。将损失设置为二进制交叉熵,因为这通常是一个二进制分类模型和一个好的优化器。
拟合模型
将批量大小设置得尽可能大。我在 Google Colab 的 32 GB TPU 上运行了 gridsearch,它轻松运行了 1000 多个批次。如有疑问,请尝试 32 个批次,如果没有使内存过载,则增加。就epochs 而言,20 个 epochs 后收益递减,所以我不会比这个特定的 CNN 高太多。
以下是 Tensorflow Keras 的完整设置:
# Instantiate the model
model = Sequential()


# Adding first three convolutional layers
model.add(Conv2D(
                filters = 32, # number of filters
                kernel_size = (3,3), # height/width of filter
                activation = 'relu', # activation function
                input_shape = (80,80,3) # shape of input (image)
                ))
model.add(Conv2D(
                filters = 32, # number of filters
                kernel_size = (3,3), # height/width of filter
                activation = 'relu' # activation function
                ))
model.add(Conv2D(
                filters = 32, # number of filters
                kernel_size = (3,3), # height/width of filter
                activation = 'relu' # activation function
                ))


# Adding pooling after convolutional layers
model.add(MaxPooling2D(pool_size = (2,2))) # Dimensions of the region that you are pooling


# Adding second set of convolutional layers
model.add(Conv2D(
                filters = 32, # number of filters
                kernel_size = (3,3), # height/width of filter
                activation = 'relu' # activation function
                ))
model.add(Conv2D(
                filters = 32, # number of filters
                kernel_size = (3,3), # height/width of filter
                activation = 'relu' # activation function
                ))


# Add last pooling layer.
model.add(MaxPooling2D(pool_size=(2,2)))


model.add(Flatten())


# Adding first dense layer with 256 nodes
model.add(Dense(256, activation='relu'))


# Adding a dropout layer to avoid overfitting
model.add(Dropout(0.3))


model.add(Dense(128, activation='relu'))
model.add(Dropout(0.3))


model.add(Dense(64, activation='relu'))
model.add(Dropout(0.3))


# adding output layer
model.add(Dense(1, activation = 'sigmoid'))


# compiling the model
model.compile(loss='binary_crossentropy',
                optimizer='adam',
                metrics=[tf.keras.metrics.AUC(curve = 'PR')])


# fitting the model
model.fit(X_train,
            y_train,
            batch_size=800,
            validation_data=(X_test, y_test),
            epochs=24)


# evaluate the model
model.evaluate(X_test, y_test, verbose=1)
曲线下的最终精确召回区域:
0.981033
创建网络摄像头应用程序
获得满意的模型后,请使用model.save('yourmodelname.h5'). 保存生产模型时,请确保运行该模型时没有验证数据,这将在导入时导致问题。
安装和导入:
这些是 Mac 优化的,尽管也可以在 Windows 上使用相同的脚本。
# installations needed for webcam application
# pip install opencv-python #
# if you want to play a sound for the alert:
# pip install -U PyObjC
# pip install playsound
# imports for webcam application
import cv2
from playsound import playsound
# import model saved above
eye_model = keras.models.load_model(‘best_model.h5’)
使用 OpenCV 访问网络摄像头
使用cv2.VideoCapture(0)启动摄像头捕获。如果想根据相对帧大小而不是绝对坐标确定文本位置,请确保使用cap.get(cv2.cap\\u PROP\\u frame\\u width)保存网络摄像头的宽度和高度,还可以每秒查看帧数。
cap = cv2.VideoCapture(0)
w = cap.get(cv2.CAP_PROP_FRAME_WIDTH)
h = cap.get(cv2.CAP_PROP_FRAME_HEIGHT)
print(cap.get(cv2.CAP_PROP_FPS))
if not cap.isOpened():
 raise IOError(‘Cannot open webcam’)
使用 OpenCV 捕获帧并对其进行裁剪
如果我们打算用框架数数闭着的眼睛,一定要设置一个计数器。A while True:循环将使相机保持开启状态,直到我们完成脚本。在 while 循环中,使用ret, frame = cap.read()格式来捕获网络摄像头视频的帧。最后,调用框架上的函数。它应该从帧中返回一个裁剪过的眼睛,如果在帧中找不到眼睛,函数将返回不能除以255的None,并跳到下一帧。
counter = 0
# create a while loop that runs while webcam is in use
while True:
  # capture frames being outputted by webcam
  ret, frame = cap.read()
  # function called on the frame
  image_for_prediction = eye_cropper(frame)
  try:
     image_for_prediction = image_for_prediction/255.0
  except:
     continue
通过模型运行框架
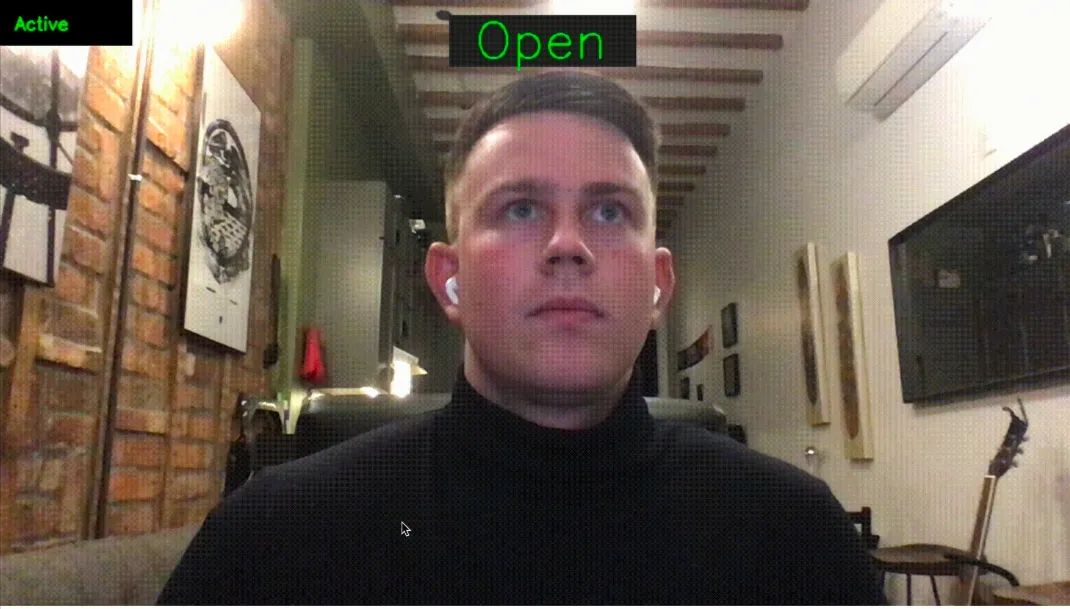
然后我们可以通过模型运行图像并获得预测。如果预测值更接近于 0,那么我们在屏幕上显示“Open”,否则(即它更接近 1),我们显示“Closed”。请注意,如果模型检测到睁开眼睛,计数器将重置为 0,如果眼睛闭上,则计数器增加 1。我们可以使用cv2.putText()显示一些基本文本来指示眼睛是闭着的还是睁开的。
prediction = eye_model.predict(image_for_prediction)
if prediction < 0.5:
counter = 0
status = ‘Open’
cv2.putText(frame, status, (round(w/2)-80,70),
cv2.FONT_HERSHEY_SIMPLEX, 2, (0,255,0), 2, cv2.LINE_4)
else:
counter = counter + 1
status = ‘Closed’
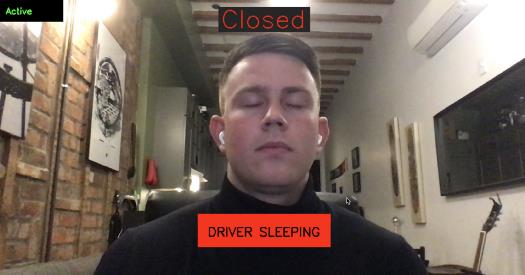
cv2.putText(frame, status, (round(w/2)-104,70), cv2.FONT_HERSHEY_SIMPLEX, 2, (0,0,255), 2, cv2.LINE_4)如果一行中有6帧是闭着眼睛的(“睡眠”),我们还希望显示一个警报。这可以使用一个简单的if语句来完成:
if counter > 5:
  cv2.putText(frame, ‘DRIVER SLEEPING’, (round(w/2)-136,round(h) — 146), cv2.FONT_HERSHEY_SIMPLEX, 1, (0,0,255), 2, cv2.LINE_4)
  counter = 5
最后,我们需要显示帧并为 while 循环提供退出键。在cv2.waitKey(1)确定帧的显示时间。括号中的数字是帧将显示的毫秒数,除非按下“k”键(在本例中为27)或escape键:
cv2.imshow(‘Drowsiness Detection’, frame)
k = cv2.waitKey(1)
if k == 27:
  break
在循环之外,释放网络摄像头并关闭应用程序:
cap.release()
cv2.destroyAllWindows()
最终产品
加上一些文体,这是最终产品。
正如我们所见,该模型非常有效,尽管训练时间很长,但仍可在几毫秒内返回预测。通过一些进一步的改进并导出到外部机器,这个程序可以很容易地应用于实际情况,甚至可以挽救生命。
import cv2
import numpy as np
from playsound import playsound
from PIL import Image, ImageDraw
import face_recognition
from tensorflow import keras
eye_model = keras.models.load_model('best_model_2.h5')


# webcam frame is inputted into function
def eye_cropper(frame):


    # create a variable for the facial feature coordinates
    facial_features_list = face_recognition.face_landmarks(frame)


    # create a placeholder list for the eye coordinates
    # and append coordinates for eyes to list unless eyes
    # weren't found by facial recognition
    try:
        eye = facial_features_list[0]['left_eye']
    except:
        try:
            eye = facial_features_list[0]['right_eye']
        except:
            return


    # establish the max x and y coordinates of the eye
    x_max = max([coordinate[0] for coordinate in eye])
    x_min = min([coordinate[0] for coordinate in eye])
    y_max = max([coordinate[1] for coordinate in eye])
    y_min = min([coordinate[1] for coordinate in eye])


    # establish the range of x and y coordinates
    x_range = x_max - x_min
    y_range = y_max - y_min


    # in order to make sure the full eye is captured,
    # calculate the coordinates of a square that has a
    # 50% cushion added to the axis with a larger range and
    # then match the smaller range to the cushioned larger range
    if x_range > y_range:
        right = round(.5*x_range) + x_max
        left = x_min - round(.5*x_range)
        bottom = round((((right-left) - y_range))/2) + y_max
        top = y_min - round((((right-left) - y_range))/2)
    else:
        bottom = round(.5*y_range) + y_max
        top = y_min - round(.5*y_range)
        right = round((((bottom-top) - x_range))/2) + x_max
        left = x_min - round((((bottom-top) - x_range))/2)


    # crop the image according to the coordinates determined above
    cropped = frame[top:(bottom + 1), left:(right + 1)]


    # resize the image
    cropped = cv2.resize(cropped, (80,80))
    image_for_prediction = cropped.reshape(-1, 80, 80, 3)


    return image_for_prediction


# initiate webcam
cap = cv2.VideoCapture(0)
w = cap.get(cv2.CAP_PROP_FRAME_WIDTH)
h = cap.get(cv2.CAP_PROP_FRAME_HEIGHT)
if not cap.isOpened():
    raise IOError('Cannot open webcam')


# set a counter
counter = 0


# create a while loop that runs while webcam is in use
while True:


    # capture frames being outputted by webcam
    ret, frame = cap.read()


    # use only every other frame to manage speed and memory usage
    frame_count = 0
    if frame_count == 0:
        frame_count += 1
        pass
    else:
        count = 0
        continue


    # function called on the frame
    image_for_prediction = eye_cropper(frame)
    try:
        image_for_prediction = image_for_prediction/255.0
    except:
        continue


    # get prediction from model
    prediction = eye_model.predict(image_for_prediction)


    # Based on prediction, display either "Open Eyes" or "Closed Eyes"
    if prediction < 0.5:
        counter = 0
        status = 'Open'


        cv2.rectangle(frame, (round(w/2) - 110,20), (round(w/2) + 110, 80), (38,38,38), -1)


        cv2.putText(frame, status, (round(w/2)-80,70), cv2.FONT_HERSHEY_SIMPLEX, 2, (0,255,0), 2, cv2.LINE_4)
        x1, y1,w1,h1 = 0,0,175,75
        ## Draw black backgroun rectangle
        cv2.rectangle(frame, (x1,x1), (x1+w1-20, y1+h1-20), (0,0,0), -1)
        ## Add text
        cv2.putText(frame, 'Active', (x1 +int(w1/10), y1+int(h1/2)), cv2.FONT_HERSHEY_SIMPLEX, 0.7, (0, 255,0),2)
    else:
        counter = counter + 1
        status = 'Closed'


        cv2.rectangle(frame, (round(w/2) - 110,20), (round(w/2) + 110, 80), (38,38,38), -1)


        cv2.putText(frame, status, (round(w/2)-104,70), cv2.FONT_HERSHEY_SIMPLEX, 2, (0,0,255), 2, cv2.LINE_4)
        x1, y1,w1,h1 = 0,0,175,75
        ## Draw black backgroun rectangle
        cv2.rectangle(frame, (x1,x1), (x1+w1-20, y1+h1-20), (0,0,0), -1)
        ## Add text
        cv2.putText(frame, 'Active', (x1 +int(w1/10), y1+int(h1/2)), cv2.FONT_HERSHEY_SIMPLEX, 0.7, (0, 255,0),2)


        # if the counter is greater than 3, play and show alert that user is asleep
        if counter > 2:


            ## Draw black background rectangle
            cv2.rectangle(frame, (round(w/2) - 160, round(h) - 200), (round(w/2) + 160, round(h) - 120), (0,0,255), -1)
            cv2.putText(frame, 'DRIVER SLEEPING', (round(w/2)-136,round(h) - 146), cv2.FONT_HERSHEY_SIMPLEX, 1, (0,0,0), 2, cv2.LINE_4)
            cv2.imshow('Drowsiness Detection', frame)
            k = cv2.waitKey(1)
            ## Sound
            playsound('rooster.mov')
            counter = 1
            continue


    cv2.imshow('Drowsiness Detection', frame)
    k = cv2.waitKey(1)
    if k == 27:
        break
cap.release()
cv2.destroyAllWindows()

往
期
回
顾
资讯
资讯
资讯
技术

分享

点收藏

点点赞

点在看
以上是关于使用卷积神经网络预防疲劳驾驶事故的主要内容,如果未能解决你的问题,请参考以下文章