Vue2.x源码学习笔记-Vue构造函数
Posted Sorrow.X
tags:
篇首语:本文由小常识网(cha138.com)小编为大家整理,主要介绍了Vue2.x源码学习笔记-Vue构造函数相关的知识,希望对你有一定的参考价值。
我们知道使用vue.js开发应用时,都是new Vue({}/*options*/)
那Vue构造函数上有哪些静态属性和方法呢?其原型上又有哪些方法呢?
一般我都会在浏览器中输入Vue来look see see

可以看到Vue构造函数上挂载了这么多属性和方法,so这么nb。
可以看到有很多的全局的api,以及实例的方法(其实就是Vue.prototype上的方法)。
那么问题来了,尤大是如何把这么多方法和属性挂载上去的。那么带着问题,进入vue源码 look see see去
现在写项目可能都使用es6+的语法,用webpack打包或者其他工具打包了。
先进入项目中,找到package.json文件,这里面有项目的依赖,有开发环境、生产环境等编译的启动脚本,有项目的许可信息等。
然而我们使用npm run dev时,其实就是package.json文件中scripts属性中dev属性,它是这么写的
"dev": "rollup -w -c build/config.js --environment TARGET:web-full-dev"
它执行了build/config.js文件(一个打包配置的文件),且带了个web-full-dev参数过去了,先这么理解这,我们去build/config.js文件中去看看,且搜下web-full-dev,会发现
// Runtime+compiler development build (Browser)
  \'web-full-dev\': {
    entry: path.resolve(__dirname, \'../src/entries/web-runtime-with-compiler.js\'),
    dest: path.resolve(__dirname, \'../dist/vue.js\'),
    format: \'umd\',
    env: \'development\',
    alias: { he: \'./entity-decoder\' },
    banner
  },
我们可以发现入口文件是\'../src/entries/web-runtime-with-compiler.js\',然而src目录下的那么文件夹和文件都会编译成dist目录下的vue.js。
我们分别打开相关目录下的文件
/src/entries/web-runtime-with-compiler.js
--> /src/entries/web-runtime.js
--> /src/core/index.js
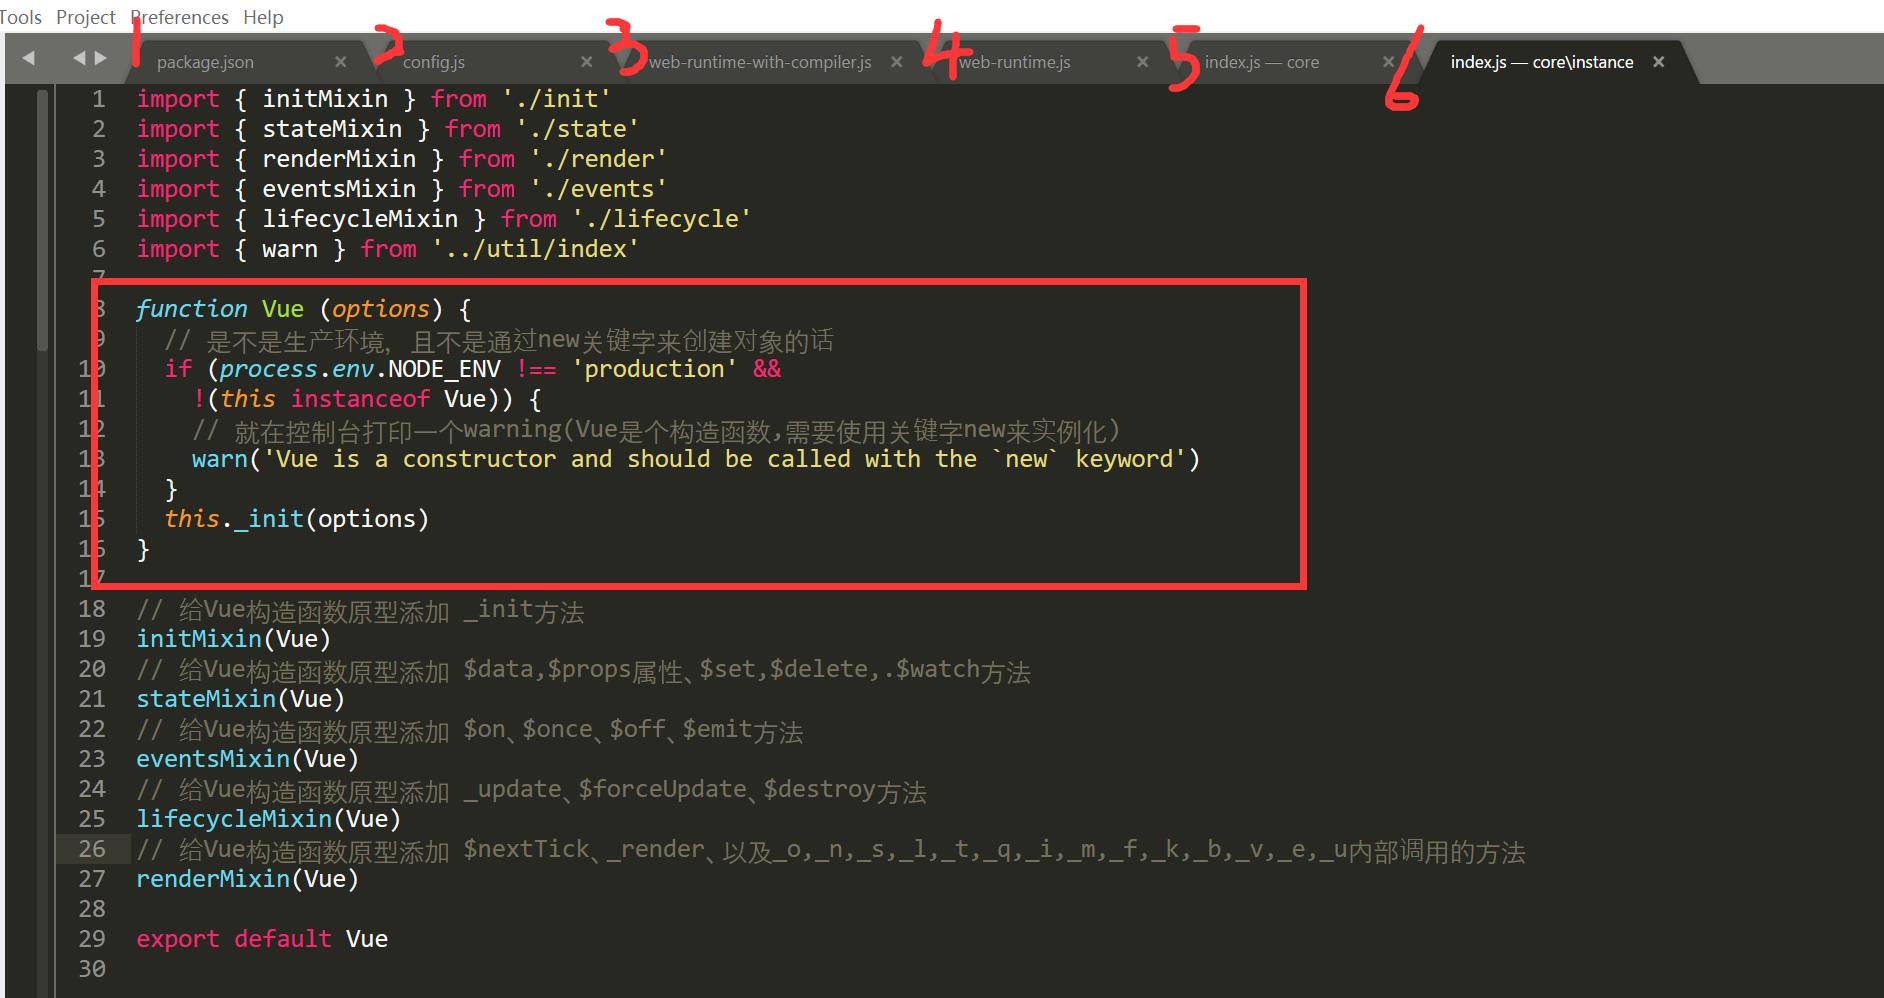
--> /src/core/instance/index.js
通过package.json文件,依次打开相关文件终于找到Vue构造函数了

可以看到Vue构造函数是如此简单,一个if分支加上一个原型上的_init方法。那么怎么往这个构造函数上混入原型方法和静态属性和静态方法呢?
我们可以看到通过
// 给Vue构造函数原型添加 _init方法
initMixin(Vue)
// 给Vue构造函数原型添加 $data,$props属性、$set,$delete,.$watch方法
stateMixin(Vue)
// 给Vue构造函数原型添加 $on、$once、$off、$emit方法
eventsMixin(Vue)
// 给Vue构造函数原型添加 _update、$forceUpdate、$destroy方法
lifecycleMixin(Vue)
// 给Vue构造函数原型添加 $nextTick、_render、以及_o,_n,_s,_l,_t,_q,_i,_m,_f,_k,_b,_v,_e,_u内部调用的方法
renderMixin(Vue)
这几个方法就给Vue.prototype添加了这么多方法了。
接着沿刚才所提到的文件引入顺序一步步来看。/src/core/instance/index.js执行之后,是/src/core/index.js文件来看下源码
import Vue from \'./instance/index\'
import { initGlobalAPI } from \'./global-api/index\'
import { isServerRendering } from \'core/util/env\'

initGlobalAPI(Vue) // 给Vue构造函数添加了一些静态方法和属性(属性: config, util, options, cid;
                   // 方法: set, delete, nextTick, use, mixin, extend, component, directive, filter方法)

// 给Vue构造函数的原型添加 $isServer 属性
Object.defineProperty(Vue.prototype, \'$isServer\', {
  get: isServerRendering
})

// 给Vue构造函数添加 version 属性
Vue.version = \'__VERSION__\'

export default Vue
可以看到initGlobalAPI方法给Vue构造函数添加了好多静态属性和方法(也就是官网api提到的全局api)。
我们可以先看下其源码
export function initGlobalAPI (Vue: GlobalAPI) {
  // config
  const configDef = {}
  configDef.get = () => config
  if (process.env.NODE_ENV !== \'production\') {
    configDef.set = () => {
      warn(
        \'Do not replace the Vue.config object, set individual fields instead.\'
      )
    }
  }
  Object.defineProperty(Vue, \'config\', configDef)

  // exposed util methods.
  // NOTE: these are not considered part of the public API - avoid relying on
  // them unless you are aware of the risk.
  Vue.util = {
    warn,
    extend,
    mergeOptions,
    defineReactive
  }

  Vue.set = set
  Vue.delete = del
  Vue.nextTick = nextTick

  Vue.options = Object.create(null)
  config._assetTypes.forEach(type => {
    Vue.options[type + \'s\'] = Object.create(null)
  })

  // this is used to identify the "base" constructor to extend all plain-object
  // components with in Weex\'s multi-instance scenarios.
  Vue.options._base = Vue

  extend(Vue.options.components, builtInComponents)

  initUse(Vue) // 给Vue构造函数添加 use方法
  initMixin(Vue) // 给Vue构造函数添加 mixin方法
  initExtend(Vue) // 给Vue构造函数添加 extend方法
  initAssetRegisters(Vue) // 给Vue构造函数添加 component, directive, filter方法
}
然后又给Vue.prototype原型添加了$isServer属性
再然后给Vue添加了version静态属性。
接着再看下/src/entries/web-runtime.js文件中的代码
// install platform specific utils 安装平台相对应的方法
Vue.config.mustUseProp = mustUseProp
Vue.config.isReservedTag = isReservedTag
Vue.config.getTagNamespace = getTagNamespace
Vue.config.isUnknownElement = isUnknownElement

// install platform runtime directives & components 安装平台相对应的指令和组件
extend(Vue.options.directives, platformDirectives)
extend(Vue.options.components, platformComponents)

// install platform patch function 如果是环境是浏览器的话, 给Vue构造函数添加__patch__函数
Vue.prototype.__patch__ = inBrowser ? patch : noop

// public mount method 给Vue构造函数添加 $mount 函数
Vue.prototype.$mount = function (
  el?: string | Element,
  hydrating?: boolean
): Component {
  el = el && inBrowser ? query(el) : undefined
  return mountComponent(this, el, hydrating)
}
可以看到
1. 根据不同的平台重写config对象中mustUseProp, isReservedTag, getTagNamespace, isUnknowElement属性的值。
2. 通过exend方法,扩展指令对象和组件对象
先不关心extend方法的具体实现,看看他把我们的Vue.options.directives和Vue.options.components变成了什么鸟样

内置指令和组件就是这么来的啊,很好,继续往下see see
3. 然后给Vue.prototype添加__patch__(虚拟dom相关) 和 $mount(挂载元素)方法
接着看下/src/entries/web-runtime-with-compiler.js 文件的代码:
const mount = Vue.prototype.$mount
// 重写Vue构造函数原型上的$mount方法
Vue.prototype.$mount = function (
  el?: string | Element,
  hydrating?: boolean
): Component {
  el = el && query(el)

  /* istanbul ignore if */
  if (el === document.body || el === document.documentElement) {
    process.env.NODE_ENV !== \'production\' && warn(
      `Do not mount Vue to <html> or <body> - mount to normal elements instead.`
    )
    return this
  }

  const options = this.$options
  // resolve template/el and convert to render function
  if (!options.render) {
    let template = options.template
    if (template) {
      if (typeof template === \'string\') {
        if (template.charAt(0) === \'#\') {
          template = idToTemplate(template)
          /* istanbul ignore if */
          if (process.env.NODE_ENV !== \'production\' && !template) {
            warn(
              `Template element not found or is empty: ${options.template}`,
              this
            )
          }
        }
      } else if (template.nodeType) {
        template = template.innerHTML
      } else {
        if (process.env.NODE_ENV !== \'production\') {
          warn(\'invalid template option:\' + template, this)
        }
        return this
      }
    } else if (el) {
      template = getOuterHTML(el)
    }
    if (template) {
      /* istanbul ignore if */
      if (process.env.NODE_ENV !== \'production\' && config.performance && mark) {
        mark(\'compile\')
      }

      const { render, staticRenderFns } = compileToFunctions(template, {
        shouldDecodeNewlines,
        delimiters: options.delimiters
      }, this)
      options.render = render
      options.staticRenderFns = staticRenderFns

      /* istanbul ignore if */
      if (process.env.NODE_ENV !== \'production\' && config.performance && mark) {
        mark(\'compile end\')
        measure(`${this._name} compile`, \'compile\', \'compile end\')
      }
    }
  }
  return mount.call(this, el, hydrating)
}

/**
 * Get outerHTML of elements, taking care
 * of SVG elements in IE as well.
 */
function getOuterHTML (el: Element): string {
  if (el.outerHTML) {
    return el.outerHTML
  } else {
    const container = document.createElement(\'div\')
    container.appendChild(el.cloneNode(true))
    return container.innerHTML
  }
}

Vue.compile = compileToFunctions // 给Vue构造函数添加 compile方法
该文件中重写Vue构造函数原型上的$mount方法,且给vue添加了compile属性
至此Vue上的静态属性和方法,还有原型上的方法怎么来的就这么看完了。
一个构造函数有了,那怎么玩它呢,必然new它,得到的实例,究竟它有哪些属性,属性怎么一步一步挂载到实例上去的,下篇帖子用个小例子说明。
总结: 该笔记主要记录Vue构造函数上的静态属性和方法还有原型方法是如何一步一步添加到Vue构造函数上的。并没有解读属性或者方法的源码。
以上是关于Vue2.x源码学习笔记-Vue构造函数的主要内容,如果未能解决你的问题,请参考以下文章