ansible一般使用
Posted
tags:
篇首语:本文由小常识网(cha138.com)小编为大家整理,主要介绍了ansible一般使用相关的知识,希望对你有一定的参考价值。
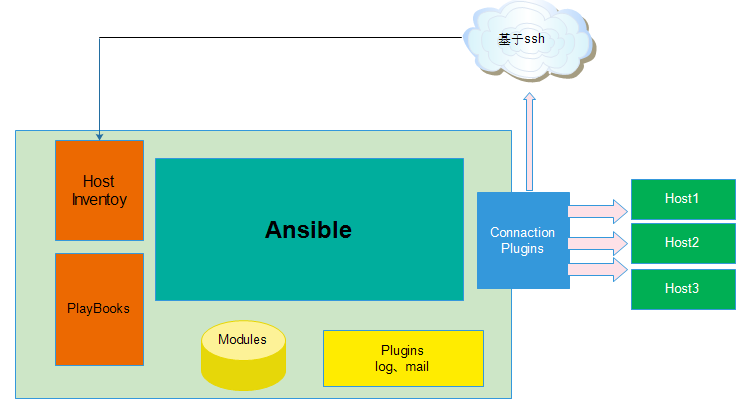
ansible可以批量管理多台主机。通过调用各个功能模块、ssh连接、发送python脚本、远程主机上的一些命令来完成管理各被控端,所以不用给各被管理节点专门安装客户端工具。
不过一般需要事先配置ansible端能基于密钥认证的方式联系各被管理节点。
如果要用密码的方式,要启用主配置文件中的ask_pass = True,并安装上sshpass软件即可。
目录:
一、介绍
二、常用模块介绍
三、playbook
四、roles
想深入了解的朋友请看这里:http://www.ansible.com.cn/
一、介绍:
模块化,调用特定的模块来完成特定任务;
基于Python语言实现,由Paramiko, PyYAML和Jinja2三个关键模块>实现;
支持自定义模块
支持playbook: 可以把多个任务编排好,一次性的执行完。
幂等性:多次执行的结果是一样的。
ansible命令的使用方式还是很简单的:
ansible <host-pattern> [-f forks] [-m module_name] [-a args]
host_pattern 是来指定主机的,可以是单台主机,也可以是主机组。前提是要在ansible的hosts配置文件中指定。
-f 指定一次批量管理的主机数量。 可以说就是并发管理数量。 与总的数量没有关系。
-m 指定模块。
-a 模块参数
它所有的管理功能都是由各个模块所提供,查看模块使用方法:
ansible-doc [-M module_path] [-l] [-s] [module...]
-M 查看模块的详细信息,要指定模块的路径
-l 列出所有模块。
-s 查看模块使用方式。
安装:
ansible依赖于Python 2.6或更高的版本、paramiko、PyYAML及Jinja2。
编译安装
# yum -y install python-jinja2 PyYAML python-paramiko python-babel python-crypto
# python setup.py build
# python setup.py install
# mkdir /etc/ansible
# cp -r examples/* /etc/ansible
注意:不同版本的ansible的功能差异可能较大。
我这里就直接yum安装了。
环境:
系统: CentOS Linux release 7.1.1503 (Core)
软件: ansible-1.9.2-1.el7
看一下所生成的文件:
/etc/ansible
/etc/ansible/ansible.cfg          #ansible主配置文件。  一般不用修改,如果想自定义一下,请看上面的网址。
/etc/ansible/hosts                   #主配置文件中所指定的主机清单文件
/etc/ansible/roles                   #用来定义roles的目录
/usr/bin/ansible
/usr/bin/ansible-doc
/usr/bin/ansible-galaxy
/usr/bin/ansible-playbook
.....
首先我们需要在hosts里面定义各被管主机。这个文件被称为inventory文件。
[[email protected] ~]# vim /etc/ansible/hosts
[wserver]
172.16.40.11
172.16.40.12

[dbserver]
172.16.40.20
这个文件里面都是一些定义主机的例子,我这里把它们注释了,添加了上面几个。
inventory文件遵循INI文件风格,中括号中的是组名,可以用各个组名表示多个主机。 也可以用all来表示所有主机。 当然也可以使用单个主机。同一个主机可以出现在多个组中。
此外,当如若目标主机使用了非默认的SSH端口,还可以在主机名称之后使用冒号加端口号来标明。
如: 172.16.40.11:22022
组还可以包含其它的组,组嵌套。
在这里如果所管理主机的系统版本不一样也没问题,因为ansible会检测主机的系统参数并做出不同的设置。但并不是绝对不会有问题。
每次执行操作会发送python脚本到客户端的 对应用户家目录下的.ansible/tmp目录下面。 具体作用暂时不清楚,可能是用来收集信息、执行任务和调用本地的命令的吧。
二、常用模块介绍:
这里只是常用的部分,详细的可以用ansible-doc来查看。如查看一下user模块。
[[email protected] ~]# ansible-doc -s user
带=号的表示必选项。
http://docs.ansible.com/ansible/modules_by_category.html
user: 用户管理
state={present|absent}   #present表示创建,absent表示删除。
force=yes          #强制删除用户。 一般情况下用户在已登录状态下是不能删除的。相当于userdel -f
remove=yes     #在删除用户的时候,同时删除家目录与mail spool。相当于userdel -r
system=yes   #创建的系统用户
uid                #指定uid
shell             #指定shell
password       #用来指定密码,要用已加密的密码。
上面的password后面的密码可以用openssl passwd 来生成。但是好像只能是md5加密的。
[[email protected] ~]# openssl passwd --help
Usage: passwd [options] [passwords]
where options are
-crypt             standard Unix password algorithm (default)
-1                 MD5-based password algorithm
.....
例:
[[email protected] ~]# openssl passwd -1
Password:
Verifying - Password:
$1$.0isU960$NDoCtqtkDBa2q9TQJYQml1

[[email protected] ~]# ansible all -m user -a ‘name=test1 password="$1$.0isU960$NDoCtqtkDBa2q9TQJYQml1"‘
172.16.40.11 | success >> {
    "changed": true,
    "comment": "",
    "createhome": true,
    "group": 1007,
    "home": "/home/test1",
    "name": "test1",
    "password": "NOT_LOGGING_PASSWORD",
    "shell": "/bin/bash",
    "state": "present",
    "system": false,
    "uid": 1007
}
.....
删除:
[[email protected] ~]# ansible all -m user -a ‘name=test1 state=absent‘
group: 组管理
  action: group
      gid                    # Optional `GID‘ to set for the group.
      name=             # Name of the group to manage.
      state                 # Whether the group should be present or not on the remote host.
      system             # If `yes‘, indicates that the group created is a system group.
与user差不多,而且参数也就只有这几个。
cron: 管理cron计划任务
      day                    # Day of the month the job should run ( 1-31, *, */2, etc )
      hour                   # Hour when the job should run ( 0-23, *, */2, etc )
      job                    # The command to execute. Required if state=present.
      minute                 # Minute when the job should run ( 0-59, *, */2, etc )
      month                  # Month of the year the job should run ( 1-12, *, */2, etc )
      name=                  # Description of a crontab entry.
      state                  # Whether to ensure the job is present or absent.
      user                   # The specific user whose crontab should be modified.
      weekday                # Day of the week that the job should run ( 0-6 for Sunday-Saturday, *, etc )
      .....
只要使用过cron,我想也不用过多解释吧。state与上面的模块一个意思,时间参数不写表示*。
name用来描述任务,andible也用它来识别各个添加的任务,才能用来删除不同的任务。
如果有name相同的任务,会覆盖。
例:
[[email protected] ~]# ansible wserver -m cron -a ‘name=sync_time minute=*/5 job="/sbin/ntpdate 172.16.0.1 > /dev/null;/sbin/hwclock -w"‘
连到一台主机看一下crontab。
[[email protected] ~]# crontab -l
*/15 * * * * /sbin/ntpdate 172.16.0.1 > /dev/null;/sbin/hwclock > /dev/null    #这个是原来就有的。
#Ansible: sync_time                #这个就是我们刚添加的。
*/5 * * * * /sbin/ntpdate 172.16.0.1 > /dev/null;/sbin/hwclock -w
删除:
[[email protected] ~]# ansible wserver -m cron -a ‘name=sync_time state=absent‘
例: 添加每2天的2:30备份/etc目录到/var/backup下。
[[email protected] ~]# ansible wserver -m cron -a ‘name=etc_tar minute=30 hour=2 day=*/2 job="/bin/tar -Jcf /var/backup/`/bin/date "+\\%Y\\%m\\%d-\\%H\\%M"`.tar.xz /etc"‘
查看一下:
#Ansible: etc_tar
30 2 */2 * * /bin/tar -Jcf /var/backup/`/bin/date +\%Y\%m\%d-\%H\%M`.tar.xz /etc
ping: 探测主机是否在线
[[email protected] ~]# ansible all -m ping
这个模块没有参数,只是用来探测主机是否在线的。
file: 文件管理
path=    表示文件路径,必选项。
mode 表示设置权限
owner属主
group属组
state=directory 创建目录或修改目录权限。
state=touch     创建文件或修改文件权限。
state=file      修改文件权限。
state=link      创建文件的符号链接。src=源文件   path=链接文件
state=absent    删除文件或目录。
创建目录是递归创建的,也就是会自动创建所需的目录。 而文件或链接文件都不行。
例:创建目录。
[[email protected] ~]# ansible wserver -m file -a ‘path=/var/backup/ state=directory‘
[[email protected] ~]# ansible wserver -m file -a ‘path=/tmp/6/7/8/9  state=directory‘
例:创建链接文件。把etc目录链接至/tmp/etc。
[[email protected] ~]# ansible wserver -m file -a ‘path=/tmp/etc src=/etc state=link‘
copy: 复制文件
content  代替src,设置文件中的内容为指定的内容。如果目标文件不存在,则自动创建随机名称文件。
                                   如果原来文件有数据,则覆盖。  暂时不知道有什么用。
src源文件路径。
owner属主。
group属组。
mode权限。
dest=目标路径。
backup 覆盖文件之前,先备份。 yes/no
例: 把/etc/nginx目录复制到远程主机的/etc/下面。
[[email protected] ~]# ansible wserver -m copy -a ‘src=/etc/nginx dest=/etc/‘
例:复制本地的/home/star/httpd.conf文件到远程主机的/etc/httpd/conf/目录下,并修改权限。
ansible wserver -m copy -a ‘src=/home/star/httpd.conf owner=root group=root mode=644 dest=/etc/httpd/conf/‘
例: 修改远程主机的/var/listen文件内容为, 第一行listen=80 第二行listen=8080
[[email protected] ~]# ansible wserver -m copy -a ‘content="listen=80\nlisten=8080\n" dest=/var/listen‘
查看一下远程主机的这个文件:
[[email protected] ~]# ssh 172.16.40.11 ‘cat /var/listen‘
listen=80
listen=8080
template:模板复制文件
也是用来复制数据的,只不过文件中的数据可以用变量替换,为不同的主机附加不同的变量,会把文件中定义的变量在发送之前转换为给对应主机所定义的变量的值,也就可以实现不同的主机所复制的文件中的数据是不同的。
而同组中主机定义不同的变量可以通过定义主机变量来实现
主机变量:定义在inventory中的主机之后的变量
如:
/etc/ansible/hosts文件中的主机后面加上变量。
[wserver]
172.16.40.11 port=8800
172.16.40.12 port=8888
要复制的源文件中引用变量可以这样: Listen {{ port }}
但我这里好像说当前版本中template不支持命令行使用
[[email protected] ~]# ansible wserver -m template -a ‘src=/home/star/http.conf dest=/etc/httpd/conf‘
172.16.40.11 | FAILED => in current versions of ansible, templates are only usable in playbooks
172.16.40.12 | FAILED => in current versions of ansible, templates are only usable in playbooks
一会儿在playbooks的时候再来说明template模块。 其它变量也在那里说明。
yum: yum安装软件,也有apt,zypper。
conf_file         #设定远程yum安装时所依赖的配置文件。如配置文件没有在默认的位置。
disable_gpg_check    #是否禁止GPG checking,只用于`present‘ or `latest‘。
disablerepo   #临时禁止使用yum库。 只用于安装或更新时。
enablerepo    #临时使用的yum库。只用于安装或更新时。
name=            #所安装的包的名称
state               #present安装, latest安装最新的, absent 卸载软件。
update_cache  #强制更新yum的缓存。
例:安装httpd。
这里只是说明一下conf_file的用法,yum的仓库文件没有在/etc/yum.repos.d/目录下的话。
[[email protected] ~]# ansible wserver -m yum -a ‘name=httpd state=present conf_file="/root/local.repo"‘
如果库本来是禁止使用的,就要用enablerepo来临时使用这个库。
这里的yum库文件已经在/etc/yum.repos.d/目录下了,不需要conf_file指定配置文件了。
[[email protected] html]# ansible wserver -m yum -a ‘name=httpd state=present enablerepo=local‘
这里的库ID 就是local.
卸载:
[[email protected] html]# ansible wserver -m yum -a ‘name=httpd state=absent‘
注意:返回的数据的 "changed": true,
安装包组,只要在名称前面加上@就可以了。
如:安装开发工具的包组:
[[email protected] html]# ansible dbserver -m yum -a ‘name="@Development Tools" state=present‘
service: 服务程序管理
arguments            #命令行提供额外的参数
enabled                 #设置开机启动。
name=                  #服务名称
runlevel                #开机启动的级别,一般不用指定。
sleep                     #在重启服务的过程中,是否等待。如在服务关闭以后等待2秒再启动。
state                      #started启动服务, stopped停止服务, restarted重启服务, reloaded重载配置。
启动httpd服务:
[[email protected] html]# ansible all -m service -a ‘name=httpd state=started‘
设置开机启动:
[[email protected] ~]# ansible all -m service -a ‘name=httpd enabled=yes‘
重启服务:
[[email protected] ~]# ansible all -m service -a ‘name=httpd sleep=2 state=restarted‘
command: 直接执行命令,默认模块,可以不用指定。
显示所有主机时间:
[[email protected] ~]# ansible all -a ‘date‘
172.16.40.20 | success | rc=0 >>
Thu Feb 11 16:04:37 CST 2016

172.16.40.12 | success | rc=0 >>
Thu Feb 11 16:04:37 CST 2016

172.16.40.11 | success | rc=0 >>
Thu Feb 11 16:04:37 CST 2016
这个模块与shell差不多,但是不能执行管道类的操作,如:
还有点不同是,command是在当前shell所执行的命令,而shell是在子shell中执行的命令。但是在被控端和管理端用pstree查看进程的时候,却也没发现不一样的。这个说法现在是有点不明白。
shell: 直接执行命令,参数一般也用不到。
这个可以执行管道类的命令,如:
script:发送脚本到各被管理节点,并执行。同样不需要参数。
[[email protected] ~]# ansible all -m script -a ‘test.sh‘
直接在-a 后面指定脚本即可。
selinux: 管理selinux。
conf     #指定应用selinux的配置文件。
state=enforcing|permissive|disabled           #对应于selinux配置文件的SELINUX。
policy=targeted|minimum|mls        #对应于selinux配置文件的SELINUXTYPE
关闭selinux:
[[email protected] ~]# ansible all -m selinux -a ‘state=disabled‘
在selinux处于enforceing状态下的时候好像只能用permissive。
在state非disabled的情况下必须要指定policy。
setup:获取指定主机的facts。
facts是由正在通信的远程目标主机发回的信息,这些信息被保存在ansible变量中。
[[email protected] ~]# ansible 172.16.40.11 -m setup
返回很多对应主机的信息,在后面的操作中可以根据不同的信息来做不同的操作。如redhat系列用yum安装,而debian系列用apt来安装软件。
三、playbook。
playbook就是一个用yaml语法把多个模块堆起来的一个文件而已。
yaml: http://www.yaml.org
3.1: 结构介绍
playbooks核心元素:
Tasks 定义任务
Variables 定义变量
Templates 定义模板
Handlers Notify 处理
Roles
除了核心元素以外还有额外的元素,而每个元素也包含了独有的元素。
YAML参考了多种语言,其中就有python。所以在写playbook的时候,段落缩进很重要。
看一下下面这个例子,最外围就是主要的元素,而各个主元素里面还有各个子元素。
每一个-开始表示一个列表的开始,到下一个-之前结束,也可以说这之间就是一个项目,一出戏。
各个列表之间是没有关系的,我们只要区分开也就不混乱了。tasks里面就是模块的使用了,所以整体来说结构还是很直观的。
        - hosts: 172.16.100.68        #定义主机
          vars:                                     #定义变量
               var1: value
               var2: value
          tasks:                                    #定义任务
               - name:                            #任务名称。
                                                         #这里就可以开始用模块来执行具体的任务了。
               - name:

               - name:

          handlers:                              #定义触发通知所作的操作。里面也是跟tasks一样,用模块定义任务。
               - name:

          remote_user:                       #远程主机执行任务时的用户。一般都是root,一般也不用指定。
        - hosts: 172.16.100.69
          vars:
          tasks:
          handlers:
          remote_user:
-表示一个列表的开始,一个列表表示一个独立的整体结构,而列表里面的元素(表项)是由字典组成的,字典中存储的就是各个要定义的键值。如:tasks是字典的键,里面的各部分是值。只不过这部分同时又是列表。
vars是用来定义变量的,所以里面的各变量都是字典而不是列表。只不过vars是字典的键,里面的两项是字典的值,而这个值同样也是字典。
网上有的说每一个-表示一个表项。不过意思差不多,只不过最外围加了一个列表而已。不过这样好乱啊。
这里跟使用没有关系,如果感觉混乱就不用管了。了解一下python的话也就容易理解了。
结构差不多也就是这样了,来补充点:
各字典项的键冒号与值之间要有空格。 如:hosts: abc
字典项要与-之间有空格。表示在结构内。并不是说Hosts特殊要在-的后面。 它也可以在下面的一行开始。如:
-
  hosts:
  tasks:
-表示列表的开始,后面的hosts跟下面的vars之类的都是同一级。不过要注意前面都要有两个空格的缩进,表示在此结构内。就好像是第一级结构为- , 每二级结构与第一级结构之间要用空格隔开。
3.2:变量
变量名仅能由字母、数字和下划线组成,且只能以字母开头。
变量种类:
1、facts:由远程主机发回的主机属性信息,这些信息被保存在ansible变量中;无须定义,可直接调用;
2、自定义变量:
2.1、通过命令行传递: ansible-playbook 指令后面指定变量:--extra-vars "var1= var2=" ,简写 -e “vars="
2.2、通过roles传递
2.3、主机变量:定义在inventory中的主机之后的变量
2.4、组变量:定义在inventory中的组上的变量。如:
[wserver]
172.16.40.11 port=8800
172.16.40.12 port=8888

[wserver:vars]
port=80

[dbserver]
172.16.40.20

[dbserver:vars]
port=3306
2.5、在playbook的vars元素下面定义变量.
3.3 使用:
实现目标:
1、wserver组主机安装httpd。
2、复制本机已配置好的httpd配置文件到各主机。
3、启动httpd,并设置开机启动。
[[email protected] ~]# vim httpd.yml

- hosts: wserver
  remote_user: root
  tasks:
        - name: install httpd
          yum: name=httpd state=present
        - name: copy httpd configuration
          copy: src=/root/httpd dest=/etc/
        - name: start httpd
          service: name=httpd state=started
        - name: boot httpd start
          service: name=httpd enabled=yes
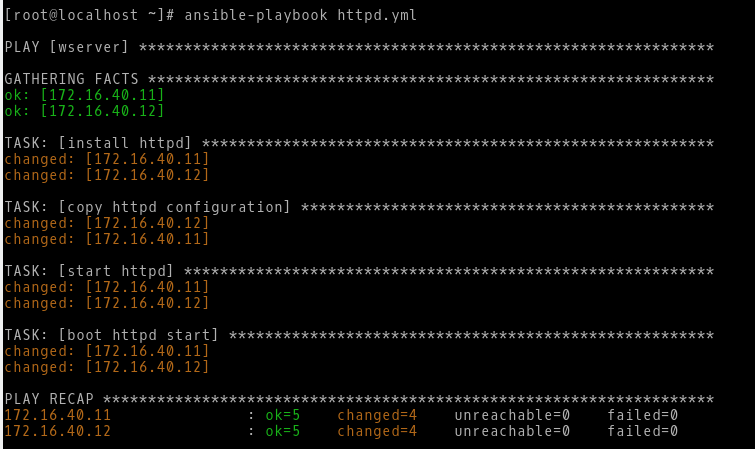
执行过程。用ansible-playbook来执行playbook文件。文件扩展名随意,我这里习惯用yml了。
***字表示发生变化,绿色表示未变化,红色表示错误。 ok=5 changed=4 表示完成了5个,其中4个发生变化。
查看httpd是否启动:
[[email protected] ~]# ansible wserver -m shell -a ‘ss -tnlp‘            #直接查看信息,但多了以后。。。
[[email protected] ~]# ansible wserver -m shell -a ‘ss -tnlp‘ | grep httpd | wc -l     #可以直接用wc来计数。
是否开机启动:
[[email protected] ~]# ansible wserver -m shell -a ‘systemctl status httpd‘
或者:
[[email protected] ~]# ansible wserver -m shell -a ‘systemctl status httpd‘ | grep enabled | wc -l
条件判断:
如果要管理有主机中有不同系列的系统,这里只是做个比喻。正常情况下应该连系统版本都是相同的。
比如有一台ubuntu的主机,因为它的软件管理用的是apt-get。在ansible里面是用apt模块来操作的。而且配置文件也不一样,软件的名称也不一样,服务脚本也不一样。额,复杂了好像。
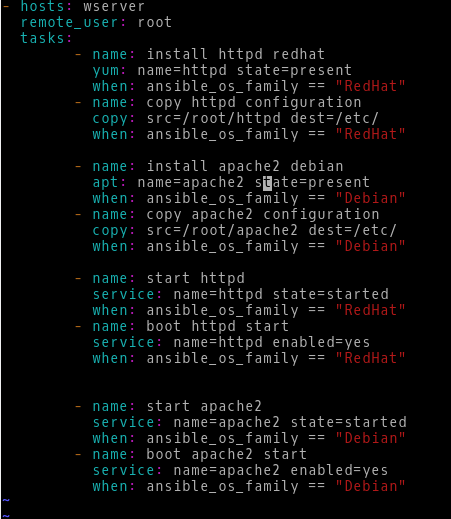
只要在一个任务的最后加上when就可以了,意思是说只有当后面的条件满足的时候才执行此任务。
条件变量就是facts类的变量。可以用ansible 主机 -m setup来查看,上面模块部分也说了。可以用ansible_os_family这个变量。
httpd.yml
- hosts: wserver
  remote_user: root
  tasks:
        - name: install httpd redhat
          yum: name=httpd state=present
          when: ansible_os_family == "RedHat"
        - name: copy httpd configuration
          copy: src=/root/httpd dest=/etc/
          when: ansible_os_family == "RedHat"

        - name: install apache2 debian
          apt: name=apache2 state=present
          when: ansible_os_family == "Debian"
        - name: copy apache2 configuration
          copy: src=/root/apache2 dest=/etc/
          when: ansible_os_family == "Debian"

        - name: start httpd
          service: name=httpd state=started
          when: ansible_os_family == "RedHat"
        - name: boot httpd start
          service: name=httpd enabled=yes
          when: ansible_os_family == "RedHat"


        - name: start apache2
          service: name=apache2 state=started
          when: ansible_os_family == "Debian"
        - name: boot apache2 start
          service: name=apache2 enabled=yes
          when: ansible_os_family == "Debian"
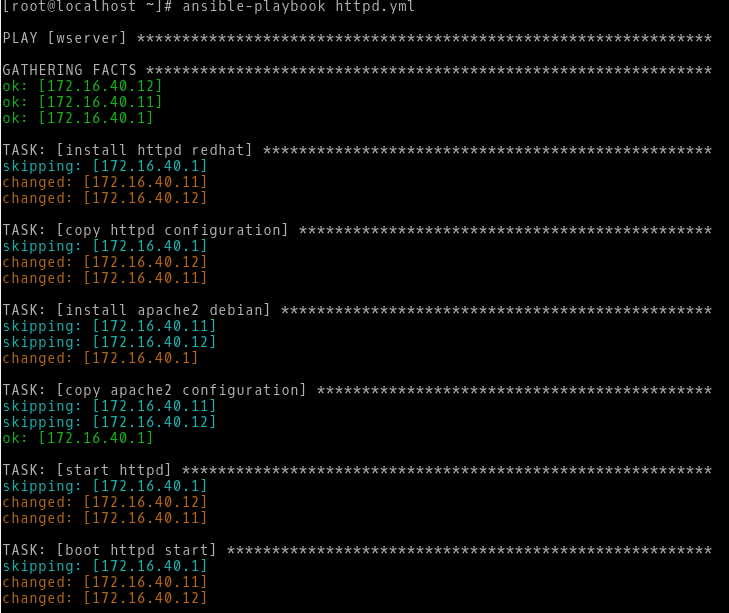
执行效果:
这里因为apache2的配置文件没有修改,与安装完成所生成的配置一模一样,通过检验发现一样就不会再复制了。所以是绿色的字。
有没有发现这样麻烦的不是一星半点啊。
再贴一个删除这些软件的:
- hosts: wserver
  remote_user: root
  tasks:
        - name: stop httpd
          service: name=httpd state=stopped
          when: ansible_os_family == "RedHat"
        - name: erase httpd
          yum: name=httpd state=absent
          when: ansible_os_family == "RedHat"
        - name: erase /etc/httpd
          file: path=/etc/httpd state=absent
          when: ansible_os_family == "RedHat"

        - name: stop apache2
          service: name=apache2 state=stopped
          when: ansible_os_family == "Debian"
        - name: erase apache2
          apt: name=apache2 state=absent purge=yes
          when: ansible_os_family == "Debian"
        - name: erase /etc/apache2
          file: path=/etc/apache2 state=absent
          when: ansible_os_family == "Debian"
标签:
有时候只想用这个文件中的复制配置文件的功能,而不想再每一项都检查,虽然也没什么问题。
- hosts: wserver
  remote_user: root
  tasks:
        - name: install httpd redhat
          yum: name=httpd state=present

        - name: copy httpd configuration
          copy: src=/root/httpd dest=/etc/
          tags: config                                                #加了一个tags.

        - name: start httpd
          service: name=httpd state=started

        - name: boot httpd start
          service: name=httpd enabled=yes
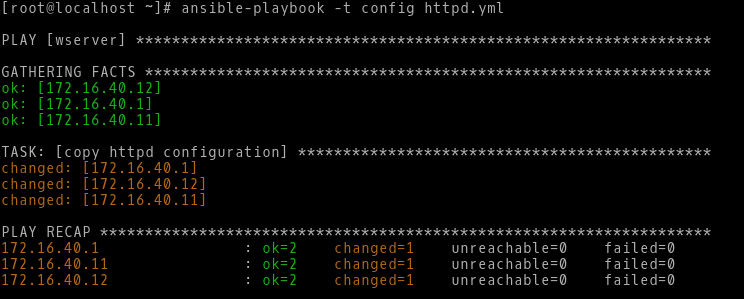
我这里的httpd给重新安装了,所以配置文件是不同的,才会显示changed。不然会是绿色的ok。
现在只执行了config标符所指定的任务了。 我这里忘了把hosts文件中的172.16.40.1去掉了。
那么复制完配置文件以后应该重载配置文件才对。可是就算再添加一个任务,因为我们指定了标签也不会执行。那么就可以用handlers啦。
handlers:
也是task任务,但只有其关注的条件满足时,才会被触发执行。这里的条件其实就是发生修改。
如果我们复制配置文件和远程主机上的一样,那就不会触发了。
- hosts: wserver
  remote_user: root
  tasks:
        - name: install httpd redhat
          yum: name=httpd state=present

        - name: copy httpd configuration
          copy: src=/root/httpd dest=/etc/
          notify: reload httpd                            #添加了一行这个。用以触发名称为reload httpd的handlers。
          tags: config

        - name: start httpd
          service: name=httpd state=started

        - name: boot httpd start
          service: name=httpd enabled=yes
  handlers:
        - name: reload httpd
          service: name=httpd state=reloaded
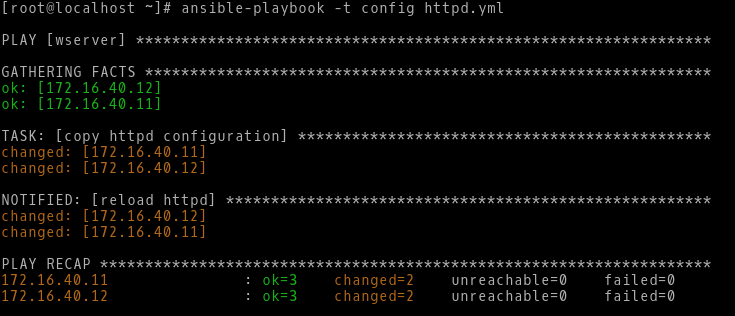
现在配置文件没有修改之前:
修改之后:
templates:
用于生成文本文件(配置文件);模板文件中可使用jinja2表达式,表达式要定义在{{ }},也可以简单地仅执行变量替换;我们这里也只来演示一下变量替换的。
如我想给不同的主机的配置文件所监听的端口不一样。
可以通过主机变量,定义/etc/ansible/hosts文件:
[wserver]
172.16.40.11 port=8800
172.16.40.12 port=8888
修改要复制过去的配置文件,
httpd.conf
Listen {{ port }} #httpd的配置文件,listen用来监听端口。在复制之前ansible会把{{ port }}替换为对应主机所设置的变量值。现在的playbook文件:为了节省篇幅,我这里把现在用不到都删了。而因为是修改端口,所以把reload改成了restart。
- hosts: wserver
  remote_user: root
  tasks:
        - name: template httpd configuration
          template: src=/root/httpd/conf/httpd.conf dest=/etc/httpd/conf/         #src好像不能再指目录了。
          notify: restart httpd

  handlers:
        - name: restart httpd
          service: name=httpd state=restarted
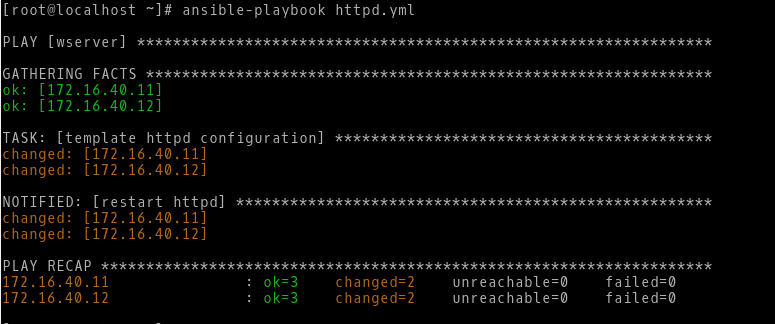
一台主机监听在8800,一台主机监听在8888。
迭代:
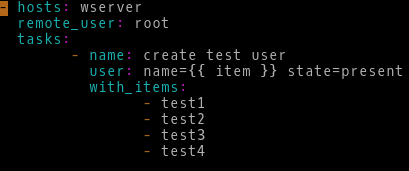
如果想要批量创建多个用户怎么办,当然用script模块最简单了,不过这里也只是来说明一下问题而已:
在task中调用内置的item变量;在某个task后面使用with_items语句来定义元素列表;
- hosts: wserver
  remote_user: root
  tasks:
        - name: create test user
          user: name={{ item }} state=present
          with_items:
                - test1
                - test2
                - test3
                - test4
而上面所指定item还可以有子集, 可以用字典来表示item中的各个键值,而不只是用表示单个值。
如:
- hosts: wserver
remote_user: root
tasks:
- name: create test user
user: name={{ item.user }} group={{ item.group }} state=present
with_items:
- { user: "test10", group: "root" }
- { user: "test11", group: "root" }
以上是关于ansible一般使用的主要内容,如果未能解决你的问题,请参考以下文章
