Ansible常用模块
Posted ArMinLi
tags:
篇首语:本文由小常识网(cha138.com)小编为大家整理,主要介绍了Ansible常用模块相关的知识,希望对你有一定的参考价值。
 Ansible批量主机管理工具
Command模块
作用:使用ansible自带模块执行一些简单的命令 不能使用 > < | & \' \'等特殊字符,如果需要使用,则用shell模块。
常用参数有:
- chdir:先切换工作目录,再执行后面的命令,一般情况下在编译时候使用;
- creates:先切换工作目录,再执行后面的命令,一般情况下在编译时候使用;
- removes:先切换工作目录,再执行后面的命令,一般情况下在编译时候使用
在节点服务器上面执行命令时,默认是在当前用户的家目录/root
ansible 192.168.1.2 -a \'ls\'

chdir 先切换工作目录,再执行后面的命令,一般情况下在编译时候使用
ansible 192.168.1.2 -a \'chdir=/tmp pwd\'

creates 如果creates的目录或文件存在,则不执行后面的操作
ansible httpd -a \'creates=/tmp ls /etc/passwd\'
ansible httpd -a \'creates=/lemon ls /etc/passwd\'

removes 和creates相反,如果removes的文件存在,才执行后面的操作
ansible httpd -a \'removes=/tmp ls /etc/passwd\'
ansible httpd -a \'removes=/lemon ls /etc/passwd\'

使用特殊符号
ansible httpd,mysql -m command -a "ifconfig ens32"

ansible httpd -m command -a "ifconfig |awk NR==2\'print $2\'"

Shell模块
参数和command基本一样,都有chdir,creates,removes等参数。
调用bash执行命令,可以理解为command的升级版,与command区别在于他能调用一些复杂的命令了。但是,类似于ifconfig |awk NR==2\'print $2\'这种很复杂的命令,他依然做不到完美的处理结果。
注意:command和shell模块的核心参数直接为命令本身;而其它模块的参数通常为“key=value”
创建目录时的警告解决方案
ansible 192.168.1.2 -m shell -a \'mkdir /tmp/test\'
ansible 192.168.1.2 -m shell -a \'ls /tmp\'

测试创建节点主机已经存在的文件之后会不会覆盖
ansible httpd -m copy -a "content=\'very good\\n\' dest=/tmp/test/1.txt"    //在节点1主机创建数据文件
ansible httpd -m shell -a \'cd /tmp/test && touch 1.txt && cat /tmp/test/1.txt\'     //验证是否会被覆盖

为了避免这种无意义的操作,使用creates如果文件存在就不执行后面的命令
ansible httpd -m shell -a \'creates=/tmp/test/1.txt cd /tmp/test && touch 1.txt && ls\'

验证shell模块能否使用特殊符号
ansible httpd,mysql -m shell -a "ifconfig ens32|grep \'RX\'"

ansible httpd -m shell -a "ifconfig |awk NR==2\'print $2\'"

解决办法:写到脚本里,在copy到远程执行,再把需要的结果拉回执行命令的机器(执行Ansible命令的机器往往称为:Master机或者中控机或者堡垒机)。
操作如下
vim /root/shell.sh
ifconfig | awk NR==2\'print $2\'

保存退出
chmod a+x /root/shell.sh
ansible httpd,mysql -m copy -a "src=/root/shell.sh dest=/root/ mode=777"     //将本地shell.sh文件远程传送到两台节点上的/root路径下
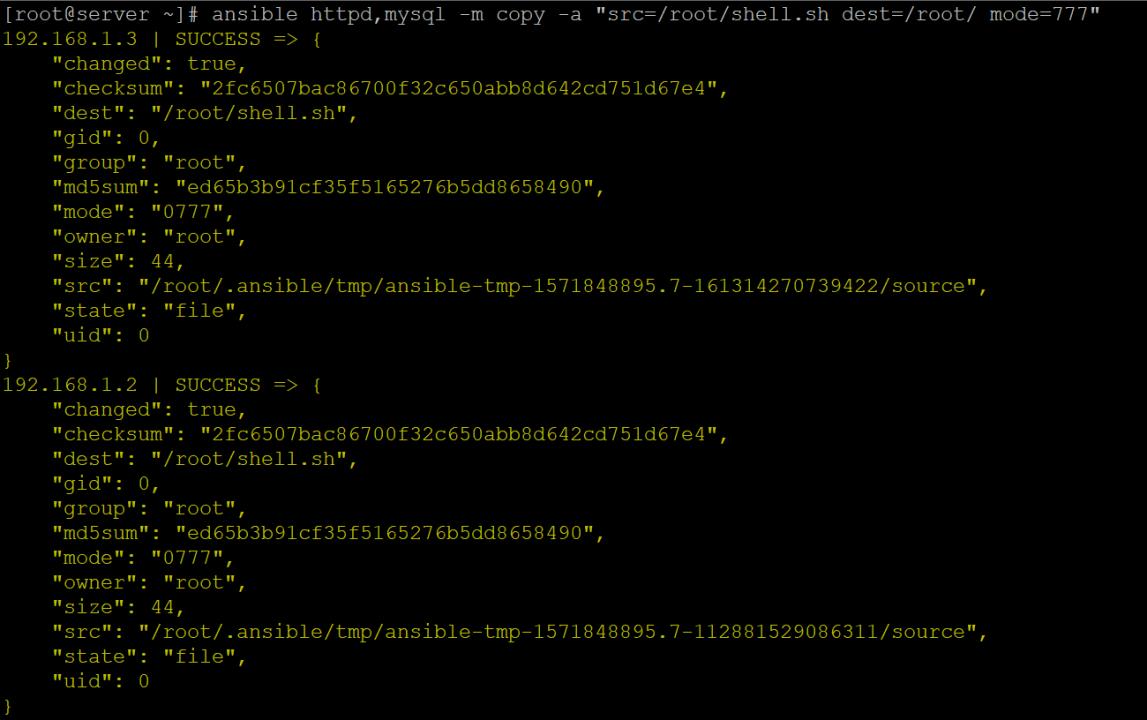
查看结果
ansible httpd,mysql -m shell -a "ls -l /root/"
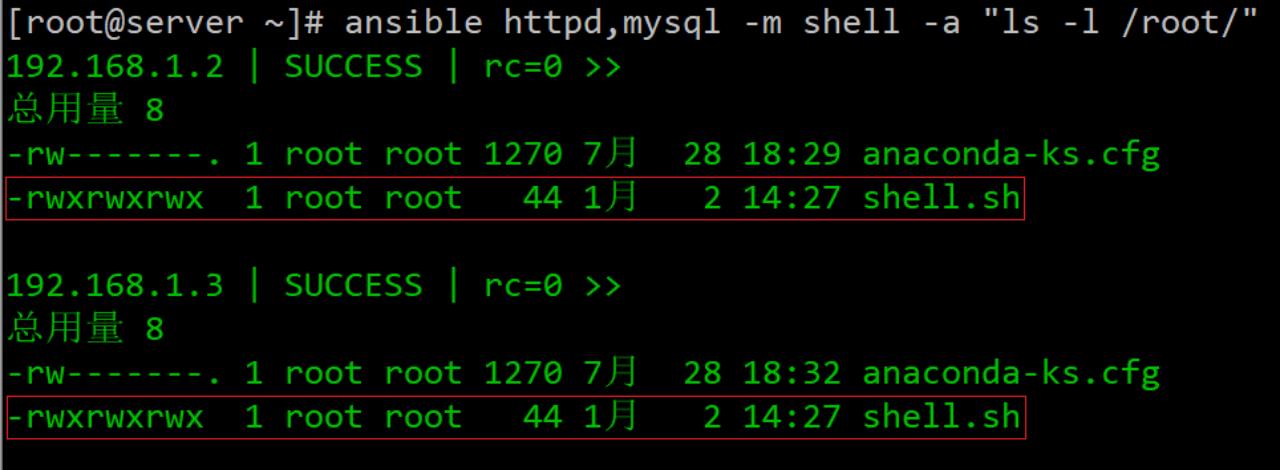
然后在运行传过去的shell脚本;结果OK
ansible httpd,mysql -m shell -a "sh /root/shell.sh"

Copy 模块
复制本地文件至远程主机,并且能够改属性等。
注意:src和content选项不能同时使用,这两种方法是互斥的!
常用参数有:
- src:需要copy的文件的源路径
- dest:需要copy的文件的目标路径
- backup:对copy的文件进行备份
- content:直接在远程主机被管理文件中添加内容,会覆盖原文件内容
- mode:对copy到远端的文件设置权限
- owner:对copy到远端的文件设置属主
- group:对copy到远端文件设置属组
1、只将数据内容直接复制到文件中
ansible httpd -m copy -a "content=\'very good\' dest=/root/good.txt"
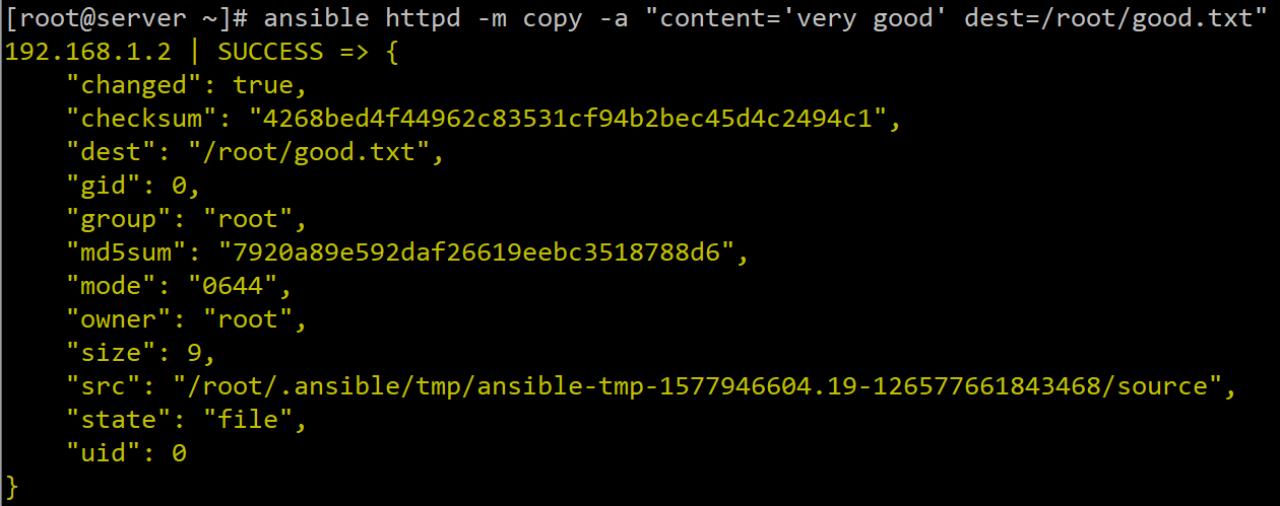
Cat查看一下是否写入成功
ansible httpd -m shell -a "cat /root/good.txt"

建议:最好在数据结尾处加上\\n换行符,不然就会出现下面这种情况!

2、将server文件复制到节点主机上并修改文件名及权限属主数组
echo \'lemon is a very good!\' > /root/nice.txt    // 创建一个文件
ansible httpd -m shell -a \'useradd tom\'      //为节点1创建用户
ansible httpd -m copy -a "src=/root/nice.txt dest=/root/very.txt mode=744 owner=tom group=tom"
src: server的文件路径
dest: 节点主机的接收路径
mode: 复制过去的文件权限
验证
ansible httpd -m shell -a "ls -lh very.txt && cat /root/very.txt"

备份:更新文件数据并备份之前未被修改过的数据
echo \'lemon is a nice man!!!!\' >> nice.txt   //更改文件数据
ansible httpd -m copy -a \'src=/root/nice.txt dest=/root/very.txt backup=yes\'
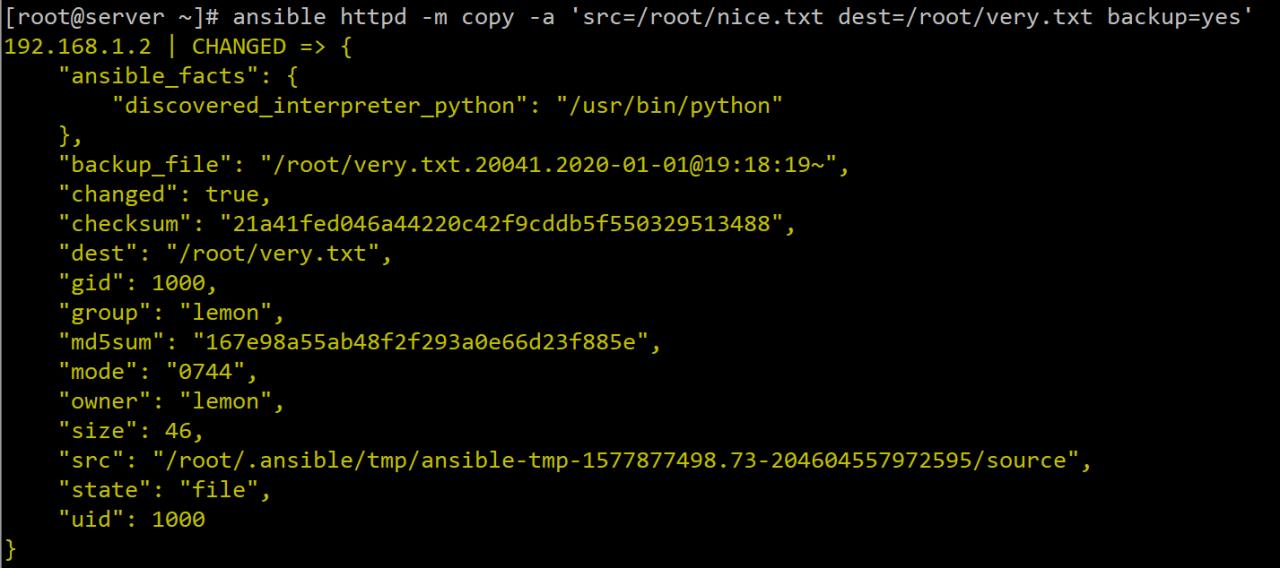
ansible httpd -m shell -a \'ls /root\'    //验证
ansible httpd -m shell -a \'cat /root/very.txt\'
ansible httpd -m shell -a \'cat /root/very.txt.21171.2020-01-02@14:34:45\'

Unarchive模块
直接将server上的tar包解压传到指定的节点主机路径上。
ansible mysql -m unarchive -a "src=/root/nginx-1.12.2.tar.gz dest=/root/ copy=yes"
ansible mysql -m shell -a "ls -ld /root/nginx-*"

Script模块
用于在被管理机器上面执行shell脚本的模块,脚本无需在被管理机器上面存在,执行结果会在server端上输出。
常用参数
- free_form:必须参数,指定需要执行的脚本,脚本位于 ansible 管理主机本地,并没有具体的一个参数名叫 free_form,具体解释请参考 command 模块。
- chdir:此参数的作用就是指定一个远程主机中的目录,在执行对应的脚本之前,会先进入到 chdir 参数指定的目录中。
- creates:使用此参数指定一个远程主机中的文件,当指定的文件存在时,就不执行对应脚本,可参考 command 模块中的解释。
- removes:使用此参数指定一个远程主机中的文件,当指定的文件不存在时,就不执行对应脚本,可参考 command 模块中的解释。
1、如果ansible主机中的 /root/test.sh 脚本将在httpd主机中执行,执行此脚本之前,会先进入到httpd主机中的/opt目录。
echo -e \'#!/bin/bash\\necho `hostname`\\necho `pwd`\' > /root/test.sh
ansible httpd -m script -a \'chdir=/opt /root/test.sh\'

2、如果httpd主机中的/bucunzai的文件存在,ansible主机中的/root/test.sh脚本将不会在httpd主机中执行。
ansible httpd -m script -a "creates=/bucunzai /root/test.sh"
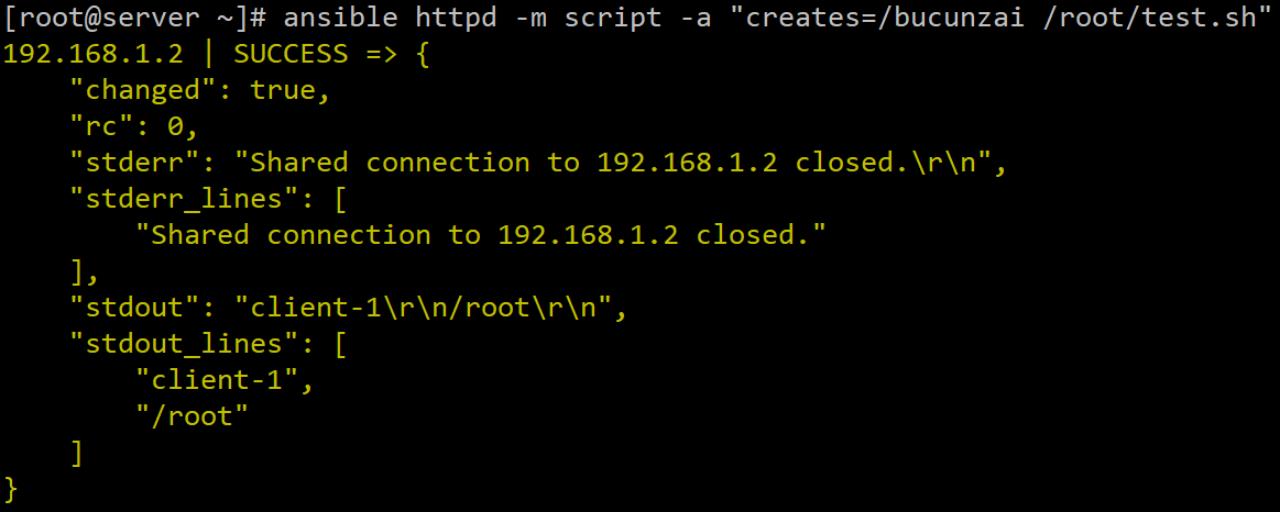
3、如果httpd主机中的/root/test文件不存在,ansible主机中的/root/test.sh脚本将不会在httpd主机中执行。
ansible httpd -m script -a "removes=/test /root/test.sh"

File模块
用于对文件的处理,创建,删除,权限控制等。
相关选项:
- path:在节点主机上创建的目录或文件名
- recurse:递归
- state:类型如下
- state=directory:创建目录
- state=touch:创建文件
- state=mode:设置文件或目录权限
- state=owner:设置文件或目录属主信息
- state=group:设置文件或目录属组信息
- state=absent:删除文件或目录
- state=link:创建软链接
- state=hard:创建硬链接
给节点1创建目录及文件;在此之前先将节点上的/root/路径下的目录及文件清空
ansible httpd -m shell -a "rm -rf /root/*"

创建目录
[root@server ~]# ansible httpd -m file -a "path=/root/lemon state=directory"

查看一下结果
ansible httpd -m shell -a "ls -l /root/"

创建文件
ansible httpd -m file -a "path=/root/hehe.txt state=touch"

查看一下结果
ansible httpd -m shell -a "ls -l /root/"

给hehe.txt文件创建一个软连接(src表示源文件,dest表示目标文件)
ansible httpd -m file -a "src=/root/hehe.txt dest=/hehe state=link"
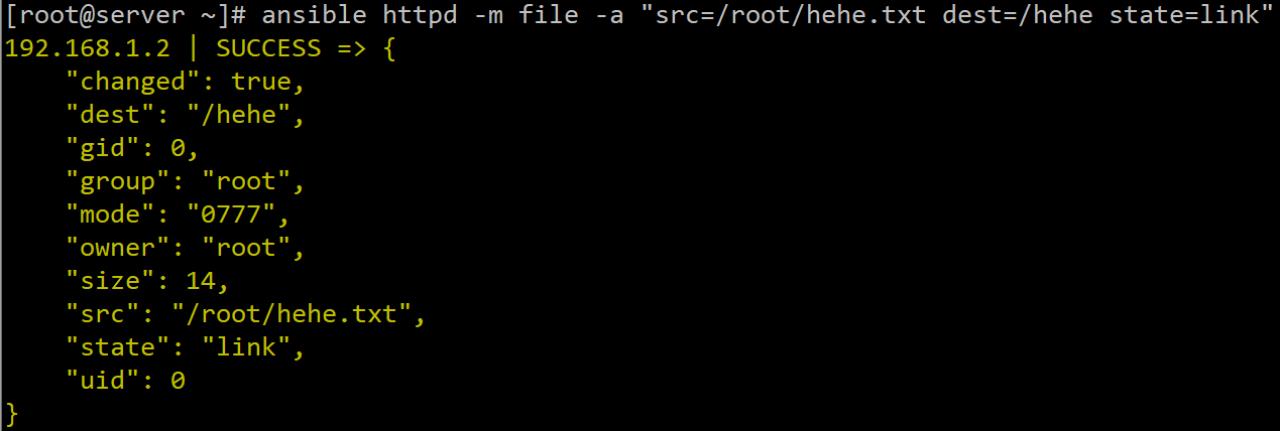
查看结果
ansible httpd -m shell -a "ls -l /hehe"

删除目录
ansible httpd -m file -a "path=/root/lemon state=absent"

删除文件(包括软连接)
ansible httpd -m file -a "path=/hehe state=absent"
ansible httpd -m file -a "path=/root/hehe.txt state=absent"
查看一下结果
ansible httpd -m shell -a "ls -l /root/"
ansible httpd -m shell -a "ls -l /hehe"

创建文件时同时设置权限、属主数组等信息
ansible httpd -m file -a \'path=/root/test state=directory mode=700 owner=tom group=tom\'

ansible httpd -m shell -a \'ls -lh /root\'       //验证

使用递归
ansible httpd -m shell -a \'touch /root/test/1..3.txt && ls -lh test\'

ansible httpd -m file -a \'path=/root/test mode=700 owner=tom group=tom recurse=yes\'

ansible httpd -m shell -a \'ls -lh /root/test\' //验证

Fetch模块
从节点主机上拉取文件到本机,拉取下来的内容会保留目录结构,一般情况用在收集被管理机器的日志文件等。
只能fetch文件,不能fetch目录,如果想拉目录,先tar/zip打包 再拉到本机即可。
ansible 192.168.1.2 -m fetch -a \'src=/var/log/cron dest=/root\'
- src=/var/log/cron:节点主机的路径文件
- dest=/root/:server的路径


cron模块
cron模块
相关选项:
- job // 指定需要执行的任务
- minute // 分钟
- hour //小时
- day // 天
- month //月
- weekday // 周
- name // 对计划任务进行描述
- state // 指定状态,默认为添加定时任务
- absetn // 删除计划任务
- prsent // 添加定时任务
// 创建一个每隔五分钟同步一次时间的计划任务
ansible httpd -m cron -a "minute=\'*/5\' job=\'/usr/sbin/ntpdate 172.16.0.1 &> /dev/null\' name=\'Synctime\'"

解释:
minute:分钟
job:命令
name:计划任务的名字

// 查看一下结果
ansible httpd -m shell -a "crontab -l"

删除计划任务
ansible httpd -m cron -a "state=absent name=\'Synctime\'"

ansible httpd -m shell -a "crontab -l"

注:删除时最好将job的命令也写上,因为可能会有重名的计划任务。
Yum 模块
用于对软件包的管理,下载、安装、卸载、升级等操作。
相关选项:
- name // 指定要操作的软件包名字
- download_dir // 指定下载软件包的存放路径,需要配合download_only一起使用
- download_only // 只下载软件包,而不进行安装,和yum --downloadonly一样
- list:
- installed // 列出所有已安装的软件包
- updates // 列出所有可以更新的软件包
- repos // 列出所有的yum仓库
- state:
- installed, present // 安装软件包(两者任选其一都可以)
- removed, absent // 卸载软件包
- latest // 安装最新软件包
# 列出所有已安装的软件包
ansible 192.168.1.2 -m yum -a \'list=installed\'

# 列出所有可更新的软件包
ansible 192.168.1.2 -m yum -a \'list=updates\'

#列出所有的yum仓库
ansible 192.168.1.2 -m yum -a \'list=repos\'

# 安装包组,类似yum groupinstall \'Development Tools\'
ansible 192.168.1.2 -m yum -a \'name="@Development Tools" state=installed\'
# 安装软件包
ansible httpd -m yum -a "name=httpd state=latest"

解释:
name=httpd    #软件名
state=latest  #安装yum源里最新的版本

注:如果不想有这些输出,直接在后面跟上“>> /dev/null”输出到黑洞里面
// 查看一下结果
ansible httpd -m shell -a "rpm -qa httpd"

# 卸载软件包
ansible 192.168.1.2 -m yum -a \'name=httpd state=removed\'

# 验证
ansible httpd -m shell -a "rpm -qa httpd"

yum_repository模块
yum_repository 模块可以帮助我们管理远程主机上的 yum 仓库。
常用参数:
- name参数:必须参数,用于指定要操作的唯一的仓库ID,也就是”.repo”配置文件中每个仓库对应的”[中括号]”内的仓库ID。
- baseurl参数:此参数用于设置 yum 仓库的 baseurl。
- description参数:此参数用于设置仓库的注释信息,也就是”.repo”配置文件中每个仓库对应的”name字段”对应的内容。
- file参数:此参数用于设置仓库的配置文件名称,即设置”.repo”配置文件的文件名前缀,在不使用此参数的情况下,默认以 name 参数的仓库ID作为”.repo”配置文件的文件名前缀,同一个”.repo” 配置文件中可以存在多个 yum 源。
- enabled参数:此参数用于设置是否激活对应的 yum 源,此参数默认值为 yes,表示启用对应的 yum 源,设置为 no 表示不启用对应的 yum 源。
- gpgcheck参数:此参数用于设置是否开启 rpm 包验证功能,默认值为 no,表示不启用包验证,设置为 yes 表示开启包验证功能。Yes:1 No:0
- gpgcakey:当 gpgcheck 参数设置为 yes 时,需要使用此参数指定验证包所需的公钥。
- state参数:默认值为 present,当值设置为 absent 时,表示删除对应的 yum 源。
示例:
1.在 httpd 主机上设置ID为 local 的 yum 源,并启用它(local源使用系统光盘镜像作为本地 yum 源,以便测试举例)。
ansible httpd -m yum_repository -a \'file=lemon name=A baseurl=file:///mnt description="local" enabled=yes gpgcheck=no\'

2.在 testA 主机上设置ID为 local 的 yum 源,开启包验证功能,并指定验证包所需的公钥位置为 /media/RPM-GPG-KEY-CentOS-7。
ansible httpd -m yum_repository -a \'name=local baseurl=file:///mnt description="A" gpgcheck=yes gpgcakey=file:///mnt/RPM-GPG-KEY-CentOS-7\'

3.在httpd主机上删除/etc/yum.repos.d/alibaba.repo 配置文件中的 aliEpel 源。
ansible httpd -m yum_repository -a \'file=lemon name=A state=absent\'
pip模块
用于安装python中的包(需要联网)。
# 查看模块参数
ansible-doc -s pip

# 配置阿里yum源
ansible httpd -m shell -a \'curl -o /etc/yum.repos.d/CentOS-Base.repo http://mirrors.aliyun.com/repo/Centos-7.repo && yum makecache && yum -y install epel epel-release\'

# 使用pip时,需要保证被管理机器上有python-pip软件包
ansible 192.168.1.2 -m yum -a \'name=python-pip\'

# 安装python的三方包
ansible 192.168.1.2 -m pip -a \'name=flask\'
ansible httpd -m shell -a \'find / -name flask\' //验证

Service|Systemd模块
用于对服务进行管理,服务的启动、关闭、开机自启等。
相关选项:
- name 指定服务的名字,比如nginx.service,crond.service
- state 填入你要执行的操作,比如reloaded, restarted, started, stopped
- enabled 指定服务开机自启 systemctl enable nginx
启动服务
ansible httpd -m yum -a "name=httpd state=latest"
ansible httpd -m service -a "name=httpd state=started"

查看一下结果
ansible httpd -m shell -a "systemctl status httpd | grep Active"

添加开机启动项
ansible httpd -m service -a "name=httpd enabled=true"

查看一下结果
ansible httpd -m shell -a "systemctl is-enabled httpd"

Selinux模块
管理Selinux的模块。
相关选项:

关闭节点1的selinux
ansible httpd -m selinux -a \'state=disabled\'

group模块
组的管理模块。
创建组并指定组的GID号
ansible httpd -m  group -a "name=alex"
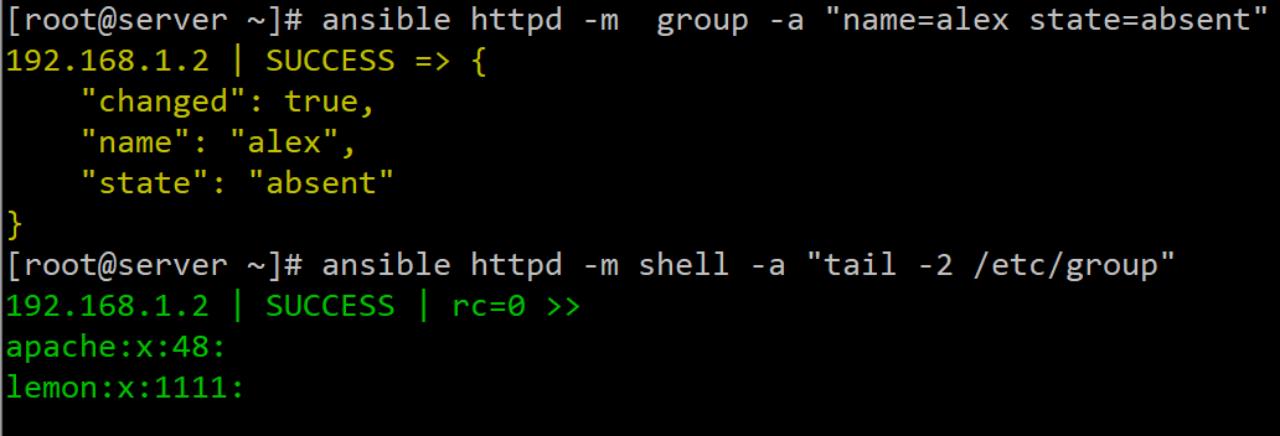
ansible httpd -m  group -a "name=lemon gid=1111"
ansible httpd -m shell -a "tail -2 /etc/group"

删除组
ansible httpd -m group -a "name=alex state=absent"
User模块
用于对系统用户的管理,用户的创建、删除、家目录、属组等设置。
相关选项:
- name // 指定用户的名字
- home // 指定用户的家目录
- uid // 指定用户的uid
- group // 指定用户的用户组
- groups // 指定用户的附加组
- password // 指定用户的密码
- shell // 指定用户的登录shell
- create_home // 是否创建用户家目录,默认是yes
- remove // 删除用户时,指定是否删除家目录
- state // 设置账号状态,不知道为创建,指定值为absent则表示删除
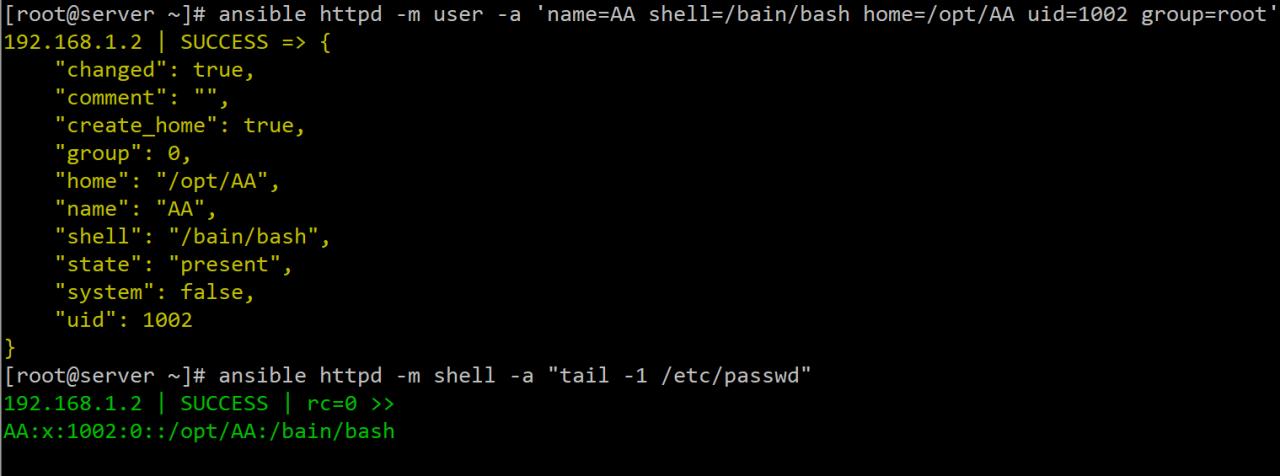
创建用户并指定家目录,指定uid及组和shell环境
ansible httpd -m user -a \'name=AA shell=/bain/bash home=/opt/AA uid=1002 group=root\'
ansible httpd -m shell -a "tail -1 /etc/passwd"
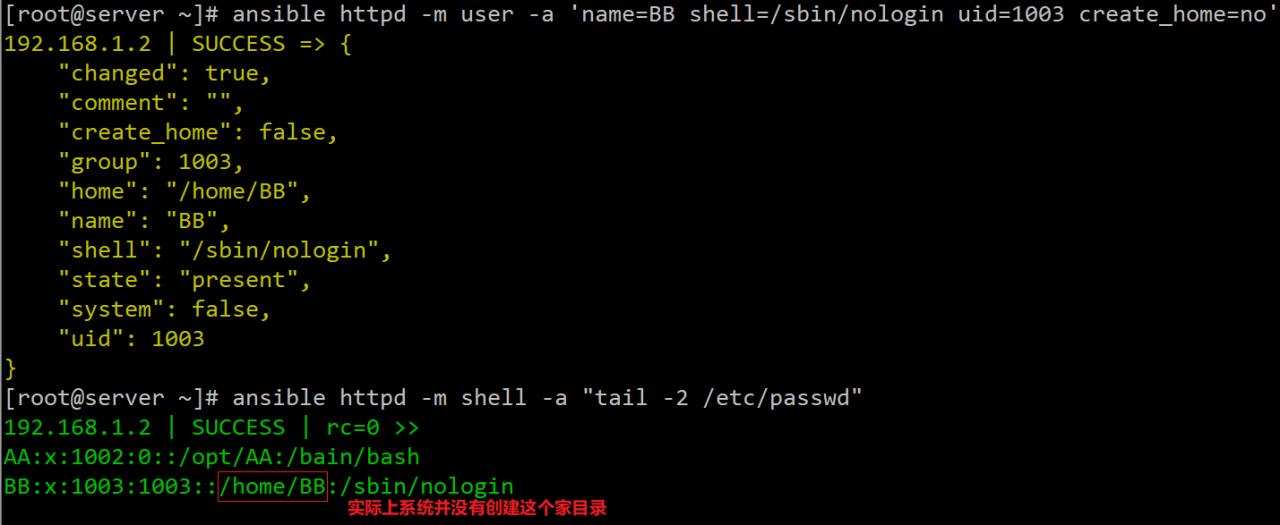
创建用户,不创建家目录,并且不能登录
ansible httpd -m user -a \'name=BB shell=/sbin/nologin uid=1003 create_home=no\'
ansible httpd -m shell -a "tail -2 /etc/passwd"      //验证

删除用户
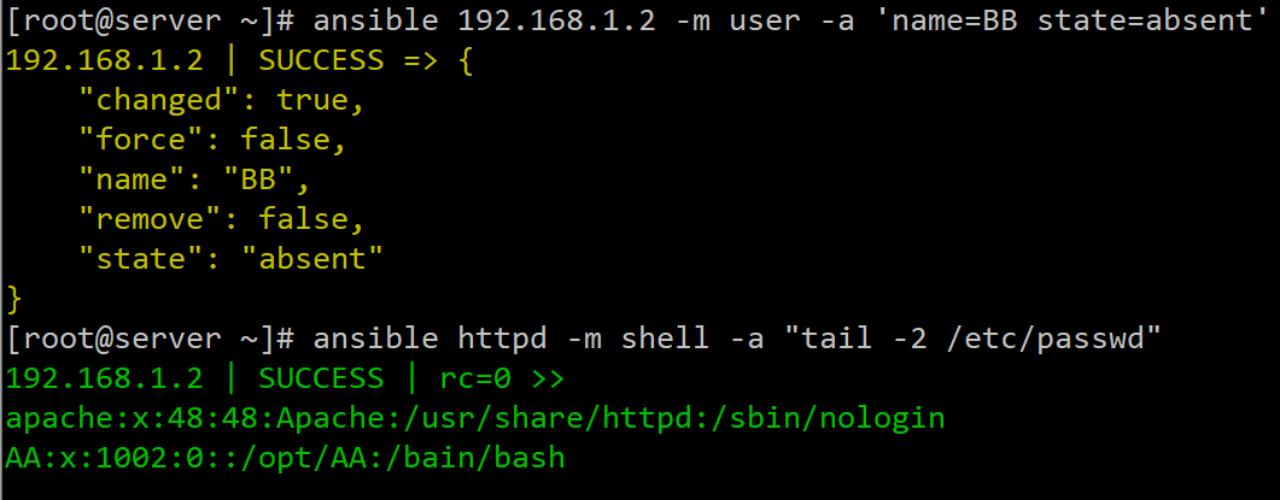
ansible 192.168.1.2 -m user -a \'name=BB state=absent\'
ansible httpd -m shell -a "tail -2 /etc/passwd"
删除用户并删除家目录
ansible httpd -m user -a \'name=AA state=absent remove=yes\'
ansible httpd -m shell -a \'cd /opt/AA/\'             //验证

ansible常用模块
ansible常用模块
安装:依赖于epel源
yum install ansible -y
配置文件:/etc/ansible/ansible.cfg
Invertoory: /etc/ansible/hosts
如何查看模块帮助:
    ansible-doc -l
    ansible-doc -s MODULE_NAME`
ansible命令应用基础:
语法:ansible <host-pattern> [options]
    -f forks: 启动的并发线程数
    -m module_name: 要使用的模块
    -a args: 模块特有的参数
ansible常用模块
command: 命令模块,默认模块,用于在远程执行命令
         ansible all -a ‘date‘
cron:
    */10 * * * * /bin/echo hello linux
    state:
        present:
        #安装 ?ansible all -m cron -a ‘minute="*/10" job="/bin/echo hello linux" name="test cron_job" state=present‘
        absent:
        #移除 ?ansible all -m cron -a ‘minute="*/10" job="/bin/echo hello linux" name="test cron_job" state=absent‘
        ?ansible all -a "crontab -l"
user:
?
# 创建用户
?   ansible all -m user -a ‘name="user1"‘
?   cat /etc/passwd # 最后一行
?
# 删除用户
?   ansible all -m user -a ‘name="user1" state="absent"‘
group:
?
# 创建组
?
?   ansible all -m group -a ‘name=mysql gid=306 system=yes‘
?   cat /etc/group
?
# 删除组
?
?   ansible all -m group -a ‘name=mysql gid=306 system=yes state=absent‘
copy:
?
# 复制文件  src定义本地源文件路径 dest定义远程主机路径(绝对路径)
?
?   ansible all -m copy -a ‘src=/etc/fstab dest=/tmp/fstab.ansible owner=root mode=640‘
?
# content 生成内容的方式进行远程复制
?
?   ansible all -m copy -a ‘content="你好崔建忠
" dest=/tmp/test.ansible‘
file: # 设定文件属性
?
# 改变文件的属主属组
?
?   ansible all -m file -a ‘owner=mysql group=mysql mode=644 path=/tmp/fstab.ansible‘
?
# link 创建文字符号链接
?
?   ansible all -m file -a ‘path=/tmp/fstab.link src=/tmp/fstab.ansible state=link‘
ping:
?
# 测试主机是否能链接
?
?   ansible all -m ping
?
?
service:
?
# 设置开机自启动,并且现在启动起来
?
?   ansible all -m service -a ‘enabled=true name=httpd state=started‘
?
# 关闭某一个服务
?
?   ansible all -m service -a ‘enabled=true name=httpd state=stopped‘
?
shell: 执行shell命令
?   ansible all -m shell -a ‘hello ansible|passwd --stdin user1‘
?
script: 将本地脚本复制到远程主机并运行
?   ansible all -m script -a ‘/root/test.sh‘
?
yum: 安装程序包
    name=: 指明要安装的程序包,可以带上版本号
    state=: present,latest表示安装,absent表示卸载
?
setup: 收集远程主机的facts
    每个被管理节点在接收并且运行管理命令之前,会将自己主机相关的信息,如操作系统版本、ip地址等报告给远程的ansible主机;
以上是关于Ansible常用模块的主要内容,如果未能解决你的问题,请参考以下文章