Flume初见与实践
Posted novwind
tags:
篇首语:本文由小常识网(cha138.com)小编为大家整理,主要介绍了Flume初见与实践相关的知识,希望对你有一定的参考价值。

Photo by Janke Laskowski on Unsplash
参考书籍:《Flume构建高可用、可扩展的海量日志采集系统》 ——Hari Shreedharan 著
以下简称“参考书籍”,文中部分资料和图片会标注引用自书中。官方文档简称“官文”。
文章为个人从零开始学习记录,如有错误,还请不吝赐教。
Flume 初见
· 简介

Flume是Cloudera提供的一个高可用的,高可靠的,分布式的海量日志采集、聚合和传输的系统,可以高效地收集、聚合和移动大量的日志数据。它具有基于流数据流的简单灵活的体系结构。它具有鲁棒性(Robust)和容错性,具有可调的可靠性机制和多种故障转移和恢复机制。它使用了一个简单的、可扩展的数据模型,允许在线分析应用程序。
· Data flow model

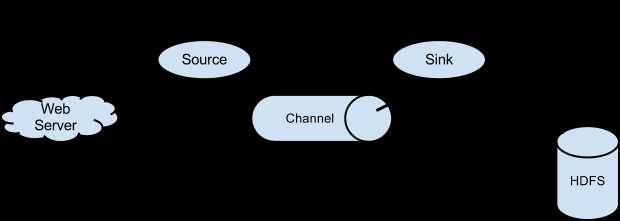
- Source:从外部数据Source(如Web服务器)接收数据,并将接收的数据以Flume的event格式传递给一个或者多个Channel,Flume提供多种数据接收的方式,比如Avro,Thrift,twitter1%等
- Channel:channel是一种短暂的存储容器,它将从source处接收到的event格式的数据缓存起来,直到它们被sinks消费掉,它在source和sink间起着桥梁的作用,channel是一个完整的事务,这一点保证了数据在收发的时候的一致性. 并且它可以和任意数量的source和sink链接. 支持的类型有: JDBC channel , File System channel , Memort channel等.
- Sink:sink将数据存储到集中存储器比如Hbase和HDFS,它从channals消费数据(events)并将其传递给目标地. 目标地可能是另一个sink,也可能HDFS,HBase。
基本工作原理:

图片取自参考书籍
· 启动配置
Flume Agent配置存储在本地配置文件中。这是一个遵循Java Properties文件格式的文本文件。可以在同一个配置文件中指定一个或多个Agent的配置。配置文件包括Agent中每个Source、Sink和Channel的属性以及它们如何连接在一起形成数据流。
Source
source是负责接收数据到Flume Agent的组件,它可以从其他系统中接收数据,像 Java消息服务(JMS)或者其他处理的输出结果,或其他Flume Agent的Sink通过RPC发送的数据。数据源从外部系统或者其他Agent(或者自身生产)接收数 据,并将数据写人到一个或多个Channel中,这些Channel是提前为Source配置过的。这也是Source最基本的职责。
Flume的配置系统验证每个Source的配置和屏蔽错误配置的Source,可以确保:
- 每个Source至少有一个正确配置的Channel连接它。
- 每个source有一个定义的type参数。
- source是在Agent中Sources里面的活跃列表。
source一旦成功配置, Flume的生命周期管理系统将会尝试启动Source.只有Agent自身停止或被杀死、或者 Agent被用户重新配置,source才会停止。
Flume最重要的特性之一就是Flume部署水平扩展的简单性。可以很容易完成扩展的原因是,很容易为Flume调度添加新的Agent,也很容易配置新的这些Agent发送数据给其他FlumeAgent.类似地,一旦添加了新的Agent,仅仅通过更新配置文件,就能很简单地配置已经运行的Agent来写入这个新的Agent。下面简单的概括官文中提到的几种Flume Source,详细的介绍可参考其他资料,文章后半部分也有一些练习例子。
- Avro Source:Flume主要的RPC Source,Avro Source被设计为高扩展的RPC服务器端,能从其他的Flume Agent的Avro Sink或者使用Flume的SDK发送数据的客户端应用接收数据到一个Flume Agent中。Avro Source使用Netty-Avro inter-process的通信(IPC)协议来通信。
- Thrift Source:由于Avro Source不能接收非JVM语言的数据,Flume加入了Apache Thrift RPC的支持来支持跨语言通信,Thrift Source可以被简单的定义为多线程、高性能的Thrift服务器。
- HTTP Source:Flume自带的HTTP source可以通过HTTP POST接收Event。GET请求方式只用于实验。HTTP请求被可插拔的“handler”转换为Flumeevent,该处理程序必须实现HTTPSourceHandler接口。这个处理程序接受一个HttpServletRequest,并返回一个Flumeevent列表。从客户端的角度来看,HTTP Source表现得像web服务器一样能接收Flumeevent。
- Spooling Directory source:监视读取event的目录。 Source期望目录中的文件是不变的,文件一旦被移入到该目录就不应该被再次写入。文件一旦被Source完全使用完且所有的event被成功写入Source的 Channel中,Source就可以基于配置重命名文件或删除文件。当文件被重命名,Source 只是给文件名添加一个后缀,而不是完全改变它。
- Syslog Source:读取syslog数据并生成Flume Event。Flume提供的syslog Source入: Syslog UDP Source、Syslog TCP Source、Multiport Syslog,UDP Source将整个消息视为单个event。TCP Source为以换行符(‘n’)分隔的每个字符串创建一个新event。
- Exec Source:执行用户配置的命令,且基于命令的标准输出来生成event。它还可以从命令中读取错误流,将event转换为Flumeevent,并将它们写人Channel. Source希望命令不断生产数据,并且吸收其输出和错误流。只要命令开始运行,Source就要不停地运行和处理,不断读取处理的输出流。
- JMS Source:Flume自带的Source,可以获取来自Java消息服务队列或Subject的数据。
- 自定义的Source:由于各种生产环境的不同,难免需要使用定制的通信格式写入到Flume,用户需要自行实现Source接口来完成自定义Source。
Channel
Channel是位于Source和Sink之间的缓冲区。因此,Channel允许source和Sink运作在不同的速率上。Channel是Flume保证数据不丢失的关键,当然这是在正确配置的情况下。Source写入数据到一个或多个Channel中,再由一个或多个Sink读取。Sink 只能从一个Channel读取数据,而多个Sink可以从相同的Channel读取以获得更好的性能。
Channel允许source 在同一Channel上操作,以拥有自己的线程模型而不必担心Sink从Channel读取数据,反之亦然。位于Source和Sink之间的缓冲区也允许它们工作在不同的速率,因为写操作发生在缓冲区的尾部,读取发生在缓冲区的头部。这也使得Flume Agent能处理 source “高峰小时”的负载,即使Sink无法立即读取Channel.
Channel允许多个Source和Sink在它们上面进行操作。Channel本质上是事务性的。每次从Channel中写人和读取数据,都在事务的上下文中发生。只有当写事务被提交,事务中的event才可以被任意Sink读取。同样,如果一个Sink已经成功读取了一个event,该event对于其他Sink是不可用的,除非该Sink回滚事务。
Flume官文中的几种Channel:
- Memory Channel:Event存储在具有可配置最大大小的内存队列中。Source从它的尾部写入,Sink从它的头部读取。Memory Channel支持很高的吞吐量,因为它在内存中保存所有的数据。Channel是线程安全的,可以同时处理几个Source的写入操作和几个Sink的读取操作。Memory Channel在不需要关心数据丢失的情景下适用,因为该类Channel没有将数据持久化到磁盘。
Memory Channel支持Flume的事务性模型,并为每个程序中的事务维护单独的队列。如果事务失败,event将以相反的顺序被重新插入到Channel的头部,所以event将以相同的顺序被再次读取,就像它们当初被插入时一样。用这种方法,尽管Flume不能保证顺序性,但是Memory Channel能保证event以它们被写入的顺序进行读取。然而,当某些事务回滚,后写入的event有可能更早写出到目的地。 - File Channel :File Channel是Flume的持久Channel,它将所有event写到磁盘,因此在程序关闭或机器宕机的情况下不会丢失数据。File Channel保证了即使机器或Agent宕机或重启,只有当Sink取走了event并提交给事务时,任何提交到Channel的event才从Channel移除。
File Channel被设计用于数据需要持久化和不容忍数据丢失的场景下。因为Channel将数据写到磁盘,它不会由于宕机或失败造成数据丢失。一个额外的好处,因为它写数据到磁盘,Channel可以有非常大的容量,尤其是和Memory Channel相比。 - Spillable Memory Channel:见名知义,可溢出的Memory Channel,内存中的队列充当主存储,磁盘作为溢出。磁盘存储使用嵌入式File Channel进行管理。当内存中的队列已满时,其他传入event将存储在File Channel中。看起来似乎挺好,当然官文中有明确提到该Channel目前是试验性的,不推荐用于生产环境。
- Custom Channel:自定义的Channel。
Sink
从Flume Agent移除数据并写人到另一个Agent或数据存储或一些其他系统的组件被称为Sink。Sink是完全事务性的。在从Channel批量移除数据之前,每个Sink用Channel启动一个事务。批量event一旦成功写出到存储系统或下一个Flume Agent, Sink就利用Channel 提交事务。事务一旦被提交,该Channel从自己的内部缓冲区删除event。
Sink使用标准的Flume配置系统进行配置。每个Agent可以没有Sink或若干Sink.每个Sink只能从一个Channel中读取event。如果Sink没有配置Channel,那么Sink就会从Agent中被移除。配置系统保证:
- 每个Sink至少有一个正确配置的Channel连接它。
- 每个Sink有一个定义的type参数。
- Sink是在Agent中Sink活跃列表中的。
Flume可以聚合线程到Sink组,每个Sink 组可以包含一个或多个Sink.如果一个Sink没有定义Sink组,那么该Sink可以被认为是在一个组内,且该Sink是组内的唯一成员。简单概括:
- HDFS Sink:HDFS Sink将event写入Hadoop分布式文件系统(HDFS)。目前支持创建文本和序列文件,可以根据经过的时间、数据大小或event数周期性地滚动文件(关闭当前文件并创建新文件)。它还根据event起源的时间戳或机器等属性对数据进行存储/分区。HDFS目录路径可能包含格式转义序列,这些转义序列将被HDFSSink替换,以生成目录/文件名来存储event。使用此Sink需要安装Hadoop,以便Flume可以使用HadoopJAR与HDFS集群通信。
- Hive Sink:Hive Sink将包含分隔文本或JSON数据的event直接流到Hive表或分区中。event是使用Hive事务编写的。一旦一组event被提交到Hive,它们就会立即对Hive查询可见。传入event数据中的字段映射到Hive表中的相应列。
- Logger Sink:在INFO level记录event。通常用于测试/调试目的。
- Avro Sink:Flume event被转换为Avro event并发送到配置的 hostname/port 对。event按配置批处理大小的批次从配置的Channel中取出。
- Thrift Sink:Flume事件被转换为Thrift事件并发送到配置的 hostname/port 对。event按配置批处理大小的批次从配置的Channel中取出。
- IRC Sink:接收来自attached channel的消息,并将这些消息中继到配置的IRC目的地。
- File Roll Sink:在本地文件系统上存储event
- Null Sink:丢弃接收的event
- HTTP Sink:接收来自Channel的Event,并使用HTTP POST请求将这些Event发送到远程服务器。event内容作为POST content发送。
- Custom Sink:自定义的Sink
另外,还有一些没有提到的Sink,比如Kafka Sink、ElasticSearch Sink等之后视情况补充。
其他组件
Interceptors
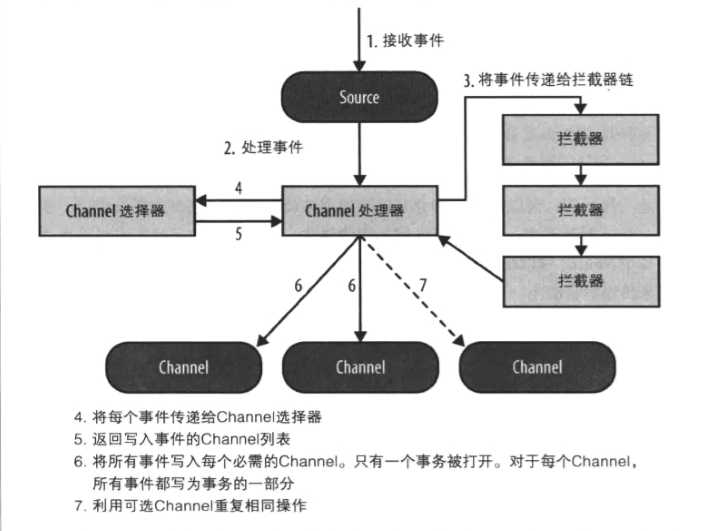
Flume Interceptors(拦截器)是设置在Source和Channel之间的插件式组件。Source将Event写入到Channel之前可以使用Interceptors对数据进行过滤和一些处理。每个Interceptors实例只处理同一个Source接收到的Event。在一个 Flume处理流程中可以添加任意数量的Interceptors来链式处理数据,由拦截器链的最后一个拦截器写入数据到Channel。
- Timestamp Interceptor:将时间戳插入到事件报头中,通常用在第一层Agent来过滤数据。
- Host Interceptor:插入服务器的IP地址或者HostName到事件报头。
- Static Interceptor:允许用户向所有事件追加具有静态值的静态标头。当前该拦截器的实现不允许一次指定多个标头。用户可能会链接多个静态拦截器,每个拦截器定义一个静态头。
- Remove Header Interceptor:通过删除一个或多个标头来操作Flume事件标头。它可以删除静态定义的标头、基于正则表达式的标头或列表中的标头。如果只需要删除一个标头,则按名称指定它比其他两个方法具有更高的性能。
- UUID Interceptor:为所有被截获的事件设置一个通用的唯一标识符。
- Morphline Interceptor:通过Morphline配置文件定义了从一个命令到另一个命令的管道记录的转换链,但拦截器中不应该出现复杂的操作。如果需要重量级的处理,最好使用Morphline Solr Sink。
- Regex Filtering Interceptor:将事件体转换为UTF-8的字符使用正则表达式来过滤事情。
- Search and Replace Interceptor:提供了基于Java正则表达式的简单的基于字符串的搜索和替换功能。
- Custom Interceptor:自定义的拦截器,实现 org.apache.flume.interceptor.Interceptor 接口。
Channel选择器
Channel选择器决定了Source接收的事件写入哪些Channel。如果Flume写入一个Channel时发生故障而发生在其他Channel的事件无法被回滚就会抛出ChannelException导致事务失败。
Flume内置了两种Channel选择器:
- Replicating Channel Selector (default):如果Source没有指定Channel选择器则默认为复制,该选择器复制每个事件到通过Source的Channels参数指定的所有Channel中。
- Multiplexing Channel Selector:多路复用选择器是专门为动态路由事件的Channel选择器,通过选择事件应该写入的Channel,基于一个特定的事件头的值来进行路由,通常结合拦截器使用。
- Custom Channel Selector:自定义的Channel选择器,实现ChannelSelector接口或继承AbstractChannelSelector抽象类。启动Flume代理时,必须将自定义通道选择器的类及其依赖项包含在代理的类路径中。
Sink grou和Sink Processors
Flume为每个Sink组实例化一个Sink Processors来执行Sink组内的任务,Sink组可以包含任意个Sink,一般这用于RPC Sink,在层之间以负载均衡或故障转移的方式传输数据。每个Sink组在活跃列表中被声明为一个组件,就像Source、Sink和Channel一样,使用sinkgroups关键字。每个Sink组是一个需要命名的组件,因为每个Agent可以有多个Sink组。需要注意的是Sink组中所有Sink是不会在同时被激活,任何时候只有它们中的一个用来发送数据。因此,Sink组不应该用来更快地清除Channel,在这种情况下,多个Sink应该只是设置为自己操作自己,而没有Sink组,且它们应该配置从相同的Channel进行读取。
- Default Sink Processor:Default Sink Processor只接受一个Sink。用户不必为单个Sink创建处理器(Sink组)。
- Failover Sink Processor:Failover Sink Processor维护一个优先的Sink列表,确保每个可用的事件到达就会被处理。 故障转移机制的工作方式是将失败的Sink降级到池中,在池中为它们分配一个冷却周期,在重试之前随着顺序故障的增加而增加。一旦Sink成功地发送了一个Event,它就被还原到活动池中。如果Sink在发送Event时失败,则下一个优先级最高的Sink将尝试发送Event。例如,具有优先级100的Sink在具有优先级80的Sink之前被激活。如果没有指定优先级,则根据在配置中指定Sinks的顺序确定该优先级。
- Load balancing Sink Processor:Load balancing Sink Processor供了在多个Sink上负载均衡的能力。它维护必须在其上分配负载的活动Sink的索引列表。实现支持使用round_robin或random选择机制。选择机制的选择默认为round_robin类型,但可以通过配置重写。调用时,此选择器使用其配置的选择机制选择下一个Sink并调用它。此实现没有黑名单失败的Sink,而是乐观地尝试每一个可用的Sink。
一些入门练习
· 官文基础例子
 vim HelloFlume.conf  //创建Agent配置文件

 # example.conf: A single-node Flume configuration
 # Name the components on this agent
 a1.sources = r1
 a1.sinks = k1
 a1.channels = c1

 # Describe/configure the source
 # 这个例子监听了本机的44444端口netcat服务
 a1.sources.r1.type = netcat
 a1.sources.r1.bind = localhost
 a1.sources.r1.port = 44444

 # Describe the sink
 a1.sinks.k1.type = logger

 # Use a channel which buffers events in memory
 a1.channels.c1.type = memory
 a1.channels.c1.capacity = 1000
 a1.channels.c1.transactionCapacity = 100

 # Bind the source and sink to the channel
 a1.sources.r1.channels = c1
 a1.sinks.k1.channel = c1

 #### 配置内容到此结束 ####

 bin/flume-ng agent --name a1 --conf conf/ --conf-file learn/part1/HelloFlume.conf -Dflume.root.logger=INFO,console
 # 注意几个参数
 # --name 表示启动的agent name ,因为上面配置文件里写了a1,所以这里写a1,key可以简写为-n
 # --conf 表示flume的conf目录 ,key可以简写为-c
 # --conf-file 表示启动当前agent使用的配置文件,指向上面创建的配置文件,key可以简写为 -f
 # 启动成功会发现当前终端被阻塞,启动另一个终端

 nc localhost 44444
 hello flume

 回到阻塞的终端看最新的日志

 2019-9-18 09:52:55,583 (SinkRunner-PollingRunner-DefaultSinkProcessor)
  [INFO - org.apache.flume.sink.LoggerSink.process(LoggerSink.java:95)]
  Event:  headers: body: 68 65 6C 6C 6F 20 66 6C  75 6D 65                hello flume
· 监控本地log文件变化并输出到不同的目的地
直接贴出配置内容
 # file-flume.conf 从本地文件系统监控变化并通过avro sink将数据传输给另外两个flume #
 #name
 a1.sources = r1
 a1.channels = c1 c2
 a1.sinks = k1 k2

 #configure the source
 # 使用TailDir的方式监视文件变化,这种方式可以以较高效率实现断点续传
 a1.sources.r1.type = TAILDIR
 a1.sources.r1.filegroups = f1
 a1.sources.r1.filegroups.f1 = /root/public/result/t2.txt
 a1.sources.r1.positionFile = /usr/local/soft/flume-1.9.0/learn/part2/position.json

 #将选择器设置为复制,其实不写也可以,因为这是默认值,熟悉一下
 a1.sources.r1.selector.type = replicating

 #channel
 a1.channels.c1.type = memory
 a1.channels.c1.capacity = 1000
 a1.channels.c1.transactionCapacity = 100

 a1.channels.c2.type = memory
 a1.channels.c2.capacity = 1000
 a1.channels.c2.transactionCapacity = 100


 #sink
 # 两个sink分别绑定不同端口
 a1.sinks.k1.type = avro
 a1.sinks.k1.hostname = master
 a1.sinks.k1.port = 12345

 a1.sinks.k2.type = avro
 a1.sinks.k2.hostname = master
 a1.sinks.k2.port = 12346

 #bind
 a1.sources.r1.channels = c1 c2
 a1.sinks.k1.channel = c1
 a1.sinks.k2.channel = c2
 # flume-hdfs.conf 从avro source接收数据并上传到hdfs sink #
 #name
 a2.sources = r1
 a2.channels = c1
 a2.sinks = k1

 #source
 a2.sources.r1.type = avro
 a2.sources.r1.bind = master
 a2.sources.r1.port = 12345

 #channel
 a2.channels.c1.type = memory
 a2.channels.c1.capacity = 1000
 a2.channels.c1.transactionCapacity = 100

 #sink
 a2.sinks.k1.type = hdfs
 #上传到hdfs的路径
 a2.sinks.k1.hdfs.path = hdfs://master:9000/flume/part2/events/%y-%m-%d/%H%M/%S
 #上传文件的前缀
 a2.sinks.k1.hdfs.filePrefix = events
 #是否按照时间滚动文件夹
 a2.sinks.k1.hdfs.round = true
 #多少时间单位创建一个新的文件夹
 a2.sinks.k1.hdfs.roundValue = 1
 #重新定义时间单位
 a2.sinks.k1.hdfs.roundUnit = hour
 #是否使用本地时间戳
 a2.sinks.k1.hdfs.useLocalTimeStamp = true
 #积攒多少个 Event 才 flush 到 HDFS 一次,这里因为是学习测试,所以设置的值比较小方便查看
 a2.sinks.k1.hdfs.batchSize = 100
 #设置文件类型,可支持压缩
 a2.sinks.k1.hdfs.fileType = DataStream
 #多久生成一个新的文件
 a2.sinks.k1.hdfs.rollInterval = 30
 #设置每个文件的滚动大小,这里最好设置成比HDFS块大小小一点
 a2.sinks.k1.hdfs.rollSize = 134217000
 #文件的滚动与 Event 数量无关
 a2.sinks.k1.hdfs.rollCount = 0

 #bind
 a2.sources.r1.channels = c1
 a2.sinks.k1.channel = c1
 # file-local.conf 从avro source接收数据并存储到本地 #

 #name
 a3.sources = r1
 a3.channels = c1
 a3.sinks = k1

 #source
 a3.sources.r1.type = avro
 a3.sources.r1.bind = master
 a3.sources.r1.port = 12346

 #channel
 a3.channels.c1.type = memory
 a3.channels.c1.capacity = 1000
 a3.channels.c1.transactionCapacity = 100

 #sink
 a3.sinks.k1.type = file_roll
 #注意这里写出的本地文件路径要提前创建好文件夹,否则flume不会帮你创建导致异常错误
 a3.sinks.k1.sink.directory = /usr/local/soft/flume-1.9.0/learn/part2/localResult/

 #bind
 a3.sources.r1.channels = c1
 a3.sinks.k1.channel = c1
配置完成即可开启flume,注意启动的参数要和选择的配置文件中的Agent Name相同
 bin/flume-ng agent --name a1 --conf conf/ --conf-file learn/part2/file-flume.conf
 bin/flume-ng agent --name a2 --conf conf/ --conf-file learn/part2/flume-hdfs.conf
 bin/flume-ng agent --name a3 --conf conf/ --conf-file learn/part2/flume-local.conf
由于监控的是本地的某个文件,所以以任意方式向该文件添加信息即可,结果:
 [root@master localResult]# hadoop fs -ls -R /flume
 drwxr-xr-x   - root supergroup          0 2019-9-18 14:33 /flume/part2
 drwxr-xr-x   - root supergroup          0 2019-9-18 14:33 /flume/part2/events
 drwxr-xr-x   - root supergroup          0 2019-9-18 14:33 /flume/part2/events/19-9-18
 drwxr-xr-x   - root supergroup          0 2019-9-18 14:33 /flume/part2/events/19-9-18/1400
 drwxr-xr-x   - root supergroup          0 2019-9-18 14:35 /flume/part2/events/19-9-18/1400/00
 -rw-r--r--   1 root supergroup       3648 2019-9-18 14:34 /flume/part2/events/19-9-18/1400/00/events.1569911635854
 -rw-r--r--   1 root supergroup       2231 2019-9-18 14:35 /flume/part2/events/19-9-18/1400/00/events.1569911670803

 [root@master localResult]# ls -lh /usr/local/soft/flume-1.9.0/learn/part2/localResult/
 总用量 8.0K
 -rw-r--r--. 1 root root 2.5K 9月  18 14:34 1569911627438-1
 -rw-r--r--. 1 root root 3.4K 9月  18 14:34 1569911627438-2
 -rw-r--r--. 1 root root    0 9月  18 14:34 1569911627438-3
 -rw-r--r--. 1 root root    0 9月  18 14:35 1569911627438-4
 -rw-r--r--. 1 root root    0 9月  18 14:35 1569911627438-5
· 官文负载均衡、故障转移、SinkGroup、Sink Processor
故障转移
 #name
 a1.sources = r1
 a1.channels = c1
 a1.sinks = k1 k2

 #configure the source,以命令的方式监控本地文件变动
 a1.sources.r1.type = exec
 a1.sources.r1.command = tail -F /root/public/result/t2.txt


 #channel
 a1.channels.c1.type = memory
 a1.channels.c1.capacity = 1000
 a1.channels.c1.transactionCapacity = 100

 #sink
 a1.sinkgroups = g1
 a1.sinkgroups.g1.sinks = k1 k2
 a1.sinkgroups.g1.processor.type = failover
 a1.sinkgroups.g1.processor.priority.k1 = 5
 a1.sinkgroups.g1.processor.priority.k2 = 10
 a1.sinkgroups.g1.processor.maxpenalty = 10000

 a1.sinks.k1.type = avro
 a1.sinks.k1.hostname = master
 a1.sinks.k1.port = 12345

 a1.sinks.k2.type = avro
 a1.sinks.k2.hostname = master
 a1.sinks.k2.port = 12346

 #bind
 a1.sources.r1.channels = c1
 a1.sinks.k1.channel = c1
 a1.sinks.k2.channel = c1
另外两个Flume启动的配置只有port和name参数不一样,所以只贴出一份
#name
a2.sources = r1
a2.channels = c1
a2.sinks = k1
#source
a2.sources.r1.type = avro
a2.sources.r1.bind = master
a2.sources.r1.port = 12345
#channel
a2.channels.c1.type = memory
a2.channels.c1.capacity = 1000
a2.channels.c1.transactionCapacity = 100
#sink
a2.sinks.k1.type = logger
#bind
a2.sources.r1.channels = c1
a2.sinks.k1.channel = c1 bin/flume-ng agent -n a1 -c conf -f learn/part3/file-flume.conf
bin/flume-ng agent -n a2 -c conf -f learn/part3/flume-sink1.conf -Dflume.root.logger=INFO,console
bin/flume-ng agent -n a3 -c conf -f learn/part3/flume-sink2.conf -Dflume.root.logger=INFO,console由于配置了Sink k2的优先级比k1高,所以一开始日志信息会全部发送到k2,使用Ctrl+c结束掉k2后信息被转移到k1
至于负载均衡配置,只需要修改几个参数即可
 a1.sinkgroups = g1
 a1.sinkgroups.g1.sinks = k1 k2
 a1.sinkgroups.g1.processor.type = load_balance
 a1.sinkgroups.g1.processor.backoff = true
 a1.sinkgroups.g1.processor.selector = random
因为每个Avro Sink对Avro Source保持持续开放的连接,拥有写人到相同Agent的多个Sink会增加更多的socket连接,且在第二层Agent上占据更多的资源。对相同Agent增加大量Sink之前必须要谨慎考虑。
· 多节点信息聚合
现在计划让Node1和Node2节点生产数据,采集的日志信息一起聚合到Master机器上,直接上配置
 # flume-node1.conf #
 #name
 a2.sources = r1
 a2.channels = c1 c2
 a2.sinks = k1 k2

 #source
 a2.sources.r1.type = exec
 a2.sources.r1.command = tail -F /usr/local/soft/flume-1.9.0/learn/part4/input/t1.txt

 a2.sources.r1.selector.type = replicating

 #channel
 a2.channels.c1.type = memory
 a2.channels.c1.capacity = 1000
 a2.channels.c1.transactionCapacity = 100

 a2.channels.c2.type = memory
 a2.channels.c2.capacity = 1000
 a2.channels.c2.transactionCapacity = 100

 #sink
 a2.sinks.k1.type = avro
 a2.sinks.k1.hostname = master
 a2.sinks.k1.port = 12345

 a2.sinks.k2.type = logger

 #bind
 a2.sources.r1.channels = c1 c2
 a2.sinks.k1.channel = c1
 a2.sinks.k2.channel = c2
# flume-node2.conf #
#name
a3.sources = r1
a3.channels = c1 c2
a3.sinks = k1 k2
#source
a3.sources.r1.type = TAILDIR
a3.sources.r1.positionFile = /usr/local/soft/flume-1.9.0/learn/part4/taildir_position.json
a3.sources.r1.filegroups = f1
a3.sources.r1.filegroups.f1 = /usr/local/soft/flume-1.9.0/learn/part4/input/t1.txt
a3.sources.r1.selector.type = replicating
#channel
a3.channels.c1.type = memory
a3.channels.c1.capacity = 1000
a3.channels.c1.transactionCapacity = 100
a3.channels.c2.type = memory
a3.channels.c2.capacity = 1000
a3.channels.c2.transactionCapacity = 100
#sink
a3.sinks.k1.type = avro
a3.sinks.k1.hostname = master
a3.sinks.k1.port = 12345
a3.sinks.k2.type = logger
#bind
a3.sources.r1.channels = c1 c2
a3.sinks.k1.channel = c1
a3.sinks.k2.channel = c2 #name
a1.sources = r1
a1.channels = c1 c2
a1.sinks = k1 k2
#configure the source
a1.sources.r1.type = avro
a1.sources.r1.bind = master
a1.sources.r1.port = 12345
a1.sources.r1.selector.type = replicating
#channel
a1.channels.c1.type = memory
a1.channels.c1.capacity = 1000
a1.channels.c1.transactionCapacity = 100
a1.channels.c2.type = memory
a1.channels.c2.capacity = 1000
a1.channels.c2.transactionCapacity = 100
#sink
a1.sinks.k1.type = file_roll
a1.sinks.k1.sink.directory = /usr/local/soft/flume-1.9.0/learn/part4/result/
a1.sinks.k2.type = logger
#bind
a1.sources.r1.channels = c1 c2
a1.sinks.k1.channel = c1
a1.sinks.k2.channel = c2配置如上,其实既然跨机器那么Agent name 是否相同都无所谓了,每个配置文件中的两个channel和sink是为了将信息打印到控制台,假如出现了错误方便观察。来一段简单的脚本慢慢的生成数据。
 #!/bin/bash
 hs=`hostname`
 for i in $(seq 1 20)
 do
     echo "来自$hs的第$i条日志" >> /usr/local/soft/flume-1.9.0/learn/part4/input/t1.txt
     sleep 1
 done
MASTER:FLUME_HOME/bin/flume-ng agent -n a1 -c conf -f learn/part4/flume-master.conf -Dflume.root.logger=INFO,console
NODE1:FLUME_HOME/bin/flume-ng agent -n a2 -c conf -f learn/part4/flume-node1.conf -Dflume.root.logger=INFO,console
NODE2:FLUME_HOME/bin/flume-ng agent -n a3 -c conf -f learn/part4/flume-node2.conf -Dflume.root.logger=INFO,console
NODE1:FLUME_HOME/learn/part4/input/generate.sh
NODE2:FLUME_HOME/learn/part4/input/generate.sh
### 数据生成和传输完成后 ###
MASTER:FLUME_HOME/learn/part4/result ls -l
总用量 8
-rw-r--r--. 1 root root 368 9月 18 20:38 1569933489286-1
-rw-r--r--. 1 root root 774 9月 18 20:38 1569933489286-2### · 拦截器 + 自定义拦截器 ###
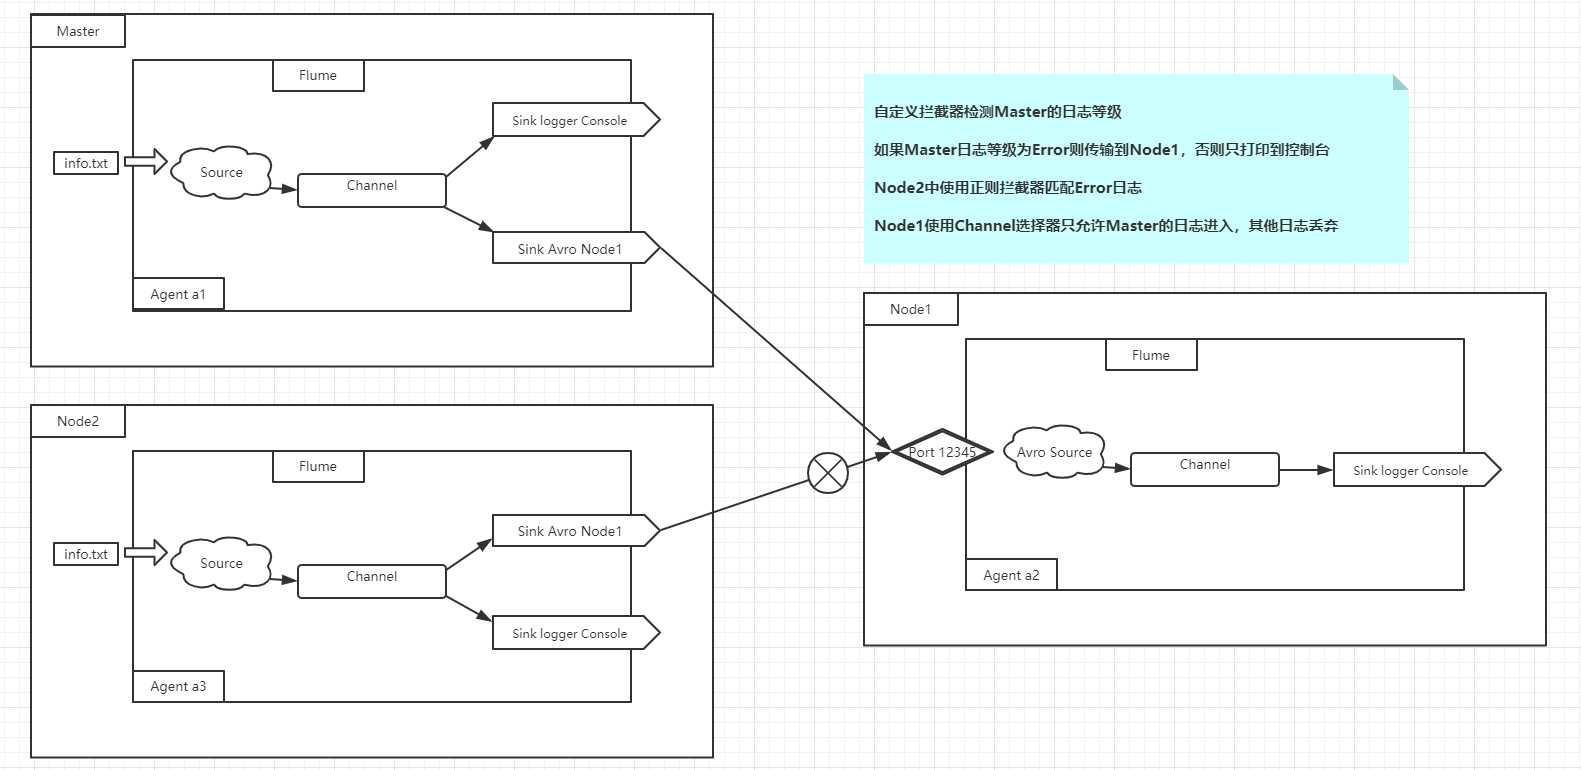
通过一些小例子结合着不同的拦截器进行理解消化,现在有如下结构

则有如下配置
 #flume-master.conf

 #name
 a1.sources = r1
 a1.channels =c1 c2
 a1.sinks =k1 k2


 #configure the source
 a1.sources.r1.type = exec
 a1.sources.r1.command = tail -F /usr/local/soft/flume-1.9.0/learn/part6/input/info.txt

 a1.sources.r1.interceptors = i1 i2 i3
 a1.sources.r1.interceptors.i1.type = static
 #使用静态拦截器为每个事件添加键值对
 a1.sources.r1.interceptors.i1.key = des
 a1.sources.r1.interceptors.i1.value = UsingStaticInterceptor
 a1.sources.r1.interceptors.i2.type = host
 a1.sources.r1.interceptors.i2.useIP = false
 a1.sources.r1.interceptors.i3.type =  priv.landscape.interceptorDemo.LevelInterceptor$Builder
 #自定义拦截器

 a1.sources.r1.selector.type = multiplexing
 a1.sources.r1.selector.header = level
 a1.sources.r1.selector.mapping.error = c1
 a1.sources.r1.selector.mapping.other = c2

 #channel
 a1.channels.c1.type = memory
 a1.channels.c1.capacity = 1000
 a1.channels.c1.transactionCapacity = 100

 a1.channels.c2.type = memory
 a1.channels.c2.capacity = 1000
 a1.channels.c2.transactionCapacity = 100


 #sink
 a1.sinks.k1.type = avro
 a1.sinks.k1.hostname = node1
 a1.sinks.k1.port = 12345


 a1.sinks.k2.type = logger

 #bind
 a1.sources.r1.channels = c1 c2
 a1.sinks.k1.channel = c1
 a1.sinks.k2.channel = c2
#其中自定义拦截器的关键Java代码 :
public class LevelInterceptor implements Interceptor
private List<Event> eventList;
@Override
public void initialize()
eventList = new ArrayList<>();
@Override
public Event intercept(Event event)
Map<String, String> headers = event.getHeaders();
String body = new String(event.getBody());
if (body.contains("ERROR"))
headers.put("level", "error");
else
headers.put("level", "other");
return event;
@Override
public List<Event> intercept(List<Event> events)
eventList.clear();
for (Event event : events)
eventList.add(intercept(event));
return eventList;
....... ## flume-node1.conf
#name
a2.sources = r1
a2.channels = c1 c2
a2.sinks = k1 k2
#source
a2.sources.r1.type = avro
a2.sources.r1.bind = node1
a2.sources.r1.port = 12345
a2.sources.r1.selector.type = multiplexing
a2.sources.r1.selector.header = host
a2.sources.r1.selector.mapping.Master = c1
a2.sources.r1.selector.mapping.Node2 = c2
a2.sources.r1.selector.mapping.default = c2
#channel
a2.channels.c1.type = memory
a2.channels.c1.capacity = 1000
a2.channels.c1.transactionCapacity = 100
a2.channels.c2.type = memory
a2.channels.c2.capacity = 1000
a2.channels.c2.transactionCapacity = 100
#sink
a2.sinks.k1.type = logger
a2.sinks.k2.type = null
#bind
a2.sources.r1.channels = c1 c2
a2.sinks.k1.channel = c1
a2.sinks.k2.channel = c2 #flume-node2.conf
#name
a3.sources = r1
a3.channels = c1 c2
a3.sinks = k1 k2
#source
a3.sources.r1.type = exec
a3.sources.r1.command = tail -F /usr/local/soft/flume-1.9.0/learn/part6/input/info.txt
a3.sources.r1.interceptors = i1 i2
a3.sources.r1.interceptors.i1.type = regex_filter
a3.sources.r1.interceptors.i1.regex = \\[ERROR\\]
a3.sources.r1.interceptors.i2.type = host
a3.sources.r1.interceptors.i2.useIP = false
#channel
a3.channels.c1.type = memory
a3.channels.c1.capacity = 1000
a3.channels.c1.transactionCapacity = 100
a3.channels.c2.type = memory
a3.channels.c2.capacity = 1000
a3.channels.c2.transactionCapacity = 100
#sink
a3.sinks.k1.type = avro
a3.sinks.k1.hostname = node1
a3.sinks.k1.port = 12345
a3.sinks.k2.type = logger
#bind
a3.sources.r1.channels = c1 c2
a3.sinks.k1.channel = c1
a3.sinks.k2.channel = c2· 构建基础Event 和 RPC Client
Event是flume中数据的基本形式,在IDE中添加Flume SDK的Maven依赖,查看Event接口
 public interface Event

  public Map<String, String> getHeaders();

  public void setHeaders(Map<String, String> headers);

  public byte[] getBody();

  public void setBody(byte[] body);
Event接口的默认实现有 SimpleEvent 和 JSONEvent,内部结构不尽相同,可以通过EventBuilder类中的静态方法来快速构建一个Event。
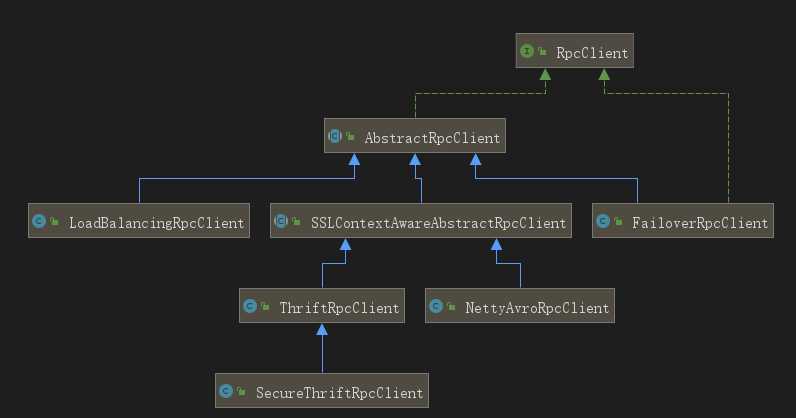
再看RpcClient接口,其中通过append方法来发送一个flume event,也可以通过继承AbstractRpcClient来实现一个RpcClient。
 public interface RpcClient

   public int getBatchSize();

   public void append(Event event) throws EventDeliveryException;

   public void appendBatch(List<Event> events) throws EventDeliveryException;

   public boolean isActive();

   public void close() throws FlumeException;
其实现结构如图:

那么尝试使用最简单的代码向Agent发送一次event
 public class FlumeClient
    public static void main(String[] args) throws EventDeliveryException

        RpcClient client = RpcClientFactory.getDefaultInstance("master", 12345);
        client.append(EventBuilder.withBody("hello , 这里是RPC Client".getBytes()));
        client.close();


 ——————————————————————————————————————————————————————————————————————————————
 Flume Agent:
 2019-9-20 19:37:21,576 (SinkRunner-PollingRunner-DefaultSinkProcessor)
 [INFO - org.apache.flume.sink.LoggerSink.process(LoggerSink.java:95)]
 Event:  headers: body: 68 65 6C 6C 6F 20 2C 20 E8 BF 99 E9 87 8C E6 98 hello , ........
· 待补充
规划、部署、监控Flume
看书ing.....
以上是关于Flume初见与实践的主要内容,如果未能解决你的问题,请参考以下文章