Word 脚本 (自用)
Posted hemou
tags:
篇首语:本文由小常识网(cha138.com)小编为大家整理,主要介绍了Word 脚本 (自用)相关的知识,希望对你有一定的参考价值。
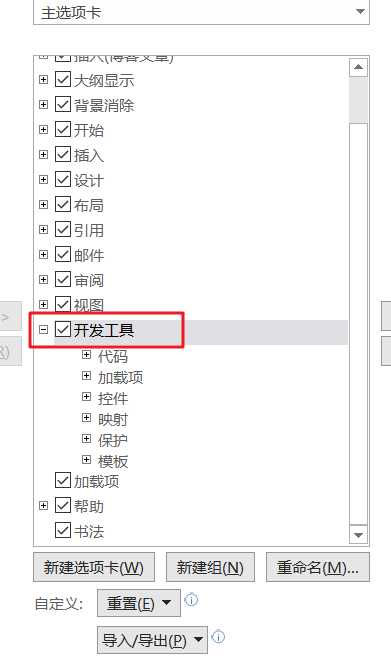
打开开发工具
右击功能区->自定义功能区

勾选开发工具->确定
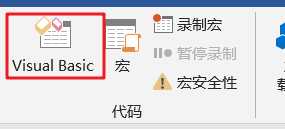
导入代码
开发工具选项卡->Visual Basic
右击Normal->插入->模块
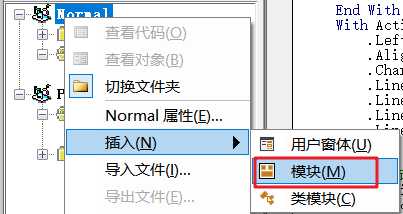
粘贴代码->ctrl+s 保存
Sub 修改样式()

    ‘ 八号磅值5
    ‘ 七号磅值5.5
    ‘ 小六磅值6.5 六号磅值7.5
    ‘ 小五磅值9 五号磅值10.5
    ‘ 小四磅值12 四号磅值14
    ‘ 小三磅值15 三号磅值16
    ‘ 小二磅值18 二号磅值22
    ‘ 小一磅值24 一号磅值26
    ‘ 小初磅值36 初号磅值42

    ‘ 删除用户所有自定义样式
    For Each sty In ActiveDocument.Styles
     If sty.BuiltIn = False Then sty.Delete
    Next sty

    ‘标题1样式
    With ActiveDocument.Styles(wdStyleHeading1).Font
        .Color = wdColorAutomatic
        .NameFarEast = "宋体"
        .NameAscii = "Times New Roman"
        .Size = 16  ‘字号,请输入对应数字
        .Bold = 1 ‘加粗为1,不加粗为0
    End With
    With ActiveDocument.Styles(wdStyleHeading1).ParagraphFormat
        .LeftIndent = CentimetersToPoints(0)
        .Alignment = wdAlignParagraphCenter ‘ 居中对齐
        .CharacterUnitFirstLineIndent = 0
        .LineUnitBefore = 0.5  ‘段前为0.5行
        .LineUnitAfter = 0.5 ‘段后为0.5行
        .LineSpacingRule = wdLineSpaceExactly
        .LineSpacing = 17
    End With

    ‘标题2样式
    With ActiveDocument.Styles(wdStyleHeading2).Font
        .Color = wdColorAutomatic
        .NameFarEast = "宋体"
        .NameAscii = "Times New Roman"
        .Size = 14  ‘字号,请输入对应数字
        .Bold = 1 ‘加粗为1,不加粗为0
    End With
    With ActiveDocument.Styles(wdStyleHeading2).ParagraphFormat
        .LeftIndent = CentimetersToPoints(0)
        .Alignment = wdAlignParagraphJustify
        .CharacterUnitFirstLineIndent = 0  ‘ 首行缩进0字符
        .LineUnitBefore = 0.5
        .LineUnitAfter = 0.5
        .LineSpacingRule = wdLineSpaceExactly
        .LineSpacing = 17
    End With

    ‘标题3样式
    With ActiveDocument.Styles(wdStyleHeading3).Font
        .Color = wdColorAutomatic
        .NameFarEast = "宋体"
        .NameAscii = "Times New Roman"
        .Size = 14  ‘字号,请输入对应数字
        .Bold = 1 ‘加粗为1,不加粗为0
    End With
    With ActiveDocument.Styles(wdStyleHeading3).ParagraphFormat
        .LeftIndent = CentimetersToPoints(0)
        .Alignment = wdAlignParagraphJustify
        .CharacterUnitFirstLineIndent = 0
        .LineUnitBefore = 0
        .LineUnitAfter = 0
        .LineSpacingRule = wdLineSpaceExactly
        .LineSpacing = 17
    End With

    ‘标题4样式
    With ActiveDocument.Styles(wdStyleHeading4).Font
        .Color = wdColorAutomatic
        .NameFarEast = "宋体"
        .NameAscii = "Times New Roman"
        .Size = 14  ‘字号,请输入对应数字
        .Bold = 1 ‘加粗为1,不加粗为0
    End With
    With ActiveDocument.Styles(wdStyleHeading4).ParagraphFormat
        .LeftIndent = CentimetersToPoints(0)
        .Alignment = wdAlignParagraphJustify
        .CharacterUnitFirstLineIndent = 0
        .LineUnitBefore = 0
        .LineUnitAfter = 0
        .LineSpacingRule = wdLineSpaceExactly
        .LineSpacing = 17
    End With

    ‘标题5样式
    With ActiveDocument.Styles(wdStyleHeading5).Font
        .Color = wdColorAutomatic
        .NameFarEast = "宋体"
        .NameAscii = "Times New Roman"
        .Size = 14  ‘字号,请输入对应数字
        .Bold = 1 ‘加粗为1,不加粗为0
    End With
    With ActiveDocument.Styles(wdStyleHeading4).ParagraphFormat
        .LeftIndent = CentimetersToPoints(0)
        .Alignment = wdAlignParagraphJustify
        .CharacterUnitFirstLineIndent = 0
        .LineUnitBefore = 0
        .LineUnitAfter = 0
        .LineSpacingRule = wdLineSpaceExactly
        .LineSpacing = 17
    End With

    ‘ 正文样式
    With ActiveDocument.Styles("正文").Font
        .Color = wdColorAutomatic
        .NameFarEast = "宋体"
        .NameAscii = "Times New Roman"
        .Size = 12  ‘字号,请输入对应数字
        .Bold = 0 ‘加粗为1,不加粗为0
    End With
    With ActiveDocument.Styles(wdStyleHeading4).ParagraphFormat
        .LeftIndent = CentimetersToPoints(0)
        .Alignment = wdAlignParagraphJustify
        .CharacterUnitFirstLineIndent = 2
        .LineUnitBefore = 0
        .LineUnitAfter = 0
        .LineSpacingRule = wdLineSpaceExactly
        .LineSpacing = 17
    End With

    ‘ 图标表
    Application.ScreenUpdating = False ‘关闭屏幕更新
    ActiveDocument.Styles.Add Name:="图标表", Type:=wdStyleTypeParagraph
    ActiveDocument.Styles("图标表").AutomaticallyUpdate = False
    With ActiveDocument.Styles("图标表").Font
        .Color = wdColorAutomatic
        .NameFarEast = "楷体"
        .NameAscii = "Times New Roman"
        .Size = 10.5  ‘字号,请输入对应数字
        .Bold = 0 ‘加粗为1,不加粗为0
    End With
    With ActiveDocument.Styles("图标表").ParagraphFormat
        .LeftIndent = CentimetersToPoints(0)
        .Alignment = wdAlignParagraphCenter
        ‘.CharacterUnitFirstLineIndent = 0
        .LineUnitBefore = 0.5
        .LineUnitAfter = 0.5
        .OutlineLevel = wdOutlineLevelBodyText ‘ 大纲级别普通文本
        .LineSpacingRule = wdLineSpaceSingle
    End With

End Sub

Sub 设置图标表()
    Selection.Style = "图标表"
End Sub
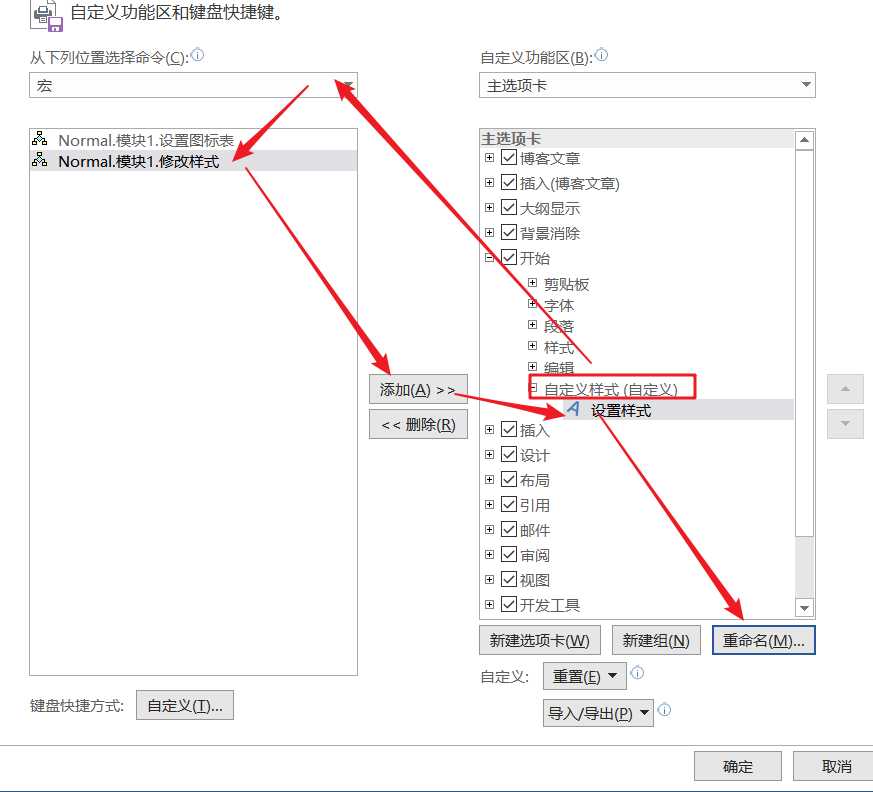
自定义功能
右击功能区->自定义功能区

点击开始->新建组->点击刚创建的组->重命名
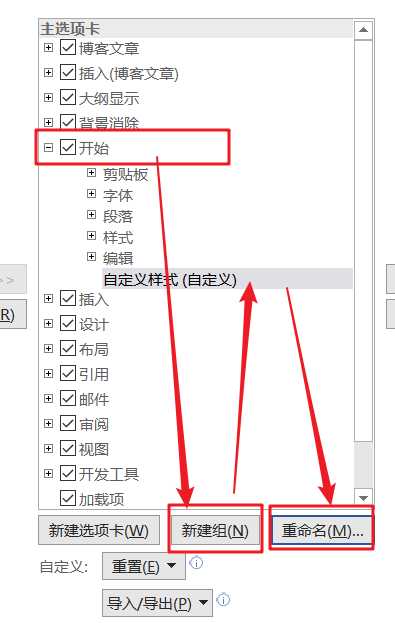
点击自定义样式->选择宏->选择相应的函数->添加->选择刚添加的函数->重命名并设置图标
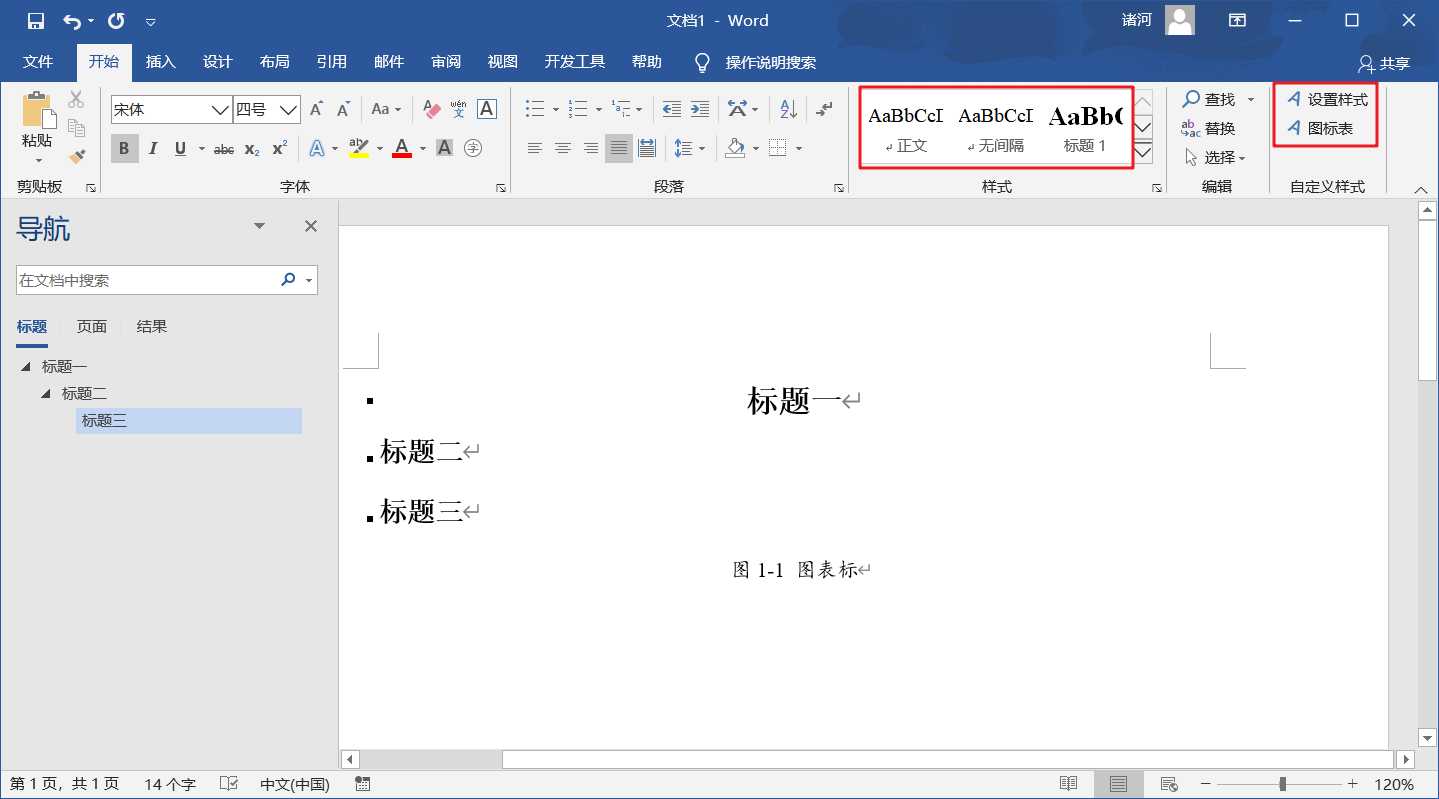
完工
最后点击相应的相应的样式,便可应用及自动产生大纲级别
以上是关于Word 脚本 (自用)的主要内容,如果未能解决你的问题,请参考以下文章