vue vue-simple-uploader 前端的简单使用
Posted 道法自然
tags:
篇首语:本文由小常识网(cha138.com)小编为大家整理,主要介绍了vue vue-simple-uploader 前端的简单使用相关的知识,希望对你有一定的参考价值。
前言
因为项目需要上传大文件tif图,考虑使用分片上传。
1、安装
npm install vue-simple-uploader --save
2、main.js中初始化
import uploader from \'vue-simple-uploader\'
Vue.use(uploader)
注:直接在vue文件中引用,居然加载不出来,不清楚原因
3、定义在template中的模板
点击查看代码
    <uploader
      ref="uploaderRef"
      :autoStart="false"
      :options="options"
      class="uploader-example"
      @file-success="onFileSuccess"
      @file-added="filesAdded"
      @file-error="onFileError"
      :file-status-text="fileStatusText"
    >
      <uploader-unsupport></uploader-unsupport>
      <uploader-drop>
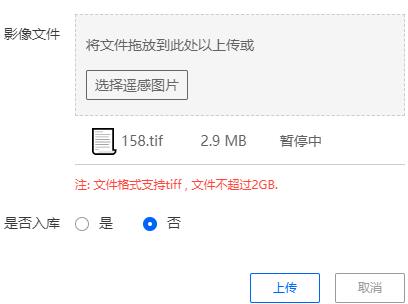
        <p>将文件拖放到此处以上传或</p>
        <!-- <uploader-btn>select files</uploader-btn> -->
        <uploader-btn :attrs="attrs" :single="true">选择遥感图片</uploader-btn>
        <!-- <uploader-btn :directory="true">select folder</uploader-btn> -->
      </uploader-drop>
      <uploader-list></uploader-list>
    </uploader>
4、定义在script中的数据
点击查看代码
import SparkMD5 from \'spark-md5\'
export default
  props:
    name:
      type: String,
      default: \'file\'
    ,
    chunkSize:
      type: Number,
      default: 0
    ,
    action:
      type: String,
      default: \'http://xxx.xxx.xx\'

  ,
  data ()
    return
      options:
        target: this.action, // 目标上传 URL
        chunkSize: this.chunkSize, // 分块大小
        fileParameterName: this.name, // 上传文件时文件的参数名,默认file
        //  maxChunkRetries: 3, // 最大自动失败重试上传次数
        testChunks: false, // 是否开启服务器分片校验
        // // 服务器分片校验函数,秒传及断点续传基础
        checkChunkUploadedByResponse: function (chunk, message)
          const objMessage = JSON.parse(message)
          if (objMessage.skipUpload)
            return true


          return (objMessage.uploaded || []).indexOf(chunk.offset + 1) >= 0
        ,

        processParams (params)
          console.log(params)

          // 每一次分片传给后台的参数,params是该方法返回的形参,包含分片信息
          return
            // 返回一个对象,会添加到每一个分片的请求参数里面
            filename: params.filename,
            identifier: params.identifier,
            totalChunks: params.totalChunks,
            chunkNumber: params.chunkNumber,
            totalSize: params.totalSize

        ,
        headers:
          // 在header中添加的验证,请根据实际业务来
          token: this.$store.getters[\'user/token\']

        // 自定义参数,随每一个切片发送
        //         query:
        //            //列如,参数id
        //             id:\'\'
        //         ,
      ,
      statusTextMap:
        success: \'上传成功\',
        error: \'上传失败\',
        uploading: \'上传中\',
        paused: \'暂停中\',
        waiting: \'等待中\'
      ,
      attrs:
        // 接受的文件类型,形如[\'.png\', \'.jpg\', \'.jpeg\', \'.gif\', \'.bmp\'...]
        accept: [\'.tif\', \'.tiff\']
      ,
      // 将不同的状态对应文字
      fileStatusText: (status, response) =>
        return this.statusTextMap[status]


  ,
  methods:
    onFileSuccess (rootFile, file, response, chunk)
      console.log(response)
      const res = JSON.parse(response)

      // 切片上传成功,调用合并
      if (res.code === 200)
        this.$emit(\'needMerger\', file.uniqueIdentifier)

    ,
    onFileError (rootFile, file, response, chunk)
      // 文件上传失败的回调
      console.log(rootFile, file, response, chunk)
      this.$emit(\'onFileError\')
    ,
    computeMD5 (file)
      const loading = this.$loading(
        lock: true,
        text: \'正在计算文件大小\',
        spinner: \'el-icon-loading\',
        background: \'rgba(0, 0, 0, 0.7)\'
      )
      const fileReader = new FileReader()
      const time = new Date().getTime()
      const blobSlice =
        File.prototype.slice ||
        File.prototype.mozSlice ||
        File.prototype.webkitSlice
      let currentChunk = 0
      const chunkSize = 10 * 1024 * 1000
      const chunks = Math.ceil(file.size / chunkSize)
      const spark = new SparkMD5.ArrayBuffer()
      file.pause()

      loadNext()

      fileReader.onload = e =>
        spark.append(e.target.result)
        if (currentChunk < chunks)
          currentChunk++
          loadNext()
          this.$nextTick(() =>
            console.log(
              \'校验MD5 \' + ((currentChunk / chunks) * 100).toFixed(0) + \'%\'
            )
          )
         else
          const md5 = spark.end()
          loading.close()
          this.computeMD5Success(md5, file)
          console.log(
            `MD5计算完毕:$file.name \\nMD5:$md5 \\n分片:$chunks 大小:$
              file.size
             用时:$new Date().getTime() - time ms`
          )


      fileReader.onerror = function ()
        this.error(`文件$file.name读取出错,请检查该文件`)
        loading.close()
        file.cancel()


      function loadNext ()
        const start = currentChunk * chunkSize
        const end =
          start + chunkSize >= file.size ? file.size : start + chunkSize
        fileReader.readAsArrayBuffer(blobSlice.call(file.file, start, end))

    ,
    computeMD5Success (md5, file)
      file.uniqueIdentifier = md5 // 把md5值作为文件的识别码
    ,
    filesAdded (file, event)
      if (this.$refs.uploaderRef.files.length === 1)
        // 只上传一张,将上一张覆盖
        this.$refs.uploaderRef.files[0].cancel()

      if (file.size / 1024 / 1024 / 1024 > 2)
        // 文件不能大于2G
        this.form.videoUrl = \'\'
        this.$message.warning(\'文件大小不能超过2G\')
        setTimeout(() =>
          this.$refs.uploaderRef.uploader.removeFile(file)
        , 0)
        return false

      this.computeMD5(file)
5、在父组件中调用上传方法
点击查看代码
 <hr-upload
          name="remote"
          :chunkSize="10 * 1024 * 1024"
          :action="action"
          ref="upload"
          @onFileError="onFileError"
          @needMerger="needMerger"
        ></hr-upload>
this.$refs.upload.$refs.uploaderRef.files[0].resume()
6、预览

本文来自博客园,作者:一尘子!,转载请注明原文链接:https://www.cnblogs.com/mengqc1995/p/15716584.html
以上是关于vue vue-simple-uploader 前端的简单使用的主要内容,如果未能解决你的问题,请参考以下文章