用 20 行 python 代码实现人脸识别!
Posted hanbosoft
tags:
篇首语:本文由小常识网(cha138.com)小编为大家整理,主要介绍了用 20 行 python 代码实现人脸识别!相关的知识,希望对你有一定的参考价值。
阅读文本大概需要 11分钟。
今天给大家介绍一个世界上最简洁的人脸识别库 face_recognition,你可以使用 Python 和命令行工具进行提取、识别、操作人脸。
基于业内领先的 C++ 开源库 dlib 中的深度学习模型,用 Labeled Faces in the Wild 人脸数据集进行测试,有高达99.38%的准确率。
1.安装
最好是使用 Linux 或 Mac 环境来安装,Windows 下安装会有很多问题。在安装 face_recognition 之前你需要先安装以下几个库,注意顺序!
1.1 先安装 cmake 和 boost
-
pip install cmake
-
pip install boost
复制
1.2 安装 dlib
pip install dlib
复制
此处安装可能要几分钟。如安装出错,建议使用 whl 文件来安装 下载地址:https://pypi.org/simple/dlib/
1.3 安装 face_recognition
face_recongnition 一般要配合 opencv 一起使用
-
pip install face_recognition
-
pip install opencv-python
复制
2. 人脸识别
比如这里总共有三张图片,其中有两张已知,第三张是需要识别的图片

首先获取人脸中的信息
-
kobe_image = face_recognition.load_image_file("kobe.jpg") # 已知科比照片
-
jordan_image = face_recognition.load_image_file("jordan.jpeg") # 已知乔丹照片
-
unknown_image = face_recognition.load_image_file("unkown.jpeg") # 未知照片
-
-
kobe_face_encoding = face_recognition.face_encodings(kobe_image)[0]
-
jordan_face_encoding = face_recognition.face_encodings(jordan_image)[0]
-
unknown_face_encoding = face_recognition.face_encodings(unknown_image)[0]
复制
代码中前三行分别是加载三张图片文件并返回图像的 numpy 数组,后三行返回图像中每个面部的人脸编码
然后将未知图片中的人脸和已知图片中的人脸进行对比,使用 compare_faces() 函数, 代码如下:
-
known_faces = [
-
kobe_face_encoding,
-
jordan_face_encoding
-
]
-
results = face_recognition.compare_faces(known_faces, unknown_face_encoding) # 识别结果列表
-
print("这张未知照片是科比吗? ".format(results[0]))
-
print("这张未知照片是乔丹吗? ".format(results[1]))
复制
运行结果如下:

不到二十行代码,就能识别出人脸是谁,是不是 so easy!
3. 人脸标注
仅仅识别图片中的人脸总是感觉差点什么,那么将识别出来的人脸进行姓名标注是不是更加有趣~
已知图片的识别和前面代码基本是一样的,未知图片代码多了人脸位置的识别,并使用了face_locations() 函数。代码如下:
-
face_locations = face_recognition.face_locations(unknown_image)
-
face_encodings = face_recognition.face_encodings(unknown_image, face_locations)
复制
函数传入两个参数,返回以上,右,下,左固定顺序的脸部位置列表的作用是将已知脸部位置和未知面部编码进行比较,得到欧式距离~~~具体是什么我也不知道,距离就相当于相识度。

函数说明:face_distance(face_encodings, face_to_compare)
face_encodings:已知的面部编码 face_to_compare:要比较的面部编码
本次图片前面两张没有变化,第三张换成了科比和乔丹的合影,最终运行之后结果如下:

左边是原图,右边是识别后自动标注出来的图片。
-
import face_recognition
-
from PIL import Image, ImageDraw
-
import numpy as np
-
-
-
def draws():
-
kobe_image = face_recognition.load_image_file("kobe.jpg")
-
kobe_face_encoding = face_recognition.face_encodings(kobe_image)[0]
-
-
jordan_image = face_recognition.load_image_file("jordan.jpeg")
-
jordan_face_encoding = face_recognition.face_encodings(jordan_image)[0]
-
-
known_face_encodings = [
-
kobe_face_encoding,
-
jordan_face_encoding
-
]
-
known_face_names = [
-
"Kobe",
-
"Jordan"
-
]
-
-
unknown_image = face_recognition.load_image_file("two_people.jpeg")
-
-
face_locations = face_recognition.face_locations(unknown_image)
-
face_encodings = face_recognition.face_encodings(unknown_image, face_locations)
-
-
pil_image = Image.fromarray(unknown_image)
-
draw = ImageDraw.Draw(pil_image)
-
-
for (top, right, bottom, left), face_encoding in zip(face_locations, face_encodings):
-
matches = face_recognition.compare_faces(known_face_encodings, face_encoding)
-
-
name = "Unknown"
-
-
face_distances = face_recognition.face_distance(known_face_encodings, face_encoding)
-
best_match_index = np.argmin(face_distances)
-
if matches[best_match_index]:
-
name = known_face_names[best_match_index]
-
-
draw.rectangle(((left, top), (right, bottom)), outline=(0, 0, 255))
-
-
text_width, text_height = draw.textsize(name)
-
draw.rectangle(((left, bottom - text_height - 10), (right, bottom)), fill=(0, 0, 255), outline=(0, 0, 255))
-
draw.text((left + 6, bottom - text_height - 5), name, fill=(255, 255, 255, 255))
-
-
del draw
-
pil_image.show()
-
pil_image.save("image_with_boxes.jpg")
复制
4. 给人脸美妆
这个功能需要结合 PIL 一起使用。用法都差不多,首先就是将图片文件加载到 numpy 数组中,然后将人脸中的面部所有特征识别到一个列表中
-
image = face_recognition.load_image_file("bogute.jpeg")
-
face_landmarks_list = face_recognition.face_landmarks(image)
复制
遍历列表中的元素,修改眉毛
-
d.polygon(face_landmarks[\'left_eyebrow\'], fill=(68, 54, 39, 128))
-
d.polygon(face_landmarks[\'right_eyebrow\'], fill=(68, 54, 39, 128))
-
d.line(face_landmarks[\'left_eyebrow\'], fill=(68, 54, 39, 150), width=5)
-
d.line(face_landmarks[\'right_eyebrow\'], fill=(68, 54, 39, 150), width=5)
复制
给人脸涂口红
-
d.polygon(face_landmarks[\'top_lip\'], fill=(150, 0, 0, 128))
-
d.polygon(face_landmarks[\'bottom_lip\'], fill=(150, 0, 0, 128))
-
d.line(face_landmarks[\'top_lip\'], fill=(150, 0, 0, 64), width=8)
-
d.line(face_landmarks[\'bottom_lip\'], fill=(150, 0, 0, 64), width=8)
复制
增加眼线
-
d.polygon(face_landmarks[\'left_eye\'], fill=(255, 255, 255, 30))
-
d.polygon(face_landmarks[\'right_eye\'], fill=(255, 255, 255, 30))
-
d.line(face_landmarks[\'left_eye\'] + [face_landmarks[\'left_eye\'][0]], fill=(0, 0, 0, 110), width=6)
-
d.line(face_landmarks[\'right_eye\'] + [face_landmarks[\'right_eye\'][0]], fill=(0, 0, 0, 110), wid=6)
复制
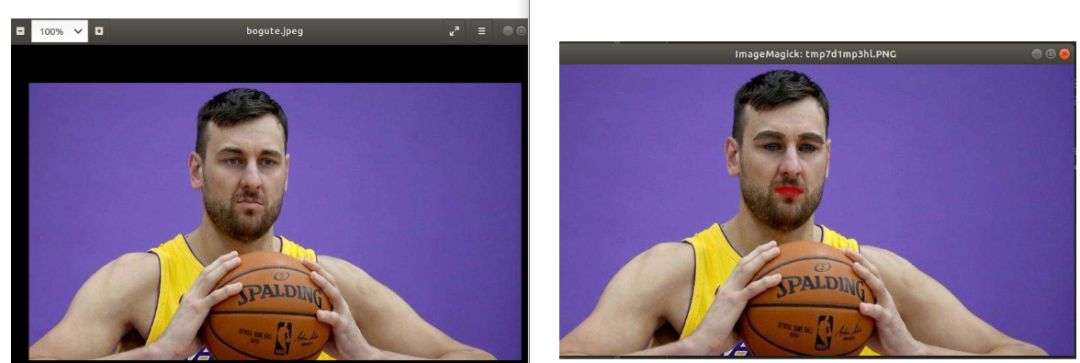
根据以上代码做了,我用实力不行,打球又脏的 "大嘴" 博格特来做演示!
左边是原图,右边是加了美妆后的效果
教你用300行Python代码实现一个人脸识别系统
用300行Python代码实现一个人脸识别系统
最近又多了不少朋友关注,先在这里谢谢大家。关注我的朋友大多数都是大学生,而且我简单看了一下,低年级的大学生居多,大多数都是为了完成课程设计,作为一个过来人,还是希望大家平时能多抽出点时间学习一下,这种临时抱佛脚的策略要少用嗷。今天我们来python实现一个人脸识别系统,主要是借助了dlib这个库,相当于我们直接调用现成的库来进行人脸识别,就省去了之前教程中的数据收集和模型训练的步骤了。
B站视频:用300行代码实现人脸识别系统_哔哩哔哩_bilibili
CSDN博客:用300行Python代码实现一个人脸识别系统_dejahu的博客-CSDN博客
码云地址:face_dlib_py37_42: 用300行代码开发一个人脸识别系统-42 (gitee.com)
预编译dlib库下载地址:人脸识别系统+windows64位-dlib-19.17.0-cp37-cp37m-win_amd64.zip-深度学习文档类资源-CSDN文库
注:直接安装dlib库可能会有编译错误,可以通过下列方式获取编译好的dlib库
-
获取方式1:
直接从付费资源下载人脸识别系统+windows64位-dlib-19.17.0-cp37-cp37m-win_amd64.zip-深度学习文档类资源-CSDN文库
-
获取方式2:
在B站视频三连并在评论区留下你的邮箱地址 -
获取方式3:
在CSDN博客中三连并在评论区留下你的邮箱地址
基本原理
人脸识别和目标检测这些还不太一样,比如大家传统的训练一个目标检测模型,你只有对这个目标训练了之后,你的模型才能找到这样的目标,比如你的目标检测模型如果是检测植物的,那显然就不能检测动物。但是人脸识别就不一样,以你的手机为例,你发现你只录入了一次你的人脸信息,不需要训练,他就能准确的识别你,这里识别的原理是通过人脸识别的模型提取你脸部的特征向量,然后将实时检测到的你的人脸同数据库中保存的人脸进行比对,如果相似度超过一定的阈值之后,就认为比对成功。不过我这里说的只是简化版本的人脸识别,现在手机和门禁这些要复杂和安全的多,也不是简单平面上的人脸识别。
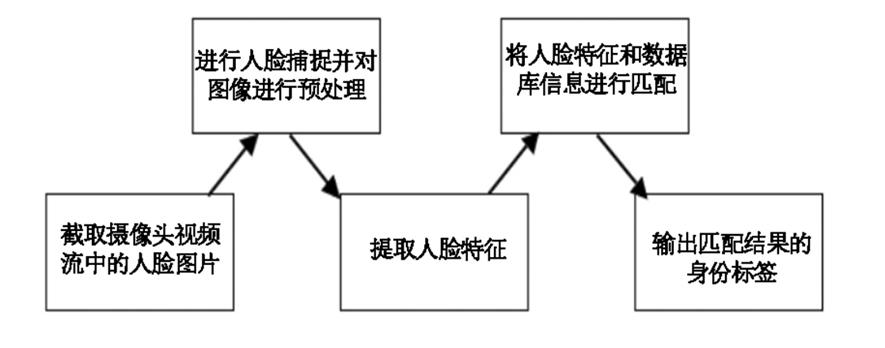
总结下来可以分为下面的步骤:
- 上传人脸到数据库
- 人脸检测
- 数据库比对并返回结果
这里我做了一个简答的示意图,可以帮助大家简单理解一下。
代码实现
废话不多说,这里就是我们的代码实现,代码我已经上传到码云,大家直接下载就行,地址就在博客开头。
不会安装python环境的兄弟请看这里:如何在pycharm中配置anaconda的虚拟环境_dejahu的博客-CSDN博客_如何在pycharm中配置anaconda
创建虚拟环境
创建虚拟环境前请大家先下载博客开头的码云源码到本地。
本次我们需要使用到python3.7的虚拟环境,命令如下:
conda create -n face python==3.7.3
conda activate face
安装必要的库
pip install -r requirements.txt
愉快地开始你的人脸识别吧!
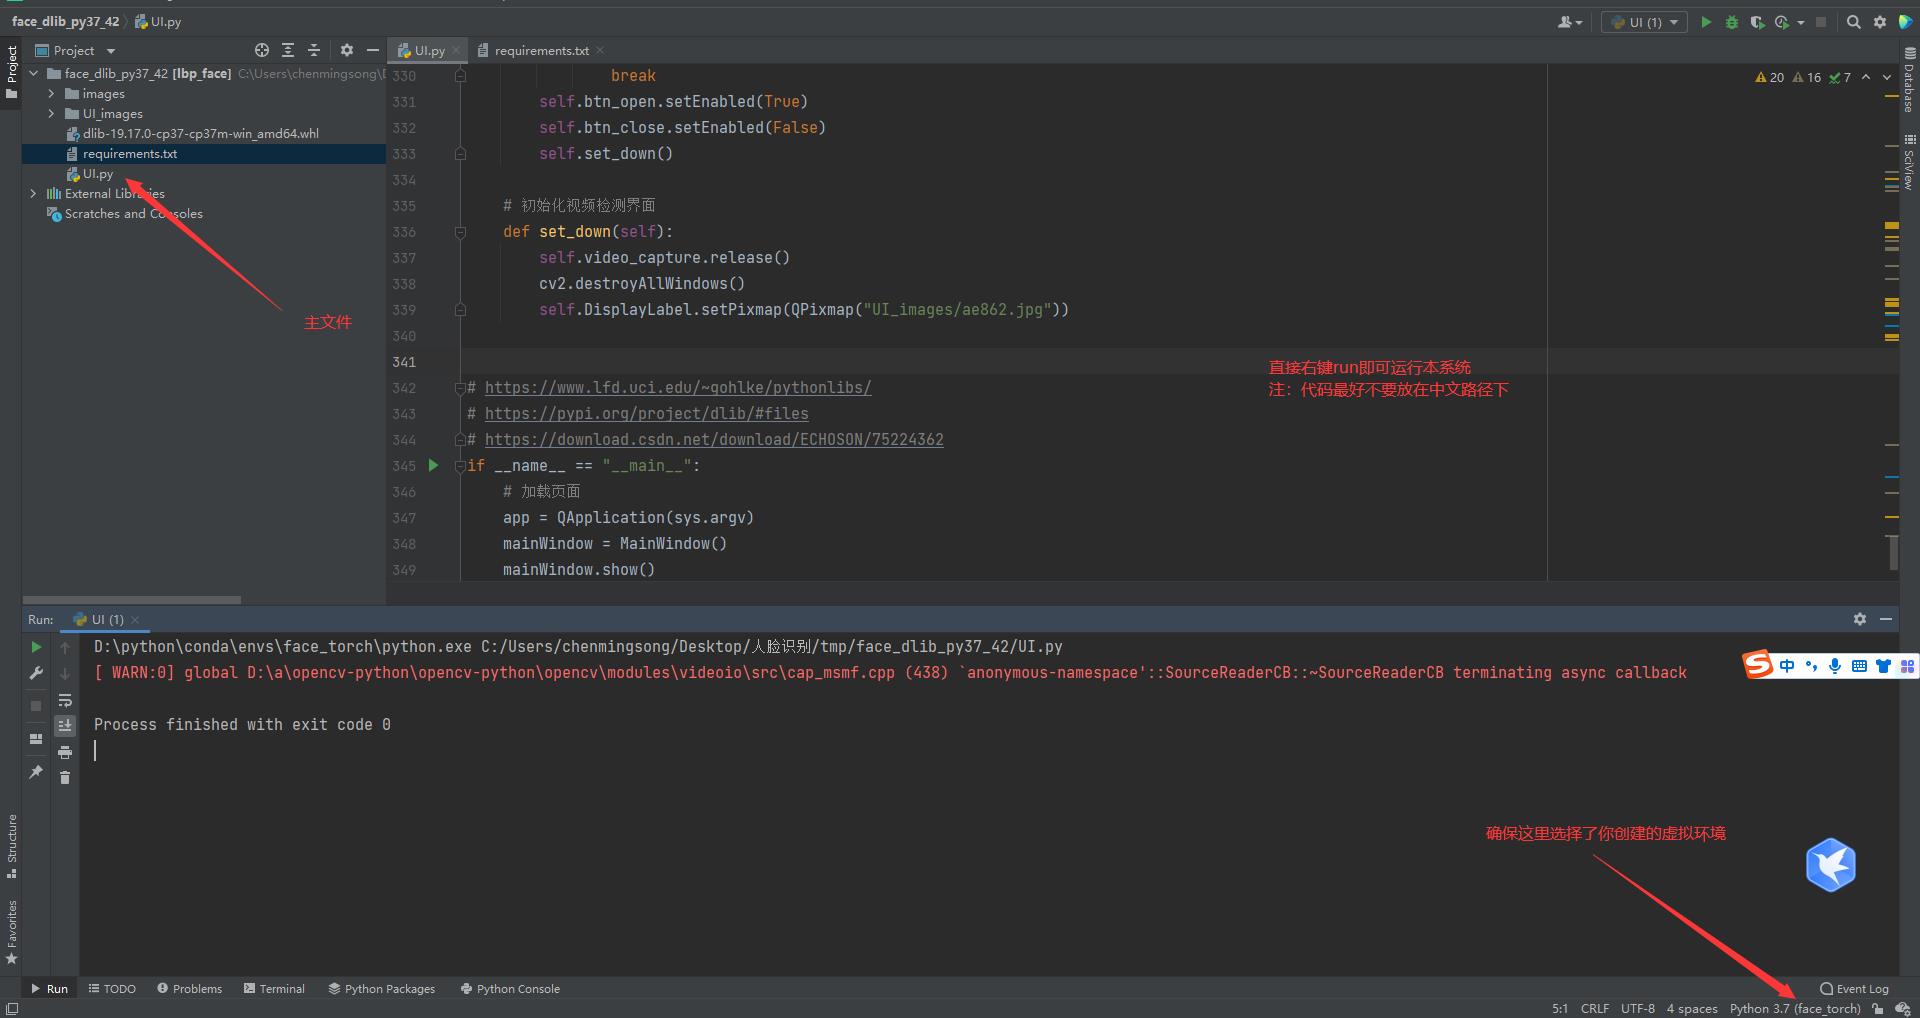
执行下面的主文件即可
python UI.py
或者在pycharm中按照下面的方式直接运行即可
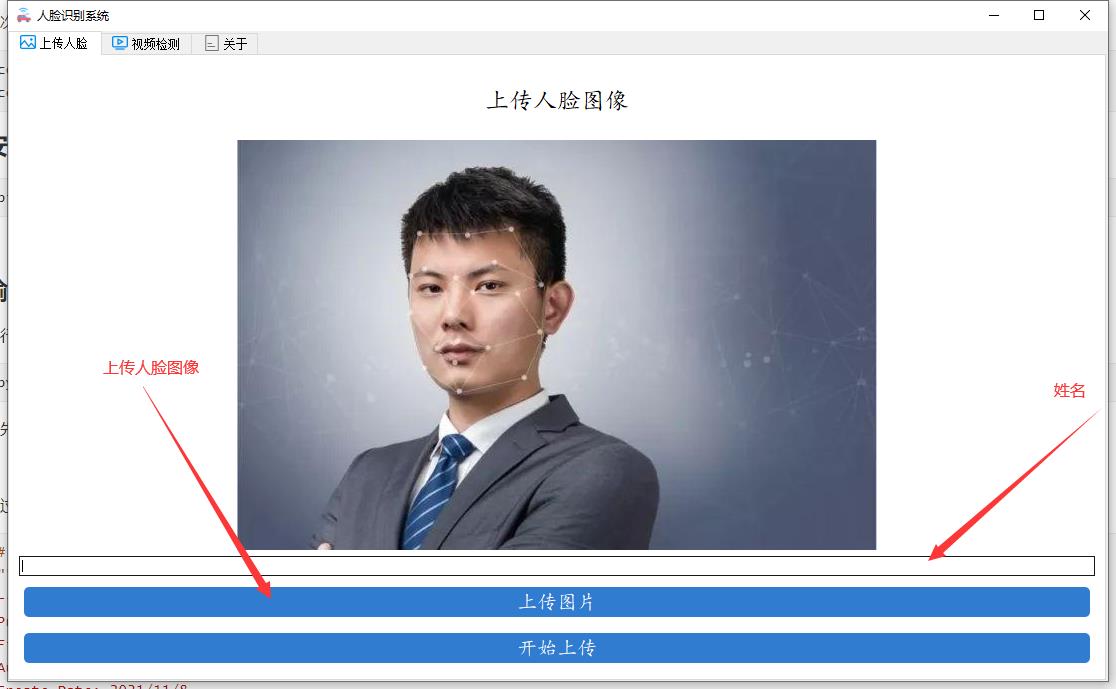
首先将你需要识别的人脸上传到数据库中
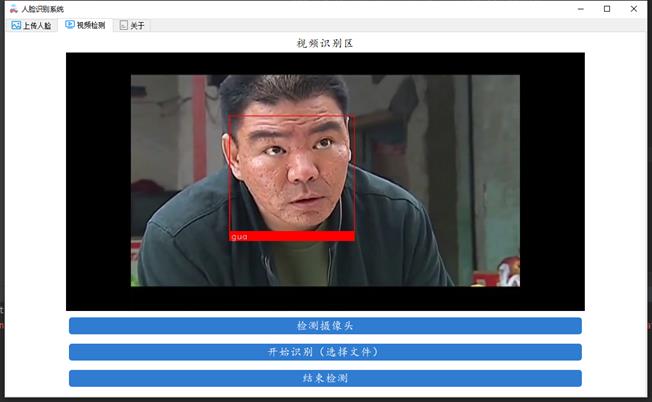
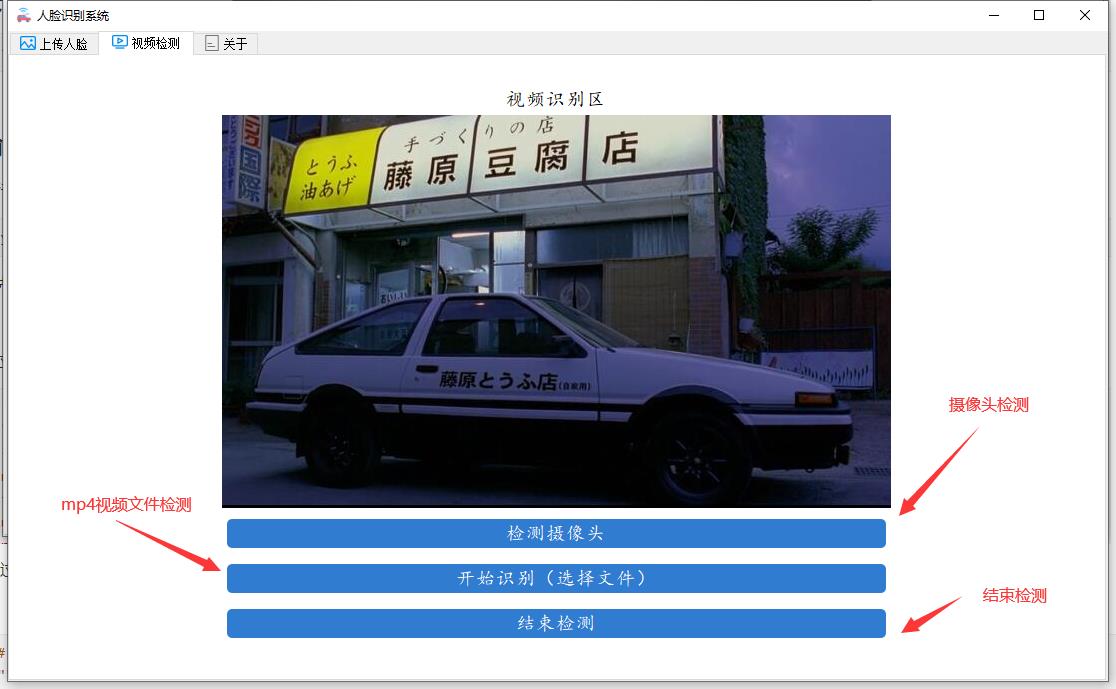
通过第二个视频检测功能识别实时的人脸
详细的代码如下:
# -*- coding: utf-8 -*-
"""
-------------------------------------------------
Project Name: yolov5-jungong
File Name: window.py.py
Author: chenming
Create Date: 2021/11/8
Description:图形化界面,可以检测摄像头、视频和图片文件
-------------------------------------------------
"""
# 应该在界面启动的时候就将模型加载出来,设置tmp的目录来放中间的处理结果
import shutil
import PyQt5.QtCore
from PyQt5.QtGui import *
from PyQt5.QtCore import *
from PyQt5.QtWidgets import *
import threading
import argparse
import os
import sys
from pathlib import Path
import cv2
import torch
import torch.backends.cudnn as cudnn
import os.path as osp
FILE = Path(__file__).resolve()
ROOT = FILE.parents[0] # YOLOv5 root directory
if str(ROOT) not in sys.path:
sys.path.append(str(ROOT)) # add ROOT to PATH
ROOT = Path(os.path.relpath(ROOT, Path.cwd())) # relative
from models.common import DetectMultiBackend
from utils.datasets import IMG_FORMATS, VID_FORMATS, LoadImages, LoadStreams
from utils.general import (LOGGER, check_file, check_img_size, check_imshow, check_requirements, colorstr,
increment_path, non_max_suppression, print_args, scale_coords, strip_optimizer, xyxy2xywh)
from utils.plots import Annotator, colors, save_one_box
from utils.torch_utils import select_device, time_sync
# 添加一个关于界面
# 窗口主类
class MainWindow(QTabWidget):
# 基本配置不动,然后只动第三个界面
def __init__(self):
# 初始化界面
super().__init__()
self.setWindowTitle('Target detection system')
self.resize(1200, 800)
self.setWindowIcon(QIcon("images/UI/lufei.png"))
# 图片读取进程
self.output_size = 480
self.img2predict = ""
self.device = 'cpu'
# # 初始化视频读取线程
self.vid_source = '0' # 初始设置为摄像头
self.stopEvent = threading.Event()
self.webcam = True
self.stopEvent.clear()
self.model = self.model_load(weights="runs/train/exp_yolov5s/weights/best.pt",
device="cpu") # todo 指明模型加载的位置的设备
self.initUI()
self.reset_vid()
'''
***模型初始化***
'''
@torch.no_grad()
def model_load(self, weights="", # model.pt path(s)
device='', # cuda device, i.e. 0 or 0,1,2,3 or cpu
half=False, # use FP16 half-precision inference
dnn=False, # use OpenCV DNN for ONNX inference
):
device = select_device(device)
half &= device.type != 'cpu' # half precision only supported on CUDA
device = select_device(device)
model = DetectMultiBackend(weights, device=device, dnn=dnn)
stride, names, pt, jit, onnx = model.stride, model.names, model.pt, model.jit, model.onnx
# Half
half &= pt and device.type != 'cpu' # half precision only supported by PyTorch on CUDA
if pt:
model.model.half() if half else model.model.float()
print("模型加载完成!")
return model
'''
***界面初始化***
'''
def initUI(self):
# 图片检测子界面
font_title = QFont('楷体', 16)
font_main = QFont('楷体', 14)
# 图片识别界面, 两个按钮,上传图片和显示结果
img_detection_widget = QWidget()
img_detection_layout = QVBoxLayout()
img_detection_title = QLabel("图片识别功能")
img_detection_title.setFont(font_title)
mid_img_widget = QWidget()
mid_img_layout = QHBoxLayout()
self.left_img = QLabel()
self.right_img = QLabel()
self.left_img.setPixmap(QPixmap("images/UI/up.jpeg"))
self.right_img.setPixmap(QPixmap("images/UI/right.jpeg"))
self.left_img.setAlignment(Qt.AlignCenter)
self.right_img.setAlignment(Qt.AlignCenter)
mid_img_layout.addWidget(self.left_img)
mid_img_layout.addStretch(0)
mid_img_layout.addWidget(self.right_img)
mid_img_widget.setLayout(mid_img_layout)
up_img_button = QPushButton("上传图片")
det_img_button = QPushButton("开始检测")
up_img_button.clicked.connect(self.upload_img)
det_img_button.clicked.connect(self.detect_img)
up_img_button.setFont(font_main)
det_img_button.setFont(font_main)
up_img_button.setStyleSheet("QPushButtoncolor:white"
"QPushButton:hoverbackground-color: rgb(2,110,180);"
"QPushButtonbackground-color:rgb(48,124,208)"
"QPushButtonborder:2px"
"QPushButtonborder-radius:5px"
"QPushButtonpadding:5px 5px"
"QPushButtonmargin:5px 5px")
det_img_button.setStyleSheet("QPushButtoncolor:white"
"QPushButton:hoverbackground-color: rgb(2,110,180);"
"QPushButtonbackground-color:rgb(48,124,208)"
"QPushButtonborder:2px"
"QPushButtonborder-radius:5px"
"QPushButtonpadding:5px 5px"
"QPushButtonmargin:5px 5px")
img_detection_layout.addWidget(img_detection_title, alignment=Qt.AlignCenter)
img_detection_layout.addWidget(mid_img_widget, alignment=Qt.AlignCenter)
img_detection_layout.addWidget(up_img_button)
img_detection_layout.addWidget(det_img_button)
img_detection_widget.setLayout(img_detection_layout)
# todo 视频识别界面
# 视频识别界面的逻辑比较简单,基本就从上到下的逻辑
vid_detection_widget = QWidget()
vid_detection_layout = QVBoxLayout()
vid_title = QLabel("视频检测功能")
vid_title.setFont(font_title)
self.vid_img = QLabel()
self.vid_img.setPixmap(QPixmap("images/UI/up.jpeg"))
vid_title.setAlignment(Qt.AlignCenter)
self.vid_img.setAlignment(Qt.AlignCenter)
self.webcam_detection_btn = QPushButton("摄像头实时监测")
self.mp4_detection_btn = QPushButton("视频文件检测")
self.vid_stop_btn = QPushButton("停止检测")
self.webcam_detection_btn.setFont(font_main)
self.mp4_detection_btn.setFont(font_main)
self.vid_stop_btn.setFont(font_main)
self.webcam_detection_btn.setStyleSheet("QPushButtoncolor:white"
"QPushButton:hoverbackground-color: rgb(2,110,180);"
"QPushButtonbackground-color:rgb(48,124,208)"
"QPushButtonborder:2px"
"QPushButtonborder-radius:5px"
"QPushButtonpadding:5px 5px"
"QPushButtonmargin:5px 5px")
self.mp4_detection_btn.setStyleSheet("QPushButtoncolor:white"
"QPushButton:hoverbackground-color: rgb(2,110,180);"
"QPushButtonbackground-color:rgb(48,124,208)"
"QPushButtonborder:2px"
"QPushButtonborder-radius:5px"
"QPushButtonpadding:5px 5px"
"QPushButtonmargin:5px 5px")
self.vid_stop_btn.setStyleSheet("QPushButtoncolor:white"
"QPushButton:hoverbackground-color: rgb(2,110,180);"
"QPushButtonbackground-color:rgb(48,124,208)"
"QPushButtonborder:2px"
"QPushButtonborder-radius:5px"
"QPushButtonpadding:5px 5px"
"QPushButtonmargin:5px 5px")
self.webcam_detection_btn.clicked.connect(self.open_cam)
self.mp4_detection_btn.clicked.connect(self.open_mp4)
self.vid_stop_btn.clicked.connect(self.close_vid)
# 添加组件到布局上
vid_detection_layout.addWidget(vid_title)
vid_detection_layout.addWidget(self.vid_img)
vid_detection_layout.addWidget(self.webcam_detection_btn)
vid_detection_layout.addWidget(self.mp4_detection_btn)
vid_detection_layout.addWidget(self.vid_stop_btn)
vid_detection_widget.setLayout(vid_detection_layout)
# todo 关于界面
about_widget = QWidget()
about_layout = QVBoxLayout()
about_title = QLabel('欢迎使用目标检测系统\\n\\n 提供付费指导:有需要的好兄弟加下面的QQ即可') # todo 修改欢迎词语
about_title.setFont(QFont('楷体', 18))
about_title.setAlignment(Qt.AlignCenter)
about_img = QLabel()
about_img.setPixmap(QPixmap('images/UI/qq.png'))
about_img.setAlignment(Qt.AlignCenter)
# label4.setText("<a href='https://oi.wiki/wiki/学习率的调整'>如何调整学习率</a>")
label_super = QLabel() # todo 更换作者信息
label_super.setText("<a href='https://blog.csdn.net/ECHOSON'>或者你可以在这里找到我-->肆十二</a>")
label_super.setFont(QFont('楷体', 16))
label_super.setOpenExternalLinks(True)
# label_super.setOpenExternalLinks(True)
label_super.setAlignment(Qt.AlignRight)
about_layout.addWidget(about_title)
about_layout.addStretch()
about_layout.addWidget(about_img)
about_layout.addStretch()
about_layout.addWidget(label_super)
about_widget.setLayout(about_layout)
self.left_img.setAlignment(Qt.AlignCenter)
self.addTab(img_detection_widget, '图片检测')
self.addTab(vid_detection_widget, '视频检测')
self.addTab(about_widget, '联系我')
self.setTabIcon(0, QIcon('images/UI/lufei.png'))
self.setTabIcon(1, QIcon('images/UI/lufei.png'))
self.setTabIcon(2, QIcon('images/UI/lufei.png'))
'''
***上传图片***
'''
def upload_img(self):
# 选择录像文件进行读取
fileName, fileType = QFileDialog.getOpenFileName(self, 'Choose file', '', '*.jpg *.png *.tif *.jpeg')
if fileName:
suffix = fileName.split(".")[-1]
save_path = osp.join("images/tmp", "tmp_upload." + suffix)
shutil.copy(fileName, save_path)
# 应该调整一下图片的大小,然后统一防在一起
im0 = cv2.imread(save_path)
resize_scale = self.output_size / im0.shape[0]
im0 = cv2.resize(im0, (0, 0), fx=resize_scale, fy=resize_scale)
cv2.imwrite("images/tmp/upload_show_result.jpg", im0)
# self.right_img.setPixmap(QPixmap("images/tmp/single_result.jpg"))
self.img2predict = fileName
self.left_img.setPixmap(QPixmap("images/tmp/upload_show_result.jpg"))
# todo 上传图片之后右侧的图片重置,
self.right_img.setPixmap(QPixmap("images/UI/right.jpeg"))
'''
***检测图片***
'''
def detect_img(self):
model = self.model
output_size = self.output_size
source = self.img2predict # file/dir/URL/glob, 0 for webcam
imgsz = 640 # inference size (pixels)
conf_thres = 0.25 # confidence threshold
iou_thres = 0.45 # NMS IOU threshold
max_det = 1000 # maximum detections per image
device = self.device # cuda device, i.e. 0 or 0,1,2,3 or cpu
view_img = False # show results
save_txt = False # save results to *.txt
save_conf = False # save confidences in --save-txt labels
save_crop = False # save cropped prediction boxes
nosave = False # do not save images/videos
classes = None # filter by class: --class 0, or --class 0 2 3
agnostic_nms = False # class-agnostic NMS
augment = False # ugmented inference
visualize = False # visualize features
line_thickness = 3 # bounding box thickness (pixels)
hide_labels = False # hide labels
hide_conf = False # hide confidences
half = False # use FP16 half-precision inference
dnn = False # use OpenCV DNN for ONNX inference
print(source)
if source == "":
QMessageBox.warning(self, "请上传", "请先上传图片再进行检测")
else:
source = str(source)
device = select_device(self.device)
webcam = False
stride, names, pt, jit, onnx = model.stride, model.names, model.pt, model.jit, model.onnx
imgsz = check_img_size(imgsz, s=stride) # check image size
save_img = not nosave and not source.endswith('.txt') # save inference images
# Dataloader
if webcam:
view_img = check_imshow()
cudnn.benchmark = True # set True to speed up constant image size inference
dataset = LoadStreams(source, img_size=imgsz, stride=stride, auto=pt and not jit)
bs = len(dataset) # batch_size
else:
dataset = LoadImages(source, img_size=imgsz, stride=stride, auto=pt and not jit)
bs = 1 # batch_size
vid_path, vid_writer = [None] * bs, [None] * bs
# Run inference
if pt and device.type != 'cpu':
model(torch.zeros(1, 3, *imgsz).to(device).type_as(next(model.model.parameters()))) # warmup
dt, seen = [0.0, 0.0, 0.0], 0
for path, im, im0s, vid_cap, s in dataset:
t1 = time_sync()
im = torch.from_numpy(im).to(device)
im = im.half() if half else im.float() # uint8 to fp16/32
im /= 255 # 0 - 255 to 0.0 - 1.0
if len(im.shape) == 3:
im = im[None] # expand for batch dim
t2 = time_sync()
dt[0] += t2 - t1
# Inference
# visualize = increment_path(save_dir / Path(path).stem, mkdir=True) if visualize else False
pred = model(im, augment=augment, visualize=visualize)
t3 = time_sync()
dt[1] += t3 - t2
# NMS
pred = non_max_suppression(pred, conf_thres, iou_thres, classes, agnostic_nms, max_det=max_det)
dt[2] += time_sync() - t3
# Second-stage classifier (optional)
# pred = utils.general.apply_classifier(pred, classifier_model, im, im0s)
# Process predictions
for i, det in enumerate(pred): # per image
seen += 1
if webcam: # batch_size >= 1
p, im0, frame = path[i], im0s[i].copy(), dataset.count
s += f'i: '
else:
p, im0, frame = path, im0s.copy(), getattr(dataset, 'frame'以上是关于用 20 行 python 代码实现人脸识别!的主要内容,如果未能解决你的问题,请参考以下文章
25 行 Python 代码实现人脸识别——OpenCV 技术教程
