最简单的人脸检测(免费调用百度AI开放平台接口)
Posted 程序员欣宸
tags:
篇首语:本文由小常识网(cha138.com)小编为大家整理,主要介绍了最简单的人脸检测(免费调用百度AI开放平台接口)相关的知识,希望对你有一定的参考价值。
欢迎访问我的GitHub
这里分类和汇总了欣宸的全部原创(含配套源码):https://github.com/zq2599/blog_demos
本篇概览
- 在检测人脸数量、位置、性别、口罩等场景时,可以考虑使用百度开放平台提供的web接口,一个web请求就能完成检测得到结果,本篇记录了从申请到真实调用的完整过程,由以下步骤组成:

注册百度账号
- 按照您的实际情况,注册个人或者企业账号,这个不多说了
登录百度智能云
- 使用刚才注册号的账号登录,地址是:https://login.bce.baidu.com/
实名认证
- 打开百度智能云的控制台:https://console.bce.baidu.com/
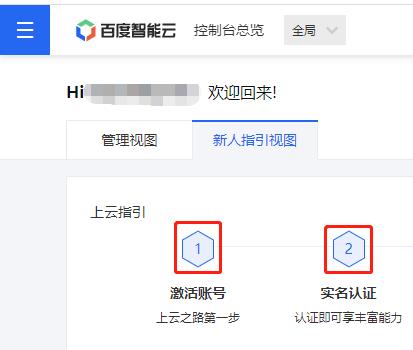
- 如下图,点击下图红框中的两个按钮,完成激活和实名认证:
创建应用
- 为了能够使用百度服务,需要创建一个应用
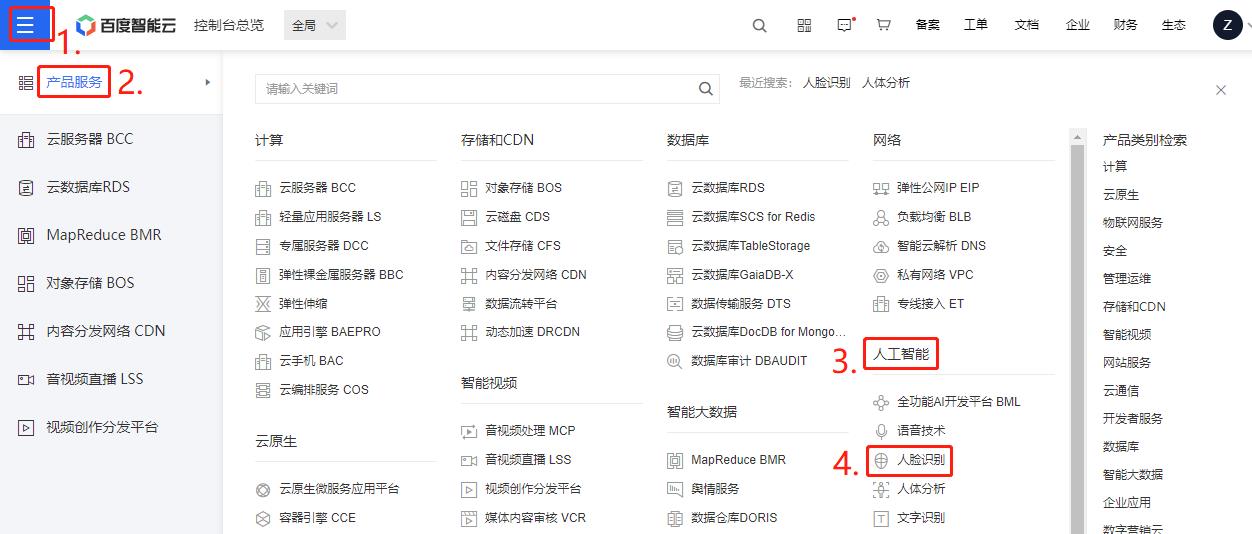
- 先选择类别,在控制台页面,操作如下图,点击红框四:
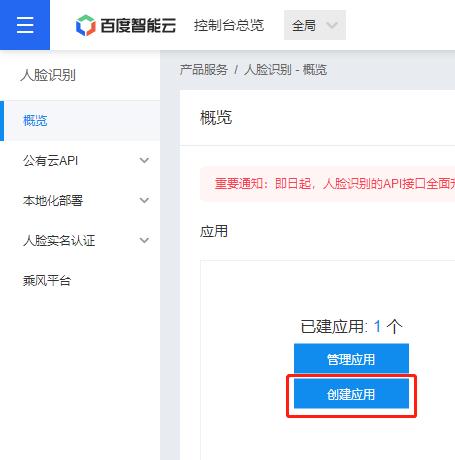
- 此刻已跳转到管理引用的页面,点击下图红框中的创建应用
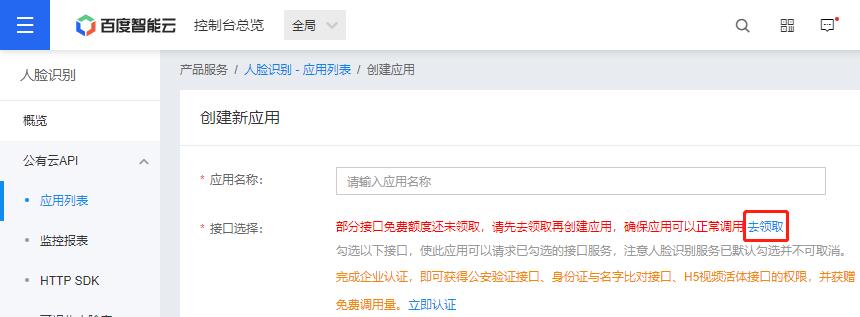
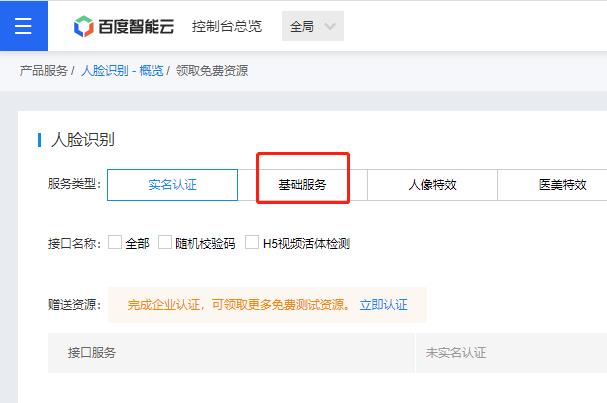
- 为了免费使用百度的服务,先点击下图红框中的去领取:
- 在领取页面勾选人脸检测:
- 领取完成后,回到创建应用的页面,发现这些服务已经被勾选,如下图:
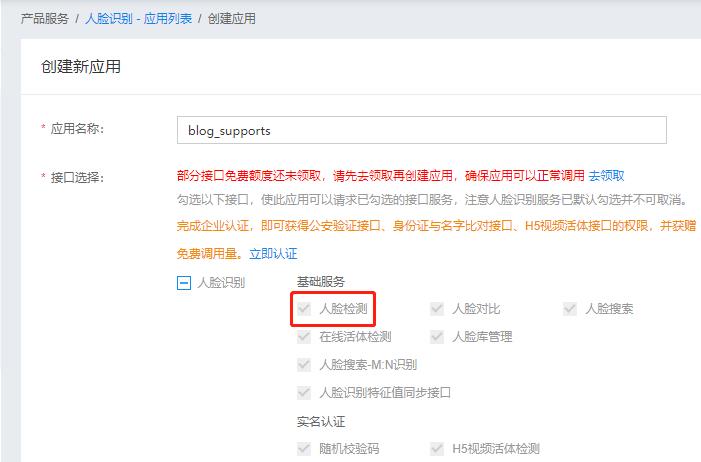
- 应用相关的信息填写完成后,提交表单即可完成创建应用
拿到API Key和Secret Key
- 在应用列表页面拿到API Key和Secret Key,这些都是调用百度服务的关键授权信息,如下图红框所示:

得到access_token
- 在使用百度提供的各种服务(如人脸检测)的时候,需要带上授权信息证明你有使用该服务的权限,这个授权信息就是access_token
- 最简单的方式就是curl命令获取
curl -i -k 'https://aip.baidubce.com/oauth/2.0/token?grant_type=client_credentials&client_id=【百度云应用的API Key】&client_secret=【百度云应用的Secret Key】'
- 这里用postman尝试上述请求,如下图,红框中就是这次请求咱们要得到的access_token信息:
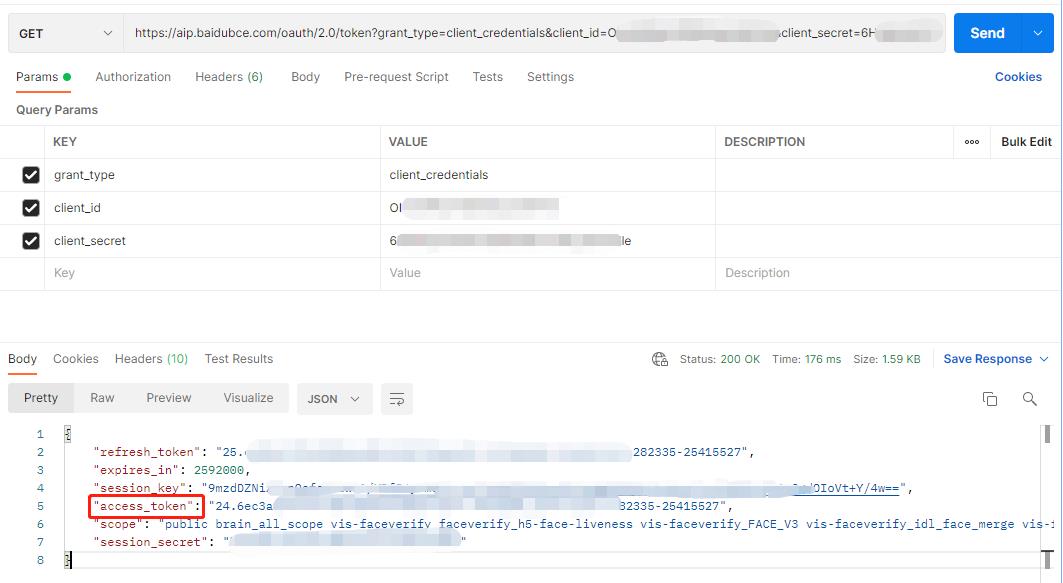
- 拿到access_token,就可以开始的调用百度的服务了,如下图,官方文档说了这个access_token的有效期是30天:

- 关于百度云授权信息的更多信息请在此查看:https://cloud.baidu.com/doc/FACE/s/Tkqahnjtk
编码
- 百度关于人脸检测的文档:https://ai.baidu.com/ai-doc/FACE/yk37c1u4t
- 人脸检测服务是个web接口,也能通过操作curl或者postman来完成,但是为了在代码中使用百度的服务,这里写一段代码来完成人脸检测
- 今天的项目是个普通的maven工程,没有使用spring或者spingboot框架,只有一些简单的java类和main方法
- 首先要在项目中引入下面三个库:
<!-- 快捷代码辅助库 -->
 <dependency>
	<groupId>org.projectlombok</groupId>
    <artifactId>lombok</artifactId>
    <version>1.18.18</version>
</dependency>
<!-- 网络请求库 -->
<dependency>
	<groupId>com.squareup.okhttp3</groupId>
	<artifactId>okhttp</artifactId>
	<version>3.10.0</version>
</dependency>
<!-- JSON处理 -->
<dependency>
	<groupId>com.fasterxml.jackson.core</groupId>
	<artifactId>jackson-databind</artifactId>
	<version>2.11.0</version>
</dependency>
- 先新建一个对象FaceDetectRequest.java,用于保存请求参数:
package com.bolingcavalry.grabpush.bean.request;

import com.fasterxml.jackson.annotation.JsonProperty;
import lombok.Data;

/**
 * @author willzhao
 * @version 1.0
 * @description 请求对象
 * @date 2022/1/1 16:21
 */
@Data
public class FaceDetectRequest
    // 图片信息(总数据大小应小于10M),图片上传方式根据image_type来判断
    String image;

    // 图片类型
    // BASE64:图片的base64值,base64编码后的图片数据,编码后的图片大小不超过2M;
    // URL:图片的 URL地址( 可能由于网络等原因导致下载图片时间过长);
    // FACE_TOKEN: 人脸图片的唯一标识,调用人脸检测接口时,会为每个人脸图片赋予一个唯一的FACE_TOKEN,同一张图片多次检测得到的FACE_TOKEN是同一个。
    @JsonProperty("image_type")
    String imageType;

    // 包括age,expression,face_shape,gender,glasses,landmark,landmark150,quality,eye_status,emotion,face_type,mask,spoofing信息
    //逗号分隔. 默认只返回face_token、人脸框、概率和旋转角度
    @JsonProperty("face_field")
    String faceField;

    // 最多处理人脸的数目,默认值为1,根据人脸检测排序类型检测图片中排序第一的人脸(默认为人脸面积最大的人脸),最大值120
    @JsonProperty("max_face_num")
    int maxFaceNum;

    // 人脸的类型
    // LIVE表示生活照:通常为手机、相机拍摄的人像图片、或从网络获取的人像图片等
    // IDCARD表示身份证芯片照:二代身份证内置芯片中的人像照片
    // WATERMARK表示带水印证件照:一般为带水印的小图,如公安网小图
    // CERT表示证件照片:如拍摄的身份证、工卡、护照、学生证等证件图片
    // 默认LIVE
    @JsonProperty("face_type")
    String faceType;

    // 活体控制 检测结果中不符合要求的人脸会被过滤
    // NONE: 不进行控制
    // LOW:较低的活体要求(高通过率 低攻击拒绝率)
    // NORMAL: 一般的活体要求(平衡的攻击拒绝率, 通过率)
    // HIGH: 较高的活体要求(高攻击拒绝率 低通过率)
    // 默认NONE
    @JsonProperty("liveness_control")
    String livenessControl;

    // 人脸检测排序类型
    // 0:代表检测出的人脸按照人脸面积从大到小排列
    // 1:代表检测出的人脸按照距离图片中心从近到远排列
    // 默认为0
    @JsonProperty("face_sort_type")
    int faceSortType;
- 其次是响应对象FaceDetectResponse.java:
package com.bolingcavalry.grabpush.bean.response;

import com.fasterxml.jackson.annotation.JsonProperty;
import lombok.Data;
import lombok.ToString;

import java.io.Serializable;
import java.util.List;

/**
 * @author willzhao
 * @version 1.0
 * @description TODO
 * @date 2022/1/1 13:30
 */
@Data
@ToString
public class FaceDetectResponse implements Serializable
    // 返回码
    @JsonProperty("error_code")
    String errorCode;
    // 描述信息
    @JsonProperty("error_msg")
    String errorMsg;
    // 返回的具体内容
    Result result;

    /**
     * @author willzhao
     * @version 1.0
     * @description 返回的具体内容
     * @date 2022/1/1 16:01
     */
    @Data
    public static class Result
        // 人脸数量
        @JsonProperty("face_num")
        private int faceNum;
        // 每个人脸的信息
        @JsonProperty("face_list")
        List<Face> faceList;

        /**
         * @author willzhao
         * @version 1.0
         * @description 检测出来的人脸对象
         * @date 2022/1/1 16:03
         */
        @Data
        public static class Face
            // 位置
            Location location;
            // 是人脸的置信度
            @JsonProperty("face_probability")
            double face_probability;
            // 口罩
            Mask mask;

            /**
             * @author willzhao
             * @version 1.0
             * @description 人脸在图片中的位置
             * @date 2022/1/1 16:04
             */
            @Data
            public static class Location
                double left;
                double top;
                double width;
                double height;
                double rotation;


            /**
             * @author willzhao
             * @version 1.0
             * @description 口罩对象
             * @date 2022/1/1 16:11
             */
            @Data
            public static class Mask
                int type;
                double probability;
- 这里有一处要注意:FaceDetectResponse对象中的字段是少于真实响应返回的字段的,这是因为这个demo不需要完整的返回内容,因此只要选择应用需要的字段定义在FaceDetectResponse.java中即可
- 最后是完整的服务类BaiduCloudService.java,如下所示,即读取图片 -> 转base64 -> 构造请求对象 -> 提交请求 -> 收到响应 -> 解析响应:
package com.bolingcavalry.grabpush.extend;

import com.bolingcavalry.grabpush.bean.request.FaceDetectRequest;
import com.bolingcavalry.grabpush.bean.response.FaceDetectResponse;
import com.fasterxml.jackson.databind.DeserializationFeature;
import com.fasterxml.jackson.databind.ObjectMapper;
import okhttp3.*;
import sun.misc.BASE64Encoder;
import java.io.FileInputStream;
import java.io.IOException;
import java.io.InputStream;

/**
 * @author willzhao
 * @version 1.0
 * @description 百度云服务的调用
 * @date 2022/1/1 11:06
 */
public class BaiduCloudService

    // 转换
    BASE64Encoder encoder = new BASE64Encoder();

    OkHttpClient client = new OkHttpClient();

    static final MediaType JSON = MediaType.parse("application/json; charset=utf-8");

    static final String URL_TEMPLATE = "https://aip.baidubce.com/rest/2.0/face/v3/detect?access_token=%s";

    String token;

    ObjectMapper mapper = new ObjectMapper();

    public BaiduCloudService(String token)
        this.token = token;

        // 重要:反序列化的时候,字符的字段如果比类的字段多,下面这个设置可以确保反序列化成功
        mapper.disable(DeserializationFeature.FAIL_ON_UNKNOWN_PROPERTIES);


    /**
     * 将指定位置的图片转为base64字符串
     * @param imagePath
     * @return
     */
    private String img2Base64(String imagePath)
        InputStream inputStream = null;
        byte[] data = null;

        try
            inputStream = new FileInputStream(imagePath);
            data = new byte[inputStream.available()];
            inputStream.read(data);
            inputStream.close();
         catch (IOException ioException)
            ioException.printStackTrace();


        return null==data ? null :encoder.encode(data);


    /**
     * 检测指定的图片
     * @param imageBase64
     * @return
     */
    public FaceDetectResponse detect(String imageBase64)
        // 请求对象
        FaceDetectRequest faceDetectRequest = new FaceDetectRequest();
        faceDetectRequest.setImageType("BASE64");
        faceDetectRequest.setFaceField("mask");
        faceDetectRequest.setMaxFaceNum(6);
        faceDetectRequest.setFaceType("LIVE");
        faceDetectRequest.setLivenessControl("NONE");
        faceDetectRequest.setFaceSortType(0);
        faceDetectRequest.setImage(imageBase64);

        FaceDetectResponse faceDetectResponse = null;

        try
            // 用Jackson将请求对象序列化成字符串
            String jsonContent = mapper.writeValueAsString(faceDetectRequest);

            //
            RequestBody requestBody = RequestBody.create(JSON, jsonContent);
            Request request = new Request
                    .Builder()
                    .url(String.format(URL_TEMPLATE, token))
                    .post(requestBody)
                    .build();
            Response response = client.newCall(request).execute();
            String rawRlt = response.body().string();
            faceDetectResponse = mapper.readValue(rawRlt, FaceDetectResponse.class);
         catch (IOException ioException)
            ioException.printStackTrace();


        return faceDetectResponse;


    public static void main(String[] args)
        // 图片在本地的位置
        String imagePath = "E:\\\\temp\\\\202201\\\\01\\\\pic\\\\1.jpeg";

        // 百度云的token,是通过此接口得到的:https://aip.baidubce.com/oauth/2.0/token
        String token = "24.95xxxxxxxxxxxxxxxxxxxxxxxxxxxxxx.xxxxxxx.xxxxxxxxxx.xxxxxx-xxxxxxxx";

        // 实例化服务对象
        BaiduCloudService service = new BaiduCloudService(token);

        // 将图片转为base64字符串
        String imageBase64 = service.img2Base64(imagePath);

        // 向百度服务发请求,检测人脸
        FaceDetectResponse faceDetectResponse = service.detect(imageBase64);

        // 输出检测结果
        System.out.println(faceDetectResponse);
- 确保用于检测的照片与上述代码中的路径一致(E:\\temp\\202201\\01\\pic\\1.jpeg),我这里选用了一张戴口罩的单人照,如下图:

- 执行BaiduCloudService的main方法,控制台将百度返回的检测结果打印出来,注意下面的内容并非JSON,而是lombok的@ToString注解拼接出的效果:
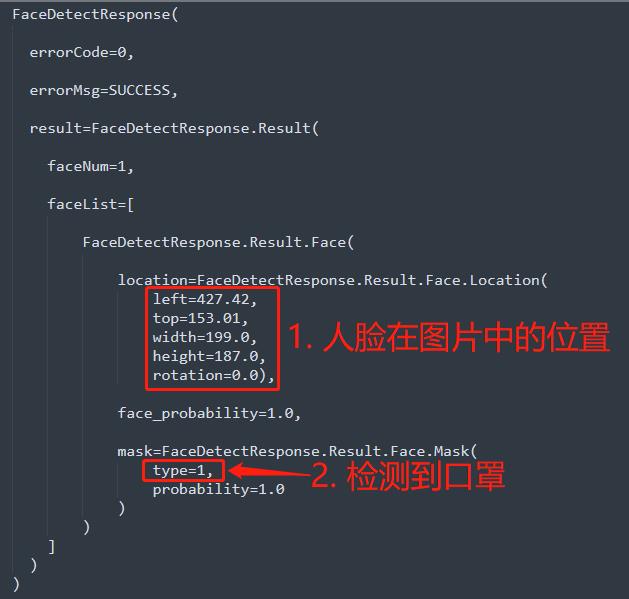
- 至此,通过百度的web接口调用人脸检测的实战已完成,可见有了云平台的支持,对于使用方来说开发过程变得非常简单
使用限制
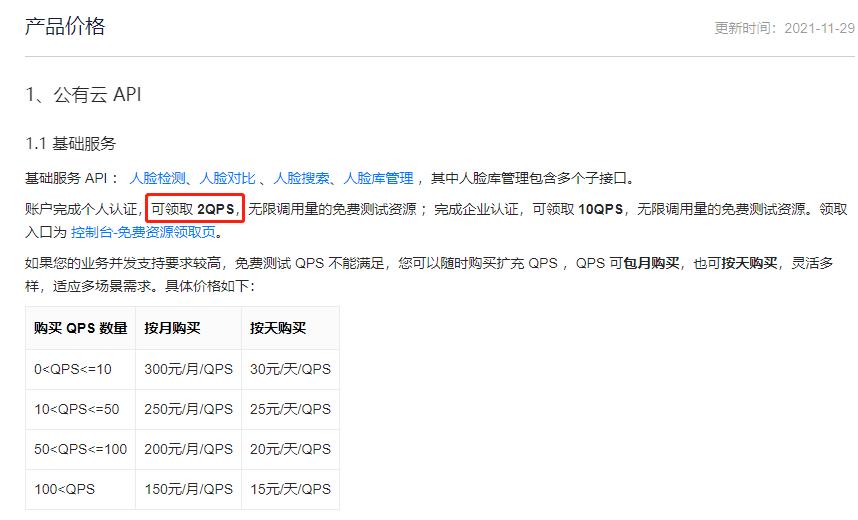
- 既然是免费的,就很难十全十美,这样的web服务存在QPS限制,如下图,一秒钟不能超过两个,如果完成了企业认证,可以增加到十个,如果依旧不能满足需要,就只能付费了:
你不孤单,欣宸原创一路相伴
以上是关于最简单的人脸检测(免费调用百度AI开放平台接口)的主要内容,如果未能解决你的问题,请参考以下文章