微信小程序之旅一(页面渲染)
Posted powermg
tags:
篇首语:本文由小常识网(cha138.com)小编为大家整理,主要介绍了微信小程序之旅一(页面渲染)相关的知识,希望对你有一定的参考价值。
1、微信小程序条件渲染(wx:if):使用wx:if={{Boolean}}来判断是否需要渲染该代码块,使用wx:elif和wx:eise来渲染else块
<view wx:if="{{isShow}}" class=‘item‘>
{{title}}
</view>
2、微信小程序多组件条件渲染(block wx:if):使用<block wx:if="{{Boolean}}"><view></view>…</block>来实现多组件条件渲染
 <block wx:if="{{isShow}}">
      <view class=‘item‘>
        <view>
          <image src=‘{{img}}‘ style=‘width:75px; height:58px‘></image>
        </view>
        <view class=‘desc‘>
          <view class=‘title‘>{{title}}</view>
          <view class=‘count‘>
            <view>{{type}}</view>
            <view class=‘liulan‘>{{liulan}}</view>
            <view class=‘pinglun‘>{{pinglun}}</view>
          </view>
        </view>
      </view>
    </block>
3、微信小程序列表渲染(wx:for):使用wx:for={{Array}}来渲染列表,使用wx:for-index指定当前下表变量名,使用wx:for-item指定当前元素变量名
 <view wx:for="{{array}}" wx:for-item="aitem" wx:for-index="aindex">
    <view>{{aitem.title}}</view>
  </view>
4、微信小程序多组件列表渲染(block wx:for):使用<block wx:for="{{Array}}"><view></view>…</block>来实现多组件列表渲染
<block wx:for="{{array}}">
      <view class=‘item‘ bindtap=‘seeDetail‘ id="0">
        <view>
          <image src=‘{{item.img}}‘ style=‘width:75px; height:58px‘></image>
        </view>
        <view class=‘desc‘>
          <view class=‘title‘>{{item.title}}</view>
          <view class=‘count‘>
            <view>{{item.type}}</view>
            <view class=‘liulan‘>{{item.liulan}}</view>
            <view class=‘pinglun‘>{{item.pinglun}}</view>
          </view>
        </view>
      </view>
    </block>
5、微信小程序指定唯一标识(wx:key)
6、微信小程序定义模板(template):在<templeat></templeat>中使用name作为模板的名字
<template name="msgitem">
  <view>
    <view>{{title}}</view>
  </view>
</template>
7、微信小程序使用模板(is):使用is属性声明需要使用的模板,然后将模板所需data传入
<template is="msgitem" data="{{item}}" />

Page({
   data:{
     item:{
        title:"测试数据"
     }
   }
})
8、微信小程序引用功能(improt和include):两者区别在于import引用模板文件,include将整个文件出了<template>之外进行引用
// improt 引用
<improt src="temp.wxml" />
<template is="temp" data="{{text:‘forbar‘}}" />
// include 引用
<include src="temp.wxml" />
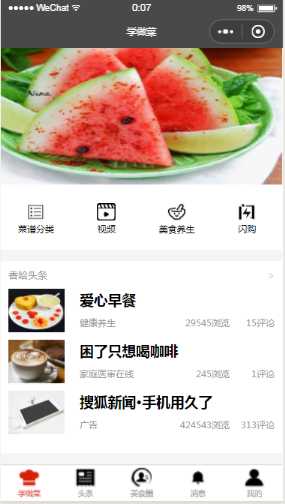
小试牛刀:(仿香哈菜谱)
代码如下
创建文件 "pages/cook/cook" , "pages/headline/headline" , "pages/food/food" , "pages/message/message" , "pages/me/me"
{
  "pages": [
    "pages/cook/cook",
    "pages/headline/headline",
    "pages/food/food",
    "pages/message/message",
    "pages/me/me"
  ],
  "window": {
    "backgroundTextStyle": "light",
    "navigationBarBackgroundColor": "#494949",
    "navigationBarTitleText": "学做菜",
    "navigationBarTextStyle": "#fff"
  },
  "tabBar": {
    "backgroundColor": "#fff",
    "color": "#999",
    "selectedColor": "#CC1004",
    "borderStyle": "black",
    "list": [
      {
        "pagePath": "pages/cook/cook",
        "text": "学做菜",
        "iconPath": "images/dev/cook-0.png",
        "selectedIconPath": "images/dev/cook-1.png"
      },
      {
        "pagePath": "pages/headline/headline",
        "text": "头条",
        "iconPath": "images/dev/headline-0.png",
        "selectedIconPath": "images/dev/headline-1.png"
      },
      {
        "pagePath": "pages/food/food",
        "text": "美食圈",
        "iconPath": "images/dev/food-0.png",
        "selectedIconPath": "images/dev/food-1.png"
      },
      {
        "pagePath": "pages/message/message",
        "text": "消息",
        "iconPath": "images/dev/message-0.png",
        "selectedIconPath": "images/dev/message-1.png"
      },
      {
        "pagePath": "pages/me/me",
        "text": "我的",
        "iconPath": "images/dev/me-0.png",
        "selectedIconPath": "images/dev/me-1.png"
      }
    ]
  }
}
cook.wxml
<!--pages/cook/cook.wxml-->
<view class=‘conetent‘>
  <view class=‘img‘>
    <image src=‘../../images/banner.jpg‘ style=‘width:100%; height:230px;‘></image>
  </view>
  <view class=‘nav‘>
    <view class=‘nav-item‘>
      <view>
        <image src=‘../../images/icon/fenlei.png‘ style=‘width:25px; height:23px;‘></image>
      </view>
      <view>菜谱分类</view>
    </view>
    <view class=‘nav-item‘>
      <view>
        <image src=‘../../images/icon/shipin.png‘ style=‘width:25px; height:23px;‘></image>
      </view>
      <view>视频</view>
    </view>
    <view class=‘nav-item‘>
      <view>
        <image src=‘../../images/icon/yangsheng.png‘ style=‘width:25px; height:23px;‘></image>
      </view>
      <view>美食养生</view>
    </view>
    <view class=‘nav-item‘>
      <view>
        <image src=‘../../images/icon/shangou.png‘ style=‘width:25px; height:23px;‘></image>
      </view>
      <view>闪购</view>
    </view>
  </view>
  <view class=‘hr‘></view>
  <view class=‘head‘>
    <view>香哈头条</view>
    <view class=‘right‘>></view>
  </view>
  <view class=‘list‘>
    <block wx:for="{{array}}">
      <view class=‘item‘ bindtap=‘seeDetail‘ id="0">
        <view>
          <image src=‘{{item.img}}‘ style=‘width:75px; height:58px‘></image>
        </view>
        <view class=‘desc‘>
          <view class=‘title‘>{{item.title}}</view>
          <view class=‘count‘>
            <view>{{item.type}}</view>
            <view class=‘liulan‘>{{item.liulan}}</view>
            <view class=‘pinglun‘>{{item.pinglun}}</view>
          </view>
        </view>
      </view>
    </block>
  </view>
  <view class=‘hr‘></view>
</view>
cook.js
// pages/cook/cook.js
Page({

  /**
   * 页面的初始数据
   */
  data: {
    array: []
  },
  onLoad: function (options) {
    var array = this.initData();
    this.setData({
      array: array
    })
  },
  initData: function () {
    let array = [];
    var object1 = new Object();
    object1.img = ‘../../images/list/foot-1.jpg‘;
    object1.title = ‘爱心早餐‘;
    object1.type = ‘健康养生‘;
    object1.liulan = ‘29545浏览‘;
    object1.pinglun = ‘15评论‘;
    array[0] = object1;

    var object2 = new Object();
    object2.img = ‘../../images/list/foot-2.jpg‘;
    object2.title = ‘困了只想喝咖啡‘;
    object2.type = ‘家庭医审在线‘;
    object2.liulan = ‘245浏览‘;
    object2.pinglun = ‘1评论‘;
    array[1] = object2;

    var object3 = new Object();
    object3.img = ‘../../images/list/foot-3.jpg‘;
    object3.title = ‘橘子吃多了容易变成小黄人‘;
    object3.type = ‘家庭医审在线‘;
    object3.liulan = ‘24543浏览‘;
    object3.pinglun = ‘13评论‘;
    array[2] = object3;

    var object3 = new Object();
    object3.img = ‘../../images/list/foot-4.jpg‘;
    object3.title = ‘搜狐新闻·手机用久了‘;
    object3.type = ‘广告‘;
    object3.liulan = ‘424543浏览‘;
    object3.pinglun = ‘313评论‘;
    array[2] = object3;
    return array;
  }
})
cook.wxss
/* pages/cook/cook.wxss */

.nav {
  display: flex;
  flex-direction: row;
  text-align: center;
}

.nav-item {
  width: 25%;
  margin-top: 20px;
  font-size: 12px;
}

.hr {
  height: 15px;
  background-color: #ccc;
  margin-top: 20px;
  opacity: 0.2;
}

.head {
  display: flex;
  flex-direction: row;
  margin: 10px;
  font-size: 13px;
  color: #999;
}

.right {
  position: absolute;
  right: 10px;
  color: #ccc;
}

.hr2 {
  height: 2px;
  background-color: #ccc;
  opacity: 0.2;
}

.item {
  display: flex;
  flex-direction: row;
  margin-left: 10px;
  margin-bottom: 5px;
}

.desc {
  margin-left: 20px;
  line-height: 30px;
}

.title {
  font-weight: bold;
}

.count {
  display: flex;
  flex-direction: row;
  font-size: 12px;
  color: #999;
}

.liulan {
  position: absolute;
  right: 70px;
}

.pinglun {
  position: absolute;
  right: 10px;
}
最终实现效果

以上是关于微信小程序之旅一(页面渲染)的主要内容,如果未能解决你的问题,请参考以下文章