Webpack 学习笔记
Posted усил
tags:
篇首语:本文由小常识网(cha138.com)小编为大家整理,主要介绍了Webpack 学习笔记相关的知识,希望对你有一定的参考价值。
Webpack 笔记
安装 webpack
前置条件安装了 node
- 全局安装 webpack 及 webpack-cli
- npm install -g webpack --registry=https://registry.npm.taobao.org
- npm instal -g webpack-cli --registry=https://registry.npm.taobao.org
快速入门
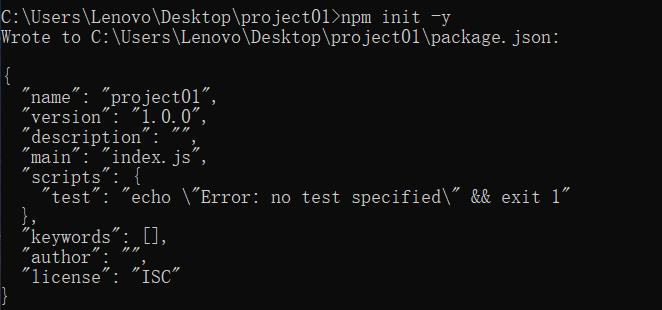
- 创建项目并初始化项目


-
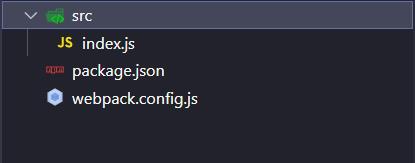
创建并配置 webpack 文件(webpack.config.js)
// 导入 path 模块 (处理路径)
var path = require('path');

// module 模块系统对象
// exports 配置选项
module.exports = {
    // 入口文件
    entry: "./src/index.js",
    // 设置模式 development(开发模式) production 生产环境
    mode: "development",
    // 输出
    output: {
        /*
          __dirname: 项目的绝对路径
          打包后的文件存放在 dist 目录下
         */
        path: path.resolve(__dirname, "dist"),
        // 设置打包后的文件名称
        filename: "bundle.js"
    }
}
多入口文件时
entry: {
index: “./src/index.js”,
detail: “./src/detail.js”,
}
-
入口文件(index.js)
var rd = function (min, max) { return Math.floor(Math.random() * (max - min) + min); } document.write(rd(100, 200)+"<br/>"); document.write(rd(100, 200)+"<br/>"); document.write(rd(100, 200)+"<br/>"); document.write(rd(100, 200)+"<br/>"); document.write(rd(100, 200)+"<br/>"); -
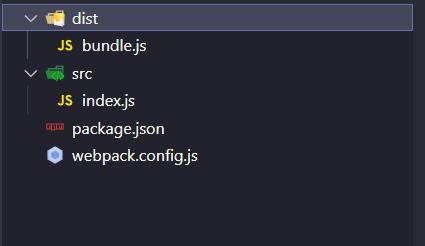
打包项目
webpack --config webpack.config.js


开发模式下
/*
 * ATTENTION: The "eval" devtool has been used (maybe by default in mode: "development").
 * This devtool is neither made for production nor for readable output files.
 * It uses "eval()" calls to create a separate source file in the browser devtools.
 * If you are trying to read the output file, select a different devtool (https://webpack.js.org/configuration/devtool/)
 * or disable the default devtool with "devtool: false".
 * If you are looking for production-ready output files, see mode: "production" (https://webpack.js.org/configuration/mode/).
 */
/******/ (() => { // webpackBootstrap
/******/ 	var __webpack_modules__ = ({

/***/ "./src/index.js":
/*!**********************!*\\
  !*** ./src/index.js ***!
  \\**********************/
/***/ (() => {

eval("var rd = function (min, max) {\\r\\n    return Math.floor(Math.random() * (max - min) + min);\\r\\n}\\r\\n\\r\\ndocument.write(rd(100, 200)+\\"<br/>\\");\\r\\ndocument.write(rd(100, 200)+\\"<br/>\\");\\r\\ndocument.write(rd(100, 200)+\\"<br/>\\");\\r\\ndocument.write(rd(100, 200)+\\"<br/>\\");\\r\\ndocument.write(rd(100, 200)+\\"<br/>\\");\\r\\n\\n\\n//# sourceURL=webpack://project01/./src/index.js?");

/***/ })

/******/ 	});
/************************************************************************/
/******/
/******/ 	// startup
/******/ 	// Load entry module and return exports
/******/ 	// This entry module can't be inlined because the eval devtool is used.
/******/ 	var __webpack_exports__ = {};
/******/ 	__webpack_modules__["./src/index.js"]();
/******/
/******/ })()
;
生产模式下
(()=>{var r=function(r,t){return Math.floor(Math.random()*(t-r)+r)};document.write(r(100,200)+"<br/>"),document.write(r(100,200)+"<br/>"),document.write(r(100,200)+"<br/>"),document.write(r(100,200)+"<br/>"),document.write(r(100,200)+"<br/>")})();
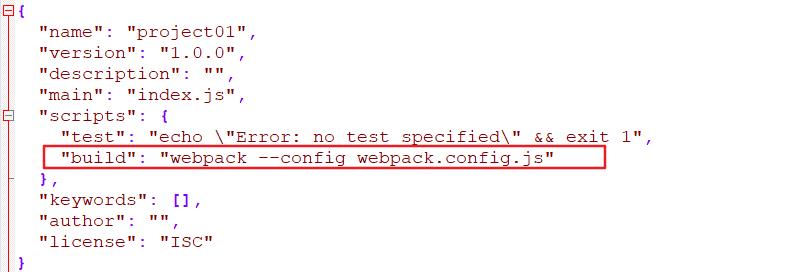
打包项目也可以使用 npm run build
前提是在项目的 package.json 中配置好选项

打包 CSS 文件
在 src 目录下创建 css 文件(base.css),并在入口文件(index.js)中引入文件
import './base.css'
- 配置 webpack.config.js
var path = require('path');
module.exports = {
    entry: "./src/index.js",
    mode: "development",
    output: {
        path: path.resolve(__dirname, "dist"),
        filename: "bundle.js"
    }
    // 配置 loader 模块
    module: {
        rules: [
            {
                // 打包 css 文件
                test: /\\.css$/i,
                use: [
                    "style-loader",
                    "css-loader"
                ]
            }
        ]
    }
}
配置前需要下载插件 style loader css-loader
npm install --save-dev style-loader
npm install css-loader
-
打包文件并启动项目
测试方法:在生产的dist 文件中创建一个 html 文件 并将 bundle.js 引入后,打开该文件,此时可以看到 css 样式是否加载成功
打包 scss
安装 sass-loader sass
npm install sass-loader sass --save-dev
module.exports = {
  module: {
    rules: [
      {
        test: /\\.s[ac]ss$/i,
        use: [
          // 3 最后把 javascript 写入到bundle.js
          "style-loader",
          // 2 再把 css 转成 javascript
          "css-loader",
          // 1 将 sass 编译为 css
          "sass-loader",
        ],
      },
    ],
  },
};
打包图片文件
安装 url-loader
npm install url-loader – save-dev
module.exports = {
  module: {
    rules: [
      {
        test: /\\.(png|jpg|gif)$/i,
        use: [
          {
            loader: 'url-loader',
            options: {
              limit: 8192,
            },
          },
        ],
      },
    ],
  },
};
编译ES6语法
安装 babel-loader
npm install -D babel-loader @babel/core @babel/preset-env
D 等价于 save-dev
module: {
  rules: [
    {
      test: /\\.m?js$/,
      // 排除 node_modules 目录下的文件
      exclude: /node_modules/,
      use: {
        loader: 'babel-loader',
        options: {
          presets: [
            ['@babel/preset-env', { targets: "defaults" }]
          ]
        }
      }
    }
  ]
}
处理 html 模板
安装 html-webpack-plugin
npm i -D html-webpack-plugin
// 打包项目所需的插件
const HtmlWebpackPlugin = require('html-webpack-plugin');//处理html模板文件
const { CleanWebpackPlugin } = require('clean-webpack-plugin');//处理dist目录多余的文件(冗余)

// 处理路径的模块
var path = require("path");
// 在模块系统下进行配置
module.exports = {
    // 入口文件 (多文件)
    entry: {
        "index": "./src/index.js",
        "detail": "./src/detail.js"
    },
    //  打包模式 development | production
    mode: "production",
    // 输入设置
    output: {
        // 路径
        path: path.resolve(__dirname, "dist"),
        // 名称
        filename: "js/bundle-[name].js"
    },
    module:{},
    //  配置插件
    plugins: [
        // 处理html模板
        new HtmlWebpackPlugin({
            title: "首页", // 网页标题
            template: "./src/views/index.html",//网页模板
            filename: "index.html",// 文件名称
            chunks:["index"] // 添加的脚本 和entry对象下的key是一一对应!!
        }),
        new HtmlWebpackPlugin({
            title: "详情页",
            template: "./src/views/detail.html",
            filename: "detail.html",
            chunks:["detail"]
        }),
		new CleanWebpackPlugin()
    ]
}
处理模板
<!DOCTYPE html>
<html lang="en">
<head>
    <meta charset="UTF-8">
    <meta http-equiv="X-UA-Compatible" content="IE=edge">
    <meta name="viewport" content="width=device-width, initial-scale=1.0">
    <title><%=htmlWebpackPlugin.options.title%></title>
</head>
<body>
    <h1>Hello world</h1>
</body>
</html>
完整版
// 打包项目所需的插件
const HtmlWebpackPlugin = require('html-webpack-plugin');//处理html模板文件
const { CleanWebpackPlugin } = require('clean-webpack-plugin');//处理dist目录多余的文件(冗余)

// 处理路径的模块
var path = require("path");
// 在模块系统下进行配置
module.exports = {
    // 1.0 入口文件 (多文件)
    entry: {
        "index": "./src/index.js",
        "detail": "./src/detail.js"
    },
    // 2.0 打包模式 development | production
    mode: "production",
    // 3.0 输入设置
    output: {
        // 路径
        path: path.resolve(__dirname, "dist"),
        // 名称
        filename: "js/bundle-[name].js"
    },
    // 4.0 配置loader模块
    module: {
        rules: [
            // 打包css文件
            {
                test: /\\.css$/i,
                use: [
                    "style-loader",
                    "css-loader"
                ]
            },
            // 打包scss文件(sass)
            {
                test: /\\.s[ac]ss$/i,
                use: [
                    // 3. 最后把javascript写入到 bundle.js 文件中
                    "style-loader",
                    // 2. 再把css转成 javascript
                    "css-loader",
                    // 1. 将sass编译为css
                    "sass-loader"
                ]
            },
            // 打包图片文件
            {
                test: /\\.(png|jpg|gif)$/i,
                use: [
                    {
                        loader: 'url-loader',
                        options: {
                            // 1KB = 1024Bytes
                            // 如果图片大小限制 小于等于8192Bytes  转base64格式字符串(图片文件)
                            // 如果超过8192Bytes 就是显示原来的图片
                            limit: 8192
                        }
                    }
                ]
            },
            // 编译ES6
            {
                test: /\\.m?js$/,
                // 排除node_modules目录的JS文件
                exclude: /node_modules/,
                use: {
                    loader: 'babel-loader',
                    options: {
                        presets: [
                            ['@babel/preset-env', { targets: "defaults" }]
                        ]
                    }
                }
            }
        ]
    },
    // 5.0 配置插件
    plugins: [
        // 处理html模板
        new HtmlWebpackPlugin({
            title: "首页", // 网页标题
            template: "./src/views/index.html",//网页模板
            filename: "index.html",// 文件名称
            chunks:["index"] // 添加的脚本 和entry对象下的key是一一对应!!
        }),
        new HtmlWebpackPlugin({
            title: "详情页",
            template: "./src/views/detail.html",
            filename: "detail.html",
            chunks:["detail"]
        }),
		new CleanWebpackPlugin()
    ]
}
以上是关于Webpack 学习笔记的主要内容,如果未能解决你的问题,请参考以下文章