InfoGAN详细介绍及特征解耦图像生成
Posted 康x呀
tags:
篇首语:本文由小常识网(cha138.com)小编为大家整理,主要介绍了InfoGAN详细介绍及特征解耦图像生成相关的知识,希望对你有一定的参考价值。
InfoGAN详细介绍及特征解耦图像生成
一.InfoGAN框架理解
特征耦合
我们知道最基本的GAN就是输入一个随机的向量,输出一个图片。以手写数字为例,我们希望修改随机向量的某一维,能改变数字的特想,比如角度,粗细,数字等
特征解耦:
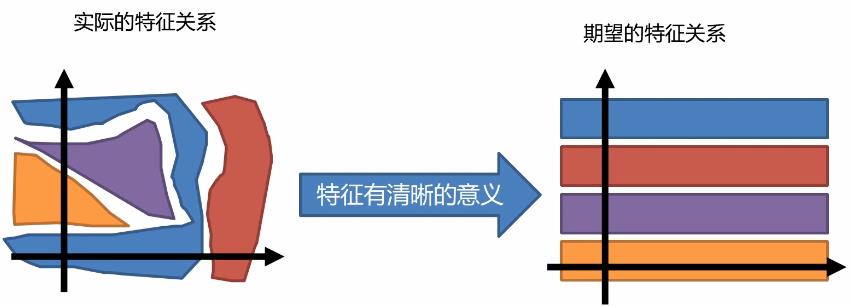
如上图:实际情况中的特征是非常杂乱无章的,然后我们希望的特征关系是比较整齐明了的,具体哪一列表示什么很清晰,从而便于控制它。而infogan的目的就是将这些杂乱无章的特征清晰化规律化。
特征解耦举例:
我们可以找到某一个控制某个特征对应的神经元,然后去改变它的值进而就可以改天具体某个特征。如下图举例所示:

InfoGAN
InfoGAN的框架如下:
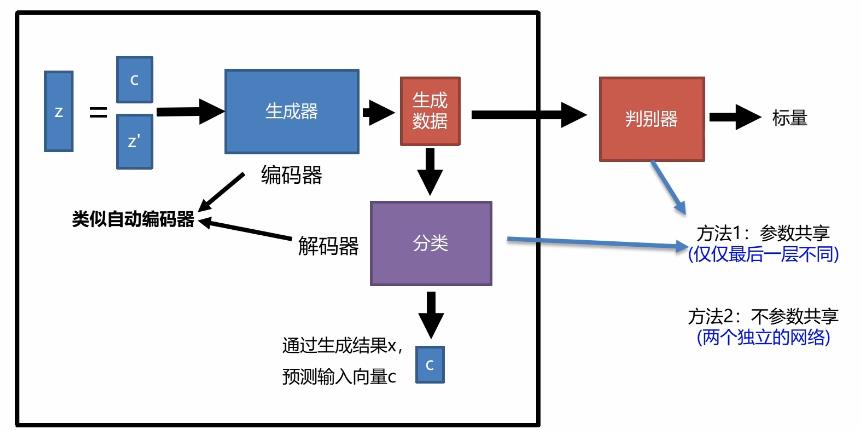
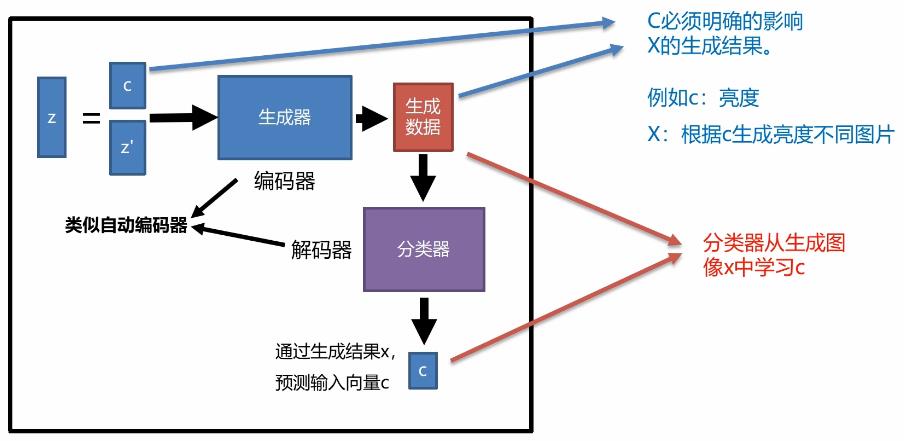
Z为输入,输入分为两部分(标签和噪声),这里的C是在初始化的时候随机给定的,这里的生成器类似于编码器,其次还有一个分类器中与生成器组成一个类似于自动编码器。将真实数据或者生成数据放入分类器中,它可以去学习C,因为生成器生成的数据中就隐藏着C的一些关系,分类器就将数据重新提取重新得到C的这样一个过程。
更进一步说明:
InfoGAN论文实验结果
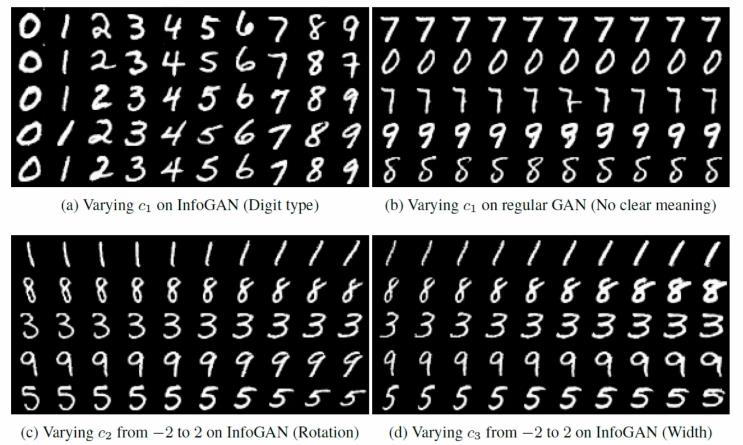
a图所示的向量C1可控制生成具体哪一类数字,b图几乎没有差异,C3是控制宽度的一个向量,通过控制C3可生成不同宽度的数字。
二.VAE-GAN框架理解
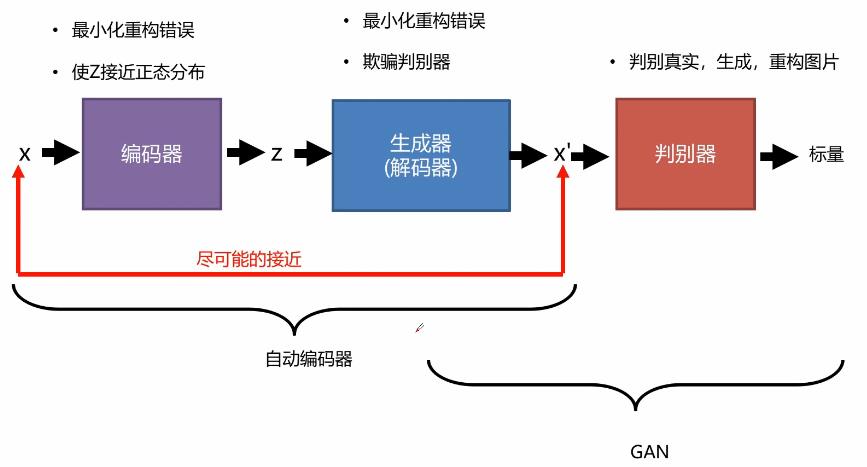
自动编码器是将输入数据压缩到高度抽象的特征空间然后进行重构的过程。一开始对于输入数据X进行压缩重构成一个向量z,在进行解码器进行解码,使输出和输入尽可能接近。这一步的操作的目的是为了更好的欺骗判别器,其余部分跟传统的GAN 网络是一致的,如下图所示:
VAE-GAN算法步骤
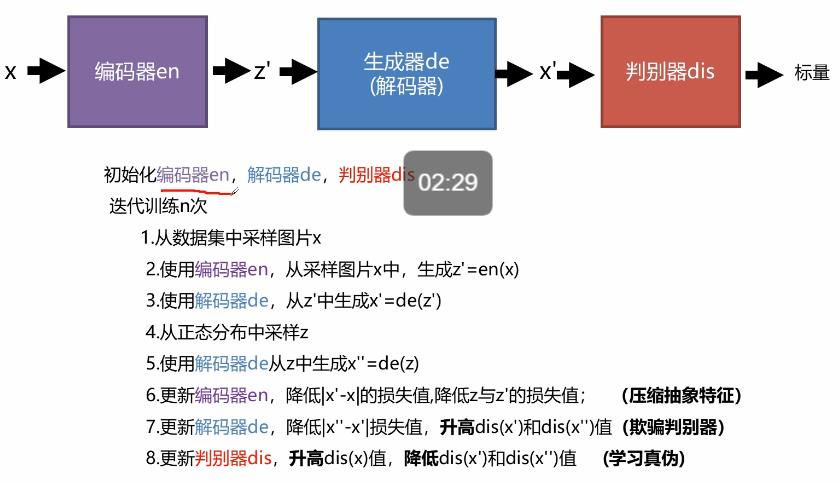
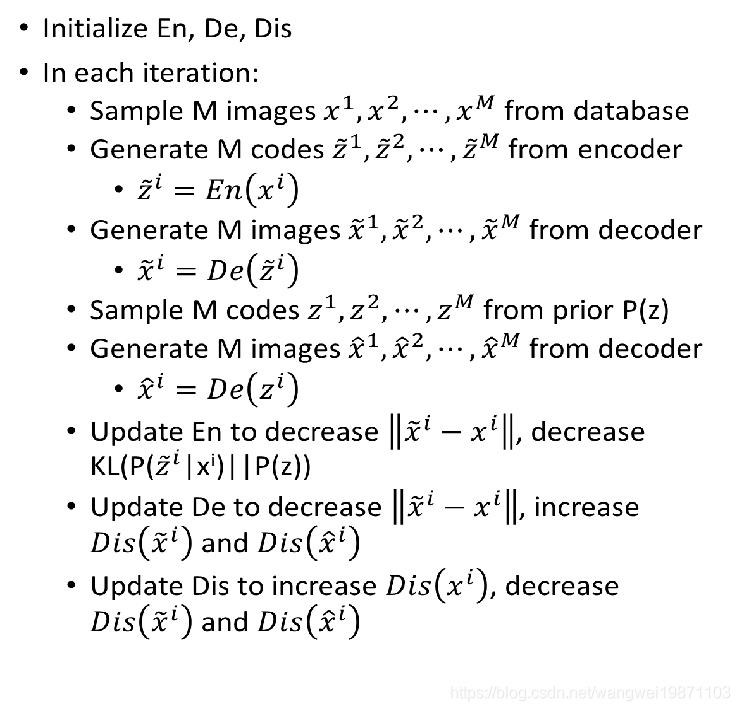
编码器要做的就是让P(z|x)逼近分布P(z),比如标准正太分布,同时最小化生成器(解码器)和输入x的差距。生成器(解码器)要做的就是最小化输出和输入x的差距,同时又要骗过判别器。判别器要做的就是给真实的高分,跟P(z)采样生成的和重建的低分。
具体算法:
三.BiGAN框架理解
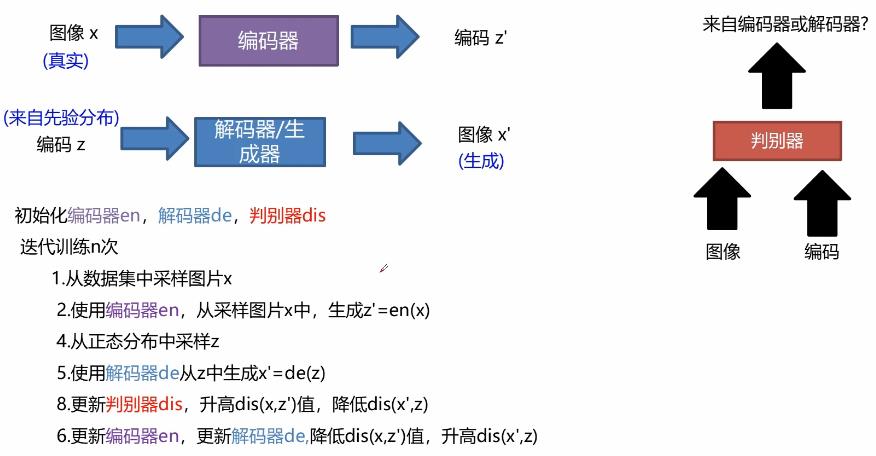
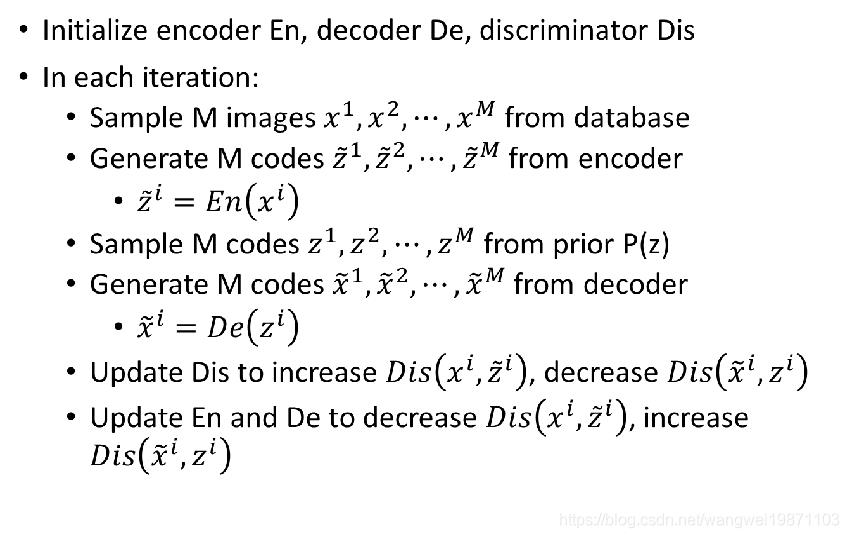
BiGAN就是双向GAN的意思,这里的判别器与上面介绍的判别器不一样,这里的判别器接收的是图像和编码,判别图像和编码是来自编码器还是解码器。
算法思想:将编码器和解码器分开,但是加一个判别器,将他们的输入和输出同时作为判别器的输入,然后区分是来自编码器还是解码器,如果无法分别来自哪个,就说明编码器的输入图片和解码器生成的图片很接近,编码器输出的z和解码器输入的z很接近,目的就达到了。
简单的原理就是将编码器看成一个P(x,z)分布,将解码器看成Q(x,z)分布,通过判别器,让他们的差异越来越小。理想情况下就会:
具体算法:
四.InfoGAN论文复现
使用MNIST数据集复现InfoGAN
在无标记信息情况下学习生成可控的图片

通过输入向量的控制进行控制自己想要生成的图像。
代码编写
初始化判别器
// An highlighted block
    def _init_dicriminator(self, input, isTrain=True, reuse=False):
        """
        初始化判别器网络模型
        :param input: 输入数据op
        :param isTrain: 是否训练状态
        :param reuse: 是否复用内部参数
        :return: 判断结果op
        """
        with tf.variable_scope('discriminator', reuse=reuse):
            # input [none,32,32,1]
            conv1 = tf.layers.conv2d(input, 32, [4, 4], strides=(2, 2), padding='same')  # [none,16,16,32]
            bn1 = tf.layers.batch_normalization(conv1, training=isTrain)
            active1 = tf.nn.leaky_relu(bn1)
            # layer 2
            conv2 = tf.layers.conv2d(active1, 64, [4, 4], strides=(2, 2), padding="same")  # [none,8,8,64]
            bn2 = tf.layers.batch_normalization(conv2, training=isTrain)
            active2 = tf.nn.leaky_relu(bn2)
            # layer 3
            conv3 = tf.layers.conv2d(active2, 128, [4, 4], strides=(2, 2), padding='same')  # [none,4,4,128]
            bn3 = tf.layers.batch_normalization(conv3, training=isTrain)
            active3 = tf.nn.leaky_relu(bn3)
            # layer 4
            active4 = tf.reshape(active3, shape=[-1, 4 * 4 * 128])
            out = tf.layers.dense(inputs=active4, units=self.d_dim)
        return out;
初始化生成器
// An highlighted block
    def _init_generator(self, input_c, input_z, isTrain=True, resue=False):
        """
        初始化生成器网络模型
        :param input_c: 输入条件[none,c_dim]
        :param input_z: 输入随机噪声[None,z_dim]
        :param isTrain: 是否训练状态
        :param resue: 是否复用内部参数
        :return: 生成数据op
        """
        with tf.variable_scope("generator", reuse=resue):
            # layer1
            input = tf.concat([input_c, input_z], axis=1)  # [none,c_dim+z_dim]
            input = tf.reshape(input, shape=[-1, 1, 1, self.c_dim + self.z_dim])
            de1 = tf.layers.conv2d_transpose(input, 256, [4, 4], strides=(1, 1), padding='valid')  # [none,4,4,256]
            de_bn1 = tf.layers.batch_normalization(de1, training=isTrain)
            de_active1 = tf.nn.leaky_relu(de_bn1)
            # layer 2
            de2 = tf.layers.conv2d_transpose(de_active1, 128, [4, 4], strides=(2, 2), padding="same")  # [none,8,8,128]
            de_bn2 = tf.layers.batch_normalization(de2, training=isTrain)
            de_active2 = tf.nn.leaky_relu(de_bn2)
            # layer 3
            de3 = tf.layers.conv2d_transpose(de_active2, 64, [4, 4], strides=(2, 2), padding="same")  # [none,16,16,64]
            de_bn3 = tf.layers.batch_normalization(de3, training=isTrain)
            de_active3 = tf.nn.leaky_relu(de_bn3)
            # layer 4
            de4 = tf.layers.conv2d_transpose(de_active3, 1, [4, 4], strides=(2, 2), padding="same")  # [none,32,32,1]
            out = tf.nn.sigmoid(de4)  #0,1
        return out
初始化分类器
// An highlighted block
   def _init_classifier(self, input, isTrain=True, reuse=False):
        """
        初始化分类器网络模型
        :param input: 输入数据(图像)[none,img_h,img_w,img_c]
        :param isTrain: 是否训练状态
        :param reuse: 是否复用内部参数
        :return: 分类条件结果op
        """
        with tf.variable_scope("classifier", reuse=reuse):
            # input [none,32,32,1]
            conv1 = tf.layers.conv2d(input, 32, [4, 4], strides=(2, 2), padding='same')  # [none,16,16,32]
            bn1 = tf.layers.batch_normalization(conv1, training=isTrain)
            active1 = tf.nn.leaky_relu(bn1)
            # layer 2
            conv2 = tf.layers.conv2d(active1, 64, [4, 4], strides=(2, 2), padding="same")  # [none,8,8,64]
            bn2 = tf.layers.batch_normalization(conv2, training=isTrain)
            active2 = tf.nn.leaky_relu(bn2)
            # layer 3
            conv3 = tf.layers.conv2d(active2, 128, [4, 4], strides=(2, 2), padding='same')  # [none,4,4,128]
            bn3 = tf.layers.batch_normalization(conv3, training=isTrain)
            active3 = tf.nn.leaky_relu(bn3)
            # layer 4
            active4 = tf.reshape(active3, shape=[-1, 4 * 4 * 128])

            out_c = tf.layers.dense(inputs=active4, units=self.c_dim, activation=tf.nn.softmax)
        return out_c
训练InfoGAN网络
// An highlighted block
 def train(self, batch_size=64, itrs=100000, save_time=1000):
        """
        训练InfoGAN网络
        :param batch_size: 采样数据量
        :param itrs: 迭代训练次数
        :param save_time: 保存,测试模型周期
        :return: None
        """
        start_time = time.time()
        data = dh.load_mnist_resize(path="data/MNIST_data",img_w=32,img_h=32)
        for i in range(itrs):
            mask = np.random.choice(data['data'].shape[0],batch_size,replace=True)
            batch_x = data['data'][mask]
            batch_noise_c = np.random.multinomial(1,self.c_dim*[0.1],size=batch_size)
            batch_noise_z = np.random.normal(0,1,(batch_size,self.z_dim))
            #训练判别器
            _,D_loss_curr= self.sess.run([self.D_trainer,self.D_loss],feed_dict={
                self.x:batch_x,self.gen_z:batch_noise_z,self.gen_c:batch_noise_c,self.isTrain:True
            })
            # 训练生成器
            batch_noise_c = np.random.multinomial(1, self.c_dim * [0.1], size=batch_size)
            batch_noise_z = np.random.normal(0, 1, (batch_size, self.z_dim))
            _,G_loss_curr = self.sess.run([self.G_trainer,self.G_loss],feed_dict={
                self.gen_c:batch_noise_c,self.gen_z:batch_noise_z,self.isTrain:True
            })
            # 训练分类器
            idx = np.random.randint(0,self.c_dim)
            batch_noise_z =np.random.normal(0,1,(batch_size,self.z_dim))
            batch_noise_c = np.zeros([batch_size,self.c_dim])
            batch_noise_c[:,idx] =1
            _,C_loss_curr = self.sess.run([self.C_trainer,self.C_loss],feed_dict={
                self.gen_z:batch_noise_z,self.gen_c:batch_noise_c,self.isTrain:True
            })
            # 保存模型
            if i%save_time==0:
                idx = np.random.randint(0, self.c_dim)
                batch_noise_z = np.random.normal(0, 1, (25, self.z_dim))
                batch_noise_c = np.zeros([25, self.c_dim])
                batch_noise_c[:, idx] = 1
                self.gen_data(c=batch_noise_c,z=batch_noise_z,
                              save_path="out/InfoGAN_MNIST/"+str(i).zfill(6)+".png")
                self.test_model()
                print("i:",i," D_loss",D_loss_curr," G_loss",G_loss_curr," C_loss",C_loss_curr)
                self.save()
                end_time = time.time()
                time_loss = end_time-start_time
                print("时间消耗",int(time_loss),"秒")
                start_time = time.time()
        self.sess.close()
总结
无论是InfoGAN还是VAE—GAN,BiGAN都是自动编码器+GAN的框架,核心就是利用自动编码器压缩后的特征与GAN网络建立联系
参考文献及博客
[1] I. Goodfellow, J. Pouget-Abadie, M. Mirza, B. Xu, D. Warde-Farley,S. Ozair, A. Courville, and Y. Bengio, “Generative adversarial nets,” in Advances in Neural Information Processing Systems (NIPS), pp. 2672–2680,2014.
[2] T. Salimans, I. Goodfellow, W. Zaremba, V. Cheung, A. Radford, X. Chen,and X. Chen, “Improved techniques for training gans,” in Advances inNeural Information Processing Systems (NIPS), pp. 2226–2234, 2016.
[3]M. Arjovsky, S. Chintala, and L. Bottou, “Wasserstein gan,”arXiv:1701.07875, 2017.
博客:
https://so.csdn.net/so/search?q=BiGAN&t=blog&u=wangwei19871103
以上是关于InfoGAN详细介绍及特征解耦图像生成的主要内容,如果未能解决你的问题,请参考以下文章
生成对抗网络(GAN)详细介绍及数字手写体生成应用仿真(附代码)