数据结构 06-图3 六度空间 (30 分)
Posted keiiha
tags:
篇首语:本文由小常识网(cha138.com)小编为大家整理,主要介绍了数据结构 06-图3 六度空间 (30 分)相关的知识,希望对你有一定的参考价值。
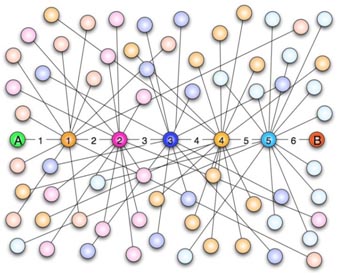
“六度空间”理论又称作“六度分隔(Six Degrees of Separation)”理论。这个理论可以通俗地阐述为:“你和任何一个陌生人之间所间隔的人不会超过六个,也就是说,最多通过五个人你就能够认识任何一个陌生人。”如图1所示。

图1 六度空间示意图
“六度空间”理论虽然得到广泛的认同,并且正在得到越来越多的应用。但是数十年来,试图验证这个理论始终是许多社会学家努力追求的目标。然而由于历史的原因,这样的研究具有太大的局限性和困难。随着当代人的联络主要依赖于电话、短信、微信以及因特网上即时通信等工具,能够体现社交网络关系的一手数据已经逐渐使得“六度空间”理论的验证成为可能。
假如给你一个社交网络图,请你对每个节点计算符合“六度空间”理论的结点占结点总数的百分比。
输入格式:
输入第1行给出两个正整数,分别表示社交网络图的结点数N(1<N≤103,表示人数)、边数M(≤33×N,表示社交关系数)。随后的M行对应M条边,每行给出一对正整数,分别是该条边直接连通的两个结点的编号(节点从1到N编号)。
输出格式:
对每个结点输出与该结点距离不超过6的结点数占结点总数的百分比,精确到小数点后2位。每个结节点输出一行,格式为“结点编号:(空格)百分比%”。
输入样例:
10 9
1 2
2 3
3 4
4 5
5 6
6 7
7 8
8 9
9 10
输出样例:
1: 70.00%
2: 80.00%
3: 90.00%
4: 100.00%
5: 100.00%
6: 100.00%
7: 100.00%
8: 90.00%
9: 80.00%
10: 70.00%
\'
测试点4为密集图,应该使用 邻接矩阵
邻接表写法 测试点4超时了
思路没什么问题 但是密集图不应该使用邻接表
#include <iostream>
#include <vector>
#include <map>
#include <math.h>
#include <iomanip>
using namespace std;
class arcNode{
public:
    int data;
    arcNode* next{nullptr};
    arcNode()=default;
    arcNode(int d):data{d}{};
};
class vertexNode{
public:
    int data;
    arcNode* first{nullptr};
    vertexNode()=default;
    vertexNode(int d):data{d}{};
};
class adjacencyListGraphic{
public:
    map<int,vertexNode*> vertexs;
    int arcNum{0},vertexNum{0};
    adjacencyListGraphic()=default;
    void BFSTraversal(){
        map<vertexNode*,int> visited;
        for(auto it=vertexs.begin();it!=vertexs.end();it++){
            visited[vertexs[it->first]]=0;
        }
        for(auto it=vertexs.begin();it!=vertexs.end();it++){
            map<vertexNode*,int> visitedTemp=visited;
            cout.setf(ios::fixed);
            cout << it->second->data <<": "<<setprecision(2)
            << BFS(vertexs[it->first],visitedTemp)*100<<"%"<<endl;
        }
    }
    double BFS(vertexNode* vn,map<vertexNode*,int> &visited){
        vertexNode* vnp=vn;
        vector<vertexNode*> vertexnodes;
        vector<vertexNode*> stack;
        vector<arcNode*> arcNodes;
        stack.push_back(vnp);
        vertexnodes.push_back(vnp);
        int count{0};
        for(int i=0;i<=6;i++){
            stack=vertexnodes;
            vertexnodes.clear();
            while(stack.size()){
                if(!visited[stack.front()]){//顶点未访问过
                    visited[stack.front()]=1;//访问位置为true
                    arcNode* anp=stack.front()->first;//将边都推入
                    while(anp){
                        if(!visited[vertexs[anp->data]]){//边中包含未访问点 推入待访问队列
                            vertexnodes.push_back(vertexs[anp->data]);
                        }
                        anp=anp->next;
                    }
                    stack.erase(stack.begin());//边中未访问的顶点都推入队列后,删除顶点
                }
            }
        }
        count=0;
        for(auto it=visited.begin();it!=visited.end();it++){
            if(it->second){
                count ++;
            }
        }
        return double(count)/vertexNum;
    }
    void insertNode(int a,int b){//插入结点 插入边
        if(vertexs.find(a)==vertexs.end()){//没有这个顶点 则建立顶点
            vertexs[a]=new vertexNode{a};
            vertexs[a]->first=new arcNode{b};
        }else{//已经存在该顶点, 加入边表
            arcNode* p=vertexs[a]->first;
            while(p->next){//到边表末尾
                p=p->next;
            }
            p->next=new arcNode{b};
        }
    }
    void build(int n,int m){
        vertexNum=n;
        arcNum=m;
        int a,b;
        for(int i=0;i<m;i++){//建立无向图邻接表
            scanf("%d %d",&a,&b);
            insertNode(a, b);
            insertNode(b, a);
        }
    }
};
int main(){
    int n,m;
    cin >> n >> m;
    adjacencyListGraphic ALG;
    ALG.build(n, m);
    ALG.BFSTraversal();
    return 0;
}
以上是关于数据结构 06-图3 六度空间 (30 分)的主要内容,如果未能解决你的问题,请参考以下文章