手把手教你使用nodejs编写cli(命令行)
Posted 五虎战画戟
tags:
篇首语:本文由小常识网(cha138.com)小编为大家整理,主要介绍了手把手教你使用nodejs编写cli(命令行)相关的知识,希望对你有一定的参考价值。
为什么要坚持写作?写作就是求甚解的过程。
目录
在前端开发工作中,我们经常会使用到webpack-cli、Vue-cli、create-react-app等cli工具,在实际业务开发中我们也是有很多的cli需求来帮助我们实现 新工程或模块的快速创建。下面我们开始搞起来!
我们以一个demo来演示来实现cli。这个demo就是通过输入
my-cli实现快速构建一个webpack基础项目,进入cli创建的项目后执行npm run start或者npx webpack serve启动serve
Target
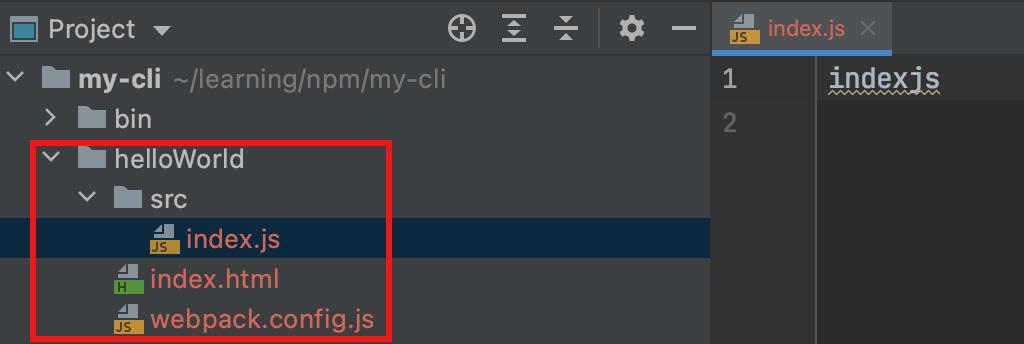
通过 my-cli 创建项目 hello-world

// hello-world
├── src
│   └── index.js
├── index.html
├── .gitignore
├── package.json
├── package-lock.json
└── webpack.config.js
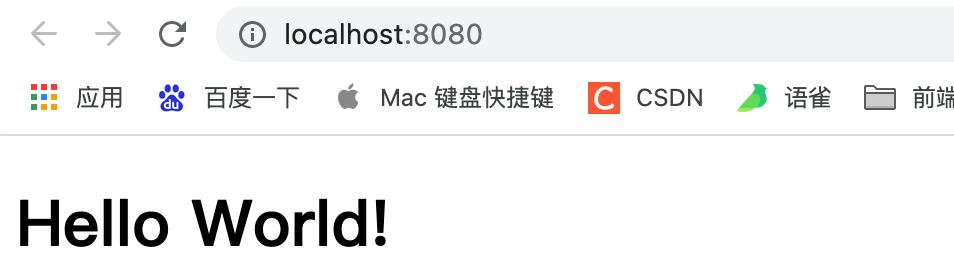
在 hello-world 项目下执行 npm run start 启动服务,输出 hello-world!
1. 初始化cli项目
创建一个新项目,姑且称之为 my-cli,并且使用 nodejs 的 esm 模块
my-cli 源码
esm模块不支持文件扩展名的自动解析以及导入具有索引文件的目录的能力,后面需要注意不要丢掉 index.js、.js
package.json
  ...
  "type": "module",
  ...
项目目录
my-cli
├── bin
│   ├── prompt/                # 交互式命令
│   ├── template               # ejs模板
│   │   ├── main               # 入口文件模板
│   │   		├── main.ejs   # 入口文件模板ejs
│   │   		└── index.js   # 导出模板
│   ├── utils/                 # 工具函数
│   └── index.js               # CLI执行入口文件
├── .gitignore
├── package.json
└── package-lock.json
2. Cli 实现思路
cli的本质就是运行node脚本
// bin/index.js
console.log('hello world!')
命令行:
## 输入
> node bin/index.js

## 输出
> hello world
执行上面的命令会在命令行输出 hello world!
而 cli 要完成目标则需要以下几个步骤:
- 创建文件夹
- 创建文件及入口文件
- 创建package.json
- 安装依赖
2.1 创建文件夹
通过 node 的 fs 模块来实现创建文件夹
import fs from 'fs'

fs.mkdirSync('./helloWorld')
fs.mkdirSync('./helloWorld/src')
执行 node bin/index.js 就可以看到会增加一个 helloWorld 文件夹并且包含一个 src 文件夹

上面的 ./helloWorld 实质上就是我们cli创建的文件根路径,我们来提取根路径并修改上面的代码
import fs from 'fs'

const getRootPath = () =>
  return './helloWorld'


fs.mkdirSync(getRootPath())
fs.mkdirSync(`$getRootPath()/src`)
2.2 创建文件及入口文件
还是通过 node 的 fs 模块来实现创建文件
文件写入方法fs.writeFile()
fs.writeFile(‘文件路径’,‘要写入的内容’,[‘编码’],‘回调函数’);
fs.writeFileSync(`$getRootPath()/src/index.js`, 'indexjs')
fs.writeFileSync(`$getRootPath()/index.html`, 'indexhtml')
fs.writeFileSync(`$getRootPath()/webpack.config.js`, 'webpack')
再次执行 node bin/index.js 会报错,因为 helloWorld 文件夹已经存在了
修添加一个 npm 脚本来实现快速测试
package.json
  ...
  "test": "rm -rf ./helloWorld && node bin/index.js"
  ...
执行 npm run test 就可以看到会增加一个 helloWorld/src/index.js ,并且文件内容也已经存在
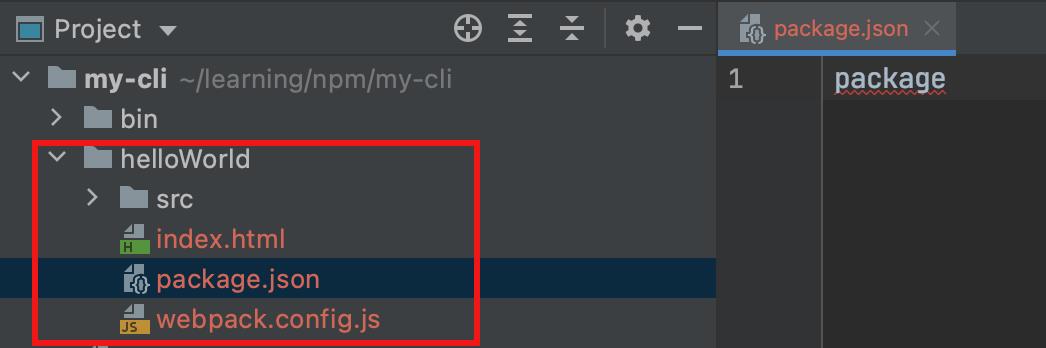
2.3 创建package.json
fs.writeFileSync(`$getRootPath()/src/package.json`, 'package')
执行 npm run test 就可以看到会增加一个 helloWorld/src/package.json ,并且文件内容也已经存在
2.4 安装依赖
这个步骤我们放在后面实现
3. ejs模板化文件内容
上面写入文件的内容显然不是我们想要的,那怎么生成我们需要的文件内容?让我们借助 ejs 来实现文件模板
3.1 安装ejs
npm i ejs
3.2 ejs Example
<% if (user)  %>
  <h2><%= user.name %></h2>
<%  %>
3.3 获取绝对路径
bin/utils/index.js
import path from 'path'
import  fileURLToPath  from 'url'
// 获取绝对路径
export const getRootPath = (pathUrl) =>
  // esm 模块没有 CommonJS的 __dirname
  // 这里需要通过工具函数fileURLToPath来封装一个 __dirname
  // 注意:这里的 __dirname 指向的是当前文件 bin/utils/index.js 的路径,因此加了两层 ../ 来将路径修改到 bin目录
  const __dirname = fileURLToPath(import.meta.url)
  return path.resolve(__dirname, `../../$pathUrl`)
3.4 使用ejs模板
template 目录结构
├── bin
    ├── template                      # ejs模板
        ├── indexHtml                 # html
        │		├── indexHtml.ejs
        │		└── index.js
        ├── main                      # 入口文件
        │		├── main.ejs
        │		└── index.js
        ├── package                   # package.json
        │		├── package.ejs
        │		└── index.js
        └── webpackConfig             # webpack.config.js
        		├── webpackConfig.ejs
         		└── index.js
bin/template/indexHtml/indexHtml.ejs
<!doctype html>
<html lang="en">
<head>
    <meta charset="UTF-8">
    <meta name="viewport"
          content="width=device-width, user-scalable=no, initial-scale=1.0, maximum-scale=1.0, minimum-scale=1.0">
    <meta http-equiv="X-UA-Compatible" content="ie=edge">
    <title>测试-<%= packageName %></title>
</head>
<body>

</body>
</html>
bin/template/indexHtml/index.js
import ejs from 'ejs'
import fs from 'fs'
import  getRootPath  from "../../utils/index.js";

export default ( packageName ) =>
  // 使用 fs.readFileSync 读取文件
  const file = fs.readFileSync(getRootPath('template/indexHtml/indexHtml.ejs'))
  // 使用 ejs.render 处理.ejs模板文件,并传入变量
  return ejs.render(file.toString(),  packageName )
bin/template/main/main.ejs
const h1 = document.createElement('h1');
h1.innerText = 'Hello World!';
document.body.appendChild(h1);
bin/template/main/index.js
import ejs from 'ejs'
import fs from 'fs'
import  getRootPath  from "../../utils/index.js";

export default () =>
  const file = fs.readFileSync(getRootPath('template/main/main.ejs'))
  return ejs.render(file.toString(), )
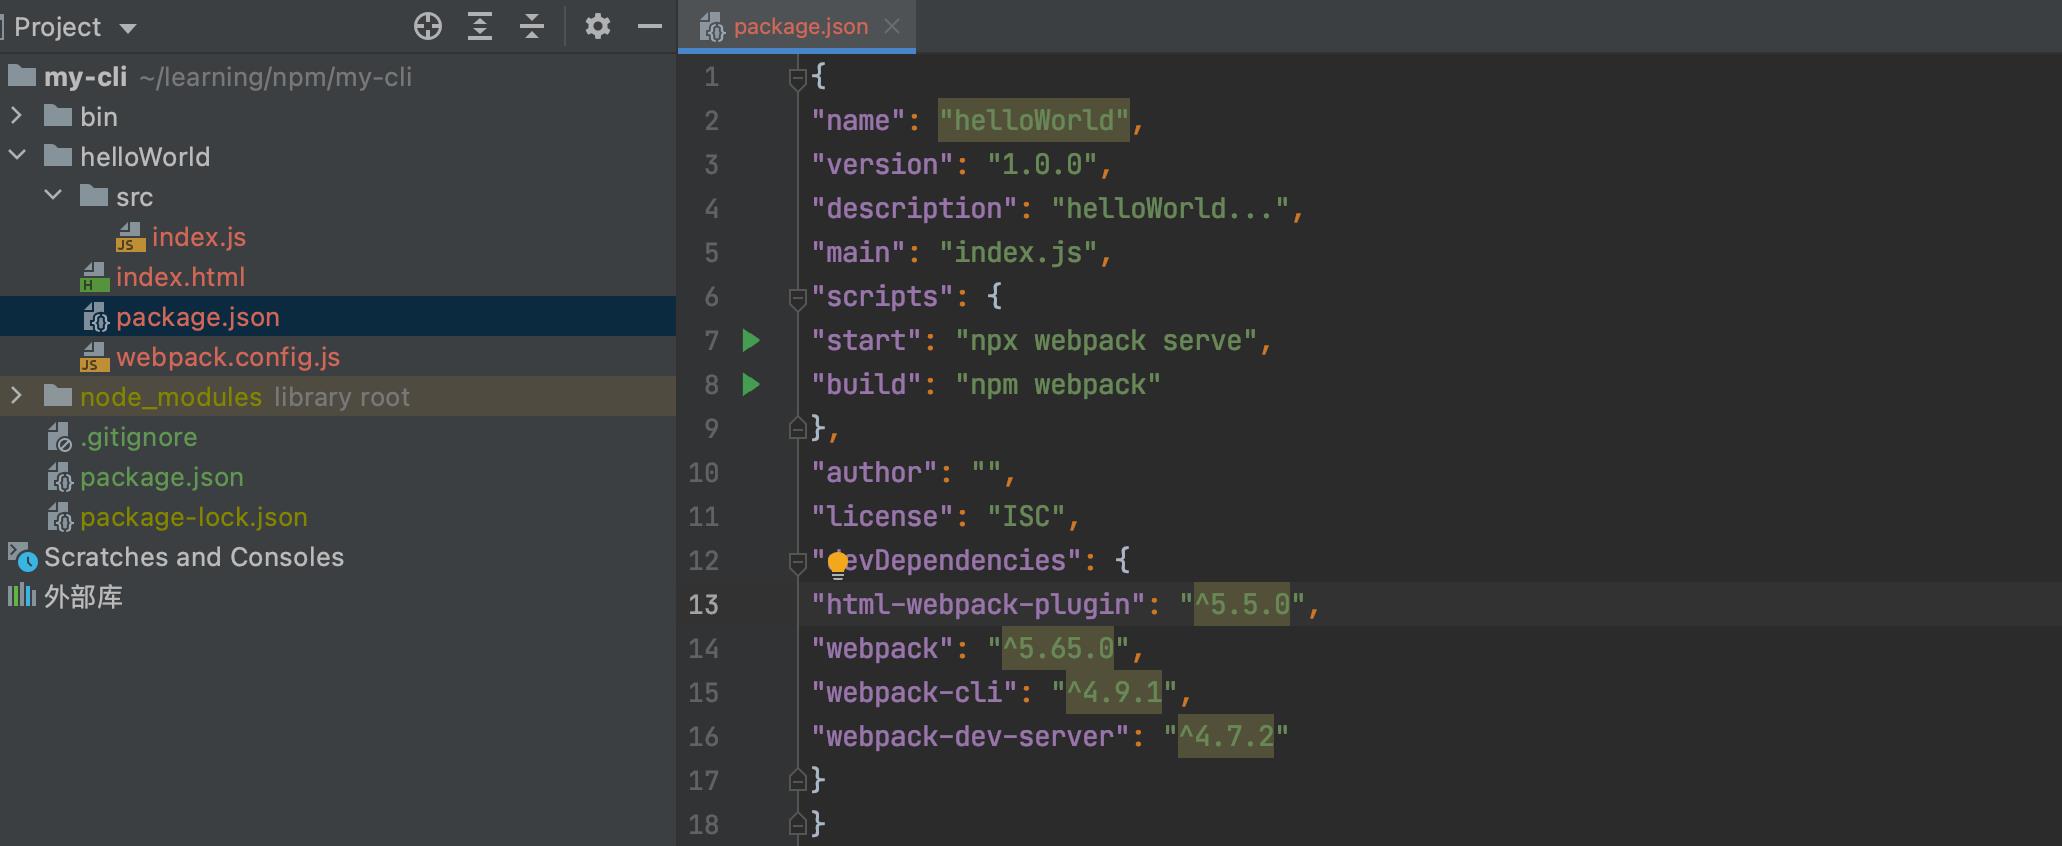
bin/template/package/package.ejs
  "name": "<%= packageName %>",
  "version": "1.0.0",
  "description": "<%= packageName %>...",
  "main": "index.js",
  "scripts":
    "start": "npx webpack serve",
    "build": "npm webpack"
  ,
  "author": "",
  "license": "ISC",
  "devDependencies":
    "html-webpack-plugin": "^5.5.0",
    "webpack": "^5.65.0",
    "webpack-cli": "^4.9.1",
    "webpack-dev-server": "^4.7.2"
bin/template/package/index.js
import ejs from 'ejs'
import fs from 'fs'
import  getRootPath  from "../../utils/index.js";

export default ( packageName ) =>
  const file = fs.readFileSync(getRootPath('template/package/package.ejs'))
  return ejs.render(file.toString(),  packageName )
bin/template/webpackConfig/webpackConfig.ejs
const HtmlWebpackPlugin = require('html-webpack-plugin')

module.exports =
  mode: 'development',
  entry: './src/index.js',
  output:
    clean: true
  ,
  devtool: '<%= devtool %>',
  devServer:
    port: <%= port %>,
  ,
  plugins: [
    new HtmlWebpackPlugin()
  ]
bin/template/webpackConfig/index.js
import ejs from 'ejs'
import fs from 'fs'
import  getRootPath  from "../../utils/index.js";

export default ( devtool, port ) =>
  const file = fs.readFileSync(getRootPath('template/webpackConfig/webpackConfig.ejs'))
  return ejs.render(file.toString(),  devtool, port )
3.5 加载模板内容
bin/index.js
import fs from 'fs'

import indexHtml from './template/indexHtml/index.js'
import main from './template/main/index.js'
import packageJson from './template/package/index.js'
import webpackConfig from './template/webpackConfig/index.js'

// 创建的项目路径
const getProjectPath = () =>
  return './helloWorld'


// 模拟交互命令行输入的值
const config =
  packageName: 'helloWorld',
  port: 8080,
  devtool: 'eval-cheap-module-source-map',


// 1. 创建文件夹
fs.mkdirSync(getProjectPath())
fs.mkdirSync(`$getProjectPath()/src`)

// 2. 创建文件和入口文件
fs.writeFileSync(`$getProjectPath()/src/index.js`, main())
fs.writeFileSync(`$getProjectPath()/index.html`, indexHtml(config))
fs.writeFileSync(`$getProjectPath()/webpack.config.js`, webpackConfig(config))

// 3. 创建package.json
fs.writeFileSync(`$getProjectPath()/package.json`, packageJson(config))
执行 npm run test,可以看到文件内容已经使用ejs模板生成,并且你所配置的动态内容也已经被填充,但是内容并没有格式化,这个我们后面解决
4. inquirer交互式命令行
安装 inquirer
npm i inquirer
创建问答交互命令
prompt 目录结构
├── bin
    ├── prompt                # 问答
        ├── index.js          # 入口
        ├── packageName.js    # 项目名称
        ├── devtool           # source map
        ├── port              # 端口号
        └── installTool       # yarn / npm
prompt/packageName.js
export default () => (
  type: 'input', // 命令类型
  name: 'packageName', // 键名
  message: 'set package name', // 提示语
  validate(val)  // 校验
    if (val) return true;
    return 'Please enter package name'

)
prompt/devtool.js
export default () => (
  type: 'list',
  name: 'devtool',
  message: 'set devtool',
  default: 'eval-cheap-module-source-map', // 默认值
  choices: [
     value: 'eval-cheap-module-source-map', name: 'eval-cheap-module-source-map' ,
     value: 'eval-cheap-source-map', name: 'eval-cheap-source-map' ,
     value: 'eval-source-map', name: 'eval-source-map' ,
  ]
)
prompt/port.js
export default () => (
  type: 'input',
  name: 'port',
  default: 8080,
  message: 'set port number',
)
prompt/installTool.js
export default () => (
  type: 'list',
  name: 'installTool',
  message: 'select installation Tool',
  default: 'yarn',
  choices: [
     name: 'yarn' ,
     name: 'npm'
  ]
)
prompt/index.js
import inquirer from 'inquirer'
import packageName from "./packageName.js";
import port from "./port.js";
import devtool from "./devtool.js";
import installTool from "./installTool.js";

export default () => inquirer.prompt([
  packageName(),
  port(),
  devtool(),
  installTool(),
])
bin/index.js 引入交互命令
// ...
import question from './prompt/index.js'

const config = await question()

// 创建的项目路径
const getProjectPath = () =>
  // 动态项目名称
  return `./$ config.packageName `

// ...
执行 npm run test
执行完成可以看到项目已经创建成功!
5. execa安装依赖
安装
npm i execa
// 安装依赖
// 第一个参数是一个字符串,就是你在cmd中运行脚本的时候敲的命令;
// 第二个参数是一个参数列表,放着你要给这个脚本传入的参数,注意是一个列表,没有列表就不返回;
// 第三个参数一个函数,返回一个对象
execa(config.installTool, ['install'],
  cwd: getProjectPath(), // 根路径
  stdio: [2, 2, 2] // 使子进程的输入输出流继承父进程,在当前父进程显示子进程的输入与输出
)
执行 npm run test,可以看到能够安装依赖了!
进入到创建的项目中,执行 npm run serve 可以看到服务成功启动了!
6. 使用CLI
6.1 bin
在 package.json 添加 bin 字段。
bin字段可以直接写 被执行的文件,也可以写成键值对形式,定义执行的脚本命令
  ...
  "name": "my-cli",
  "bin": "bin/index.js",
  // 或
  "bin":
    // 这里你可以随意定义
    "my-cli": "bin/index.js",
  ,
  ...
bin 字段会告诉npm,bin 字段指向的 js 脚本可以通过命令行的方式执行,以 my-cli 的命令调用。当然命令行的名字你想写什么都是你的自由,比如:
  ...
  "bin":
    "create-app": "bin/index.js",
  ,
  ...
6.2 声明执行环境
在 bin/index.js 文件顶部声明执行环境
#!/usr/bin/env node

// ...
添加#!/usr/bin/env node或者#!/usr/bin/node,这是告诉系统,下面这个脚本,使用nodejs来执行。当然,这个系统不包括windows,因为windows下有个JScript的历史遗留物在,会让你的脚本跑不起来。
#!/usr/bin/env node的意思是让系统自己去找node的执行程序。#!/usr/bin/node的意思是,明确告诉系统,node的执行程序在路径为/usr/bin/node。
6.1 测试阶段
在 cli 根目录执行 npm link将 cli 模块链接到全局npm模块中,与 npm i -g 类似,但是他可以调试代码,因为 npm link 的形式可以理解为模块链接或者快捷方式。
6.2 正式阶段
通过 npm publish 将 cli 项目发布到 npm , 通过 npm i -g 的形式安装到全局,然后执行 my-cli 即可执行我们的cli工具。
npm检测到 package.json 里面存在一个bin字段,它就同时在全局npm包目录下生成了一个可执行文件,当我们在系统命令行直接执行
my-cli的时候,实际上就是执行这些脚本。因为安装node的时候,npm将这个目录配置为系统变量环境了,当你执行命令的时候,系统会先找系统命令和系统变量,然后到变量环境里面去查找这个命令名,然后找到这个目录后,发现匹配上了该命令名的可执行文件,接着就直接执行它。vue-cli也好,webpack-cli也好,都是这样执行的。
到这里,我们的第一个cli脚本就成功安装了,可以在命令行里面,直接敲你定义的 cli 名字就可以成功的快速输出想要的结果了!!
但是,我们的 CLI 工具似乎还可以再完善一下
7. 完善
7.1 格式化ejs输出的模板
前文提到过ejs输出的文件模板可能没有格式化内容,这让我们阅读起来很不方便,我们可以用很多方式来格式化,比如手动使用IDE格式化、或者 通过 ESLint、stylelint格式化,又或者使用 Prettier。这里来演示 prettier
安装
npm i prettier
使用,更多options 请查看文档 Prettier
bin/template/indexHtml.index.js
import ejs from 'ejs'
import fs from 'fs'
import prettier from "prettier";
import  getRootPath  from "../../utils/index.js";

export default ( packageName ) =>
  const file = fs.readFileSync(getRootPath('template/indexHtml/indexHtml.ejs'))
  const code = ejs.render(file.toString(),  packageName )
  // 格式化
  return prettier.format(code,  parser: 'html' )

以上是关于手把手教你使用nodejs编写cli(命令行)的主要内容,如果未能解决你的问题,请参考以下文章