AlexNet--CNN经典网络模型详解(pytorch实现)
Posted 浩波的笔记
tags:
篇首语:本文由小常识网(cha138.com)小编为大家整理,主要介绍了AlexNet--CNN经典网络模型详解(pytorch实现)相关的知识,希望对你有一定的参考价值。
建议大家可以实践下,代码都很详细,有不清楚的地方评论区见~
二、AlexNet
在imagenet上的图像分类challenge上大神Alex提出的alexnet网络结构模型赢得了2012届的冠军,振奋人心,利用CNN实现了图片分类,别人用传统的机器学习算法调参跳到半死也就那样,Alex利用CNN精度远超传统的网络。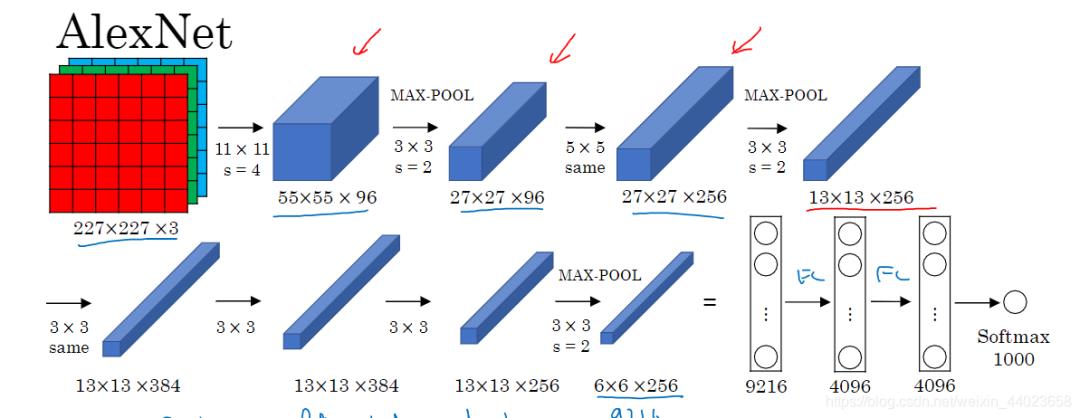 1. conv1阶段DFD(data flow diagram):
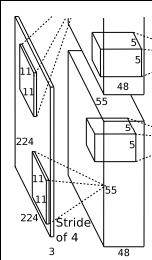
 第一层输入数据为原始的2272273的图像,这个图像被11113的卷积核进行卷积运算,卷积核对原始图像的每次卷积都生成一个新的像素。卷积核沿原始图像的x轴方向和y轴方向两个方向移动,移动的步长是4个像素。因此,卷积核在移动的过程中会生成(227-11)/4+1=55个像素(227个像素减去11,正好是54,即生成54个像素,再加上被减去的11也对应生成一个像素),行和列的5555个像素形成对原始图像卷积之后的像素层。共有96个卷积核,会生成555596个卷积后的像素层。96个卷积核分成2组,每组48个卷积核。对应生成2组555548的卷积后的像素层数据。这些像素层经过relu1单元的处理,生成激活像素层,尺寸仍为2组5555*48的像素层数据。
这些像素层经过pool运算(池化运算)的处理,池化运算的尺度为33,运算的步长为2,则池化后图像的尺寸为(55-3)/2+1=27。即池化后像素的规模为272796;然后经过归一化处理,归一化运算的尺度为55;第一卷积层运算结束后形成的像素层的规模为272796。分别对应96个卷积核所运算形成。这96层像素层分为2组,每组48个像素层,每组在一个独立的GPU上进行运算。
反向传播时,每个卷积核对应一个偏差值。即第一层的96个卷积核对应上层输入的96个偏差值。
2. conv2阶段DFD(data flow diagram):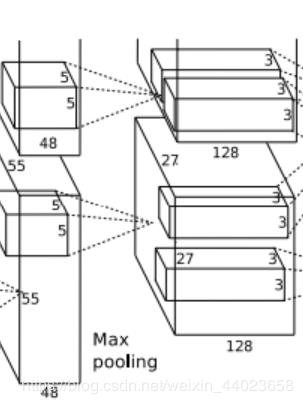
 第二层输入数据为第一层输出的272796的像素层,为便于后续处理,每幅像素层的左右两边和上下两边都要填充2个像素;27x27x96的像素数据分成27x27x48的两组像素数据,两组数据分别再两个不同的GPU中进行运算。每组像素数据被5x5x48的卷积核进行卷积运算,卷积核对每组数据的每次卷积都生成一个新的像素。卷积核沿原始图像的x轴方向和y轴方向两个方向移动,移动的步长是1个像素。因此,卷积核在移动的过程中会生成(27-5+2x2)/1+1=27个像素。(27个像素减去5,正好是22,在加上上下、左右各填充的2个像素,即生成26个像素,再加上被减去的5也对应生成一个像素),行和列的27x27个像素形成对原始图像卷积之后的像素层。共有256个5x5x48卷积核;这256个卷积核分成两组,每组针对一个GPU中的27x27x48的像素进行卷积运算。会生成两组27x27x128个卷积后的像素层。这些像素层经过relu2单元的处理,生成激活像素层,尺寸仍为两组27x27x128的像素层。
这些像素层经过pool运算(池化运算)的处理,池化运算的尺度为3x3,运算的步长为2,则池化后图像的尺寸为(57-3)/2+1=13。即池化后像素的规模为2组13x13x128的像素层;然后经过归一化处理,归一化运算的尺度为5*5;第二卷积层运算结束后形成的像素层的规模为2组13x13x128的像素层。分别对应2组128个卷积核所运算形成。每组在一个GPU上进行运算。即共256个卷积核,共2个GPU进行运算。
反向传播时,每个卷积核对应一个偏差值。即第一层的96个卷积核对应上层输入的256个偏差值。
3. conv3阶段DFD(data flow diagram):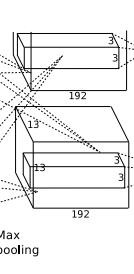
 第三层输入数据为第二层输出的2组1313128的像素层;为便于后续处理,每幅像素层的左右两边和上下两边都要填充1个像素;2组像素层数据都被送至2个不同的GPU中进行运算。每个GPU中都有192个卷积核,每个卷积核的尺寸是33256。因此,每个GPU中的卷积核都能对2组1313128的像素层的所有数据进行卷积运算。卷积核对每组数据的每次卷积都生成一个新的像素。卷积核沿像素层数据的x轴方向和y轴方向两个方向移动,移动的步长是1个像素。因此,运算后的卷积核的尺寸为(13-3+12)/1+1=13(13个像素减去3,正好是10,在加上上下、左右各填充的1个像素,即生成12个像素,再加上被减去的3也对应生成一个像素),每个GPU中共1313192个卷积核。2个GPU中共1313384个卷积后的像素层。这些像素层经过relu3单元的处理,生成激活像素层,尺寸仍为2组1313192像素层,共1313*384个像素层。
4. conv4阶段DFD(data flow diagram):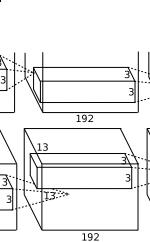
 第四层输入数据为第三层输出的2组1313192的像素层;为便于后续处理,每幅像素层的左右两边和上下两边都要填充1个像素;2组像素层数据都被送至2个不同的GPU中进行运算。每个GPU中都有192个卷积核,每个卷积核的尺寸是33192。因此,每个GPU中的卷积核能对1组1313192的像素层的数据进行卷积运算。卷积核对每组数据的每次卷积都生成一个新的像素。卷积核沿像素层数据的x轴方向和y轴方向两个方向移动,移动的步长是1个像素。因此,运算后的卷积核的尺寸为(13-3+12)/1+1=13(13个像素减去3,正好是10,在加上上下、左右各填充的1个像素,即生成12个像素,再加上被减去的3也对应生成一个像素),每个GPU中共1313192个卷积核。2个GPU中共1313384个卷积后的像素层。这些像素层经过relu4单元的处理,生成激活像素层,尺寸仍为2组1313192像素层,共1313*384个像素层。
5. conv5阶段DFD(data flow diagram):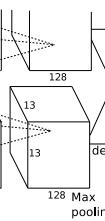
 第五层输入数据为第四层输出的2组1313192的像素层;为便于后续处理,每幅像素层的左右两边和上下两边都要填充1个像素;2组像素层数据都被送至2个不同的GPU中进行运算。每个GPU中都有128个卷积核,每个卷积核的尺寸是33192。因此,每个GPU中的卷积核能对1组1313192的像素层的数据进行卷积运算。卷积核对每组数据的每次卷积都生成一个新的像素。卷积核沿像素层数据的x轴方向和y轴方向两个方向移动,移动的步长是1个像素。因此,运算后的卷积核的尺寸为(13-3+12)/1+1=13(13个像素减去3,正好是10,在加上上下、左右各填充的1个像素,即生成12个像素,再加上被减去的3也对应生成一个像素),每个GPU中共1313128个卷积核。2个GPU中共1313256个卷积后的像素层。这些像素层经过relu5单元的处理,生成激活像素层,尺寸仍为2组1313128像素层,共1313*256个像素层。
2组1313128像素层分别在2个不同GPU中进行池化(pool)运算处理。池化运算的尺度为33,运算的步长为2,则池化后图像的尺寸为(13-3)/2+1=6。即池化后像素的规模为两组66128的像素层数据,共66*256规模的像素层数据。
6. fc6阶段DFD(data flow diagram):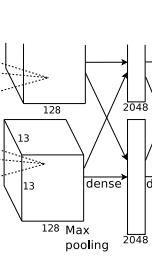
 第六层输入数据的尺寸是66256,采用66256尺寸的滤波器对第六层的输入数据进行卷积运算;每个66256尺寸的滤波器对第六层的输入数据进行卷积运算生成一个运算结果,通过一个神经元输出这个运算结果;共有4096个66256尺寸的滤波器对输入数据进行卷积运算,通过4096个神经元输出运算结果;这4096个运算结果通过relu激活函数生成4096个值;并通过drop运算后输出4096个本层的输出结果值。
由于第六层的运算过程中,采用的滤波器的尺寸(66256)与待处理的feature map的尺寸(66256)相同,即滤波器中的每个系数只与feature map中的一个像素值相乘;而其它卷积层中,每个滤波器的系数都会与多个feature map中像素值相乘;因此,将第六层称为全连接层。
第五层输出的66256规模的像素层数据与第六层的4096个神经元进行全连接,然后经由relu6进行处理后生成4096个数据,再经过dropout6处理后输出4096个数据。
7. fc7阶段DFD(data flow diagram):
 第六层输出的4096个数据与第七层的4096个神经元进行全连接,然后经由relu7进行处理后生成4096个数据,再经过dropout7处理后输出4096个数据。
8. fc8阶段DFD(data flow diagram): 第七层输出的4096个数据与第八层的1000个神经元进行全连接,经过训练后输出被训练的数值。
Alexnet网络中各个层发挥的作用如下表所述:
实现代码
#model.py

import torch.nn as nn
import torch


class AlexNet(nn.Module):
    def __init__(self, num_classes=1000, init_weights=False):
        super(AlexNet, self).__init__()
        self.features = nn.Sequential(  #打包
            nn.Conv2d(3, 48, kernel_size=11, stride=4, padding=2),  # input[3, 224, 224]  output[48, 55, 55] 自动舍去小数点后
            nn.ReLU(inplace=True), #inplace 可以载入更大模型
            nn.MaxPool2d(kernel_size=3, stride=2),                  # output[48, 27, 27] kernel_num为原论文一半
            nn.Conv2d(48, 128, kernel_size=5, padding=2),           # output[128, 27, 27]
            nn.ReLU(inplace=True),
            nn.MaxPool2d(kernel_size=3, stride=2),                  # output[128, 13, 13]
            nn.Conv2d(128, 192, kernel_size=3, padding=1),          # output[192, 13, 13]
            nn.ReLU(inplace=True),
            nn.Conv2d(192, 192, kernel_size=3, padding=1),          # output[192, 13, 13]
            nn.ReLU(inplace=True),
            nn.Conv2d(192, 128, kernel_size=3, padding=1),          # output[128, 13, 13]
            nn.ReLU(inplace=True),
            nn.MaxPool2d(kernel_size=3, stride=2),                  # output[128, 6, 6]
        )
        self.classifier = nn.Sequential(
            nn.Dropout(p=0.5),
            #全链接
            nn.Linear(128 * 6 * 6, 2048),
            nn.ReLU(inplace=True),
            nn.Dropout(p=0.5),
            nn.Linear(2048, 2048),
            nn.ReLU(inplace=True),
            nn.Linear(2048, num_classes),
        )
        if init_weights:
            self._initialize_weights()

    def forward(self, x):
        x = self.features(x)
        x = torch.flatten(x, start_dim=1) #展平   或者view()
        x = self.classifier(x)
        return x

    def _initialize_weights(self):
        for m in self.modules():
            if isinstance(m, nn.Conv2d):
                nn.init.kaiming_normal_(m.weight, mode='fan_out', nonlinearity='relu') #何教授方法
                if m.bias is not None:
                    nn.init.constant_(m.bias, 0)
            elif isinstance(m, nn.Linear):
                nn.init.normal_(m.weight, 0, 0.01)  #正态分布赋值
                nn.init.constant_(m.bias, 0)
下载数据集
DATA_URL = 'http://download.tensorflow.org/example_images/flower_photos.tgz'
下载完后执行下面脚本,将数据集进行分类
#spile_data.py

import os
from shutil import copy
import random


def mkfile(file):
    if not os.path.exists(file):
        os.makedirs(file)


file = 'flower_data/flower_photos'
flower_class = [cla for cla in os.listdir(file) if ".txt" not in cla]
mkfile('flower_data/train')
for cla in flower_class:
    mkfile('flower_data/train/'+cla)

mkfile('flower_data/val')
for cla in flower_class:
    mkfile('flower_data/val/'+cla)

split_rate = 0.1
for cla in flower_class:
    cla_path = file + '/' + cla + '/'
    images = os.listdir(cla_path)
    num = len(images)
    eval_index = random.sample(images, k=int(num*split_rate))
    for index, image in enumerate(images):
        if image in eval_index:
            image_path = cla_path + image
            new_path = 'flower_data/val/' + cla
            copy(image_path, new_path)
        else:
            image_path = cla_path + image
            new_path = 'flower_data/train/' + cla
            copy(image_path, new_path)
        print("
[{}] processing [{}/{}]".format(cla, index+1, num), end="")  # processing bar
    print()

print("processing done!")
之后应该是这样:
train.py

import torch
import torch.nn as nn
from torchvision import transforms, datasets, utils
import matplotlib.pyplot as plt
import numpy as np
import torch.optim as optim
from model import AlexNet
import os
import json
import time


#device : GPU or CPU
device = torch.device("cuda:0" if torch.cuda.is_available() else "cpu")
print(device)


#数据转换
data_transform = {
    "train": transforms.Compose([transforms.RandomResizedCrop(224),
                                 transforms.RandomHorizontalFlip(),
                                 transforms.ToTensor(),
                                 transforms.Normalize((0.5, 0.5, 0.5), (0.5, 0.5, 0.5))]),
    "val": transforms.Compose([transforms.Resize((224, 224)),  # cannot 224, must (224, 224)
                               transforms.ToTensor(),
                               transforms.Normalize((0.5, 0.5, 0.5), (0.5, 0.5, 0.5))])}

#data_root = os.path.abspath(os.path.join(os.getcwd(), "../.."))  # get data root path
data_root = os.getcwd()
image_path = data_root + "/flower_data/"  # flower data set path
train_dataset = datasets.ImageFolder(root=image_path + "/train",
                                     transform=data_transform["train"])
train_num = len(train_dataset)

# {'daisy':0, 'dandelion':1, 'roses':2, 'sunflower':3, 'tulips':4}
flower_list = train_dataset.class_to_idx
cla_dict = dict((val, key) for key, val in flower_list.items())
# write dict into json file
json_str = json.dumps(cla_dict, indent=4)
with open('class_indices.json', 'w') as json_file:
    json_file.write(json_str)

batch_size = 32
train_loader = torch.utils.data.DataLoader(train_dataset,
                                           batch_size=batch_size, shuffle=True,
                                           num_workers=0)

validate_dataset = datasets.ImageFolder(root=image_path + "/val",
                                        transform=data_transform["val"])
val_num = len(validate_dataset)
validate_loader = torch.utils.data.DataLoader(validate_dataset,
                                              batch_size=batch_size, shuffle=True,
                                              num_workers=0)

test_data_iter = iter(validate_loader)
test_image, test_label = test_data_iter.next()
#print(test_image[0].size(),type(test_image[0]))
#print(test_label[0],test_label[0].item(),type(test_label[0]))


#显示图像,之前需把validate_loader中batch_size改为4
# def imshow(img):
#     img = img / 2 + 0.5  # unnormalize
#     npimg = img.numpy()
#     plt.imshow(np.transpose(npimg, (1, 2, 0)))
#     plt.show()
#
# print(' '.join('%5s' % cla_dict[test_label[j].item()] for j in range(4)))
# imshow(utils.make_grid(test_image))


net = AlexNet(num_classes=5, init_weights=True)

net.to(device)
#损失函数:这里用交叉熵
loss_function = nn.CrossEntropyLoss()
#优化器 这里用Adam
optimizer = optim.Adam(net.parameters(), lr=0.0002)
#训练参数保存路径
save_path = './AlexNet.pth'
#训练过程中最高准确率
best_acc = 0.0

#开始进行训练和测试,训练一轮,测试一轮
for epoch in range(10):
    # train
    net.train()    #训练过程中,使用之前定义网络中的dropout
    running_loss = 0.0
    t1 = time.perf_counter()
    for step, data in enumerate(train_loader, start=0):
        images, labels = data
        optimizer.zero_grad()
        outputs = net(images.to(device))
        loss = loss_function(outputs, labels.to(device))
        loss.backward()
        optimizer.step()

        # print statistics
        running_loss += loss.item()
        # print train process
        rate = (step + 1) / len(train_loader)
        a = "*" * int(rate * 50)
        b = "." * int((1 - rate) * 50)
        print("
train loss: {:^3.0f}%[{}->{}]{:.3f}".format(int(rate * 100), a, b, loss), end="")
    print()
    print(time.perf_counter()-t1)

    # validate
    net.eval()    #测试过程中不需要dropout,使用所有的神经元
    acc = 0.0  # accumulate accurate number / epoch
    with torch.no_grad():
        for val_data in validate_loader:
            val_images, val_labels = val_data
            outputs = net(val_images.to(device))
            predict_y = torch.max(outputs, dim=1)[1]
            acc += (predict_y == val_labels.to(device)).sum().item()
        val_accurate = acc / val_num
        if val_accurate > best_acc:
            best_acc = val_accurate
            torch.save(net.state_dict(), save_path)
        print('[epoch %d] train_loss: %.3f  test_accuracy: %.3f' %
              (epoch + 1, running_loss / step, val_accurate))

print('Finished Training')
最后进行预测
predict.py

import torch
from model import AlexNet
from PIL import Image
from torchvision import transforms
import matplotlib.pyplot as plt
import json

data_transform = transforms.Compose(
    [transforms.Resize((224, 224)),
     transforms.ToTensor(),
     transforms.Normalize((0.5, 0.5, 0.5), (0.5, 0.5, 0.5))])

# load image
img = Image.open("./sunflower.jpg")  #验证太阳花
#img = Image.open("./roses.jpg")     #验证玫瑰花
plt.imshow(img)
# [N, C, H, W]
img = data_transform(img)
# expand batch dimension
img = torch.unsqueeze(img, dim=0)

# read class_indict
try:
    json_file = open('./class_indices.json', 'r')
    class_indict = json.load(json_file)
except Exception as e:
    print(e)
    exit(-1)

# create model
model = AlexNet(num_classes=5)
# load model weights
model_weight_path = "./AlexNet.pth"
model.load_state_dict(torch.load(model_weight_path))
model.eval()
with torch.no_grad():
    # predict class
    output = torch.squeeze(model(img))
    predict = torch.softmax(output, dim=0)
    predict_cla = torch.argmax(predict).numpy()
print(class_indict[str(predict_cla)], predict[predict_cla].item())
plt.show()
以上是关于AlexNet--CNN经典网络模型详解(pytorch实现)的主要内容,如果未能解决你的问题,请参考以下文章
[ 注意力机制 ] 经典网络模型1——SENet 详解与复现
DenseNet——CNN经典网络模型详解(pytorch实现)