使用openCV进行边缘检测二值化轮廓轮廓检测BGR灰度图二值化,专栏:各种openCV实践的案例
Posted dlage
tags:
篇首语:本文由小常识网(cha138.com)小编为大家整理,主要介绍了使用openCV进行边缘检测二值化轮廓轮廓检测BGR灰度图二值化,专栏:各种openCV实践的案例相关的知识,希望对你有一定的参考价值。
前言
使用OpenCV的轮廓检测,当我们加入对象的边界上的所有点时,我们得到一个轮廓。 通常,特定轮廓区域与边界像素有关,具有相似的颜色和强度。 每当强度或颜色变化很大,那么几乎总是从那里开始一个新的轮廓区域。
环境:ubuntu、anaconda、python、vscode
基本步骤
1.读取图像并将其转换为灰度格式
import cv2
image = cv2.imread('/data/file/img/image_1.jpg')
img_gray = cv2.cvtColor(image, cv2.COLOR_BGR2GRAY)
2.应用二进制阈值
ret, thresh = cv2.threshold(img_gray, 150, 255, cv2.THRESH_BINARY)
这里的ret是阈值,小于这个阈值的像素点的值会被改变为0,大于这个阈值的像素点的值会被改变为255。(我这里的ret的值是150)
thresh是应用阈值处理之后的二值化图像。
让我们来看一下二值化后的图像

可以看出边缘是很清晰的。
3.使用chain_approx_none绘制轮廓
contours, hierarchy = cv2.findContours(image=thresh, mode=cv2.RETR_TREE, method=cv2.CHAIN_APPROX_NONE)

image_copy = image.copy()
cv2.drawContours(image=image_copy, contours=contours, contourIdx=-1, color=(0, 255, 0), thickness=2, lineType=cv2.LINE_AA)

cv2.imshow('None approximation', image_copy)
cv2.waitKey(0)
cv2.destroyAllWindows()
注意,直接点击×掉显示的窗口不会使得程序停止,除非你再执行一个
cv2.destroyAllWindows()
正确关闭窗口的操作是点击图像后,按任意的键即可关闭图像。

这里在二值化后的图像找到边缘,然后将边缘画在原图上,就形成了上面的图片。
以上就是边缘检测的基本操作,下面的案例几乎都是和上面的操作类似。
4.使用单个通道:红色,绿色或蓝色
# 使用上面已经读取了的图像
# 将图像的B,G,R通道分开
blue, green, red = cv2.split(image)
contours1, hierarchy1 = cv2.findContours(image=blue, mode=cv2.RETR_TREE, method=cv2.CHAIN_APPROX_NONE)
image_contours_blue = image.copy()
cv2.drawContours(image=image_contours_blue, contours=contours1, contourIdx=-1,
                                color=(0, 255, 0), thickness=2, lineType=cv2.LINE_AA)
cv2.imshow('Contours detection using blue channels only', image_contours_blue)
cv2.waitKey(0)
cv2.destroyAllWindows()

# detect contours using green channel and without thresholding
contours2, hierarchy2 = cv2.findContours(image=green, mode=cv2.RETR_TREE, method=cv2.CHAIN_APPROX_NONE)
# draw contours on the original image
image_contour_green = image.copy()
cv2.drawContours(image=image_contour_green, contours=contours2, contourIdx=-1, color=(0, 255, 0), thickness=2, lineType=cv2.LINE_AA)
# see the results
cv2.imshow('Contour detection using green channels only', image_contour_green)
cv2.waitKey(0)
cv2.destroyAllWindows()

# detect contours using red channel and without thresholding
contours3, hierarchy3 = cv2.findContours(image=red, mode=cv2.RETR_TREE, method=cv2.CHAIN_APPROX_NONE)
# draw contours on the original image
image_contour_red = image.copy()
cv2.drawContours(image=image_contour_red, contours=contours3, contourIdx=-1, color=(0, 255, 0), thickness=2, lineType=cv2.LINE_AA)
# see the results
cv2.imshow('Contour detection using red channels only', image_contour_red)
cv2.waitKey(0)
cv2.destroyAllWindows()
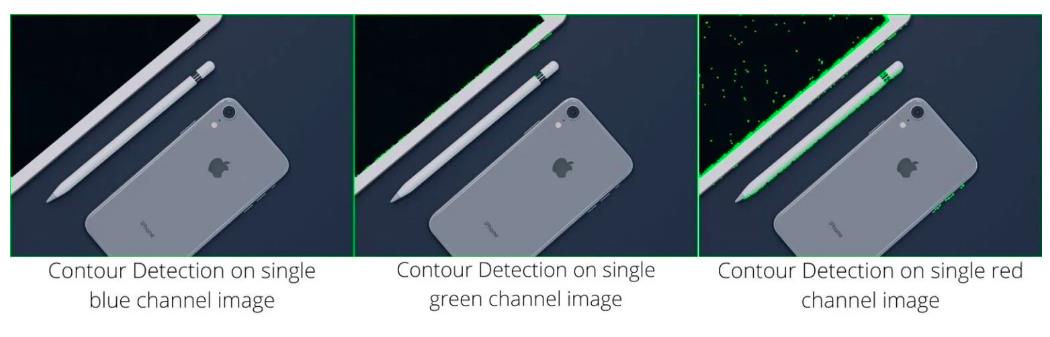
可以看出使用单通道进行边缘检测都不是很准确。
总结
这个实验我们使用了openCV的轮廓和轮廓检测。
参考连接:https://learnopencv.com/contour-detection-using-opencv-python-c/#What-are-Contours
以上是关于使用openCV进行边缘检测二值化轮廓轮廓检测BGR灰度图二值化,专栏:各种openCV实践的案例的主要内容,如果未能解决你的问题,请参考以下文章