利用OpenCV进行图像的轮廓检测
Posted 卓晴
tags:
篇首语:本文由小常识网(cha138.com)小编为大家整理,主要介绍了利用OpenCV进行图像的轮廓检测相关的知识,希望对你有一定的参考价值。
简 介: 本文对于OpenCV中的轮廓检测算法进行了讨论,可以看到一些基于轮廓检测的应用。接着对四种不同的提取方式的结果进行了讨论。你还了解了如何将轮廓进行绘制的方法。
关键词: 轮廓检测,二值化
§00 前 言
本文根据 Contour Detection using OpenCV (Python/C++) 中的内容整理而得。
使用轮廓检测可以获得物体的边界,方便在图像中对他们进行定位。通常在一些有趣的应用中轮廓检测是第一处理环节。,比如图像前景提取,简单的图像分割,检测以及识别等。
下面让我们认识一下轮廓以及在OpenCV中实现轮廓检测算法,自己考虑一下如何基于此形成更加有趣的应用。
0.1 机器视觉中的轮廓
基于轮廓信息完成移动物体检测和分割可以构建很多有趣的应用,下面给出一些例子:
- 运动检测: 在视频监视中,移动物体检测技术有着广泛的应用:室内外安全环境监测、交通控制、在体育活动中的行为检测、监测非法入侵物体,甚至在视频压缩中都有着应用。下图中,可以看到视频流中的移动人去在监控中有着重要的应用。在左侧站立静止不动的人群则没有被标注出来。只有那些运动的才被抓拍。基于本文方法细节进行研究。
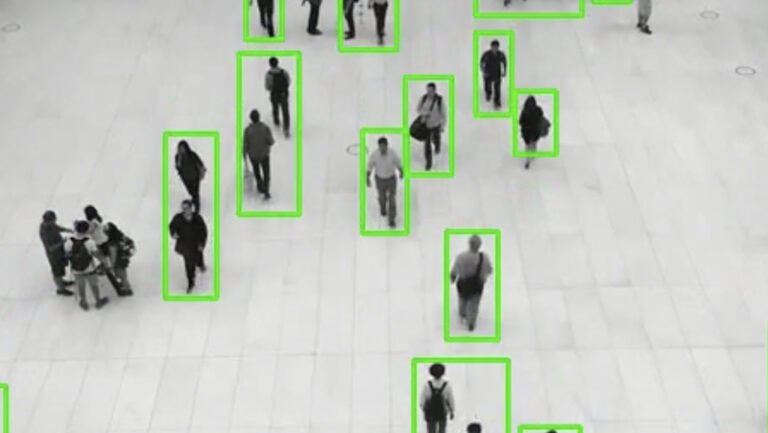
▲ 图1.1 运动检测的应用示例。对于移动中的人体进行检测。对于站立静止不动的人群没有检测
- 可疑物体检测: 在公共场合的非法侵入物品被当做可疑物品。 一个有效安全的方法:通过轮廓建模和背景减除进行入侵物体检测。
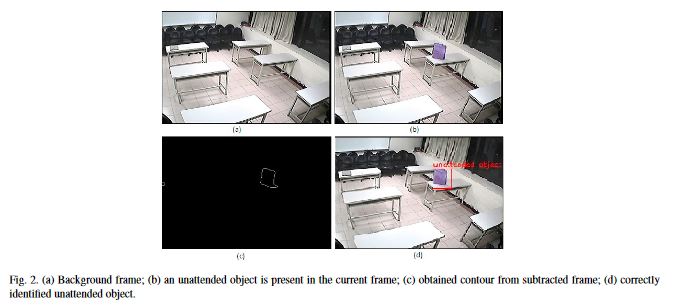
▲ 图1.2 入侵物体检测
从上述引用的文章来看,背景图片以及带有非法入侵物体图片可以找出并标注出可疑物体。
- 背景前景分割: 将图像中的背景进行替换,你需要执行图像的前景提取(类似于图像分割)。使用轮廓信息可以帮助我们完成前景的分割。本文中将会给出更爱的细节。下面的图展示了种种应用的简单示例。
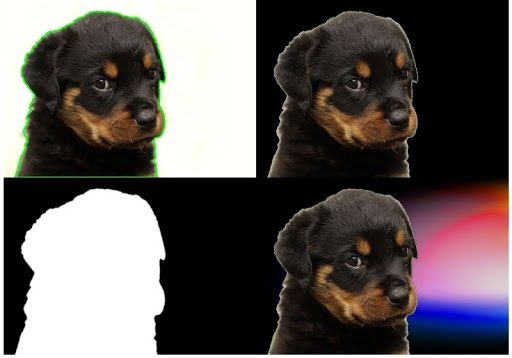
▲ 图1.3 图镶前景提取的示例,添加新的背景
0.2 什么是轮廓
当我们把物体边缘所有的点连接在一起可以获得轮廓。通常,对于特定的轮廓是指那些具有相同颜色和亮度的边界点像素。 OpenCV使得寻找和绘制图像中物体轮廓变得很容易了。它提供了一下两个简单函数:
1. findContours();
2. drawContours();
还有,它还提供了不同的轮廓检测算法:
1. CHAIN_APPOROX_SIMPLE
2. CAHIN_APPROX_NONE
在下面的例子中我们将详细讨论。下面图片显示了这些算法是如何能够检测到简单物体的轮廓的。

▲ 图2.1 轮廓检测结果
上面解释了什么是物体的轮廓,下面我们讨论轮廓检测中的步骤。
§01 轮廓检测和绘制
OpenCV使得轮廓检测和绘制变得十分容易。只需一下步骤:
1.1 读取图片转换成灰度格式
将图像读取并转换成灰度格式。将图像转换成灰度图是进行下一步操作前的重要步骤。将图像转换成单通道的灰度值可以用于后面的阈值处理,这是后面进行轮廓检测的必须步骤。
1.2 进行二值化阈值处理
为了检测轮廓,需要先对灰度图进行二值化结果,或者Canny边缘检测结果上进行。这里我们采用二值化结果。
将图像转换成黑白图像,吧感兴趣物体加亮凸显出来便于轮廓检测算法。阈值处理将图片中的物体区域转换成白色,所有的物体像素都具有相同的亮度值。从这些白色像素中算法获得物体的轮廓。
注意:黑色像素,取值为0。代表着背景,在轮廓检测中被忽略。
此时,会产生一个问题,是否我们可以使用彩色图像中的一个彩色通道,比如 R,G,B通道,取代灰度图呢?这种情况下, 轮廓检测可能工作不好。前面我们讨论过,检测边界的算法,也就是检测相同亮度像素以发现轮廓。在灰度图上建立的黑白图比起单个颜色通道(R,G,B)效果会更好。本文后半部分,我们会给出仅仅基于R,G,B单个彩色通道下测轮廓检测结果。
1.3 检测轮廓
使用 findContours()函数来检测图像中的所有的轮廓。
1.4 在原图中显示轮廓
当轮廓被确定之后,可以使用 drawContours()函数来在原始图像上重合上轮廓标注曲线。
通过代码可以使得上面各个步骤的含义更加确切和明了。
§02 OpenCV轮廓检测
2.1 图像读入和转换
先以OpenCV的导入开始,然后读取图像。
- Python
import cv2

# read the image
image = cv2.imread('input/image_1.jpg')
上面代码是假设图像文件在当前工程目录中。下面是将图像转换成灰度图像(单通道格式)
- C++
#include<opencv2/opencv.hpp>
#include <iostream>

using namespace std;
using namespace cv;

int main()
   // read the image
   Mat image = imread("input/image_1.jpg");
接下来使用 cvtColor() 函数将原来的RGB图像转换成灰度图像。
- Python
# convert the image to grayscale format
img_gray = cv2.cvtColor(image, cv2.COLOR_BGR2GRAY)
- C++
// convert the image to grayscale format
Mat img_gray;
cvtColor(image, img_gray, COLOR_BGR2GRAY);
2.2 阈值处理
使用threshold()函数将图像进行二值化。对于所有像素值大于150 将被转换成255(白色),其余的像素则转换成(0)黑色。参数150是一个可以调整的参数,你可以通过实验来确定它。
经过阈值处理之后可以通过 imshow观察到二值化图像。函数在下面代码中演示:
- Python
# apply binary thresholding
ret, thresh = cv2.threshold(img_gray, 150, 255, cv2.THRESH_BINARY)
# visualize the binary image
cv2.imshow('Binary image', thresh)
cv2.waitKey(0)
cv2.imwrite('image_thres1.jpg', thresh)
cv2.destroyAllWindows()
- C++
// apply binary thresholding
Mat thresh;
threshold(img_gray, thresh, 150, 255, THRESH_BINARY);
imshow("Binary mage", thresh);
waitKey(0);
imwrite("image_thres1.jpg", thresh);
destroyAllWindows();
查看下面的图像。这是对原来的RGB彩色图像的二值化。你可以缺口处看到笔、手写笔以及手机的边缘都变成了白色。 轮廓算法将这些白色当成物体,来寻找这些物体的轮廓。
注意,所有的背景都是黑色,包括手机的背面。这些区域将会被算法忽略。 每个物体边缘的白色像素都被当做具有相同亮度的像素,算法通过相似度量来把它们结合成物体的轮廓。

▲ 图2.2.1 经过阈值处理之后的二值化图像
2.3 利用CHAIN_APPROX_NONE绘制轮廓
下面通过 CHAIN_APPROX_NONE方法来发现和绘制轮廓。
首先使用 findContours() 函数。它需要三个输入参数,下面给出具体定义。对于可选参数可以参考这个 链接中的文档 。
- image: The binary input image obtained in the previous step.
- ode: This is the contour-retrieval mode. We provided this as RETR_TREE, which means the algorithm will retrieve all possible contours from the binary image. More contour retrieval modes are available, we will be discussing them too. You can learn more details on these options here.
- thod: This defines the contour-approximation method. In this example, we will use CHAIN_APPROX_NONE.Though slightly slower than CHAIN_APPROX_SIMPLE, we will use this method here tol store ALL contour points.
值得说明的是, mode 参数是指提取轮廓的类型, method参数则是指轮廓中的哪些点将被存储。后面我们将会详细解释。
对于相同的图像施加不同的方法的结果差异可以通过观察很容易进行理解。
下面代码中,我们先对原始图像进行拷贝,然后展示处理方法。之所以拷贝是不想算法对原始图像进行改动。
截止,使用 drawContours()函数了在RGB图像上绘制轮廓。这个函数具有四个必须的参数以及一些可选的参数。前面四个参数在下面列出。可选参数可以参考 这个链接中的文档 。
-
image: This is the input RGB image on which you want to draw the contour.
-
contours: Indicates the contours obtained from the findContours() function.
-
contourIdx: The pixel coordinates of the contour points are listed in the obtained contours. Using this argument, you can specify the index position from this list, indicating exactly which contour point you want to draw. Providing a negative value will draw all the contour points.
-
color: This indicates the color of the contour points you want to draw. We are drawing the points in green.
-
thickness: This is the thickness of contour points.
-
Python
# detect the contours on the binary image using cv2.CHAIN_APPROX_NONE
contours, hierarchy = cv2.findContours(image=thresh, mode=cv2.RETR_TREE, method=cv2.CHAIN_APPROX_NONE)

# draw contours on the original image
image_copy = image.copy()
cv2.drawContours(image=image_copy, contours=contours, contourIdx=-1, color=(0, 255, 0), thickness=2, lineType=cv2.LINE_AA)

# see the results
cv2.imshow('None approximation', image_copy)
cv2.waitKey(0)
cv2.imwrite('contours_none_image1.jpg', image_copy)
cv2.destroyAllWindows()
- C++
// detect the contours on the binary image using cv2.CHAIN_APPROX_NONE
vector<vector<Point>> contours;
vector<Vec4i> hierarchy;
findContours(thresh, contours, hierarchy, RETR_TREE, CHAIN_APPROX_NONE);
// draw contours on the original image
Mat image_copy = image.clone();
drawContours(image_copy, contours, -1, Scalar(0, 255, 0), 2);
imshow("None approximation", image_copy);
waitKey(0);
imwrite("contours_none_image1.jpg", image_copy);
destroyAllWindows();
上面代码执行完之后将会产生和显示下面的图像,我们将结果存储在磁盘中。

▲ 图2.3.1 使用 CHINA_APPROX_NONE检测轮廓结果
下图给出了原始图像(左)以及附盖有检测轮廓的图像(右)。

▲ 图2.3.2 原始图像以及有轮廓标注的图像
你所看的结果显示了算法所产生的轮廓细腻找出了每个物体的边界 。然而,如果你放大仔细看可以发现每个物体存在着不止一个轮廓。对于手机摄像头镜头和补光灯前面的圆形区域,就有许多分离的边界。在手机边缘也存在着第二边界。
需要知道,轮廓算法的检测精度和检测治理一类与所提供的二值图的质量(重新观察前面得到的图像二值图可以看到与第二轮廓之间的联系)。对于一些要求轮廓检测质量高的应用,需要通过不同的 阈值来处理灰度图以便获取质量好的二值图,对于结果查看以便确定最优的阈值。
存在其他方法可以利用前面所产生的二值图来去除不需要的轮廓。你也能使用更好的轮廓特征算法,可以看如下的连接。
2.4 使用单个通道:R,G,B
只是为了测试一个想法,下面代码使用单个R,G,B通道来进行轮廓检测。前面对此提到过,下面是相应的代码实现。
- Python
import cv2

# read the image
image = cv2.imread('input/image_1.jpg')

# B, G, R channel splitting
blue, green, red = cv2.split(image)

# detect contours using blue channel and without thresholding
contours1, hierarchy1 = cv2.findContours(image=blue, mode=cv2.RETR_TREE, method=cv2.CHAIN_APPROX_NONE)

# draw contours on the original image
image_contour_blue = image.copy()
cv2.drawContours(image=image_contour_blue, contours=contours1, contourIdx=-1, color=(0, 255, 0), thickness=2, lineType=cv2.LINE_AA)
# see the results
cv2.imshow('Contour detection using blue channels only', image_contour_blue)
cv2.waitKey(0)
cv2.imwrite('blue_channel.jpg', image_contour_blue)
cv2.destroyAllWindows()

# detect contours using green channel and without thresholding
contours2, hierarchy2 = cv2.findContours(image=green, mode=cv2.RETR_TREE, method=cv2.CHAIN_APPROX_NONE)
# draw contours on the original image
image_contour_green = image.copy()
cv2.drawContours(image=image_contour_green, contours=contours2, contourIdx=-1, color=(0, 255, 0), thickness=2, lineType=cv2.LINE_AA)
# see the results
cv2.imshow('Contour detection using green channels only', image_contour_green)
cv2.waitKey(0)
cv2.imwrite('green_channel.jpg', image_contour_green)
cv2.destroyAllWindows()

# detect contours using red channel and without thresholding
contours3, hierarchy3 = cv2.findContours(image=red, mode=cv2.RETR_TREE, method=cv2.CHAIN_APPROX_NONE)
# draw contours on the original image
image_contour_red = image.copy()
cv2.drawContours(image=image_contour_red, contours=contours3, contourIdx=-1, color=(0, 255, 0), thickness=2, lineType=cv2.LINE_AA)
# see the results
cv2.imshow('Contour detection using red channels only', image_contour_red)
cv2.waitKey(0)
cv2.imwrite('red_channel.jpg', image_contour_red)
cv2.destroyAllWindows()
- C++
#include<opencv2/opencv.hpp>
#include <iostream>

using namespace std;
using namespace cv;

int main()
   // read the image
   Mat image = imread("input/image_1.jpg");

   // B, G, R channel splitting
   Mat channels[3];
   split(image, channels);

   // detect contours using blue channel and without thresholding
   vector<vector<Point>> contours1;
   vector<Vec4i> hierarchy1;
   findContours(channels[0], contours1, hierarchy1, RETR_TREE, CHAIN_APPROX_NONE);
   // draw contours on the original image
   Mat image_contour_blue = image.clone();
   drawContours(image_contour_blue, contours1, -1, Scalar(0, 255, 0), 2);
   imshow("Contour detection using blue channels only", image_contour_blue);
   waitKey(0);
   imwrite("blue_channel.jpg", image_contour_blue);
   destroyAllWindows();

   // detect contours using green channel and without thresholding
   vector<vector<Point>> contours2;
   vector<Vec4i> hierarchy2;
   findContours(channels[1], contours2, hierarchy2, RETR_TREE, CHAIN_APPROX_NONE);
   // draw contours on the original image
   Mat image_contour_green = image.clone();
   drawContours(image_contour_green, contours2, -1, Scalar(0, 255, 0), 2);
   imshow("Contour detection using green channels only", image_contour_green);
   waitKey(0);
   imwrite("green_channel.jpg", image_contour_green);
   destroyAllWindows();

   // detect contours using red channel and without thresholding
   vector<vector<Point>> contours3;
   vector<Vec4i> hierarchy3;
   findContours(channels[2], contours3, hierarchy3, RETR_TREE, CHAIN_APPROX_NONE);
   // draw contours on the original image
   Mat image_contour_red = image.clone();
   drawContours(image_contour_red, contours3, -1, Scalar(0, 255, 0), 2);
   imshow("Contour detection using red channels only", image_contour_red);
   waitKey(0);
   imwrite("red_channel.jpg", image_contour_red);
   destroyAllWindows();
下面的图片显示了使用三个不同的参赛通道检测的结果。

▲ 图2.4.1 使用三个不同的彩色通道检测的轮廓
上面结果显示只使用单个颜色通道来进行轮廓检测结果并不理想。这是因为基于单个颜色通道无法正确确定物体的编辑,对于像素亮度差异也没有很好的定义。这就是为什么我们使用灰度图来进行二值化并检测轮廓的原因。
2.5 使用CHAIN_APPROX_SIMPLE绘制轮廓
下面对比一的CHAIN_APPROX_SIMPLE 与 CHAIN_APPROX_NONE之间的差异。
下面就是对应的代码:
- Python
"""
Now let's try with `cv2.CHAIN_APPROX_SIMPLE`
"""
# detect the contours on the binary image using cv2.ChAIN_APPROX_SIMPLE
contours1, hierarchy1 = cv2.findContours(thresh, cv2.RETR_TREE, cv2.CHAIN_APPROX_SIMPLE)
# draw contours on the original image for `CHAIN_APPROX_SIMPLE`
image_copy1 = image.copy()
cv2.drawContours(image_copy1, contours1, -1, (0, 255, 0), 2, cv2.LINE_AA)
# see the results
cv2.imshow('Simple approximation', image_copy1)
cv2.waitKey(0)
cv2.imwrite('contours_simple_image1.jpg', image_copy1)
cv2.destroyAllWindows()
- C++
// Now let us try with CHAIN_APPROX_SIMPLE`
// detect the contours on the binary image using cv2.CHAIN_APPROX_NONE
vector<vector<Point>> contours1;
vector<Vec4i> hierarchy1;
findContours(thresh, contours1, hierarchy1, RETR_TREE, CHAIN_APPROX_SIMPLE);
// draw contours on the original image
Mat image_copy1 = image.clone();
drawContours(image_copy1, contours1, -1, Scalar(0, 255, 0), 2);
imshow("Simple approximation", image_copy1);
waitKey(0);
imwrite("contours_simple_image1.jpg", image_copy1);
destroyAllWindows();
这两个参数用在fondContours()中的method取值中。
CHAIN_APPROX_SIMPLE算法对水平、垂直以及对角线方向的片段轮廓进行了省略,仅仅保存了他们的端点。这意味着所有直线上的点都会消失,只保存端点信息。比如,对于举行的轮廓,除了四个角落的点其他的点都被省略。这种模式先处理速度要比CHAIN_APPROX_NONE更快,所需要的内存更少,因此执行时间就会被节省。
下面给出了处理结果。
hf[CSDN-ZHUOQINGJOKING-97298]
▲ 图1 利用 CHAIN_APPROX_SIMPLE所得到的结果
如果你自己观察,在输出结果上 CHAIN_APPROX_NONE, CHAIN_APPROX_SIMPLE并没有任何差异。
那么,为什么是这样?
这就是 drawContours() 函数的 优点。虽然CHAIN_APPROX_SIMPLE 方法只保存了少了的角点,但drawContours()自动把中间的相邻点都补齐了,尽管他们并没有在输出轮廓结果列表中。
因此,我们如何确定 CHAIN_APPROX_SIMPLE所带来的优点的确有效果呢?
- 可以通过OpenCV中的画圆函数对于检测结果中所有的点进行标注;
- 更换一个不同的图像来帮助我们看到算法的结果。
▲ 图2.5.1 用于展示CHAIN_APPROX_SIMPLE方法的图像
下面代码使用上面的图像来显示CHAIN_APPROX_SIMPLE方法算法的特性。几乎所有的步骤都是相同的,只是添加了for循环以及一些变量的名称。
- 第一个for巡回是对contours列表中进行循环;
- 迪若各则是对区域中的每个坐标进行循环;
- 使用circle() 对于每个坐标绘制相应的圆圈;
- 最后可以看到相应的结果并存盘。
- Python
# to actually visualize the effect of `CHAIN_APPROX_SIMPLE`, we need a proper image
image1 = cv2.imread('input/image_2.jpg')
img_gray1 = cv2.cvtColor(image1, cv2.COLOR_BGR2GRAY)

ret, thresh1 = cv2.threshold(img_gray1, 150, 255, cv2.THRESH_BINARY)
contours2, hierarchy2 = cv2.findContours(thresh1, cv2.RETR_TREE,
                                               cv2.CHAIN_APPROX_SIMPLE)
image_copy2 = image1.copy()
cv2.drawContours(image_copy2, contours2, -1, (0, 255, 0), 2, cv2.LINE_AA)
cv2.imshow('SIMPLE Approximation contours', image_copy2)
cv2.waitKey(0)
image_copy3 = image1.copy()
for i, contour in enumerate(contours2): # loop over one contour area
   for j, contour_point in enumerate(contour): # loop over the points
       # draw a circle on the current contour coordinate
       cv2.circle(image_copy3, ((contour_point[0][0], contour_point[0][1])), 2, (0, 255, 0), 2, cv2.LINE_AA)
# see the results
cv2.imshow('CHAIN_APPROX_SIMPLE Point only', image_copy3)
cv2.waitKey(0)
cv2.imwrite('contour_point_simple.jpg', image_copy3)
cv2.destroyAllWindows()
- C++
// using a proper image for visualizing CHAIN_APPROX_SIMPLE
Mat image1 = imread("input/image_2.jpg");
Mat img_gray1;
cvtColor(image1, img_gray1, COLOR_BGR2GRAY);
Mat thresh1;
threshold(img_gray1, thresh1, 150, 255, THRESH_BINARY);
vector<vector<Point>> contours2;
vector<Vec4i> hierarchy2;
findContours(thresh1, contours2, hierarchy2, RETR_TREE, CHAIN_APPROX_NONE);
Mat image_copy2 = image1.clone();
drawContours(image_copy2, contours2, -1, Scalar(0, 255, 0), 2);
imshow("None approximation", image_copy2);
waitKey(0);
imwrite("contours_none_image1.jpg", image_copy2);
destroyAllWindows();
Mat image_copy3 = image1.clone();
for(int i=0; i<contours2.size(); i=i+1)
for (int j=0; j<contours2[i].size(); j=j+1)
circle(image_copy3, (contours2[i][0]