Flutter上线项目实战——即时通讯端对端加密(E2E)
Posted callme大帅
tags:
篇首语:本文由小常识网(cha138.com)小编为大家整理,主要介绍了Flutter上线项目实战——即时通讯端对端加密(E2E)相关的知识,希望对你有一定的参考价值。
1.背景知识
- 数字签名算法EdDSA: ed25519
- 密钥交换算法ECDH: x25519
- 加密算法AES
- 参考阅读: http://www.freebuf.com/articles/database/113855.html
2.设计思路
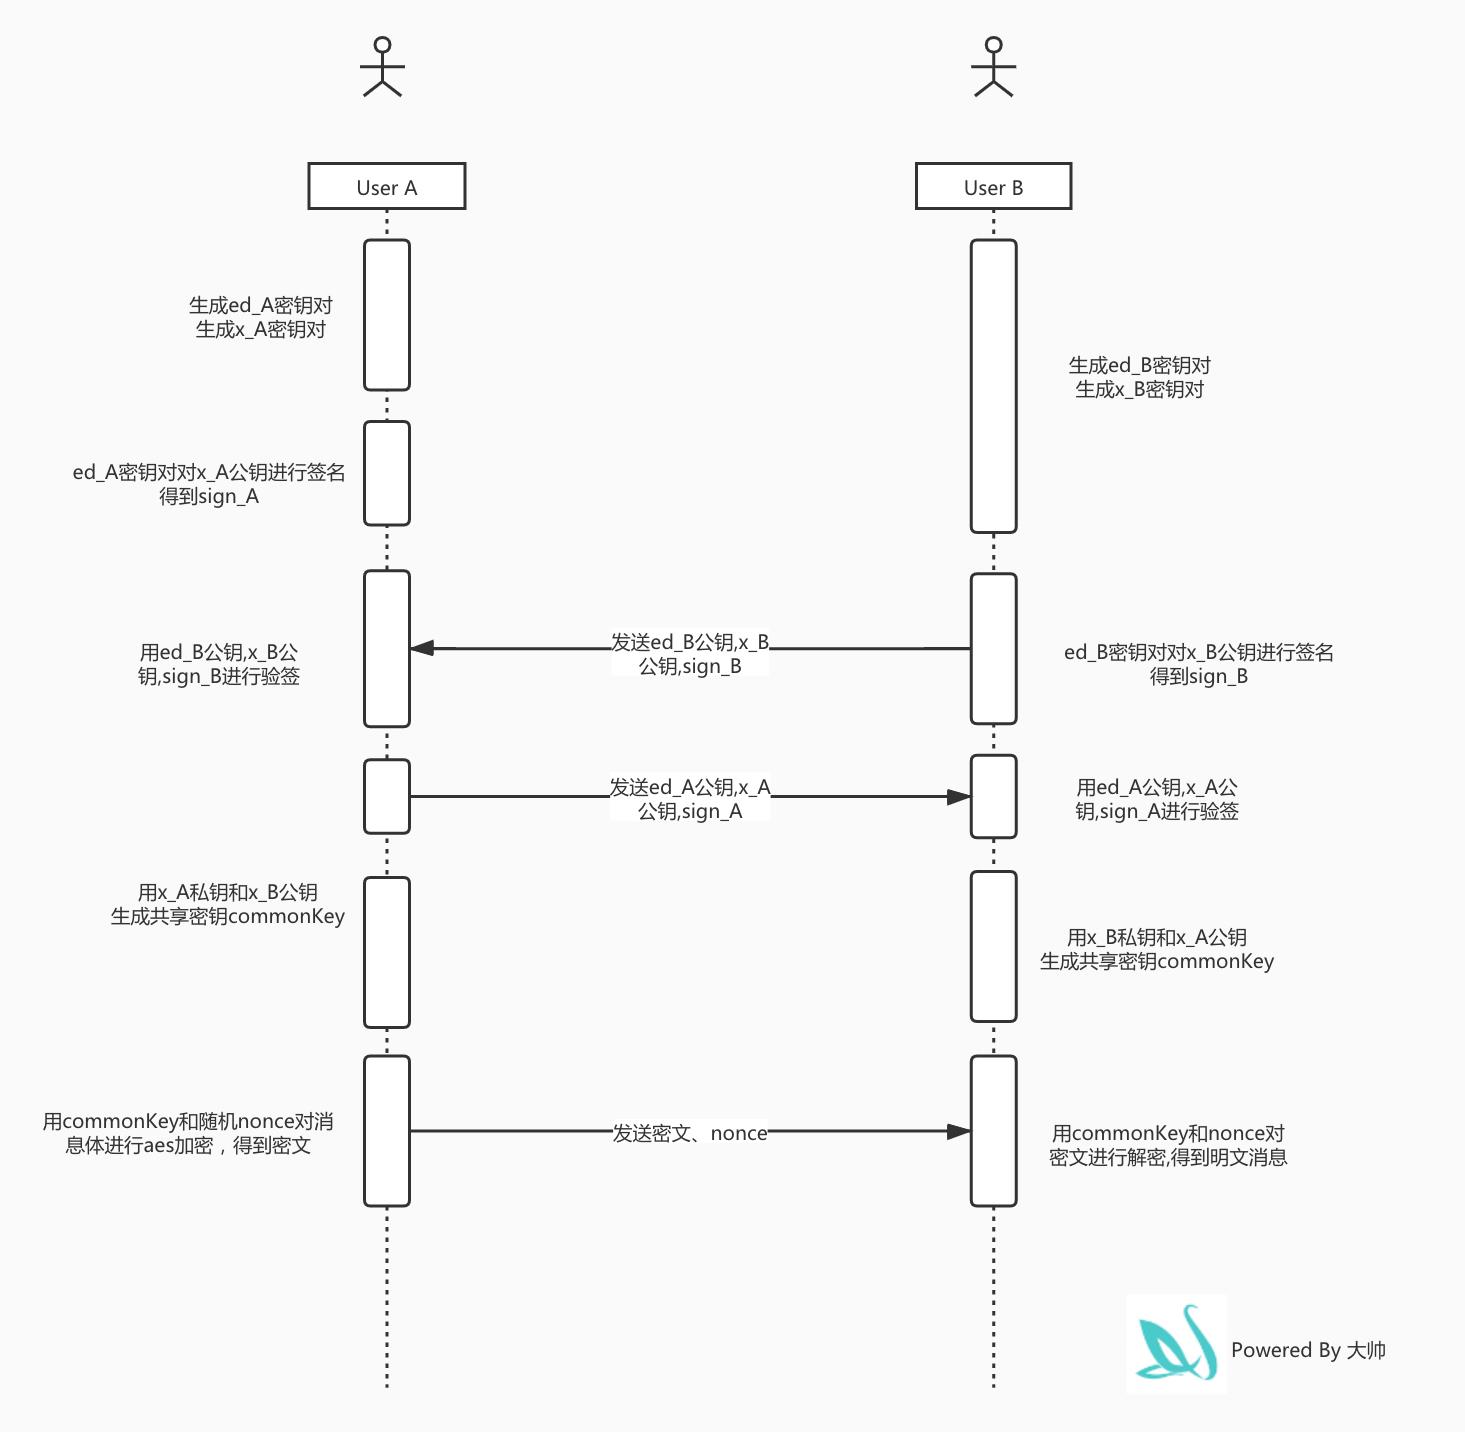
>> image link
3.流程代码
- 引入加解密库
cryptography: ^1.4.0
- 主流程
  static Future<void> mainLogic() async {
    // User A 生成密钥
    var keyPairEd25519App1 = await ed25519.newKeyPair();
    var keyPairX25519App1 = await x25519.newKeyPair();
    // User B 生成密钥
    var keyPairEd25519App2 = await ed25519.newKeyPair();
    var keyPairX25519App2 = await x25519.newKeyPair();

    // User A通过 ed25519 密钥对对 x25519 的公钥进行签名
    var signature1 = await EncryptUtil.sign(keyPairX25519App1.publicKey.bytes, keyPairEd25519App1);
    // User B通过 ed25519 密钥对对 x25519 的公钥进行签名
    var signature2 = await EncryptUtil.sign(keyPairX25519App2.publicKey.bytes, keyPairEd25519App2);

    // User A验证签名
    var publicKeyEd25519App2 = base64.encode(keyPairEd25519App2.publicKey.bytes);
    var publicKeyX25519App2 = base64.encode(keyPairX25519App2.publicKey.bytes);
    var isMatch1 = await EncryptUtil.verify(publicKeyEd25519App2, publicKeyX25519App2, signature2);
    assert(isMatch1);
    // User B验证签名
    var publicKeyEd25519App1 = base64.encode(keyPairEd25519App1.publicKey.bytes);
    var publicKeyX25519App1 = base64.encode(keyPairX25519App1.publicKey.bytes);
    var isMatch2 = await EncryptUtil.verify(publicKeyEd25519App1, publicKeyX25519App1, signature1);
    assert(isMatch2);

    // User A 生成共享密钥
    var commomKey1 = await EncryptUtil.sharedSecret(keyPairX25519App1.privateKey, publicKeyX25519App2);
    L.d('app1 计算共享密钥: ${base64.encode(sc1)}');
    // User B 生成共享密钥
    var commomKey2 = await EncryptUtil.sharedSecret(keyPairX25519App2.privateKey, publicKeyX25519App1);
    L.d('app2 计算共享密钥: ${base64.encode(sc2)}');
    assert(base64.encode(commomKey1) == base64.encode(commomKey2));


    // User A 加密消息
    SecretKey secretKey = SecretKey(base64.decode(commonKey1));
    Nonce nonce = Nonce.randomBytes(12);
    List<int> message = utf8.encode('要加密的消息');
    Uint8List encrypted = await EncryptUtil.encrypt(message, secretKey, nonce);
    // 发送加密消息
    String nonceString = nonce.bytes.toString();
    String body = base64Encode(encrypted);
    sendMsg(body, nonceString);

    // User B 解密
    SecretKey secretKey = SecretKey(base64.decode(commonKey2));
    Nonce nonce = await getNonceByString(nonceString);
    Uint8List decrypted = await EncryptUtil.decrypt(base64Decode(body), secretKey, nonce);
    // 打印明文
    String result = utf8.decode(decrypted);
  }
- 元子操作
class EncryptUtil {
  // 根据本地密钥和远程公钥,计算出共享密钥
  static Future<List<int>> sharedSecret(PrivateKey localPrivateKey, String remotePublicKey) async {
    PublicKey pk = PublicKey(base64.decode(remotePublicKey));
    // We can now calculate a shared 256-bit secret
    SecretKey sharedSecret = await x25519.sharedSecret(
      localPrivateKey: localPrivateKey,
      remotePublicKey: pk,
    );

    List<int> secretBytes = await sharedSecret.extract();
    return secretBytes;
  }

  /// 用 ED25519 key pair 对 X25519 publicKey 签名
  static Future<String> sign(List<int> publicKeyX25519, KeyPair keyPairEd25519) async {
    // Sign
    Signature signature = await ed25519.sign(publicKeyX25519, keyPairEd25519);

    return base64.encode(signature.bytes);
  }

  /// 验证公钥与签名是否匹配
  static Future<bool> verify(publicKeyEd25519, publicKeyX25519, String signature) async {
    PublicKey pk = PublicKey(base64.decode(publicKeyEd25519));
    Signature s2 = Signature(base64.decode(signature), publicKey: pk);
    bool isSignatureCorrect = await ed25519.verify(base64.decode(publicKeyX25519), s2);
    return isSignatureCorrect;
  }

  /// AES-CTR加密消息, 并附加Hmac签名
  static Future<Uint8List> encrypt(Uint8List byte, SecretKey secretKey, Nonce nonce) async {
    CipherWithAppendedMac cipher = CipherWithAppendedMac(aesCtr, Hmac(sha512));
    Uint8List encrypted = await cipher.encrypt(
      byte,
      secretKey: secretKey,
      nonce: nonce,
    );
    return encrypted;
  }

  /// AES-CTR解密消息, 并验证Hmac签名
  static Future<Uint8List> decrypt(Uint8List encrypted, SecretKey secretKey, Nonce nonce) async {
    CipherWithAppendedMac cipher = CipherWithAppendedMac(aesCtr, Hmac(sha512));
    Uint8List decrypted = await cipher.decrypt(
      encrypted,
      secretKey: secretKey,
      nonce: nonce,
    );
    return decrypted;
  }

  static Future<Nonce> getNonceByString(String nonceStr) async {
    String str = nonceStr.substring(1, nonceStr.length - 1);
    List nonceList = str.split(',');
    List<int> nonceResult = [];
    for (int i = 0; i < nonceList.length; i++) {
      nonceResult.add(int.parse(nonceList[i]));
    }
    Nonce nonce = Nonce(nonceResult);
    return nonce;
  }
}
完结,撒花🎉
以上是关于Flutter上线项目实战——即时通讯端对端加密(E2E)的主要内容,如果未能解决你的问题,请参考以下文章