全球名校课程作业分享系列(11)--斯坦福CS231n之生成对抗网络
Posted 寒小阳
tags:
篇首语:本文由小常识网(cha138.com)小编为大家整理,主要介绍了全球名校课程作业分享系列(11)--斯坦福CS231n之生成对抗网络相关的知识,希望对你有一定的参考价值。
课程作业原地址:CS231n Assignment 3
作业及整理:@邓姸蕾 && @Molly && @寒小阳
时间:2018年2月。
出处:http://blog.csdn.net/han_xiaoyang/article/details/79316554
引言
CS231N到目前位置,所有对神经网络的应用都是判别式模型,给定一个输入,训练产生一个label输出。从直接对一个图片的分类到句子生成(也是一个分类问题,我们的label是在词空间中,我们会去逐个学习来产生多词label)。在这个作业中,我们会拓展开来,用神经网络来构建一个生成式模型。特别的,我们会学习如何构建模型来生成与训练集类似的图片。
GAN是什么?
在2014年,Goodfellow et al.发表了训练生成模型的一个方法:生成对抗网络(GANs)。在一个GAN中,我们构建两个不同的神经网络。 第一个网络是传统的分类网络叫判别器。 我们会用判别器来判断图片是真实的(属于训练集)还是假的(不在训练集中)。另一个网络,叫做生成器,会把随机噪音作为输入,然后用一个神经网络通过它生成图片。生成器的目标就是为了骗过判别器,让判别器以为生成的图片是真的。
我们可以把这个想成是一个最小最大博弈(minimax game), 生成器 (
G
G
G)反复的想要糊弄判别器,而判别器 (
D
D
D)则要努力的正确区分真实还是假的。
minimize
G
  
maximize
D
  
E
x
∼
p
data
[
log
D
(
x
)
]
+
E
z
∼
p
(
z
)
[
log
(
1
−
D
(
G
(
z
)
)
)
]
\\undersetG\\textminimize\\; \\undersetD\\textmaximize\\; \\mathbbE_x \\sim p_\\textdata\\left[\\log D(x)\\right] + \\mathbbE_z \\sim p(z)\\left[\\log \\left(1-D(G(z))\\right)\\right]
GminimizeDmaximizeEx∼pdata[logD(x)]+Ez∼p(z)[log(1−D(G(z)))]
其中
x
∼
p
data
x \\sim p_\\textdata
x∼pdata 是来自于输入数据的样本,
z
∼
p
(
z
)
z \\sim p(z)
z∼p(z) 是随机噪音样本,
G
(
z
)
G(z)
G(z) 是用生成网络
G
G
G生成的图片,
D
D
D 是判别器的输出,指的是一个输入是真实图片的概率。 在Goodfellow et al., 他们分析了最小最大博弈并且展示了它和最小化训练数据分布和
G
G
G的生成样本分布之间的Jensen-Shannon散度的关系。
为了优化这个最小最大博弈,我们会在对于 G G G的目标上采用梯度下降和在 D D D的目标上采用梯度上升之间转换。
- 更新生成器( G G G)来最小化__判别器做出正确选择__的概率
- 更新判别器( D D D)来最大化__判别器做出正确选择__的概率
虽然这些更新理论上是有很有用的,但是在实际中他们表现并不好。取而代之的是,当我们更新生成器的时候,我们会用不同的目标函数:最大化判别器做出错误选择的概率。这一个小小的改变减轻了由于判别器置信度非常高的时候导致的生成器梯度消失的问题。这也是在大部分GAN的论文中的标准更新方法,并且在 Goodfellow et al.原始论文中也是这么用的。
在这个作业中,我们会交替进行下面的更新:
- 更新生成器(
G
G
G)来最大化判别器在生成数据上做出错误选择的概率
maximize G    E z ∼ p ( z ) [ log D ( G ( z ) ) ] \\undersetG\\textmaximize\\; \\mathbbE_z \\sim p(z)\\left[\\log D(G(z))\\right] GmaximizeEz∼p(z)[logD(G(z))] - 更新判别器(
D
D
D)来最大化判别器在真实以及生成数据上做出正确选择的概率
maximize D    E x ∼ p data [ log D ( x ) ] + E z ∼ p ( z ) [ log ( 1 − D ( G ( z ) ) ) ] \\undersetD\\textmaximize\\; \\mathbbE_x \\sim p_\\textdata\\left[\\log D(x)\\right] + \\mathbbE_z \\sim p(z)\\left[\\log \\left(1-D(G(z))\\right)\\right] DmaximizeEx∼pdata[logD(x)]+Ez∼p(z)[log(1−D(G(z)))]
一些其它的工作
自2014年以来,GAN被应用到广泛的研究领域中,有大量的workshops,以及上百篇论文。 相比于生成模型的其它方法,他们通常生成最高质量的样本,但是训练起来也是最难和繁琐的(详见this github repo 包含了17中方法,对于训练模型很有帮助)。提升GAN的训练的稳定性和鲁棒性一直是一个开放的研究问题,每天都有新的论文。最近的GANs的教程,详见here.也有一些最近更让人兴奋的工作,把目标函数变成了Wasserstein距离,在不同的模型架构中生成了更加稳定的结果。WGAN, WGAN-GP.
GANs并不是唯一的训练生成模型的方法!对于其它的生成模型可以参考深度学习书book的deep generative model chapter 。 另一个流行的训练神经网络作为生成模型的方法是变分自动编码器(Variational Autoencoders)(co-discovered here and here)。 变分自动编码器用变分推断来训练深度生成模型。这些模型训练起来更稳定和容易,但是现在还没有GANs生成的图片那么漂亮。

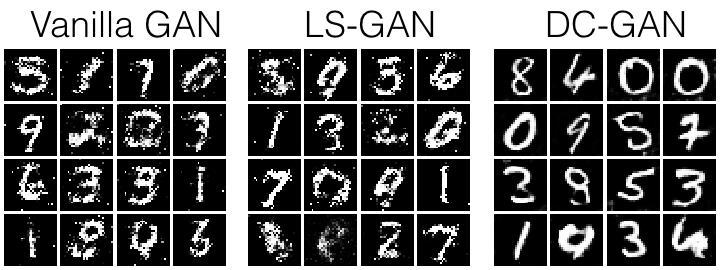
你可以预期会生成的图片,如上所示,你的可能稍微有点不一样
构造
from __future__ import print_function, division
import tensorflow as tf
import numpy as np

import matplotlib.pyplot as plt
import matplotlib.gridspec as gridspec

%matplotlib inline
plt.rcParams['figure.figsize'] = (10.0, 8.0) # set default size of plots
plt.rcParams['image.interpolation'] = 'nearest'
plt.rcParams['image.cmap'] = 'gray'

# A bunch of utility functions

def show_images(images):
    images = np.reshape(images, [images.shape[0], -1])  # images reshape to (batch_size, D)
    sqrtn = int(np.ceil(np.sqrt(images.shape[0])))
    sqrtimg = int(np.ceil(np.sqrt(images.shape[1])))

    fig = plt.figure(figsize=(sqrtn, sqrtn))
    gs = gridspec.GridSpec(sqrtn, sqrtn)
    gs.update(wspace=0.05, hspace=0.05)

    for i, img in enumerate(images):
        ax = plt.subplot(gs[i])
        plt.axis('off')
        ax.set_xticklabels([])
        ax.set_yticklabels([])
        ax.set_aspect('equal')
        plt.imshow(img.reshape([sqrtimg,sqrtimg]))
    return

def preprocess_img(x):
    return 2 * x - 1.0

def deprocess_img(x):
    return (x + 1.0) / 2.0

def rel_error(x,y):
    return np.max(np.abs(x - y) / (np.maximum(1e-8, np.abs(x) + np.abs(y))))

def count_params():
    """Count the number of parameters in the current TensorFlow graph """
    param_count = np.sum([np.prod(x.get_shape().as_list()) for x in tf.global_variables()])
    return param_count


def get_session():
    config = tf.ConfigProto()
    config.gpu_options.allow_growth = True
    session = tf.Session(config=config)
    return session

answers = np.load('gan-checks-tf.npz')
数据集
GANs对于超参数是要求很高的,也需要训练很多轮。为了能让这个作业在没有GPU的情况下也可以完成,我们会在MNIST数据集上做,其中60000张作为训练集,10000作为测试集。每张图片的当中都是一个白色的数字在黑色的背景上(0-9)。这也是训练卷积网络最早实用的数据集之一,相对也比较简单,一个标准的CNN模型就可以轻松超过99%的准确率。
为了简化我们的代码,我们会用TensorFlow MNIST的封装,它会下载和加载MNIST数据集,见这个文档。默认的参数会用5000张训练样本作为验证集。数据会被存到一个文件夹叫MNIST_data (笔者注:同学们也可以自己下载数据集后放到对应的文件夹下就可以了)
敲黑板: 注意TensorFlow MNIST的封装会把图片作为向量返回,也就是说他们的尺寸是(batch, 784),如果你想把他们作为图片处理,就需要resize他们变成(batch,28,28)或者(batch,28,28,1)。 它们的类型是np.float32并且位于[0,1]之间。
from tensorflow.examples.tutorials.mnist import input_data
import os
os.environ["CUDA_VISIBLE_DEVICES"]="0"

mnist = input_data.read_data_sets('./cs231n/datasets/MNIST_data', one_hot=False)

# show a batch
#show_images(mnist.train.next_batch(16)[0])
Extracting ./cs231n/datasets/MNIST_data/train-images-idx3-ubyte.gz
Extracting ./cs231n/datasets/MNIST_data/train-labels-idx1-ubyte.gz
Extracting ./cs231n/datasets/MNIST_data/t10k-images-idx3-ubyte.gz
Extracting ./cs231n/datasets/MNIST_data/t10k-labels-idx1-ubyte.gz
LeakyReLU
实现一个LeakyReLU,参见课堂笔记或者这篇论文的等式(3)this paper。 LeakyReLUs使得ReLU的元素不"失活",在GANS的方法中经常实用(maxout也可以,但是这会增加整个模型的大小,因此这个作业里没有用)。
def leaky_relu(x, alpha=0.01):
    """Compute the leaky ReLU activation function.

    Inputs:
    - x: TensorFlow Tensor with arbitrary shape
    - alpha: leak parameter for leaky ReLU

    Returns:
    TensorFlow Tensor with the same shape as x
    """
    # TODO: implement leaky ReLU
    condition = tf.less(x, 0)
    res = tf.where(condition, alpha * x, x)

    return res
测试你的leaky ReLU 实现。你的误差应当小于1e-10。
def test_leaky_relu(x, y_true):
    tf.reset_default_graph()
    with get_session() as sess:
        y_tf = leaky_relu(tf.constant(x))
        y = sess.run(y_tf)
        print('Maximum error: %g'%rel_error(y_true, y))

test_leaky_relu(answers['lrelu_x'], answers['lrelu_y'])
Maximum error: 0
随机噪声
生成一个在-1到1之间大小为[batch_size, dim]的均匀分布的噪音张量(Tensor)。
def sample_noise(batch_size, dim):
    """Generate random uniform noise from -1 to 1.

    Inputs:
    - batch_size: integer giving the batch size of noise to generate
    - dim: integer giving the dimension of the the noise to generate

    Returns:
    TensorFlow Tensor containing uniform noise in [-1, 1] with shape [batch_size, dim]
    """
    # TODO: sample and return noise
    return tf.random_uniform([batch_size,dim], minval=-1, maxval=1)
确保噪音的大小和类型是正确的:
def test_sample_noise():
    batch_size = 3
    dim = 4
    tf.reset_default_graph()
    with get_session() as sess:
        z = sample_noise(batch_size, dim)
        # Check z has the correct shape
        assert z.get_shape().as_list() == [batch_size, dim]
        # Make sure z is a Tensor and not a numpy array
        assert isinstance(z, tf.Tensor)
        # Check that we get different noise for different evaluations
        z1 = sess.run(z)
        z2 = sess.run(z)
        assert not np.array_equal(z1, z2)
        # Check that we get the correct range
        assert np.all(z1 >= -1.0) and np.all(z1 <= 1.0)
        print("All tests passed!")

test_sample_noise()
All tests passed!
判别器
首先我们来建一个判别器,你可以用tf.layers来构建层。
所有的全连接层都应该包含偏置项(bias)。
架构:
- 全连接层,从784到256
- LeakyReLU, alpha为0.01
- 全连接层,从256到256
- LeakyReLU, alpha为0.01
- 全连接层,从256到1
判别器的输出应该是[batch_size, 1],并且包含了实数来表示batch_size中的每张图片是真实图片的打分。
def discriminator(x):
    """Compute discriminator score for a batch of input images.

    Inputs:
    - x: TensorFlow Tensor of flattened input images, shape [batch_size, 784]

    Returns:
    TensorFlow Tensor with shape [batch_size, 1], containing the score
    for an image being real for each input image.
    """
    with tf.variable_scope("discriminator"):
        # TODO: implement architecture
        fc1 = tf.layers.dense(x, units=256, use_bias=True, name="first_fc")
        leaky_relu1 = leaky_relu(fc1, alpha=0.01)
        fc2 = tf.layers.dense(leaky_relu1, units=256, use_bias=True, name="second_fc")
        leaky_relu2 = leaky_relu(fc2, alpha=0.01)
        logits = tf.layers.dense(leaky_relu2, units=1, name="logits")
        return logits
测试以确保判别器中参数数量是正确的:
def test_discriminator(true_count=267009):
    tf.reset_default_graph()
    with get_session() as sess:
        y = discriminator(tf.ones((2, 784)))
        cur_count = count_params()
        if cur_count != true_count:
            print('Incorrect number of parameters in discriminator. 0 instead of 1. Check your achitecture.'.format(cur_count,true_count))
        else:
            print('Correct number of parameters in discriminator.')

test_discriminator()
Correct number of parameters in discriminator.
生成器
现在来构建一个生成器,你可以用tf.layers来构建这个模型,所有的全连接层都要包含偏置项。
架构:
- 全连接层从tf.shape(z)[1] (噪音的纬度) 到1024
- ReLU
- 全连接层从1024到1024
- ReLU
- 全连接层从1024到784
- TanH (严格限定输出是[-1,1])
def generator(z):
    """Generate images from a random noise vector.

    Inputs:
    - z: TensorFlow Tensor of random noise with shape [batch_size, noise_dim]

    Returns:
    TensorFlow Tensor of generated images, with shape [batch_size, 784].
    """
    with tf.variable_scope("generator"):
        # TODO: implement architecture
        fc1 = tf.layers.dense(z, units=1024, use_bias=True)
        relu1 = tf.nn.relu(fc1)
        fc2 = tf.layers.dense(relu1, units=1024, use_bias=True)
        relu2 = tf.nn.relu(fc2)
        fc3 = tf.layers.dense(relu2, units=784, use_bias=True)
        img = tf.nn.tanh(fc3)
        return img
测试以确保生成器参数的数量是正确的:
def test_generator(true_count=1858320):
tf.reset_default_graph()
with get_session() as sess:
y = generator(tf.ones((1, 4)))
cur_count = count_params()
if cur_count != true_count:
print(以上是关于全球名校课程作业分享系列(11)--斯坦福CS231n之生成对抗网络的主要内容,如果未能解决你的问题,请参考以下文章
全球名校课程作业分享系列(10)--斯坦福CS231n之Network visualization
全球名校课程作业分享系列(10)--斯坦福CS231n之Network visualization
全球名校课程作业分享系列--斯坦福计算机视觉与深度学习CS231n之KNN
全球名校课程作业分享系列--斯坦福计算机视觉与深度学习CS231n之tensorflow实践