java网络编程基础—NIO非阻塞编程
Posted
tags:
篇首语:本文由小常识网(cha138.com)小编为大家整理,主要介绍了java网络编程基础—NIO非阻塞编程相关的知识,希望对你有一定的参考价值。
本节讲点:
NIO引入:分析普通Socket通信中存在的IO问题--阻塞通信,并分析传统的线程池的优缺点,进而引入NIO解决方案
NIO核心框架:讲解NIO的4个核心概念所对应的框架包,包括缓存Buffer、字符集Charset、通道Channel及选择器Selector
缓存Buffer:是包含数据且用于读写的线性表结构。
字符集Charset:提供Unicode字符串映射到字节序列及逆映射操作
通道Channel:包含Socket、File和Pipe3种管道,双向的
选择器Selector:将多元异步I/O操作集中到一个或多个线程中
NIO通道编程
文件通道FileChannel:用于实现对文件的读写、锁定和映射
Socket通道SocketChannel:实现基于Socket的通道
ServerSocket通道ServerSocketChannel:基于SeverSocket通道
数据报通道DatagramChannel:实现基于DatagramSocket的通道
NIO引入
基于Socket通信存在的问题 -- I/O阻塞通信
阻塞监听客户端输入。BufferedReader类的readLine()方法阻塞。
阻塞监听客户端连接。accept()方法的调用造成阻塞
读取阻塞。产生大量的String垃圾BufferedReader创建了缓存区从客户端套接字读入数据,但是同样创建了一些字符串存储这些数据。
传统解决方法 --- 使用线程池
面对大量用户请求时,需要使用大量的线程,这一般是实现一个线程池来处理请求
线程池是服务器可以处理多个连接,但是它们同样引发了许多问题。每个线程都拥有自己的栈空间并且占用一些CPU时间,耗费很大。
最新的解决方案 --- NIO非阻塞通信
NIO的非阻塞I/O机制是围绕选择器和通道构建的。Channel类表示服务器和客户端之间的一种通信机制。与反应器模式一致,Selector是Channel的多路复用器。
在NIO解决方案中的缓存区、Selector、Channel等概念,
缓存区:表示数据存放的容器,提供可读写的数据缓存区
字符集:用来对缓存区数据进行解码和编码,在字节和Unicode字符之间
通道:用来接收或发送数据,提供文件、套接字等的连接
选择器:它们与可选择通道一起定义了多路、无阻塞的I/O设施
NIO框架位于Java.nio包中,它为每个概念都提供了核心的支撑类
缓存区Buffer的4个基本属性
capacity:容量,一般在Buffer被创建时指定。int capacity();//返回此缓存区容量
limit:限制。在Buffer上进行的操作不能越过这个下标。当写数据到Buffer中时,limit一般和capacity相等,当读数据时,limit代表Buffer中有效数据的长度,取得和修改限制的方法如下:
int limit();//返回此缓存区的限制
Buffer limit(int newLimit);//设置此缓存区的限制
position:读写操作当前下标。当使用Buffer的相对位置进行读写操作时,读写会从这个下标进行,并完成操作后,Buffer会更显下标值,
int position();//返回此缓存区的位置
Buffer position(int newPosition);//设置此缓存区的位置
mark:一个临时存放的位置下标
字符集Charset -- 编码与解码
通过构造java.nio.charset.CharsetEncoder和java.nio.charset.CharsetDecoder将字符序列CharBuffer转换成ByteBuffer和逆转换
从CharBuffer到ByteBuffer的编码转换
Charset charset = Charset.forName("UTF-8");
CharsetEncoder encoder = charset.newEncoder();
ByteBuffer byteBuffer = encoder.encode(charBuffer);
从ByteBuffer到CharBuffer的解码转换
Charset charset = Charset.forName("UTF-8");
CharsetDecoder decoder = charset.newDecoder();
CharBuffer charBuffer = decoder.decode(byteBuffer);
通道Channel
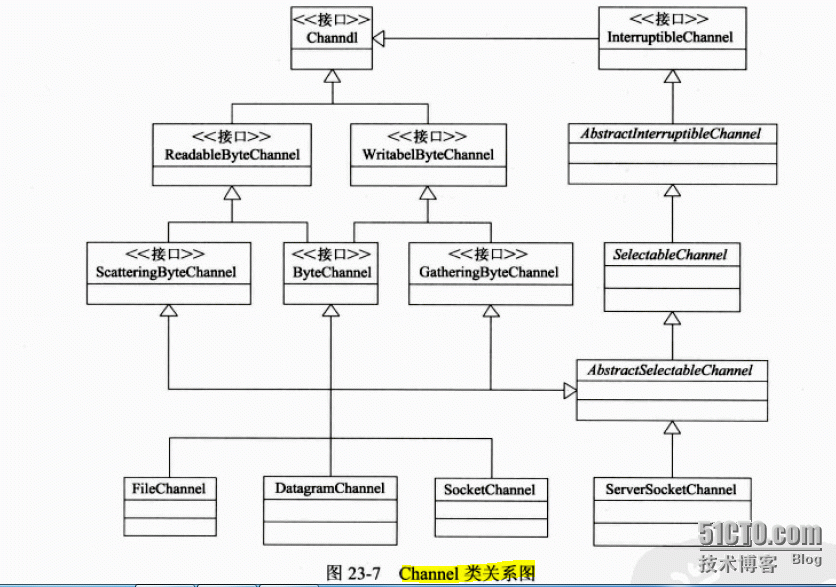
NIO中提供了Channel通道类来读写Buffer。Channel是一个连接,可用于接收和发送数据。因为Channel连接的是底层的物理设备,它可以直接支持设备的读写,或者文件锁。
最下面的4个类为具体实现类。共包括7个接口类、3个抽象类和4个实现类
Channel是最顶层的接口。
ReadableByteChannel和WritableByteChannel分别提供对通道读取和写入Byte数据的功能
ByteChannel用来将读取和写入的功能合并
ScatteringByteChannel和GatheringByteChannel分别提供了批量读取和写入ByteBuffer数组的能力
InterruptibleChannel提供了多线程异步关闭的能力
7个接口类的详细方法如下:
Channel代表一个可以进行IO操作的通道。定义了一下方法
boolean isOpen();//判断此通道是否处于打开状态
void close();//关闭这个Channel,相关资源被释放
ReadableByteChannel和WritableByteChannel分别定义了一个读取和写入byte数据的Channel接口。分别定义了read()和write()方法。
int read(ByteBuffer dst);//将字节序列从此通道中读入到给定的缓存区
int write(ByteBuffer src);//将字节序列从给定的缓存区写入此通道
ByteChannel没有定义新的方法,它的作用只是把ReadableByteChannel和WritableByteChannel合并在一起
ScatteringByteChannel可以一次将数据从通道读入多个ByteBuffer中。而GatheringByteBufferChannel可以一次将多个ByteBuffer中的数据写入通道。提供的方法如下
long read(ByteBuffer[] dsts);//将字节序列从此通道中读入给定的缓存区
long read(ByteBuffer[],int offset,int length);//讲字节序列从此通道中读入给定的缓存区,位置从offset开始到length
long write(ByteBuffer[] src);//将字节序列从给定的缓存区写入此通道
long write(ByteBuffer[] src,int offset,int length);//将字节序列从给定的缓存区写入此通道,位置从offset开始到length
InterruptibleChannel用来提供一个可以被异步关闭的Channel,它覆盖了Channel接口的关闭方法close()。
选择器Selector
Selector是非阻塞I/O的核心,可以同时监控多个SelectableChannel的I/O状况,对每一个监听到的事件都产生一个SelectionKey对象。使用Selector为SelectableChannel所用,需要经历如下3个步骤
(1)创建选择器Selector。
Selector类提供了静态方法,用于创建新的一个Selector实例。
static Selector open();
/**实例如下*/
try{
    //创建一个Selector
    Selector selector = Selector.open();
}catch(IOException e){}
(2)注册到SelectableChannel
SelectableChannel在打开后,可以使用register()将它注册到特定的选择器,实现通道与选择器的事件绑定。
/**注册到SelectableChannel示例
 * 必须使用configureBlocking(false)将通道设置为非阻塞
 * 才可以向Selector注册SelectableChannel对象
 */
try{
    //创建一个Selector
    Selector selector = Selector.open();

    //注册到Selector
    SelectableChannel socket = SocketChannle.open();
    socket.configureBlocking(false);//设置为非阻塞模式
    socket.register(selector,SelectionKey.OP_CONNECT);
}catch(IOException e){
}
(3)处理监听事件对象SelectionKey
static int OP_ACCEPT;//用于套接字接受操作的操作集位
static int OP_CONNECT;//用于套接字连接操作的操作集位
static int OP_READ;//用于读取操作的操作集位
static int OP_WRITE;//用于写入操作的操作集位
注册了事件类型以后,就可以使用Selector的select()监听该事件
int select();//监控所有注册的channel
int select(long timeout);//可以设置超时的select()操作
int selectNow();//进行一个立即返回的select()操作
Selector wakeup();//使一个还未返回的selecor()操作立即返回
一旦有该事件触发,就可以使用Selecor的selectedKeys()方法返回所有该事件的列表。可以循环处理该事件列表,在处理前删除当前事件,防止重复处理。
/**监听事件处理过程*/
while(true){
    //监听事件
    selector.select();
    //事件来源列表
    Iterator<SelectorKey> it = selecotr.selectedKeys().iterator();
    while(it.hasNext()){
        SelectorKey key = it.next();
        //删除当前事件
        it.remove();

        //判断事件类型
        if(key.isConnectable()){
            //连接事件
            SocketChannel channel = (SocketChannel)key.channel();
            //注册新的事件
            channel.register(selector,SelectionKey.OP_READ);
        }else if(key.isReadable){
            //读取数据事件
            SocketChannel channel = (SocketChannel)key.channle();
            //注册新的事件
            channel.register(selector,SelectionKey.OP_WRITE);
        }else if(key.isWritable){
            //写入数据事件
            SocketChannel channel = (SocketChannel)key.channle();
            //注册新的事件
            channel.register(selector,SelectionKey.OP_READ);
        }
    }
}
NIO通道编程详解
文件通道FileChannel:用于对文件的读取、写入、锁定和映射
Socket通道SocketChannel:实现基于Socket的通道
ServerSocket通道ServerSocketChannel:实现基于ServerSocket的通道
数据报通道DatagramChannel:实现基于DatagramSocket的通道
1、文件通道FileChannel
在Channel使用中,文件通道FileChannel是最具有代表性的。FileChannel实现了类似输入输出流的功能,用于读取、写入、锁定和映射文件。
(1)创建FileChannel对象
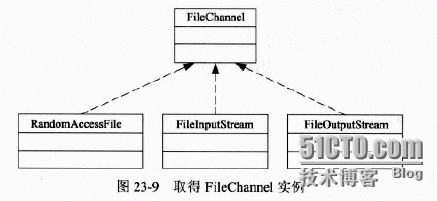
FileChannel并没有向我们提供打开文件的方法,我们可以通过调用RandomAccessFile、fileInputStream和FileOutputStream类实例的getChannel(0方法获取其实例,如图示
给出示例演示3中获取FileChannel对象的方法,注意在打开文件后要关闭FileChannel和来源文件对象
package org.test.nio;

import java.io.FileInputStream;
import java.io.FileNotFoundException;
import java.io.FileOutputStream;
import java.io.IOException;
import java.io.RandomAccessFile;
import java.nio.channels.FileChannel;

public class TestFileChannel {

	public static void main(String[] args) {
		// TODO 获取FileChannel实例
		//1、根据RandomAccessFile获得
		try {
			//RandomAccessFile打开文件rw适用于读写FileChannel
			RandomAccessFile randomFile = new RandomAccessFile("D:\\DownloadFile\\test.txt", "rw");
			FileChannel channel = randomFile.getChannel();
			channel.close();
			randomFile.close();
		} catch (FileNotFoundException e) {
			// TODO Auto-generated catch block
			e.printStackTrace();
		} catch (IOException e) {
			// TODO Auto-generated catch block
			e.printStackTrace();
		}
		//2、根据FileInputStream获取
		try {
			FileInputStream fis = new FileInputStream("D:\\DownloadFile\\test.txt");
			FileChannel channel = fis.getChannel();
			channel.close();
			fis.close();
		} catch (FileNotFoundException e) {
			// TODO Auto-generated catch block
			e.printStackTrace();
		} catch (IOException e) {
			// TODO Auto-generated catch block
			e.printStackTrace();
		}
		//3、根据FileOutputStream获取
		try {
			FileOutputStream fos = new FileOutputStream(":\\DownloadFile\\test.txt");
			FileChannel channel = fos.getChannel();
			channel.close();
			fos.close();
		} catch (FileNotFoundException e) {
			// TODO Auto-generated catch block
			e.printStackTrace();
		} catch (IOException e) {
			// TODO Auto-generated catch block
			e.printStackTrace();
		}
	}

}
(2)从FileChannel中读取数据
FileChannel提供了4个方法读取数据
a、读入缓存区对象 abstract int read(ByteBuffer dst);
b、读入缓存区数组 long read(ByteBuffer[] dsts);
c、读入缓存区数据 long read(ByteBuffer[] dsts,int offset,int length);
d、从给定位置缓存区数组 abstract int read(ByteBuffer dst,long postion);//返回当前文件的位置,额可以通过size()返回文件的大小。
//读取数据
			ByteBuffer byteBuffer = ByteBuffer.allocate(10);
			channel.read(byteBuffer);
			System.out.println(new String(byteBuffer.array()));
(3)向FileChannel写入数据
FileChannel提供了4个方法写入数据
a、写入缓存区对象 abstract int write(ByteBuffer dst);
b、写入缓存区数组 long write(ByteBuffer[] dsts);
c、写入缓存区数据 long write(ByteBuffer[] dsts,int offset,int length);
d、将缓存区数据写入通道中的指定位置 abstract int write(ByteBuffer dst,long postion);//返回当前文件的位置,额可以通过size()返回文件的大小。执行写入操作后,使用force(true)函数强制将所有对此通道的文件更新写入包含该文件中,防止缓存。
//写入数据
			ByteBuffer byteBuffer = ByteBuffer.wrap("我是写入的内容".getBytes());
			channel.write(byteBuffer);
(4)使用文件锁
FileChannel提供了两种加锁机制,分别对应lock()和tryLock(),两者区别在于,lock是同步的,直至成功才返回,tryLock是异步的,无论成不成功都立即返回。
(5)使用内存映射
MappedByteBuffer是通过FileChannel创建的文件到内存的映射。MappedByteBuffer是一个直接缓存区。
try {
			File file = new File("D:\\DownloadFile\\test1.txt");
			if(!file.exists()){
				if(file.createNewFile()){
					System.out.println("文件创建成功");
				}
			}
			//使用内存映射复制文件
			FileChannel channel = new FileInputStream("D:\\DownloadFile\\test.txt").getChannel();
			FileChannel channel2 = new FileOutputStream(file).getChannel();
			//映射第一个文件到内存
			MappedByteBuffer buffer = channel.map(FileChannel.MapMode.READ_ONLY, 0, channel.size());
			//写入到第二个文件
			channel2.write(buffer);
			channel.close();
			channel2.close();
		} catch (FileNotFoundException e) {
			// TODO Auto-generated catch block
			e.printStackTrace();
		} catch (IOException e) {
			// TODO Auto-generated catch block
			e.printStackTrace();
		}
2、Socket通道SocketChannel
为了实现基础的非阻塞套接字读写操作,我们需要处理两个类,InetSocketAddress类,它指定连接到哪里,以及SocketChannel类,它执行实际的读写操作。
InetSocketAddress类与InetAddress类相似,用于创建指向某一个主机和端口的地址对象。
InetSocketAddress(InetAddress addr,int port);//根据IP地址和端口号创建
InetSocketAddress(int port);//IP地址为通配符地址,端口号指定
InetSocketAddress(String hostname,int port);//根据主机名和端口号指定
创建的InetSocketAddress对象可以通过以下方法取得其中的属性,并可转化为InetAddress
String getHostName();//
int getPort();//
InetAddress getAddress();//
套接字类SocketChannel类似于Socket,可以用于创建一个套接字对象,不同的是,它具有非阻塞的功能。与Socket的使用过程很相似。Socket具体使用方法,请见http://aku28907.blog.51cto.com/5668513/1775429
Socket使用工作过程:
(1)创建一个SocketChannel对象:SocketChannel socket = SocketChannel.open();
(2)设置为非阻塞模式:socket.configureBlocking(false);
(3)注册到Selector:socket.register(selector,SelectionKey.OP_CONNECT);
(4)开始连接到远程地址:InetSocketAddress ip = new InetSocketAddress("localhost",12345);socket.connect(ip);
(5)开始处理读写事件
在使用selector的select()开始监听后,第一个监听到的事件是连接事件。
连接事件:在新客户端连接后,必须使用finishConnect()显示地完成连接,然后将该客户端注册为读或写事件,以继续监听该客户端的监听
if(key.isConnectable()){
    //连接事件
     SocketChannel channel = (SocketChannel)key.channel();
     if(channel.isConnectionPeading()){
         channel.finishConnect();//显示地完成连接
     }
     channel.register(selector,SelectionKey.OP_READ);
}
读取数据事件:在读取数据时,可以使用SocketChannel的read()方法读取到ByteBuffer对象中,并使用解码器CharsetDecoder进行解码输出。
if(key.isReadable()){
            //读取数据事件
            SocketChannel channel = (SocketChannel)key.channle();
            //注册新的事件
            channel.register(selector,SelectionKey.OP_WRITE);

            //读取数据
            CharsetDecoder decoder = Charset.forName("UTF-8").newDecoder();
            ByteBuffer buffer = ByteBuffer.allocate(1024);
            int count = channel.read(buffer);
            System.out.println(count + ":" + decoder.decode(buffer));
}
写入数据事件:在写入数据时,可以使用SocketChannel的write()方法写入编码后的ByteBuffer数据
if(key.isWritable()){
    //写入数据事件
    SocketChannel channel = (SocketChannel)key.channle();
    channel.register(selecotr,SelectionKey.OP_READ);

    //写入数据
    CharsetEncoder encoder = Charset.forName("UTF-8").newEncoder();
    channel.write(encoder.encode(CharBuffer.wrap("Hello")));
}
关闭连接:selector.close();socket.close();
完成代码示例如下:
(后续客户端将基于此示例进行完善)
package org.test.nio;

import java.io.IOException;
import java.net.InetSocketAddress;
import java.nio.ByteBuffer;
import java.nio.CharBuffer;
import java.nio.channels.ClosedChannelException;
import java.nio.channels.SelectionKey;
import java.nio.channels.Selector;
import java.nio.channels.SocketChannel;
import java.nio.charset.CharacterCodingException;
import java.nio.charset.Charset;
import java.nio.charset.CharsetDecoder;
import java.nio.charset.CharsetEncoder;
import java.util.Iterator;

public class TestSocketChannel {

	public static void main(String[] args) {
		Selector selector = null;
		SocketChannel socket = null;

		try {
			// TODO 创建一个Selector
			selector = Selector.open();

			// TODO 创建并注册Socket
			socket = SocketChannel.open();
			socket.configureBlocking(false);
			socket.register(selector, SelectionKey.OP_CONNECT);

			// TODO 连接到远程地址
			InetSocketAddress ip = new InetSocketAddress("localhost", 12345);
			socket.connect(ip);

			//TODO 监听事件
			while(true){
				selector.select();
				//事件来源列表
				Iterator<SelectionKey> it = selector.selectedKeys().iterator();
				while(it.hasNext()){
					SelectionKey key = it.next();
					//删除当前事件
					it.remove();

					//判断当前事件类型
					if(key.isConnectable()){
						//连接事件
						SocketChannel channel = (SocketChannel)key.channel();
						channel.register(selector, SelectionKey.OP_READ);
					}else if(key.isReadable()){
						//读取数据事件
						SocketChannel channel = (SocketChannel)key.channel();
						channel.register(selector, SelectionKey.OP_WRITE);

						//读取数据
						CharsetDecoder decoder = Charset.forName("UTF-8").newDecoder();
						ByteBuffer buffer = ByteBuffer.allocate(1024);
						int count = channel.read(buffer);
						System.out.println(count + ":" + decoder.decode(buffer));
					}else if(key.isWritable()){
						//写入数据事件
						SocketChannel channel = (SocketChannel)key.channel();
						channel.register(selector, SelectionKey.OP_READ);

						//写入数据
						CharsetEncoder encoder = Charset.forName("UTF-8").newEncoder();
						channel.write(encoder.encode(CharBuffer.wrap("Hello")));
					}
				}
			}
		} catch (ClosedChannelException e) {
			// TODO Auto-generated catch block
			e.printStackTrace();
		} catch (CharacterCodingException e) {
			// TODO Auto-generated catch block
			e.printStackTrace();
		} catch (IOException e) {
			// TODO Auto-generated catch block
			e.printStackTrace();
		} finally{
			try {
				selector.close();
				socket.close();
			} catch (IOException e) {
				// TODO Auto-generated catch block
				e.printStackTrace();
			}
		}
	}
}
3、ServerSocket通道ServerSocketChannel
ServerSocketChannel类似于ServerSocket,可以用于创建一个服务端套接字对象,它具有非阻塞的功能。与ServerSocket的使用过程相似,ServerSocketChannel的工作过程如下:
(1)创建一个ServerSocketChannel对象:ServerSocketChannel server = ServerSocketChannel.open();
(2)设置为非阻塞模式:server.configureBlocking(false);
(3)注册到Selector:server.register(selector,SelectionKey.OP_ACCEPT);
(4)开始启动端口监听
创建一个InetSocketAddress地址对象,使用SocketChannel的socket()函数取得ServerSocket对象,然后再使用ServerSocket的bind()函数绑定到指定的地址端口
InetSocketAddress ip = new InetSocketAddress("localhost",12345);
server.socket().bind(ip);
(5)开始处理客户端连接事件和处理时间
客户端连接事件、读取数据事件和关闭连接
完整实例如下:
(后续实例中,我们将完善此服务端代码)
package org.test.nio;

import java.io.IOException;
import java.net.InetSocketAddress;
import java.nio.ByteBuffer;
import java.nio.CharBuffer;
import java.nio.channels.ClosedChannelException;
import java.nio.channels.SelectionKey;
import java.nio.channels.Selector;
import java.nio.channels.ServerSocketChannel;
import java.nio.channels.SocketChannel;
import java.nio.charset.CharacterCodingException;
import java.nio.charset.Charset;
import java.nio.charset.CharsetDecoder;
import java.nio.charset.CharsetEncoder;
import java.util.Iterator;

public class TestServerSocketChannel {

	public static void main(String[] args) {
		Selector selector = null;
		ServerSocketChannel server = null;

		try {
			// TODO 创建一个Selector
			selector = Selector.open();

			// TODO 创建Socket并注册
			server = ServerSocketChannel.open();
			server.configureBlocking(false);
			server.register(selector, SelectionKey.OP_ACCEPT);

			// TODO 启动端口监听
			InetSocketAddress ip = new InetSocketAddress("localhost", 12345);
			server.socket().bind(ip);

			// TODO 监听事件
			while(true){
				//监听事件
				selector.select();
				//事件来源列表
				Iterator<SelectionKey> it = selector.selectedKeys().iterator();
				while(it.hasNext()){
					SelectionKey key = it.next();
					//删除该事件
					it.remove();

					//判断事件类型
					if(key.isConnectable()){
						//连接事件
						SocketChannel channel = (SocketChannel)key.channel();
						if(channel.isConnectionPending()){
							channel.finishConnect();
						}
						channel.register(selector, SelectionKey.OP_READ);
					}else if(key.isReadable()){
						//读取数据事件
						//读取数据事件
						SocketChannel channel = (SocketChannel)key.channel();
						channel.register(selector, SelectionKey.OP_WRITE);

						//读取数据
						CharsetDecoder decoder = Charset.forName("UTF-8").newDecoder();
						ByteBuffer buffer = ByteBuffer.allocate(1024);
						int count = channel.read(buffer);
						System.out.println(count + ":" + decoder.decode(buffer));
					} else if(key.isWritable()){
						SocketChannel channel = (SocketChannel)key.channel();
						channel.register(selector, SelectionKey.OP_READ);

						//写入数据
						CharsetEncoder encoder = Charset.forName("UTF-8").newEncoder();
						channel.write(encoder.encode(CharBuffer.wrap("Hello")));
					}
				}
			}
		} catch (ClosedChannelException e) {
			// TODO Auto-generated catch block
			e.printStackTrace();
		} catch (CharacterCodingException e) {
			// TODO Auto-generated catch block
			e.printStackTrace();
		} catch (IOException e) {
			// TODO Auto-generated catch block
			e.printStackTrace();
		} finally{
			//关闭
			try {
				selector.close();
				server.close();
			} catch (IOException e) {
				// TODO Auto-generated catch block
				e.printStackTrace();
			}
		}
	}

}
实例一:支持多客户端的Client/Server任务响应程序
演示一个可以接受多个客户端请求的服务器程序,服务端使用非阻塞模式监听多个客户端的连接和发送来的消息,在收到消息后根据消息命令来处理不同的业务逻辑,然后回复给客户端,客户端通过控制台输入的字符串发送给服务器端。
服务器端代码
package org.test.nio;

import java.io.IOException;
import java.net.InetSocketAddress;
import java.nio.ByteBuffer;
import java.nio.CharBuffer;
import java.nio.channels.ClosedChannelException;
import java.nio.channels.SelectionKey;
import java.nio.channels.Selector;
import java.nio.channels.ServerSocketChannel;
import java.nio.channels.SocketChannel;
import java.nio.charset.CharacterCodingException;
import java.nio.charset.Charset;
import java.nio.charset.CharsetDecoder;
import java.nio.charset.CharsetEncoder;
import java.util.Iterator;

public class Nioserver {

	public static void main(String[] args) {
		Selector selector = null;
		ServerSocketChannel server = null;

		try {
			// TODO 创建一个Selector
			selector = Selector.open();

			// TODO 创建Socket并注册
			server = ServerSocketChannel.open();
			server.configureBlocking(false);
			server.register(selector, SelectionKey.OP_ACCEPT);

			// TODO 启动端口监听
			InetSocketAddress ip = new InetSocketAddress(12345);
			server.socket().bind(ip);

			// TODO 监听事件
			while(true){
				//监听事件
				selector.select();
				//事件来源列表
				Iterator<SelectionKey> it = selector.selectedKeys().iterator();
				while(it.hasNext()){
					SelectionKey key = it.next();
					//删除该事件
					it.remove();

					//判断事件类型
					if(key.isAcceptable()){
						//连接事件
						ServerSocketChannel server2 = (ServerSocketChannel) key.channel();
						SocketChannel channel = server2.accept();
						channel.configureBlocking(false);
						if(channel.isConnectionPending()){
							channel.finishConnect();
						}
						channel.register(selector, SelectionKey.OP_READ);
						System.out.println("accept客户端连接:"
								+ channel.socket().getInetAddress().getHostName()
								+ channel.socket().getPort());
					}else if(key.isReadable()){
						//读取数据事件
						SocketChannel channel = (SocketChannel)key.channel();

						//读取数据
						CharsetDecoder decoder = Charset.forName("UTF-8").newDecoder();
						ByteBuffer buffer = ByteBuffer.allocate(64);
						int count = channel.read(buffer);
						buffer.flip();
						String msg = decoder.decode(buffer).toString();
						System.out.println(count + "收到:" + msg);

						//写入数据
						CharsetEncoder encoder = Charset.forName("UTF-8").newEncoder();
						channel.write(encoder.encode(CharBuffer.wrap("server"+msg)));
					} else if(key.isWritable()){
						SocketChannel channel = (SocketChannel)key.channel();
						channel.register(selector, SelectionKey.OP_READ);

						//写入数据
						CharsetEncoder encoder = Charset.forName("UTF-8").newEncoder();
						channel.write(encoder.encode(CharBuffer.wrap("Hello")));
					}
				}
			}
		} catch (ClosedChannelException e) {
			// TODO Auto-generated catch block
			e.printStackTrace();
		} catch (CharacterCodingException e) {
			// TODO Auto-generated catch block
			e.printStackTrace();
		} catch (IOException e) {
			// TODO Auto-generated catch block
			e.printStackTrace();
		} finally{
			//关闭
			try {
				selector.close();
				server.close();
			} catch (IOException e) {
				// TODO Auto-generated catch block
				e.printStackTrace();
			}
		}
	}
}
客户端代码
package org.test.nio;

import java.io.BufferedReader;
import java.io.IOException;
import java.io.InputStreamReader;

public class NIOClient {

	public static void main(String[] args) {
		NIOClientThread clientThread = new NIOClientThread();
		clientThread.start();

		//输入输出流
		BufferedReader sin = new BufferedReader(new InputStreamReader(System.in));

		try {
			//循环读取键盘输入
			String readLine;
			while((readLine = sin.readLine()) != null){
				if(readLine.equals("bye")){
					clientThread.close();
					System.exit(0);
				}
				clientThread.send(readLine);
			}
		} catch (IOException e) {
			// TODO Auto-generated catch block
			e.printStackTrace();
		}
	}

}
客户端处理线程
package org.test.nio;

import java.io.IOException;
import java.net.InetSocketAddress;
import java.nio.ByteBuffer;
import java.nio.CharBuffer;
import java.nio.channels.ClosedChannelException;
import java.nio.channels.SelectionKey;
import java.nio.channels.Selector;
import java.nio.channels.SocketChannel;
import java.nio.charset.CharacterCodingException;
import java.nio.charset.Charset;
import java.nio.charset.CharsetDecoder;
import java.nio.charset.CharsetEncoder;
import java.util.Iterator;

public class NIOClientThread extends Thread {
	private CharsetDecoder decoder = Charset.forName("UTF-8").newDecoder();
	private CharsetEncoder encoder = Charset.forName("UTF-8").newEncoder();
	private Selector selector = null;
	private SocketChannel socket = null;
	private SelectionKey clientKey = null;

	// TODO 启动客户端
	public NIOClientThread() {
		try {
			// 创建一个Selector
			selector = Selector.open();

			// 创建并注册Socket
			socket = SocketChannel.open();
			socket.configureBlocking(false);
			clientKey = socket.register(selector, SelectionKey.OP_CONNECT);

			// 连接到远程地址
			InetSocketAddress ip = new InetSocketAddress("localhost", 12345);
			socket.connect(ip);
		} catch (ClosedChannelException e) {
			// TODO Auto-generated catch block
			e.printStackTrace();
		} catch (IOException e) {
			// TODO Auto-generated catch block
			e.printStackTrace();
		}
	}
	// TODO 读取事件
	@Override
	public void run() {
		try {
			// 监听事件
			while (true) {
				selector.select(1);
				// 事件来源列表
				Iterator<SelectionKey> it = selector.selectedKeys().iterator();
				while (it.hasNext()) {
					SelectionKey key = it.next();
					// 删除当前事件
					it.remove();

					// 判断当前事件类型
					if (key.isConnectable()) {
						// 连接事件
						SocketChannel channel = (SocketChannel) key.channel();
						if(channel.isConnectionPending()){
							channel.finishConnect();
						}
						channel.register(selector, SelectionKey.OP_READ);
						System.out.println("连接服务器端成功!");
					} else if (key.isReadable()) {
						// 读取数据事件
						SocketChannel channel = (SocketChannel) key.channel();
						channel.register(selector, SelectionKey.OP_WRITE);

						// 读取数据
						ByteBuffer buffer = ByteBuffer.allocate(64);
						int count = channel.read(buffer);
						buffer.flip();
						String msg = decoder.decode(buffer).toString();
						System.out.println(count + "收到:" + msg);
					}
				}
			}
		} catch (ClosedChannelException e) {
			// TODO Auto-generated catch block
			e.printStackTrace();
		} catch (CharacterCodingException e) {
			// TODO Auto-generated catch block
			e.printStackTrace();
		} catch (IOException e) {
			// TODO Auto-generated catch block
			e.printStackTrace();
		}
	}

	// TODO 发送消息
	public void send(String msg) {
		// 写入数据事件
		try {
			SocketChannel channel = (SocketChannel) clientKey.channel();
			channel.write(encoder.encode(CharBuffer.wrap(msg)));
		} catch (CharacterCodingException e) {
			// TODO Auto-generated catch block
			e.printStackTrace();
		} catch (IOException e) {
			// TODO Auto-generated catch block
			e.printStackTrace();
		}
	}

	// TODO 关闭客户端
	public void close(){
		try {
			selector.close();
			socket.close();
		} catch (IOException e) {
			// TODO Auto-generated catch block
			e.printStackTrace();
		}
	}
}
运行结果
服务器端:

accept客户端连接:1.0.0.127.in-addr.arpa52591
15收到:你好服务器
accept客户端连接:1.0.0.127.in-addr.arpa52596
9收到:啊啊啊


客户端:
连接服务器端成功!
你好服务器
21收到:server你好服务器

连接服务器端成功!
啊啊啊
15收到:server啊啊啊
4、数据报通道DatagramChannel
DatagramChannel与DatagramSocket类似,用于实现非阻塞的数据报通信。与DatagramSocket的使用过程相似,Datagram的使用过程见:http://aku28907.blog.51cto.com/5668513/1782137。DatagramChannel的工作过程如下:
(1)创建一个DatagramChannel对象:socket = DatagramChannel.open();
(2)开始连接到远程地址
创建一个InetSocketAddress地址对象,使用SocketChannel的connect()函数连接该地址
InetSocketAddress ip = new InetSocketAddress("localhost",12345);
socket.connect(ip);
(3)发送或者接收数据
可以使用socket的write()来发送Buffer对象的数据,用receive()来接收Buffer数据。
socket.write(buffer);
socket.receive(buffer);
实例二:利用数据报通信的Client/Server程序
(示例比较简单,有兴趣的博友可以参照SocketChannel进行改造下)
服务器端
package org.test.nio.udp;

import java.io.IOException;
import java.net.InetSocketAddress;
import java.net.SocketException;
import java.nio.ByteBuffer;
import java.nio.channels.DatagramChannel;
import java.nio.charset.CharacterCodingException;
import java.nio.charset.Charset;
import java.nio.charset.CharsetDecoder;

public class UDPServer {

	public static void main(String[] args) {
		DatagramChannel socket = null;
		try {
			//创建socket
			socket = DatagramChannel.open();
			InetSocketAddress ip = new InetSocketAddress("localhost", 12345);
			socket.socket().bind(ip);

			//循环监听
			while(true){
				CharsetDecoder decoder = Charset.forName("UTF-8").newDecoder();
				ByteBuffer buffer = ByteBuffer.allocate(64);
				socket.receive(buffer);
				buffer.flip();
				System.out.println(decoder.decode(buffer).toString());
			}
		} catch (SocketException e) {
			// TODO Auto-generated catch block
			e.printStackTrace();
		} catch (CharacterCodingException e) {
			// TODO Auto-generated catch block
			e.printStackTrace();
		} catch (IOException e) {
			// TODO Auto-generated catch block
			e.printStackTrace();
		} finally{
			try {
				socket.close();
			} catch (IOException e) {
				// TODO Auto-generated catch block
				e.printStackTrace();
			}
		}

	}

}
客户端
package org.test.nio.udp;

import java.io.IOException;
import java.net.InetSocketAddress;
import java.nio.CharBuffer;
import java.nio.channels.DatagramChannel;
import java.nio.charset.CharacterCodingException;
import java.nio.charset.Charset;
import java.nio.charset.CharsetEncoder;

public class UDPClient {

	public static void main(String[] args) {
		// TODO Auto-generated method stub
		DatagramChannel socket = null;
		try {
			//创建一个Socket
			socket = DatagramChannel.open();
			InetSocketAddress ip = new InetSocketAddress("localhost", 12345);
			socket.connect(ip);

			//发送数据
			CharsetEncoder encoder = Charset.forName("UTF-8").newEncoder();
			socket.write(encoder.encode(CharBuffer.wrap("Hello")));
		} catch (CharacterCodingException e) {
			// TODO Auto-generated catch block
			e.printStackTrace();
		} catch (IOException e) {
			// TODO Auto-generated catch block
			e.printStackTrace();
		} finally{
			try {
				socket.close();
			} catch (IOException e) {
				// TODO Auto-generated catch block
				e.printStackTrace();
			}
		}
	}

}
运行结果:
本文出自 “阿酷博客源” 博客,请务必保留此出处http://aku28907.blog.51cto.com/5668513/1782560
以上是关于java网络编程基础—NIO非阻塞编程的主要内容,如果未能解决你的问题,请参考以下文章
Java网络编程和NIO详解5:Java 非阻塞 IO 和异步 IO
java网络编程系列之JavaIO的“今生”:NIO非阻塞模型


