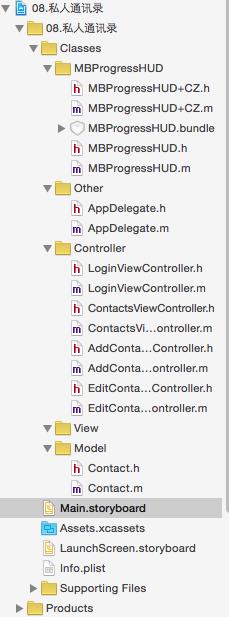
私人通讯录
Posted
tags:
篇首语:本文由小常识网(cha138.com)小编为大家整理,主要介绍了私人通讯录相关的知识,希望对你有一定的参考价值。
一、私人通讯录
什么是Segue
● Storyboard上每?一根?用来界?面跳转的线,都是?一个UIStoryboardSegue对象(简称Segue)
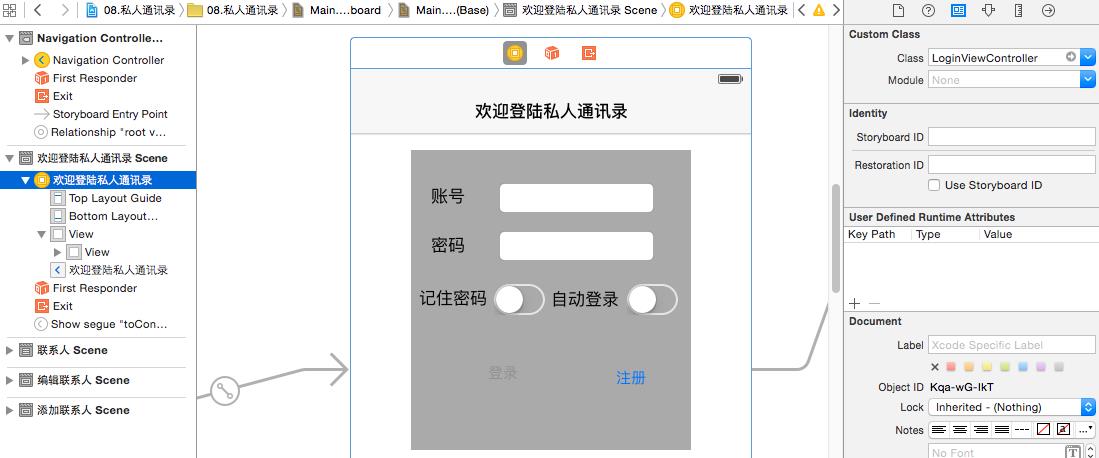
"【登录界面】"
1.掌握UIStoryboardSegue对象
(1)在storyboard中,可以通过连线完成多个界面间的跳转,每一连线我们称为segue
(2)掌握storyboard中的segue连线有两种,一是自动跳转、二是手动跳转
自动跳转从按钮连线,不管账号和密码是不是正确,就直接跳到下一个界面,而手动跳转,是用控制器开始连线。并设置segue的Identifier.
(3)掌握如何使用代码跳转页面手动segue -->【[self performSegueWithIdentifier:@"contactSegue" sender:nil];】
(4)掌握UIStoryboardSegue对象的源控制器和目标控制器
2.掌握MBProgressHUD的使用,给用户一个友好的提示
3.掌握控制器的数据传递
(1) 在控制器的【-(void)prepareForSegue:sender:】的方法中获取目标控制器
(2) 设置目标控制器的属性,可以实现数据的传递
4.掌握文件框文字改变的监听
方法1 使用通知中心
[[NSNotificationCenter defaultCenter] addObserver:self selector:@selector(textChange) name:UITextFieldTextDidChangeNotification object:self.passwordField];
方法2 往文本输入框添加事件
【addTarget: action: forControlEvents:UIControlEventEditingChanged】
方法3 storybaord连线
5.掌握记住密码与自动登录逻辑
(1)记住密码为关闭的情况下,如果自动登录为开启状态,应该关闭
(2)如果自动登录为关闭状态,记住密码必需为开启状态
"【添加联系人页面】"
1.掌握数据的逆向传递
(1)如果想向上一个控制器传递数据,可以使用代理的方法
(2)向上个控制器传递数据时,可以传递字符串或者模型
2.掌握表格的局部刷新,性能更好,使用【self.tableView insertRowsAtIndexPaths:withRowAnimation:】方法
"【编辑联系人】"
1.使用代理的方法通知上一个控制器联系个编辑完成,并保存
2.刷新数据使用局部刷新【[self.tableView reloadRowsAtIndexPaths:withRowAnimation】

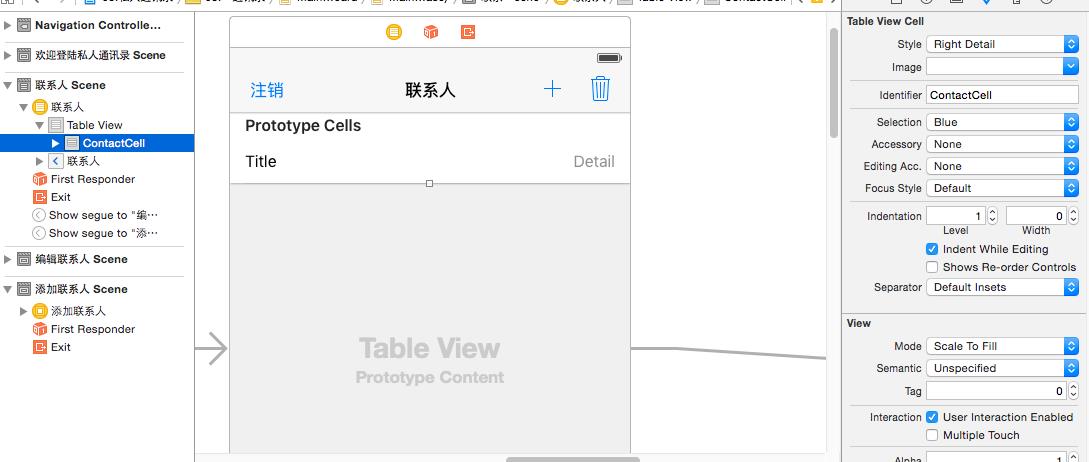
Main.storyboard


cell的ID和添加联系人时可以防止cell右面没有数据(在Style中设置)

LoginViewController.m
//
// LoginViewController.m
// 08.私人通讯录
//
// Created by huan on 16/1/21.
// Copyright © 2016年 huanxi. All rights reserved.
//
#import "LoginViewController.h"
#import "ContactsViewController.h"
#import "MBProgressHUD+CZ.h"
//定义用户偏好设置的key 防止写错
#define rememberPwdKey @"rememberPwd" //记录密码
#define autoLoginKey @"autoLogin"//自动登录
#define accountKey @"account"//账号
#define passwordKey @"password"//密码
@interface LoginViewController ()
@property (weak, nonatomic) IBOutlet UITextField *accoutField;
@property (weak, nonatomic) IBOutlet UITextField *passwordField;
- (IBAction)loginBtnClick;
@property (weak, nonatomic) IBOutlet UIButton *loginBtn;
@property (weak, nonatomic) IBOutlet UISwitch *rememberPwdSwitch;
@property (weak, nonatomic) IBOutlet UISwitch *autoLoginSwitch;
@end
@implementation LoginViewController
- (void)viewDidLoad {
[super viewDidLoad];
// Do any additional setup after loading the view.
#pragma mark 输入框里没有值,禁用登录按钮有3种方法(1)通知(2)添加事件(3)连线
//使用通知中心来监听文本(TextField)的变化
// [[NSNotificationCenter defaultCenter] addObserver:self selector:@selector(textChange) name:UITextFieldTextDidChangeNotification object:self.accoutField];
// [[NSNotificationCenter defaultCenter] addObserver:self selector:@selector(textChange) name:UITextFieldTextDidChangeNotification object:self.passwordField];
//textField 添加事件
// [self.accoutField addTarget:self action:@selector(textChange) forControlEvents:UIControlEventEditingChanged];
// [self.passwordField addTarget:self action:@selector(textChange) forControlEvents:UIControlEventEditingChanged];
//设置 “开关” 默认值
NSUserDefaults *defaults = [NSUserDefaults standardUserDefaults];
self.rememberPwdSwitch.on = [defaults boolForKey:rememberPwdKey];
self.autoLoginSwitch.on = [defaults boolForKey:autoLoginKey];
//设置账号和密码 默认值
self.accoutField.text = [defaults objectForKey:accountKey];
NSLog(@"++++++++++%@", NSHomeDirectory());
if (self.rememberPwdSwitch.isOn) {
self.passwordField.text = [defaults objectForKey:passwordKey];
}
//调用 文本 变化 的方法
[self textChange];//解决登录按钮禁止的问题
//如果 “自动登录” 勾选,让自动登录
if (self.autoLoginSwitch.isOn) {
[self loginBtnClick];
// dispatch_after(dispatch_time(DISPATCH_TIME_NOW, (int64_t)(1 * NSEC_PER_SEC)), dispatch_get_main_queue(), ^{
// [self loginBtnClick];
// });
}
NSLog(@"viewDidLoad 打印窗口%@",[UIApplication sharedApplication].windows);
}
// UITextEffectsWindow 给键盘,只有view显示完成之后才会创建
-(void)viewDidAppear:(BOOL)animated{
NSLog(@"viewDidAppear打印窗口%@", [UIApplication sharedApplication].windows);
;
}
//控制器已经销毁,不需要监听
-(void)dealloc{
//移除通知者中心
[[NSNotificationCenter defaultCenter] removeObserver:self];
}
- (IBAction)textChange:(id)sender {
self.loginBtn.enabled = (self.accoutField.text.length != 0 && self.passwordField.text.length != 0);
}
-(void)textChange{
NSLog(@"%s",__func__);
//判断输入有没有值
// if (self.accoutField.text.length != 0 && self.passwordField.text.length != 0) {
// self.loginBtn.enabled = YES;
// }else{
// self.loginBtn.enabled = NO;
//
// }
self.loginBtn.enabled = (self.accoutField.text.length != 0 && self.passwordField.text.length != 0);
//没有值,禁用登录按钮
}
- (IBAction)loginBtnClick {
//判断用户名密码是否正确,只有正确的情况下,才能进行下一个界面
NSString *accout = self.accoutField.text;
NSString *password = self.passwordField.text;
//不添加toView参数,提示框是添加在window上,toView代表提示框添加到哪个view上
[MBProgressHUD showMessage:@"正在登录中。。。"];
// [MBProgressHUD showMessage:@"正在登录中。。。" toView:self.view];//self.view 就是LoginViewController的view
// [MBProgressHUD showMessage:@"正在登录中。。。" toView:self.navigationController.view];
//模拟登录有一个等待过程
//一般登录是网络的请求,而不是本地的请求,很多数据都保存在 云(服务器) 上面去的
dispatch_after(dispatch_time(DISPATCH_TIME_NOW, (int64_t)(1 * NSEC_PER_SEC)), dispatch_get_main_queue(), ^{
//登录完成 隐藏提示框
[MBProgressHUD hideHUD];
// [MBProgressHUD hideHUDForView:self.view];
if ([accout isEqualToString:@"zhangsan"] && [password isEqualToString:@"123"]) {//账号与密码正确
NSLog(@"账号与密码正确");
//执行一个segue,就会进入segue所指的控制器
[self performSegueWithIdentifier:@"toContactsSegue" sender:nil];
//保存用户账号和密码
NSUserDefaults *defaults = [NSUserDefaults standardUserDefaults];
[defaults setObject:accout forKey:accountKey];
//只有“记住密码”开启的状态,才要保存
if (self.rememberPwdSwitch.isOn) {
[defaults setObject:password forKey:passwordKey];
}
[defaults synchronize];
}else{
NSLog(@"账号或者密码不正确");
//给一个错误的提示
[MBProgressHUD showError:@"账号或者密码不正确"];
}
});
}
// 记录密码开关的值的变化
- (IBAction)rememberPwdSwitchChange {
//如果记住密码 为 关闭状态,并且 自动登录为 开启的状态,此时,自动登录 应该为关闭
if (self.rememberPwdSwitch.isOn == NO && self.autoLoginSwitch.isOn == YES) {
// self.autoLoginSwitch.on = NO;
//添加动画
[self.autoLoginSwitch setOn:NO animated:YES];
}
//保存开关数据
[self saveSwitchToPreference];
}
//自动登录开关的值的变化
- (IBAction)autoLoginSwitchChange {
//如果 自动登录 为 开启状态 并且 记住密码 关闭状态,此时,记住密码应该为开启
if (self.rememberPwdSwitch.isOn == NO && self.autoLoginSwitch.isOn == YES) {
[self.rememberPwdSwitch setOn:YES animated:YES];
}
[self saveSwitchToPreference];
}
-(void)saveSwitchToPreference{
//保存开关数据
NSUserDefaults *defaults = [NSUserDefaults standardUserDefaults];
[defaults setBool:self.rememberPwdSwitch.isOn forKey:rememberPwdKey];
[defaults setBool:self.autoLoginSwitch.isOn forKey:autoLoginKey];
[defaults synchronize];
}
//使用segue跳转下一个界面之前会调用
-(void)prepareForSegue:(UIStoryboardSegue *)segue sender:(id)sender{
NSLog(@"%s", __func__);
NSLog(@"源控制器 %@", [segue sourceViewController]);
NSLog(@"目标控制器 %@", segue.destinationViewController);
//可以传递数据给下一个控制器
//目标控制器
id destVc = segue.destinationViewController;
//判断控制器的类型
if ([destVc isKindOfClass:[ContactsViewController class]]) {
ContactsViewController *contactsVc = destVc;
//设置名字属性
contactsVc.name = self.accoutField.text;
}
}
@end
ContactsViewController.h
#import <UIKit/UIKit.h>
@interface ContactsViewController : UITableViewController
@property (nonatomic, copy) NSString *name;
@end
ContactsViewController.m
//
// ContactsViewController.m
// 08.私人通讯录
//
// Created by huan on 16/1/21.
// Copyright © 2016年 huanxi. All rights reserved.
//
/**
* 保存联系人 使用NSKeyedArcheiver
* 1.Contact要遵守 NScoding
* 2.文件保存的路径
* 3.NSKeyedArcheiver 保存
* 4.NSKeyedUnArcheiver 读取数据
*/
#import "ContactsViewController.h"
#import "AddContactViewController.h"
#import "EditContactViewController.h"
#import "Contact.h"
@interface ContactsViewController ()<AddContactViewControllerDelegate, UITableViewDataSource, UITableViewDelegate, EditContactViewControllerDelegate>
@property (nonatomic, strong) NSMutableArray *contacts;
/**
* 联系人数据保存的路径
*/
@property (nonatomic, copy) NSString *contactPath;
@end
@implementation ContactsViewController
-(NSString *)contactPath{
if (!_contactPath) {
NSString *doc = [NSSearchPathForDirectoriesInDomains(NSDocumentDirectory, NSUserDomainMask, YES) lastObject];
_contactPath = [doc stringByAppendingPathComponent:@"contacts.archiver"];
}
return _contactPath;
}
-(NSMutableArray *)contacts{
if (!_contacts) {
//先从“沙盒”获取数据
_contacts = [NSKeyedUnarchiver unarchiveObjectWithFile:self.contactPath];
//程序第一次使用,沙盒没有联系人数据
if (!_contacts) {
_contacts = [NSMutableArray array];
}
}
return _contacts;
}
- (void)viewDidLoad {
[super viewDidLoad];
// Do any additional setup after loading the view.
//设置标题
self.title = [NSString stringWithFormat:@"%@的联系人",self.name];
NSLog(@"%@", self.contactPath);
///Users/huan/Library/Developer/CoreSimulator/Devices/37683403-6248-4A9A-863A-53CB9C1361FD/data/Containers/Data/Application/28527B3B-9CCB-4DA4-B3FE-45A8958805EC/Documents/contacts.archiver
//懒加载中 那个Yes改为NO ~/Documents/contacts.archiver
//在导航栏右边加个按钮
// UIBarButtonItem *deleteItem = [[UIBarButtonItem alloc] initWithBarButtonSystemItem:UIBarButtonSystemItemTrash target:self.navigationItem action:@selector(delete:)];
// self.navigationItem.rightBarButtonItems = @[deleteItem, self.navigationItem.rightBarButtonItem];//在ios8上只有这样写,用代码的方式,但是iOS9作出改进,可以在Main.storyboard中添加UIBarButtonItem.
}
- (IBAction)delete:(id)sender {
//设置表格的“编辑”属性
// self.tableView.editing = YES;
//添加动画
// [self.tableView setEditing:YES animated:YES];
[self.tableView setEditing:!self.tableView.editing animated:YES];//点击“垃圾”按钮可回去。
}
#pragma mark 返回表格的“编辑”状态
-(UITableViewCellEditingStyle)tableView:(UITableView *)tableView editingStyleForRowAtIndexPath:(nonnull NSIndexPath *)indexPath{
if (indexPath.row == 0) {
return UITableViewCellEditingStyleInsert;
}
return UITableViewCellEditingStyleDelete;
}
-(void)tableView:(UITableView *)tableView commitEditingStyle:(UITableViewCellEditingStyle)editingStyle forRowAtIndexPath:(NSIndexPath *)indexPath{
NSLog(@"%s", __func__);
if (editingStyle == UITableViewCellEditingStyleDelete) {
//获取行
//删除联系人
[self.contacts removeObjectAtIndex:indexPath.row];
//刷新表格
NSIndexPath *deleteIndex = [NSIndexPath indexPathForRow:indexPath.row inSection:0];
[self.tableView deleteRowsAtIndexPaths:@[deleteIndex] withRowAnimation:UITableViewRowAnimationFade];
//同步数据
[NSKeyedArchiver archiveRootObject:self.contacts toFile:self.contactPath];
}else if (editingStyle == UITableViewCellEditingStyleInsert){
//添加一个10086联系人
Contact *contact = [[Contact alloc] init];
contact.tel = @"10086";
//保存数据,刷新表格
[self.contacts insertObject:contact atIndex:indexPath.row + 1];
NSIndexPath *insertIndex = [NSIndexPath indexPathForRow:indexPath.row + 1 inSection:0];
[self.tableView insertRowsAtIndexPaths:@[insertIndex] withRowAnimation:UITableViewRowAnimationFade];
//同步数据
[NSKeyedArchiver archiveRootObject:self.contacts toFile:self.contactPath];
}
}
#pragma mark 表格的数据
-(NSInteger)tableView:(UITableView *)tableView numberOfRowsInSection:(NSInteger)section{
return self.contacts.count;
}
-(UITableViewCell *)tableView:(UITableView *)tableView cellForRowAtIndexPath:(NSIndexPath *)indexPath{
NSLog(@"%s", __func__);
static NSString *ID = @"ContactCell";
UITableViewCell *cell = [tableView dequeueReusableCellWithIdentifier:ID];
//显示数据
Contact *contact = self.contacts[indexPath.row];
cell.textLabel.text = contact.name;
cell.detailTextLabel.text = contact.tel;
return cell;
}
- (IBAction)logoutBtnClick:(id)sender {
//注销
UIAlertController *alert = [UIAlertController alertControllerWithTitle:@"提醒" message:nil preferredStyle:UIAlertControllerStyleAlert];
[alert addAction:[UIAlertAction actionWithTitle:@"确认" style:UIAlertActionStyleDefault handler:^(UIAlertAction * _Nonnull action) {
//直接返回上一个控制器
[self.navigationController popViewControllerAnimated:YES];
}]];
[alert addAction:[UIAlertAction actionWithTitle:@"取消" style:UIAlertActionStyleDefault handler:^(UIAlertAction * _Nonnull action) {
}]];
//弹出提示框
[self presentViewController:alert animated:true completion:nil];
}
-(void)prepareForSegue:(UIStoryboardSegue *)segue sender:(id)sender{
//获取目标控制器
id destVc = segue.destinationViewController;
//判断类型
if ([destVc isKindOfClass:[AddContactViewController class]]) {
AddContactViewController *addContactVc = destVc;
addContactVc.delegate = self;
}else if ([destVc isKindOfClass:[EditContactViewController class]]){
//1.获取目标控制器
EditContactViewController *editVc = destVc;
//2.获取对应索引的联系人
NSInteger selectedRow = self.tableView.indexPathForSelectedRow.row;
Contact *contact = self.contacts[selectedRow];
//3.设置编辑联系人控制器的contact属性
editVc.contact = contact;
//4.设置编辑联系人的代理
editVc.delegate = self;
}
}
//-(void)addContactViewController:(AddContactViewController *)addContactVc didSaveContactWithName:(NSString *)name tel:(NSString *)tel{
// //刷新表格
// Contact *contact = [[Contact alloc] init];
// contact.name = name;
// contact.tel = tel;
// //添加联系人数组
// [self.contacts addObject:contact];
// //刷新表格
// [self.tableView reloadData];
//
// //隐藏添加联系人的控制器
// [self.navigationController popViewControllerAnimated:YES];
//}
#pragma mark 添加联系人控制器的代理
-(void)addContactViewController:(AddContactViewController *)addContactVc didSaveContact:(Contact *)contact{
//把模型添加到联系人数组
[self.contacts addObject:contact];
//刷新
// [self.tableView reloadData];
//局部刷新
NSIndexPath *lastPath = [NSIndexPath indexPathForRow:self.contacts.count - 1 inSection:0];
[self.tableView insertRowsAtIndexPaths:@[lastPath] withRowAnimation:UITableViewRowAnimationFade];
//隐藏添加联系人的控制器
[self.navigationController popViewControllerAnimated:YES];//这句代码也可以写在添加联系人控制器保存按钮操作中,因为官方文档说,谁打开谁销毁。但是也可以写在本控制器刷新前面。这个位置不定,随自己的喜好而定。
// 同步数据 到沙盒
[NSKeyedArchiver archiveRootObject:self.contacts toFile:self.contactPath];
}
#pragma mark 编辑联系人控制器的代理
-(void)editContactViewController:(EditContactViewController *)editContactVc didFinishedSaveConatct:(Contact *)contact{
//局部刷新
//当前刷新的行
NSInteger row = [self.contacts indexOfObject 以上是关于私人通讯录的主要内容,如果未能解决你的问题,请参考以下文章