金庸武功之“”天山折梅手“”-elk5.2
Posted
tags:
篇首语:本文由小常识网(cha138.com)小编为大家整理,主要介绍了金庸武功之“”天山折梅手“”-elk5.2相关的知识,希望对你有一定的参考价值。
ELK是Elasticsearch、Logstash、Kibana的简称,这三者是核心套件,但并非全部。
Elasticsearch是实时全文搜索和分析引擎,提供搜集、分析、存储数据三大功能;是一套开放REST和JAVA API等结构提供高效搜索功能,可扩展的分布式系统。它构建于Apache Lucene搜索引擎库之上。
Logstash是一个用来搜集、分析、过滤日志的工具。它支持几乎任何类型的日志,包括系统日志、错误日志和自定义应用程序日志。它可以从许多来源接收日志,这些来源包括 syslog、消息传递(例如 RabbitMQ)和JMX,它能够以多种方式输出数据,包括电子邮件、websockets和Elasticsearch。
Kibana是一个基于Web的图形界面,用于搜索、分析和可视化存储在 Elasticsearch指标中的日志数据。它利用Elasticsearch的REST接口来检索数据,不仅允许用户创建他们自己的数据的定制仪表板视图,还允许他们以特殊的方式查询和过滤数据
Centos7.2 mini
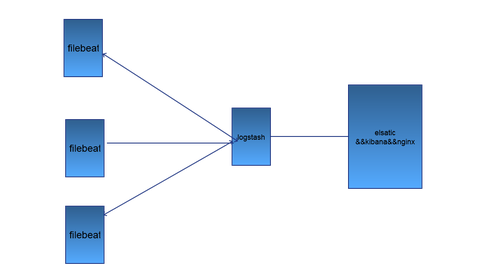
A: 192.168.1.241 es && kibana && nginx
B: 192.168.1.242 logstach
C: 192.168.1.243 Filebeat代理 httpd(client):将其日志发送到Logstash的客户端服务器
每台服务器都安装Java环境,1.8以上 jdk-8u131-linux-x64.rpm
rpm -ivh jdk-8u131-linux-x64.rpm
[[email protected] java]# java -version
java version "1.8.0_131"
Java(TM) SE Runtime Environment (build 1.8.0_131-b11)
Java HotSpot(TM) 64-Bit Server VM (build 25.131-b11, mixed mode)
[[email protected] java]# which java
/usr/bin/java
这里说明下,用rpm包方式安装的Java 默认的安装路径是在/usr/java下,要记住:
vi /etc/profile
JAVA_HOME=/usr/java/jdk1.8.0_131
JRE_HOME=/usr/java/jdk1.8.0_131/jre
PATH=$PATH:$JAVA_HOME/bin:$JRE_HOME/bin
CLASSPATH=.:$JAVA_HOME/lib/dt.jar:$JAVA_HOME/lib/tools.jar:$JRE_HOME/lib
source /etc/profile
二.安装logsstach
在服务器B上:
yum install -y wget
wget https://artifacts.elastic.co/downloads/logstash/logstash-5.2.0.rpm
yum install -y logstash-5.2.0.rpm
cd /usr/share/logstash/bin/
./logstash -e ‘input{stdin{}}output{stdout{codec=>rubydebug}}‘
vi /etc/profile.d/logstash.sh
export PATH=/usr/share/logstash/bin:$PATH
source /etc/profile
cd /etc/logstash/conf.d/
vi sample.conf
input {
stdin {}
}
output {
stdout {
codec => rubydebug
}
}
logstash -f /etc/logstash/conf.d/sample.conf
vi /etc/logstash/conf.d/filebeat.conf
input {
beats {
port => "5044"
}
}
output {
stdout {
codec => rubydebug
}
}
安装filebeat
在服务器C上:
curl -L -O https://artifacts.elastic.co/downloads/beats/filebeat/filebeat-5.2.0-x86_64.rpm
rpm -vih filebeat-5.2.0-x86_64.rpm
vi /etc/filebeat/filebeat.yml
- input_type: log
# Paths that should be crawled and fetched. Glob based paths.
paths:
- /var/log/nginx/access_log
#- c:\programdata\elasticsearch\logs\*
#-------------------------- Elasticsearch output ------------------------------
#output.elasticsearch:
# Array of hosts to connect to.
#hosts: ["localhost:9200"]
# Optional protocol and basic auth credentials.
#protocol: "https"
#username: "elastic"
#password: "changeme"
#----------------------------- Logstash output --------------------------------
output.logstash:
# The Logstash hosts
hosts: ["192.168.1.242:5044"]
# Optional SSL. By default is off.
# List of root certificates for HTTPS server verifications
#ssl.certificate_authorities: ["/etc/pki/root/ca.pem"]
# Certificate for SSL client authentication
#ssl.certificate: "/etc/pki/client/cert.pem"
# Client Certificate Key
#ssl.key: "/etc/pki/client/cert.key"
/etc/init.d/filebeat start (这样端口才会起来)
ss -ntpl
LISTEN 0 128 :::5044 :::* users:(("java",pid=12888,fd=54))
在服务器B上:
logstash -f /etc/logstash/conf.d/filebeat.conf #就会输入C上httpd的访问日志,证明filebeat把日志输出到了 logstash
安装nginx
yum install epel-release -y
yum update -y
yum install nginx -y
systemctl enable nginx
systemctl start nginx
这里要重点说下,在B服务器上也要安装filebeat
在服务器B上:
curl -L -O https://artifacts.elastic.co/downloads/beats/filebeat/filebeat-5.2.0-x86_64.rpm
rpm -vih filebeat-5.2.0-x86_64.rpm
vi /etc/filebeat/filebeat.yml
- input_type: log
# Paths that should be crawled and fetched. Glob based paths.
paths:
- /var/log/*.log
#- c:\programdata\elasticsearch\logs\*
#================================ Outputs =====================================
# Configure what outputs to use when sending the data collected by the beat.
# Multiple outputs may be used.
#-------------------------- Elasticsearch output ------------------------------
#output.elasticsearch:
# Array of hosts to connect to.
#hosts: ["localhost:9200"]
# Optional protocol and basic auth credentials.
#protocol: "https"
#username: "elastic"
#password: "changeme"
#----------------------------- Logstash output --------------------------------
output.logstash:
# The Logstash hosts
hosts: ["localhost:5044"]
# Optional SSL. By default is off.
# List of root certificates for HTTPS server verifications
#ssl.certificate_authorities: ["/etc/pki/root/ca.pem"]
# Certificate for SSL client authentication
#ssl.certificate: "/etc/pki/client/cert.pem"
# Client Certificate Key
#ssl.key: "/etc/pki/client/cert.key"
/etc/init.d/filebeat start
总结:B和C(logstash和日志源)都要安装filebeat,其中C上filebeat的output
logstash的host:指向B服务器的IP:192.168.1.242,而B上的就写localhost
还有一个问题就是,filebeat的端口,问题,在C上启动了,端口不监听,不管它,只要进程在,B上能输出C的日志就行了
安装es && kibana
wget https://artifacts.elastic.co/downloads/elasticsearch/elasticsearch-5.2.0.rpm
yum install -y elasticsearch-5.2.0.rpm
cd /usr/share/elasticsearch/bin/
[[email protected] bin]# ./elasticsearch
Exception in thread "main" org.elasticsearch.bootstrap.BootstrapException: java.nio.file.NoSuchFileException: /usr/share/elasticsearch/config
Likely root cause: java.nio.file.NoSuchFileException: /usr/share/elasticsearch/config
at sun.nio.fs.UnixException.translateToIOException(UnixException.java:86)
at sun.nio.fs.UnixException.rethrowAsIOException(UnixException.java:102)
at sun.nio.fs.UnixException.rethrowAsIOException(UnixException.java:107)
at sun.nio.fs.UnixFileAttributeViews$Basic.readAttributes(UnixFileAttributeViews.java:55)
at sun.nio.fs.UnixFileSystemProvider.readAttributes(UnixFileSystemProvider.java:144)
at sun.nio.fs.LinuxFileSystemProvider.readAttributes(LinuxFileSystemProvider.java:99)
at java.nio.file.Files.readAttributes(Files.java:1737)
at java.nio.file.FileTreeWalker.getAttributes(FileTreeWalker.java:225)
at java.nio.file.FileTreeWalker.visit(FileTreeWalker.java:276)
at java.nio.file.FileTreeWalker.walk(FileTreeWalker.java:322)
at java.nio.file.Files.walkFileTree(Files.java:2662)
at org.elasticsearch.common.logging.LogConfigurator.configure(LogConfigurator.java:150)
at org.elasticsearch.common.logging.LogConfigurator.configure(LogConfigurator.java:122)
at org.elasticsearch.bootstrap.Bootstrap.init(Bootstrap.java:316)
at org.elasticsearch.bootstrap.Elasticsearch.init(Elasticsearch.java:123)
at org.elasticsearch.bootstrap.Elasticsearch.execute(Elasticsearch.java:114)
at org.elasticsearch.cli.EnvironmentAwareCommand.execute(EnvironmentAwareCommand.java:67)
at org.elasticsearch.cli.Command.mainWithoutErrorHandling(Command.java:122)
at org.elasticsearch.cli.Command.main(Command.java:88)
at org.elasticsearch.bootstrap.Elasticsearch.main(Elasticsearch.java:91)
at org.elasticsearch.bootstrap.Elasticsearch.main(Elasticsearch.java:84)
Refer to the log for complete error details.
这个错误我觉得主要是因为找不到配置文件,但是如果你直接在安装目录里去启动elasticsearch的话,elasticsearch只会在当前目录找config文件夹,如果安装成service的形式应该是可以找到配置文件,但我没去尝试,后面试试。
问题知道了,我们可以直接把/etc目录下的elasticsearch配置文件copy过来:
cp -r /etc/elasticsearch /usr/share/elasticsearch/config
这个时候我们再启动就不会报刚才的错误了,我们再试一遍:bin/elasticsearch
意料之中,这时候会提示以下错误:
        at org.elasticsearch.bootstrap.Elasticsearch.init(Elasticsearch.java:125) ~[elasticsearch-5.1.2.jar:5.1.2]
        at org.elasticsearch.bootstrap.Elasticsearch.execute(Elasticsearch.java:112) ~[elasticsearch-5.1.2.jar:5.1.2]
        at org.elasticsearch.cli.SettingCommand.execute(SettingCommand.java:54) ~[elasticsearch-5.1.2.jar:5.1.2]
        at org.elasticsearch.cli.Command.mainWithoutErrorHandling(Command.java:122) ~[elasticsearch-5.1.2.jar:5.1.2]
        at org.elasticsearch.cli.Command.main(Command.java:88) ~[elasticsearch-5.1.2.jar:5.1.2]
        at org.elasticsearch.bootstrap.Elasticsearch.main(Elasticsearch.java:89) ~[elasticsearch-5.1.2.jar:5.1.2]
        at org.elasticsearch.bootstrap.Elasticsearch.main(Elasticsearch.java:82) ~[elasticsearch-5.1.2.jar:5.1.2]
Caused by: java.lang.RuntimeException: can not run elasticsearch as root
        at org.elasticsearch.bootstrap.Bootstrap.initializeNatives(Bootstrap.java:100) ~[elasticsearch-5.1.2.jar:5.1.2]
        at org.elasticsearch.bootstrap.Bootstrap.setup(Bootstrap.java:176) ~[elasticsearch-5.1.2.jar:5.1.2]
        at org.elasticsearch.bootstrap.Bootstrap.init(Bootstrap.java:306) ~[elasticsearch-5.1.2.jar:5.1.2]
        at org.elasticsearch.bootstrap.Elasticsearch.init(Elasticsearch.java:121) ~[elasticsearch-5.1.2.jar:5.1.2]
        ... 6 more
这个错误的原因是elasticsearch不允许使用root启动,因此我们要解决这个问题需要新建一个用户来启动elasticsearch(参考:https://my.oschina.net/topeagle/blog/591451?fromerr=mzOr2qzZ)
具体操作如下:
  ~ groupadd elsearch
  ~ useradd elsearch -g elsearch -p elsearch
  ~ cd /usr/share
   chown -R elsearch:elsearch elasticsearch

  su elsearch
  cd /usr/share/elasticsearch/bin
  ./elasticsearch
或者回到root下
systemctl start elasticsearch
systemctl enable elasticsearch
[[email protected] ~]# curl 127.0.0.1:9200
{
"name" : "tZhA-Rw",
"cluster_name" : "elasticsearch",
"cluster_uuid" : "OzC1IJd3Sg66bwDv7AAUHw",
"version" : {
"number" : "5.5.1",
"build_hash" : "19c13d0",
"build_date" : "2017-07-18T20:44:24.823Z",
"build_snapshot" : false,
"lucene_version" : "6.6.0"
},
&qunt;t醙lmne" : "You Know, for Search"
这里如果想开房外网访问:
{
  "name" : "qO-BHYV",
  "cluster_name" : "elasticsearch",
  "cluster_uuid" : "7nmo0Io_SDOQ5Gt7AV7fjw",
  "version" : {
    "number" : "5.5.1",
    "build_hash" : "19c13d0",
    "build_date" : "2017-07-18T20:44:24.823Z",
    "build_snapshot" : false,
    "lucene_version" : "6.6.0"
  },
  "tagline" : "You Know, for Search"
}需要修改/etc/elasticsearch/elasticsearch.yml这个文件(虽然前面我们复制它到了/usr/share/elasticsearch/config)下了,但配置文件生效的确是/etc/elasticsearch/elasticsearch.yml
systemctl restart elasticsearch
这点要特别的注意:
cluster.name: ptsearch # 组名(同一个组,组名必须一致)
node.name: yunwei-ts-100-70 # 节点名称,建议和主机名一致
path.data: /data/elasticsearch # 数据存放的路径
path.logs: /var/log/elasticsearch/ # 日志存放的路径
bootstrap.mlockall: true # 锁住内存,不被使用到交换分区去
network.host: 0.0.0.0 # 网络设置
http.port: 9200 # 端口
discovery.zen.ping.unicast.hosts: ["172.16.100.71","172.16.100.111"] #手动发现节点,写本机之外的集群节点IP地址
discovery.zen.ping.multicast.enabled: false #关闭多播模式
```
==以上配置3台elasticsearch节点都要配,注意nodename写每台主机的名称,discovery.zen.ping.unicast.hosts:xie写本机之外的集群节点IP地址。==
https://artifacts.elastic.co/downloads/kibana/kibana-5.2.0-x86_64.rpm
yum install -y kibana-5.2.0-x86_64.rpm
systemctl daemon-reload
systemctl enable kibana.service
systemctl start kibana.service
vi /etc/kibana/kibana.yml
修改 server.host: "192.168.1.241"
systemctl restart kibana.service
访问: htpp://IP:5601 #如果出现打开页面一直LOAD 换一个浏览器试试
安装nginx反向代理
配置Kibana在localhost上监听,必须设置一个反向代理,允许外部访问它。本文使用Nginx来实现发向代理
创建nginx官方源来安装nginx
vi /etc/yum.repos.d/nginx.repo
[nginx]
name=nginx repo
baseurl=http://nginx.org/packages/centos/$releasever/$basearch/
gpgcheck=0
enabled=1
yum install nginx httpd-tools -y
[[email protected] kibana]# htpasswd -c -m /etc/nginx/htpasswd.users kibanaadmin
New password:
Re-type new password:
Adding password for user kibanaadmin
vi /etc/nginx/conf.d/kibana.conf
server {
listen 80;
server_name kibana.aniu.co;
access_log /var/log/nginx/kibana.aniu.co.access.log main;
error_log /var/log/nginx/kibana.aniu.co.access.log;
auth_basic "Restricted Access";
auth_basic_user_file /etc/nginx/htpasswd.users;
location / {
proxy_pass http://localhost:5601;
proxy_http_version 1.1;
proxy_set_header Upgrade $http_upgrade;
proxy_set_header Connection ‘upgrade‘;
proxy_set_header Host $host;
proxy_cache_bypass $http_upgrade;
}
}
systemctl start nginx
systemctl enable nginx
vi /etc/kibana/kibana.yml
修改 server.host: "localhost" #改回来
systemctl restart kibana.service
在WINDOWS本机的hosts文件增加记录
192.168.1.241 kibana.aniu.co
输入 kibanaadmin tongbang123
以上是关于金庸武功之“”天山折梅手“”-elk5.2的主要内容,如果未能解决你的问题,请参考以下文章
