Ganglia安装篇
Posted
tags:
篇首语:本文由小常识网(cha138.com)小编为大家整理,主要介绍了Ganglia安装篇相关的知识,希望对你有一定的参考价值。
一、ganglia基本介绍
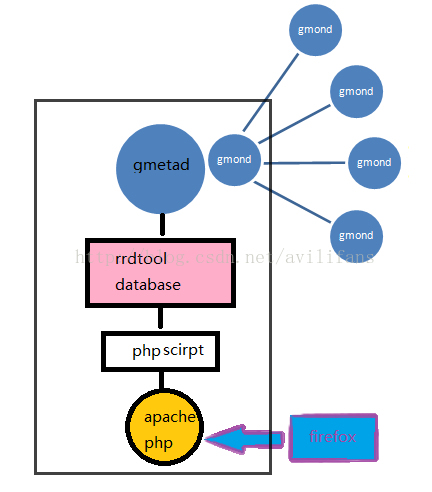
ganglia是分布式的监控系统,有两个Daemon,分别是:客户端GangliaMonitoring Daemon(gmond)和服务端GangliaMetaDaemon (gmetad),还有GangliaphpWeb
Frontend(基于web的动态访问方式)组成是一个Linux下图形化监控系统运行性能的软件,界面美观、丰富,功能强大而ganglia又依赖于一个web服务器用来显示集群状态,用rrdtool来存储数据和生成曲线图,需要xml解析因此需要expat,配置文件解析需要libconfuse。
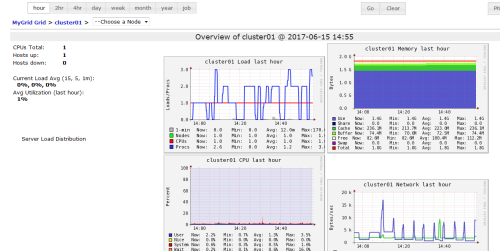
Ganglia是一个监控服务器,集群的开源软件,能够用曲线图表现最近一个小时,最近一天,最近一周,最近一月,最近一年的服务器或者集群的cpu负载,内存,网络,硬盘等指标。
Ganglia的强大在于:ganglia服务端能够通过一台客户端收集到同一个网段的所有客户端的数据,ganglia集群服务端能够通过一台服务端收集到它下属的所有客户端数据。这个体系设计表示一台服务器能够通过不同的分层能够管理上万台机器。这个功能是其他mrtg,nagios,cacti所不能比拟。
二、环境的准备
服务端:系统Centos6.5 64位
运行环境:Apache Web Server PHP 5.2及更新版本 PHP JSON 扩展的安装和启用
gmetad 服务,gmond服务(为了监控服务端服务安装的客户端服务)
客户端:系统Centos6.5 64位
只安装gmond服务
1.安装php支持
yum install php-common php-cliphp-gb php
2. 安装ganglia及其相关组件
server端:yum install httpd rrdtool rrdtool-devel ganglia-gmetad ganglia-gmondganglia-gmond-python httpd apr-devel zlib-devel libconfuse-devel expat-develpcre-devel
下载最新版本的gweb
(https://sourceforge.net/projects/ganglia/files/gweb/)
本示例当前最新版本为3.7.2
命令: wget http://ncu.dl.sourceforge.net/project/ganglia/ganglia-web/3.7.2/ganglia-web-3.7.2.tar.gz
下载后 解压: tar -zxvf ganglia-web-3.7.2.tar.gz
需要修改 Makfile文件:
cd ganglia-web-3.7.2
vim Makefile
修改默认配置:
GDESTDIR = /var/www/html/ganglia2
APACHE_USER = apache
client端:yum install ganglia-gmond
3、检查状态并启动相关的服务
检查httpd是否启动:service httpd status
启动httpd:service httpd start
检查gmetad是否启动: service gmetad status
启动gmetad:service gmetad start
检查本地gmond是否启动:service gmond status
启动gmond:service gmond start
4、关闭selinux
如果跳过这一步,打开http://<server ip address>/ganglia2会出现以下异常:
There was an error collecting ganglia data (127.0.0.1:8652): fsockopen error: Permission denied
SELinux是什么
http://wiki.centos.org/zh/HowTos/SELinux
查看SELinux状态:
sestatus
关闭SELinux:
命令: setenforce 0
setenforce 这个指令可以即时切换 Enforcing 及 Permissive 这两个模式,但这些改动在系统重新开机时不会被保留。
要想在下次开机后生效,需要在 /etc/selinux/config 内修改 SELINUX= 这一行为 enforcing。
5、相关配置
客户端上的配置:
修改/etc/ganglia/gmond.conf
cluster {
name = "cluster01"
owner = "unspecified"
latlong = "unspecified"
url = "unspecified"
}
udp_send_channel {
#bind_hostname = yes # Highly recommended, soon to be default.
# This option tellsgmond to use a source address
# that resolves to themachine‘s hostname. Without
# this, the metrics mayappear to come from any
# interface andthe DNS names associated with
# those IPs will be usedto create the RRDs.
mcast_join = 239.2.11.71
port = 8649
ttl = 1
}
/* You can specify as manyudp_recv_channels as you like as well. */
udp_recv_channel {
mcast_join = 239.2.11.71
port = 8649
bind = 239.2.11.71
retry_bind = true
#Size of the UDP buffer. If you are handling lots of metrics you really
#should bump it up to e.g. 10MB or even higher.
#buffer = 10485760
}
服务端上的配置:
修改文件/etc/ganglia/gmetad.conf
data_source "cluster01"localhost // cluster01是gmond.conf中cluster里name的名字 localhost则需要是服务器端的ip
gridname "MyGrid"
6、访问服务
http://<server ip address>/ganglia2/目录“/ganglia2”可以在 ganglia-web的Makefile文件中GDESTDIR被修改,修改后需要重新编译
参考:http://www.cnblogs.com/chaoren399/p/6228936.html
参考:http://www.centoscn.com/image-text/install/2014/0523/3002.html
参考:http://blog.csdn.net/avilifans/article/details/22685425
本文出自 “Holy” 博客,请务必保留此出处http://holy2010.blog.51cto.com/1086044/1937118
以上是关于Ganglia安装篇的主要内容,如果未能解决你的问题,请参考以下文章

