ImageMagik——开发篇(转)
Posted HappyEDay
tags:
篇首语:本文由小常识网(cha138.com)小编为大家整理,主要介绍了ImageMagik——开发篇(转)相关的知识,希望对你有一定的参考价值。

安装
我自己的系统是Windows的,因此从网站上下载安装包之后,一路“Next”就可以安装完毕。需要注意的地方是,如果想要使用ImageMagick进行开发,需要在安装的过程中勾选“Install development headers and libraries for C and C++”

安装完成后,目录如下图所示:

介绍其中几个重要的文件:
Lib文件夹:开发需要使用的静态库文件。包含4个库(前3个分别对应3种接口):
CORE_RL_magick_.lib; CORE_RL_Magick++_.lib;CORE_RL_wand_.lib; X11.lib;
Include文件夹:开发需要使用的头文件。包含3个文件夹(分别对应3种接口):
magick; Magick++; wand;
*.dll:开发和使用过程中需要使用的动态链接库文件。
*.exe:各种工具,以命令行工具为主。只有一个工具是图形界面的——imdisplay.exe,是个图片浏览器。
使用
在这里简单介绍一下自己使用过的几个程序。
convert.exe
转换图像格式和大小,模糊,裁剪,驱除污点,图片上画图片,加入新图片,生成缩略图等。
identify.exe
描述一个或多个图像文件的格式和特性。
mogrify.exe
按规定尺寸制作一个图像,模糊,裁剪等。改写最初的图像文件然后写成一个不同的图像文件。
composite.exe
根据多个图片组合生成图片。
montage.exe
创建一些分开的缩略图像。可以给这些缩略图像添加修饰,比如边框、图片名称等。
compare.exe
在算术上和视觉上评估原始图片和处理后的图片。
本文介绍使用ImageMagick开发程序的方法。ImageMagick安装之后就可以支持C/C++程序的开发,提供了3种接口。在这里首先介绍一下ImageMagick的3种接口。
MagickCore:
底层的C语言接口。较复杂,但是可以修改很多参数,只适合高端用户使用。
MagickWand:
推荐的C语言接口。相比于MagickCore接口,简单很多。适合普通用户使用。
Magick++:
提供面向对象的C++接口。
下面回顾一下ImageMagick安装后目录:

其中几个和开发有关的文件:
Lib文件夹:开发需要使用的静态库文件。包含4个库,前3个对应ImageMagick的3个接口:
CORE_RL_magick_.lib; CORE_RL_Magick++_.lib; CORE_RL_wand_.lib; X11.lib;
Include文件夹:开发需要使用的头文件。包含3个文件夹,对应ImageMagick的3个接口:
magick; Magick++; wand;
*.dll:开发和使用过程中需要使用的动态链接库文件。
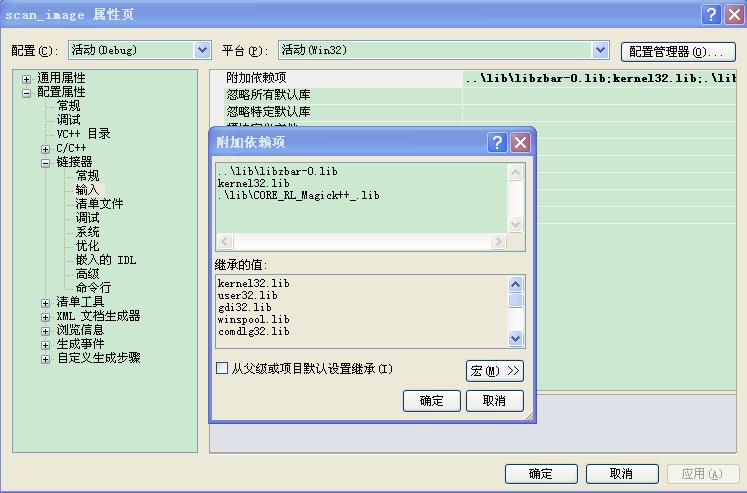
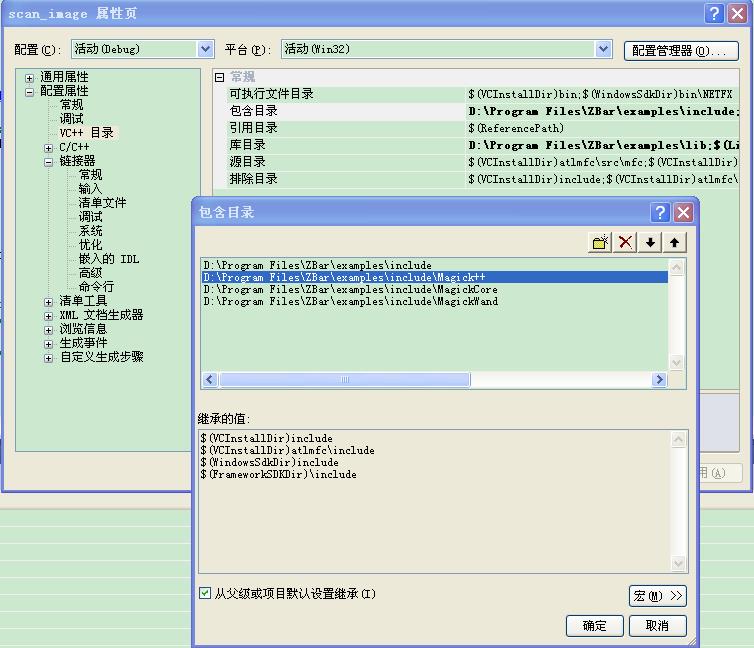
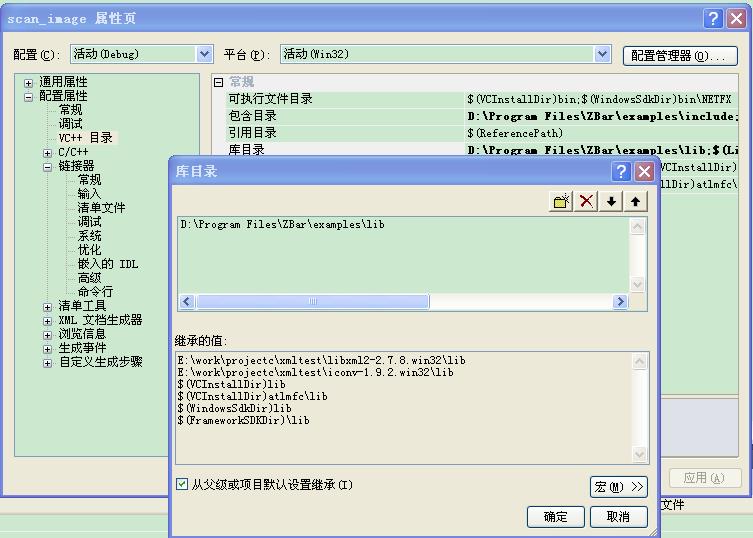
在开发中我们需要3种文件:头文件(*.h),静态库文件(*.lib),动态库文件(*.dll)。因此我们在VC中新建一个工程,然后将Lib文件夹,Include文件夹,以及dll拷贝到工程目录下(如D:\\Program Files\\ZBar\\examples),并且配置一下头文件和静态库的路径,就可以了(解决方案资源管理器->项目点击右键->属性)。

链接器->输入->附加依赖项


下面分别给出ImageMagick的3种接口对应的例子。
MagickCore(底层的C语言接口。较复杂,但是可以修改很多参数,只适合高端用户使用)
功能:读取文件,创建缩略图,并保存成文件。
#include <stdio.h>
#include <stdlib.h>
#include <string.h>
#include <time.h>
#include <magick/MagickCore.h>

int main(int argc,char **argv)
{
  ExceptionInfo
    *exception;

  Image
    *image,
    *images,
    *resize_image,
    *thumbnails;

  ImageInfo
    *image_info;

  if (argc != 3)
    {
      (void) fprintf(stdout,"Usage: %s image thumbnail\\n",argv[0]);
      exit(0);
    }
  /*
    Initialize the image info structure and read an image.
  */
  MagickCoreGenesis(*argv,MagickTrue);
  exception=AcquireExceptionInfo();
  image_info=CloneImageInfo((ImageInfo *) NULL);
  (void) strcpy(image_info->filename,argv[1]);
  images=ReadImage(image_info,exception);
  if (exception->severity != UndefinedException)
    CatchException(exception);
  if (images == (Image *) NULL)
    exit(1);
  /*
    Convert the image to a thumbnail.
  */
  thumbnails=NewImageList();
  while ((image=RemoveFirstImageFromList(&images)) != (Image *) NULL)
  {
    resize_image=ResizeImage(image,106,80,LanczosFilter,1.0,exception);
    if (resize_image == (Image *) NULL)
      MagickError(exception->severity,exception->reason,exception->description);
    (void) AppendImageToList(&thumbnails,resize_image);
    DestroyImage(image);
  }
  /*
    Write the image thumbnail.
  */
  (void) strcpy(thumbnails->filename,argv[2]);
  WriteImage(image_info,thumbnails);
  /*
    Destroy the image thumbnail and exit.
  */
  thumbnails=DestroyImageList(thumbnails);
  image_info=DestroyImageInfo(image_info);
  exception=DestroyExceptionInfo(exception);
  MagickCoreTerminus();
  return(0);
}
MagickWand(推荐的C语言接口。相比于MagickCore接口,简单很多。适合普通用户使用)
功能: 读取文件,创建缩略图,并保存成文件。
#include <stdio.h>
#include <stdlib.h>
#include <wand/MagickWand.h>

int main(int argc,char **argv)
{

  MagickBooleanType status;

  MagickWand *magick_wand;

  if (argc != 3)
    {
      (void) fprintf(stdout,"Usage: %s image thumbnail\\n",argv[0]);
      exit(0);
    }
  /*
    Read an image.
  */
  MagickWandGenesis();
  magick_wand=NewMagickWand();
  status=MagickReadImage(magick_wand,argv[1]);
  /*
    Turn the images into a thumbnail sequence.
  */
  MagickResetIterator(magick_wand);
  while (MagickNextImage(magick_wand) != MagickFalse)
    MagickResizeImage(magick_wand,106,80,LanczosFilter,1.0);
  /*
    Write the image then destroy it.
  */
  status=MagickWriteImages(magick_wand,argv[2],MagickTrue);

  magick_wand=DestroyMagickWand(magick_wand);
  MagickWandTerminus();
  return(0);
}
Magick++(提供面向对象的C++接口)
//创建Image对象,
// create a blank image canvas with 640x480 size and \'white\' color as background:
 Image blank_image( Geometry(640, 480), Color(MaxRGB, MaxRGB, MaxRGB, 0));
 // or also, by using the automatic C++ type conversions for the arguments:
 Image blank_image("640x480", "white");

 // create an image from URL
 Image url_image("http://www.serverName.com/image.gif");
 Image local_file_image("my_image.gif");   // here the URL points to the local filesystem
//获取/设置属性
// Canvas geometry
// returns an unsigned int representing the my_image width
unsigned int Image::columns();
// returns an unsigned int representing the my_image heigth
unsigned int Image::rows();
// sets the my_image format; the format string can be "GIF", etc
void Image::magick("png");
// returns a string value representing the image format (e.g. “GIF”, “JPEG”, etc)
string Image::magick();
//读取/保存图像文件
// Reading the contents of a disk file into an image object can be performed
Image my_image();  // create an *empty* image using the default Image constructor
// read a GIF image file from disk; the image format is automatically set to GIF
my_image.read("aGIFImageFile.gif");
// Writing an Image object to a disk file. set the "format" attribute of my_image to PNG
my_image.magick("png");
// write to disk an image file
my_image.write("file_name_explicit_extension.gif");
MagickWand一般情况下属于使用比较普遍的,下面记录两个MagickWand开发的例子。
更多的例子可以参考:http://members.shaw.ca/el.supremo/MagickWand/
功能:将图像的宽高变成源图像的50%
#include <windows.h>
#include <wand/magick_wand.h>

void test_wand(void)
{
         MagickWand *m_wand = NULL;

         int width,height;

         MagickWandGenesis();

         m_wand = NewMagickWand();
         // Read the image - all you need to do is change "logo:" to some other
         // filename to have this resize and, if necessary, convert a different file
         MagickReadImage(m_wand,"logo:");

         // Get the image\'s width and height
         width = MagickGetImageWidth(m_wand);
         height = MagickGetImageHeight(m_wand);

         // Cut them in half but make sure they don\'t underflow
         if((width /= 2) < 1)width = 1;
         if((height /= 2) < 1)height = 1;

         // Resize the image using the Lanczos filter
         // The blur factor is a "double", where > 1 is blurry, < 1 is sharp
         // I haven\'t figured out how you would change the blur parameter of MagickResizeImage
         // on the command line so I have set it to its default of one.
         MagickResizeImage(m_wand,width,height,LanczosFilter,1);

         // Set the compression quality to 95 (high quality = low compression)
         MagickSetImageCompressionQuality(m_wand,95);

         /* Write the new image */
         MagickWriteImage(m_wand,"logo_resize.jpg");

         /* Clean up */
         if(m_wand)m_wand = DestroyMagickWand(m_wand);

         MagickWandTerminus();
}
功能:在图像的周围加上边框
#include <windows.h>
#include <wand/magick_wand.h>

void test_wand(void)
{
         MagickWand *m_wand = NULL;
         PixelWand *p_wand;
         int w,h;

         MagickWandGenesis();

         /* Create a wand */
         m_wand = NewMagickWand();
         p_wand = NewPixelWand();

         // Change this to whatever colour you like - e.g. "none"
         PixelSetColor(p_wand, "blue");
         /* Read the input image */
         MagickReadImage(m_wand,"logo:");
         w = MagickGetImageWidth(m_wand);
         h = MagickGetImageHeight(m_wand);
         MagickSetImageBackgroundColor(m_wand,p_wand);
         // This centres the original image on the new canvas.
         // Note that the extent\'s offset is relative to the
         // top left corner of the *original* image, so adding an extent
         // around it means that the offset will be negative
         MagickExtentImage(m_wand,1024,768,-(1024-w)/2,-(768-h)/2);
         MagickWriteImage(m_wand,"logo_extent.jpg");

         /* Tidy up */
         m_wand = DestroyMagickWand(m_wand);
         p_wand = DestroyPixelWand(p_wand);
         MagickWandTerminus();
}
补充:详细的教程可以从ImageMagick的官网(http://www.imagemagick.org/)左侧的目录中查看。在Program Interfaces里面有几种接口的详细开发说明。
以上是关于ImageMagik——开发篇(转)的主要内容,如果未能解决你的问题,请参考以下文章
django.core.exceptions.ImproperlyConfigured: Requested setting DEFAULT_INDEX_TABLESPACE的解决办法(转)(代码片段
django.core.exceptions.ImproperlyConfigured: Requested setting DEFAULT_INDEX_TABLESPACE的解决办法(转)(代码片段