小型自动化运维--expect脚本之指定ip,指定文件进行同步操作
Posted
tags:
篇首语:本文由小常识网(cha138.com)小编为大家整理,主要介绍了小型自动化运维--expect脚本之指定ip,指定文件进行同步操作相关的知识,希望对你有一定的参考价值。
小型自动化运维--expect脚本之指定ip,指定文件进行同步操作
# vim 5.expect
#!/usr/bin/expect
set passwd "wtf"
set host [lindex $argv 0]
set file [lindex $argv 1]
spawn rsync -av $file [email protected]$host:$file
expect {
"yes/no" { send "yes\r"}
"password:" { send "$passwd\r" }
}
expect eof
对5.expect授予执行权限:
# chmod a+x 5.expect
执行命令:
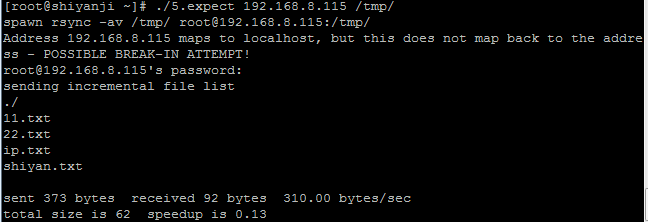
#./5.expect 192.168.8.115 /tmp/
截图如下:
查看远程主机/tmp/路径下文件,截图如下:
注:
(1)192.168.8.115是远程主机ip;
(2)#./5.expect 192.168.8.115 /tmp/这条命令表示:把本地主机/tmp/路径下的文件,远程同步到ip为192.168.8.115主机/tmp/路径下。
(3)spawn rsync -av $file [email protected]$host:$file 这里的文件路径要完全一致,本地的 file 路径和远程的 file 路径要完全一致,做到标准化。
(4)那么在实际环境中,应用程序的位置,配置文件的位置,不同的机器,存放的路径应该一致,root密码也应该一致,否则 expect 自动化运维便不那么方便。
扩展一:传输到多个机器
# vim /tmp/ip.txt 【创建 ip 列表】
192.168.8.115
192.168.8.116
192.168.8.117
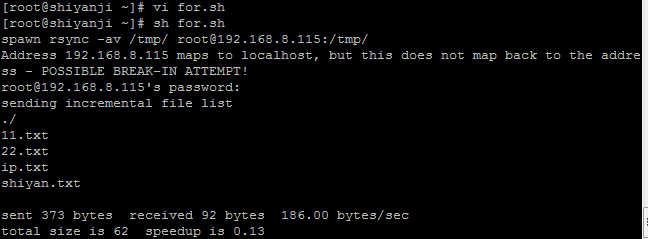
方法一:# for ip in `cat /tmp/ip.txt`; do ./5.expect $ip /tmp/;done
或者:写个for循环脚本,脚本如下:
方法二:
#!/bin/bash
d=`date`
for ip in `cat /tmp/ip.txt`
do ./5.expect $ip /tmp/
done
上面两种方式的区别:
方法一可以直接以命令形式执行,注意命令之间的分号;方法二使用sh for.sh执行!
截图如下:
注:我这里只是用了一台192.168.8.115的虚拟主机。
扩展二:多个文件传输到一台主机上
本地主机多个文件同步传输到远程主机上
# vim /tmp/filelist 【创建一个文件列表文件,里面是需要传输的各个文件的路径, 绝对路径 】
/tmp/33.txt
/usr/test
# vim 6.expect
#! /usr/bin/expect
set passwd "wtf"
set host [lindex $argv 0]
set file [lindex $argv 1]
spawn rsync -av --files-from=/tmp/filelist / [email protected]$host:$file
expect {
"yes/no" { send "yes\r"}
"password:" { send "$passwd\r" }
}
expect eof
授权:chmod +x 6.expect
执行:./6.expect 192.168.8.115 /
或者:
# /usr/bin/expect 6.expect 192.168.8.115 /
注:最后的 / 表示远程的根目录 /。
截图如下:
远程主机上查看:
本文出自 “圣骑士控魔之手” 博客,请务必保留此出处http://wutengfei.blog.51cto.com/10942117/1919148
以上是关于小型自动化运维--expect脚本之指定ip,指定文件进行同步操作的主要内容,如果未能解决你的问题,请参考以下文章


