IBatis增删改查
Posted
tags:
篇首语:本文由小常识网(cha138.com)小编为大家整理,主要介绍了IBatis增删改查相关的知识,希望对你有一定的参考价值。
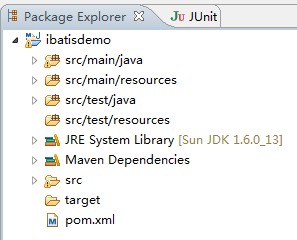
1.创建Maven项目,项目名称ibatisdemo,目录结构如图所示
2.pom.xml文件中的内容如下
<project xmlns="http://maven.apache.org/POM/4.0.0" xmlns:xsi="
xsi:schemaLocation="http://maven.apache.org/POM/4.0.0 http://maven.apache.org/xsd/maven-4.0.0.xsd">
  <modelVersion>4.0.0</modelVersion>
  <groupId>com.mycompany</groupId>
  <artifactId>ibatisdemo</artifactId>
  <version>0.0.1-SNAPSHOT</version>
  <build/>

  <dependencies>
  	<!-- https://mvnrepository.com/artifact/org.apache.ibatis/ibatis-sqlmap -->
	<dependency>
	    <groupId>org.apache.ibatis</groupId>
	    <artifactId>ibatis-sqlmap</artifactId>
	    <version>2.3.0</version>
	</dependency>

	<!-- https://mvnrepository.com/artifact/mysql/mysql-connector-java -->
	<dependency>
	    <groupId>mysql</groupId>
	    <artifactId>mysql-connector-java</artifactId>
	    <version>5.1.38</version>
	</dependency>
  </dependencies>
</project>
3.在src/main/java下创建实体类Student,包名(com.mycompany.entity)
4.实体类Student的内容如下
package com.mycompany.entity;

public class Student {
	private int sid;
	private String name;
	public int getSid() {
		return sid;
	}
	public void setSid(int sid) {
		this.sid = sid;
	}
	public String getName() {
		return name;
	}
	public void setName(String name) {
		this.name = name;
	}
	public String toString(){
		return "id="+sid + "name="+name;
	}
}
5.创建实体类Student的配置文件Student.xml,如图所示
6.Student.xml的内容如下
<?xml version="1.0" encoding="UTF-8"?>
<!DOCTYPE sqlMap PUBLIC "-//ibatis.apache.org//DTD SQL Map 2.0//EN"
"http://ibatis.apache.org/dtd/sql-map-2.dtd">

<sqlMap>
	<!-- 定义别名为Student -->
	<typeAlias alias="Student" type="com.mycompany.entity.Student"/>

	<!-- id:表示唯一标识名,resultClass:表示返回结果的类型 -->
	<select id="selectAllStudent" resultClass="Student">
		SELECT * FROM student
	</select>

	<!-- 根据ID查询学生信息 -->
	<select id="selectStudentById" parameterClass="int" resultClass="Student">
		SELECT * FROM student WHERE sid=#sid#
	</select>

	<!-- 根据名称模糊查询 -->
	<select id="selectStudentByName" parameterClass="String" resultClass="Student">
		SELECT sid,name FROM student WHERE name LIKE ‘%$name$%‘
	</select>

	<!-- 添加学生信息 -->
	<insert id="addStudent" parameterClass="Student">
		INSERT INTO student(name) VALUES(#name#)
		<selectKey resultClass="int" keyProperty="sid">
			select LAST_INSERT_ID() AS sid
		</selectKey>
	</insert>

	<!-- 删除学生信息 -->
	<delete id="deleteStudentById" parameterClass="int">
		DELETE FROM student WHERE sid=#sid#
	</delete>

	<!-- 修改学生信息 -->
	<update id="updateStudent" parameterClass="Student">
		UPDATE student SET name=#name# WHERE sid = #sid#
	</update>
</sqlMap>
7.在src/main/resources下创建属性文件SqlMap.properties,如图所示
8.SqlMap.properties的内容如下
driver=com.mysql.jdbc.Driver
url=jdbc:mysql://localhost:3306/test
username=root
password=
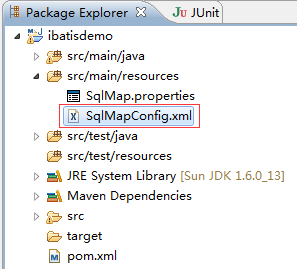
9.在src/main/resources下创建配置文件SqlMapConfig.xml,如图所示
10.配置文件SqlMapConfig.xml的内容如下
<?xml version="1.0" encoding="UTF-8"?>
<!DOCTYPE sqlMapConfig PUBLIC "-//ibatis.apache.org//DTD SQL Map Config 2.0//EN"
"http://ibatis.apache.org/dtd/sql-map-config-2.dtd">

<sqlMapConfig>
	<properties resource="SqlMap.properties"/>

	<transactionManager type="JDBC">
		<dataSource type="simple">
			<property name="JDBC.Driver" value="${driver}"/>
			<property name="JDBC.ConnectionURL" value="${url}"/>
			<property name="JDBC.Username" value="${username}"/>
			<property name="JDBC.Password" value="${password}"/>
		</dataSource>
	</transactionManager>

	<sqlMap resource="com/mycompany/entity/Student.xml"/>
</sqlMapConfig>
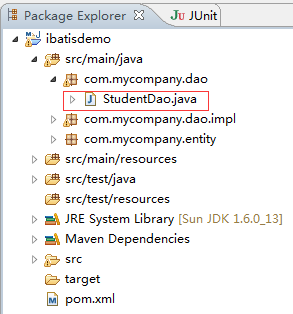
11.在src/main/java下创建接口StudentDao,包名(com.mycompany.dao)如图所示
12.接口StudentDao的内容如下
package com.mycompany.dao;

import java.util.List;

import com.mycompany.entity.Student;

public interface StudentDao {
	/**
	* 查询全部学生信息
	*
	* @return 返回学生列表
	*/
	public List<Student> selectAllStudent();

	/**
	 * 根据学生ID查询学生信息
	 * @param sid
	 * @return 学生对象
	 */
	public Student selectStudentById(int sid);

	/**
	 * 根据名称模糊查询
	 * @param name
	 * @return 学生列表
	 */
	public List<Student> selectStudentByName(String name);

	/**
	 * 添加学生信息
	 * @param student
	 * @return 是否添加成功
	 */
	public boolean addStudent(Student student);

	/**
	 * 根据ID删除学生信息
	 * @param sid
	 * @return 删除是否成功
	 */
	public boolean deleteStudentById(int sid);

	/**
	 * 修改学生信息
	 * @param student
	 * @return
	 */
	public boolean updateStudent(Student student);
}
13.在src/main/java下创建StudentDao的实现类StudentDaoImpl,包名(com.mycompany.dao.impl),如图所示
14.StudentDao的实现类StudentDaoImpl的内容如下
package com.mycompany.dao.impl;

import java.io.IOException;
import java.io.Reader;
import java.sql.SQLException;
import java.util.List;

import com.ibatis.common.resources.Resources;
import com.ibatis.sqlmap.client.SqlMapClient;
import com.ibatis.sqlmap.client.SqlMapClientBuilder;
import com.mycompany.dao.StudentDao;
import com.mycompany.entity.Student;

public class StudentDaoImpl implements StudentDao {
	private static SqlMapClient sqlMapClient = null;

	static{
		try {
			Reader reader = Resources.getResourceAsReader("SqlMapConfig.xml");
			sqlMapClient = SqlMapClientBuilder.buildSqlMapClient(reader);
			reader.close();
		} catch (IOException e) {
			e.printStackTrace();
		}
	}

	/**
	 * 查询所有学生信息列表
	 */
	public List<Student> selectAllStudent() {
		List<Student> students = null;
		try {
			students = sqlMapClient.queryForList("selectAllStudent");
		} catch (SQLException e) {
			e.printStackTrace();
		}
		return students;
	}

	/**
	 * 查询学生对象信息
	 */
	public Student selectStudentById(int sid) {
		Student student = null;
		try {
			student = (Student) sqlMapClient.queryForObject("selectStudentById",sid);
		} catch (SQLException e) {
			e.printStackTrace();
		}
		return student;
	}

	/**
	 * 根据名称查询学生列表
	 */
	public List<Student> selectStudentByName(String name) {
		List<Student> students = null;
		try {
			students = sqlMapClient.queryForList("selectStudentByName",name);
		} catch (SQLException e) {
			e.printStackTrace();
		}
		return students;
	}

	/**
	 * 添加学生信息
	 */
	public boolean addStudent(Student student) {
		Object object = null;
		boolean flag = false;
		try {
			object = sqlMapClient.insert("addStudent",student);
		} catch (SQLException e) {
			e.printStackTrace();
		}
		if(object != null){
			flag = true;
		}
		return flag;
	}

	/**
	 * 根据ID删除学生信息
	 */
	public boolean deleteStudentById(int sid) {
		Object object = null;
		boolean flag = false;
		try {
			object = sqlMapClient.delete("deleteStudentById",sid);
		} catch (SQLException e) {
			e.printStackTrace();
		}
		if(object != null){
			flag = true;
		}
		return flag;
	}

	/**
	 * 修改学生信息
	 */
	public boolean updateStudent(Student student) {
		Object object = null;
		boolean flag = false;
		try {
			object = sqlMapClient.update("updateStudent",student);
		} catch (SQLException e) {
			e.printStackTrace();
		}
		if (object != null) {
			flag = true;
		}
		return flag;
	}

}
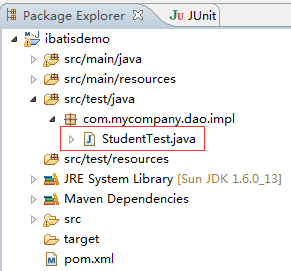
15.在src/test/java下创建测试类StudentTest,包名(com.mycompany.dao.impl),如图所示
16.测试类StudentTest的内容如下
package com.mycompany.dao.impl;

import java.util.List;

import com.mycompany.entity.Student;

public class StudentTest {

	/**
	 * @param args
	 */
	public static void main(String[] args) {
		StudentDaoImpl studentDaoImpl = new StudentDaoImpl();

		//查询所有学生信息列表
		List<Student> students = studentDaoImpl.selectAllStudent();
		for (Student student : students) {
			System.out.println(student);
		}

		//根据学生ID查询学生对象信息
		Student student = studentDaoImpl.selectStudentById(2);
		System.out.println(student);

		//根据学生名称查询学生列表
		List<Student> students2 = studentDaoImpl.selectStudentByName("xiao");
		for (Student student2 : students2) {
			System.out.println(student2);
		}

		//添加学生信息
		Student student3 = new Student();
		student3.setName("demo");
		boolean flag = studentDaoImpl.addStudent(student3);
		System.out.println(flag);

		//根据ID删除学生信息
		boolean flag2 = studentDaoImpl.deleteStudentById(3);
		System.out.println(flag2);

		//修改学生信息
		Student student4 = new Student();
		student4.setSid(4);
		student4.setName("xiao4");
		boolean flag3 = studentDaoImpl.updateStudent(student4);
		System.out.println(flag3);

	}

}
17.表结构如下
CREATE TABLE `student` (
  `sid` INT(10) NOT NULL AUTO_INCREMENT,
  `name` VARCHAR(50) DEFAULT NULL,
  PRIMARY KEY (`sid`)
) ENGINE=INNODB AUTO_INCREMENT=11 DEFAULT CHARSET=utf8;
本文出自 “素颜” 博客,谢绝转载!
以上是关于IBatis增删改查的主要内容,如果未能解决你的问题,请参考以下文章


