无人值守自动装机
Posted
tags:
篇首语:本文由小常识网(cha138.com)小编为大家整理,主要介绍了无人值守自动装机相关的知识,希望对你有一定的参考价值。
系统Centos 6.5 x86_64
ip:192.168.1.201
测试所需设备:(注意自己的dhcp网段修改,还有ip地址)
1.DHCP 服务器
2.TFTP 服务器
3.KickStart所生成的ks.cfg配置文件
4.一台存放系统安装文件的服务器,如 NFS、HTTP 或 FTP 服务器,本文选择HTTP进行
5.带有一个 PXE 支持网卡的将安装的主机
1、安装相应的软件包
# yum install httpd tftp-server system-config-kickstart dhcpsyslinux -y
挂载CentOS6.5的DVD光盘,并复制第一张光盘下的所有内容到/var/www/html/centos6/
# mkdir -p /var/www/html/centos6
# mount -r /dev/cdrom /mnt
# cp -rf /mnt/* /var/www/html/centos6
2、配置tftp,启动http、tftp服务
# vim /etc/xinetd.d/tftp
# default: off
# description: The tftp server serves files using the trivial file transfer \
#protocol.The tftp protocol is often used to boot diskless \
#workstations, download configuration files to network-aware printers, \
#and to start the installation process for some operating systems.
service tftp
{
socket_type= dgram
protocol= udp
wait= yes
user= root
server= /usr/sbin/in.tftpd
server_args= -s /tftpboot
disable= no
per_source= 11
cps= 100 2
flags= IPv4
}
3、配置dhcp
# vim /etc/dhcp/dhcpd.conf
#dhcpd.conf
optiondomain-name "cnlinux.com";
optiondomain-name-servers 114.114.114.114;
default-lease-time86400;
max-lease-time86400;
log-facilitylocal7;
subnet192.168.1.0 netmask 255.255.255.0 {
range 192.168.1.240 192.168.1.250;
option routers 192.168.1.1;
filename "pxelinux.0";
next-server 192.168.1.202;
}
4、配置支持PXE启动
# mkdir -p /tftpboot/pxelinux.cfg
# cp /usr/share/syslinux/pxelinux.0 /tftpboot/
# cd /mnt/images/pxeboot/;cp initrd.img vmlinuz /tftpboot
# cp /mnt/isolinux/boot.msg /tftpboot/
# cp /mnt/isolinux/vesamenu.c32 /tftpboot/
# cp /mnt/isolinux/splash.jpg /tftpboot/
# cp /mnt/isolinux/isolinux.cfg/tftpboot/pxelinux.cfg/default
# service dhcpd restart
# service xinetd restart
# service httpd restart
# chkconfig --level 35 httpd on
# chkconfig --level 35 dhcpd on
# chkconfig --level 35 xinetd on
关闭selinux
# setenforce 0
# sed -i "[email protected][email protected][email protected]"/etc/sysconfig/selinux
关闭iptables
# /etc/init.d/iptables stop
# chkconfig iptables off
# vim /tftpboot/pxelinux.cfg/default
default linux
#prompt 1
timeout 600
display boot.msg
menu background splash.jpg
menu title Welcome to CentOS 6.7!
menu color border 0 #ffffffff #00000000
menu color sel 7 #ffffffff #ff000000
menu color title 0 #ffffffff #00000000
menu color tabmsg 0 #ffffffff #00000000
menu color unsel 0 #ffffffff #00000000
menu color hotsel 0 #ff000000 #ffffffff
menu color hotkey 7 #ffffffff #ff000000
menu color scrollbar 0 #ffffffff#00000000
label linux
menu label ^Install or upgrade anexisting system
menu default
kernel vmlinuz
append initrd=initrd.imgks=http://192.168.1.201/centos6/ks.cfg
label vesa
menu label Install system with ^basicvideo driver
kernel vmlinuz
append initrd=initrd.img xdriver=vesanomodeset
label rescue
menu label ^Rescue installed system
kernel vmlinuz
append initrd=initrd.img rescue
label local
menu label Boot from ^local drive
localboot 0xffff
label memtest86
menu label ^Memory test
kernel memtest
append -
# vim /var/www/html/centos6/ks.cfg
install
text
url --url http://192.168.1.201/centos6
lang en_US.UTF-8
keyboard us
network --onboot no --device eth0--bootproto dhcp --noipv6
rootpw jf.com
firewall --disabled
authconfig --enableshadow--passalgo=sha512
selinux --disabled
timezone Asia/Shanghai
bootloader --location=mbr--driveorder=sda --append="crashkernel=auto rhgb quiet"
clearpart --all --initlabel
zerombr yes
part /boot --fstype=ext4 --size=200
part / --fstype=ext4 --grow --size=1
part swap --size=2000
%packages
@core
@server-policy
@workstation-policy
%end
reboot
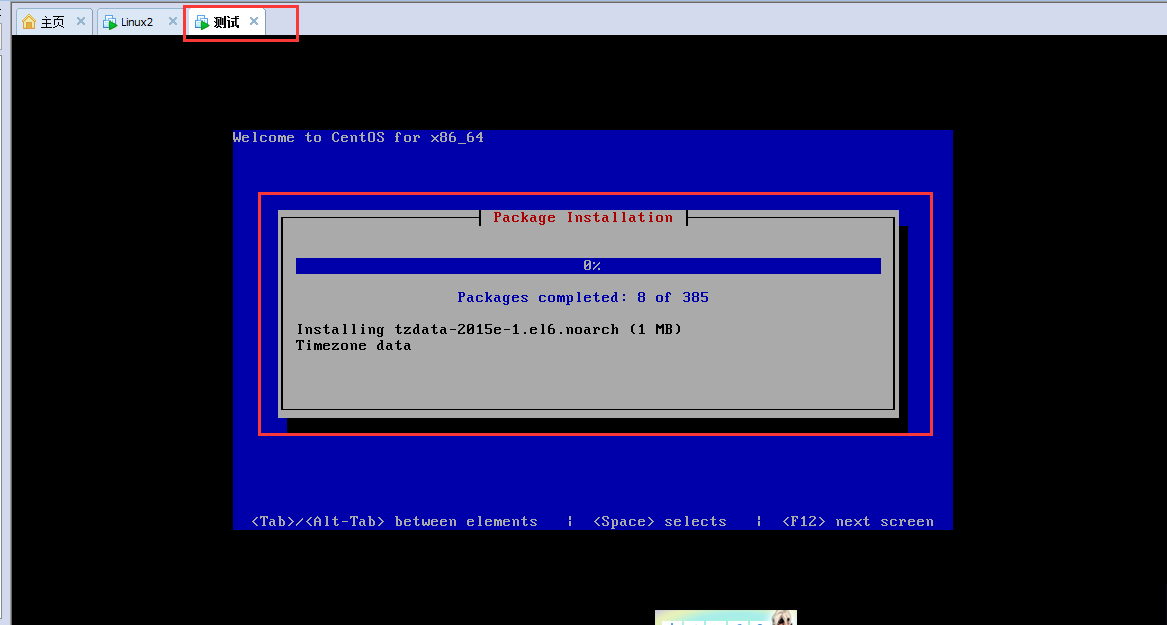
最后构建一台服务器,会自动装机。
下图是在安装途中的。
下面是安装成功后 自动重启 然后输入密码登入的机器
以上是关于无人值守自动装机的主要内容,如果未能解决你的问题,请参考以下文章

