LAMP环境搭建
Posted
tags:
篇首语:本文由小常识网(cha138.com)小编为大家整理,主要介绍了LAMP环境搭建相关的知识,希望对你有一定的参考价值。
LAMP:Linux+apache + mysql + php
一、安装mysql,这里采用编译的方式
1、先安装cmake,这里采用yum安装的方式
先配置好epel的yum源
wget https://mirrors.tuna.tsinghua.edu.cn/epel//6/x86_64/epel-release-6-8.noarch.rpm
rpm -ivh epel-release-6-8.noarch.rpm
2、查看epel的yum源中的cmake版本
[[email protected] yum.repos.d]# yum list | grep cmake
cmake.x86_64 2.8.12.2-4.el6 base
cmake-fedora.noarch 2.7.1-1.el6 epel
cmake-gui.x86_64 2.8.12.2-4.el6 base
cmake28.x86_64 2.8.12.2-2.el6 epel
cmake28-gui.x86_64 2.8.12.2-2.el6 epel
cmake3.x86_64 3.6.1-2.el6 epel
cmake3-data.noarch 3.6.1-2.el6 epel
cmake3-doc.noarch 3.6.1-2.el6 epel
cmake3-gui.x86_64 3.6.1-2.el6 epel
3、安装cmake
yum install cmake28.x86_64
4、安装几个依赖包,编译要使用这几个模块
yum install -y readline-devel zlib-devel openssl-devel make gcc gcc-c++
5、编译安装mysql-5.5.33.tar.gz
tar -zxvf mysql-5.5.33.tar.gz
cd mysql-5.5.33
cmake . -DCMAKE_INSTALL_PREFIX=/usr/local/mysql \
-DMYSQL_DATADIR=/mydata/data \
-DSYSCONFDIR=/etc \
-DWITH_INNOBASE_STORAGE_ENGINE=1 \
-DWITH_ARCHIVE_STORAGE_ENGINE=1 \
-DWITH_BLACKHOLE_STORAGE_ENGINE=1 \
-DWITH_READLINE=1 \
-DWITH_SSL=system \
-DWITH_ZLIB=system \
-DWITH_LIBWRAP=0 \
-DMYSQL_UNIX_ADDR=/tmp/mysql.sock \
-DDEFAULT_CHARSET=utf8 \
-DDEFAULT_COLLATION=utf8_general_ci
make
make install
6、创建mysql用户和mysql组
useradd mysql -s /sbin/nokogin
groupadd mysql
7、改变mysql家目录所有文件的属组为mysql
cd /usr/local/mysql/
chown -R :mysql ./*
8、指定数据存储的用户和组的所有权限为mysql
chown -R mysql.mysql /mydata/data/
9、初始化数据库,并到数据目录查看生成的数据库文件
cd /usr/local/mysql
scripts/mysql_install_ db --user=mysql --datadir=/mydata/data
cd /mydata/data
ls
lost+found mysql performance_schema test
10、创建启动脚本,并加入的服务列表中
cd /usr/local/mysql
cp support-files/mysql.server /etc/init.d/mysqld
chmod +x /etc/init.d/mysqld
chkconfig --add mysqld
11、编辑配置文件
cd /usr/local/mysq
cp support-files/my-large.cnf /etc/my.cnf
vim /etc/my.cnf
把datadir = /mydata/data加入到【mysqld】下
12、启动mysql
service mysqld start
13、为了让mysql可以正常的使用,要把mysql家目录下的bin文件里的程序导入到系统环境变量中
vim /etc/profile.d/mysql.sh
export PATH=/usr/local/mysql/bin:$PATH
14、登入测试
[[email protected] ~]# mysql
Welcome to the MySQL monitor. Commands end with ; or \g.
Your MySQL connection id is 1
Server version: 5.5.33-log Source distribution
Copyright (c) 2000, 2013, Oracle and/or its affiliates. All rights reserved.
Oracle is a registered trademark of Oracle Corporation and/or its
affiliates. Other names may be trademarks of their respective
owners.
Type ‘help;‘ or ‘\h‘ for help. Type ‘\c‘ to clear the current input statement.
mysql> quit
Bye
15、导出mysql库文件和头文件到系统库文件和头文件目录
ln -sv /usr/local/mysql/include /usr/include/mysql
vim /etc/ld.so.conf.d/mysql.conf
/usr/local/mysql/lib
ldconfig
16、为mysql用户创建密码
mysql> update user set password=PASSWORD(‘huaxia‘) where user=‘root‘;
Query OK, 4 rows affected (0.10 sec)
Rows matched: 4 Changed: 4 Warnings: 0
mysql> select user,password,host from user;
+------+-------------------------------------------+----------------+
| user | password | host |
+------+-------------------------------------------+----------------+
| root | *728E5AA5AC1AF35A788CCC519F3027936273D123 | localhost |
| root | *728E5AA5AC1AF35A788CCC519F3027936273D123 | 192.168.10.102 |
| root | *728E5AA5AC1AF35A788CCC519F3027936273D123 | 127.0.0.1 |
| root | *728E5AA5AC1AF35A788CCC519F3027936273D123 | ::1 |
+------+-------------------------------------------+----------------+
4 rows in set (0.00 sec)
mysql> flush privileges;
Query OK, 0 rows affected (0.04 sec)
二、安装httpd
这里下载的版本是httpd-2.4.16.tar.gz,因为httpd安装需要依赖apr、apr-utils和pcre-devel的包,所以要首先安装这几个软件。
1、安装pcre-devel,使用yum的安装方法。
yum install pcre-devel
2、安装apr
tar -zxvf apr-1.5.2.tar.gz
cd apr-1.5.2
./configure --prefix=/usr/local/apr
make
make install
3、安装apr-util
tar -zxvf apr-util-1.5.4.tar.gz
cd apr-util-1.5.4
./configure --prefix=/usr/local/apr-util --with-apr=/usr/local/apr
make
make install
4、安装httpd
tar -zxvf httpd-2.4.16.tar.gz
cd httpd-2.4.16
./configure --prefix=/usr/local/apache --sysconfdir=/etc/httpd --enable-so --enable-ssl --enable-cgi --with-zlib --with-pcre --enable-rewrite --with-apr=/usr/local/apr --with-apr-util=/usr/local/apr-util --enable-modules=most --enable-mpms-shared=all --with-mpm=event
make && make install
5、配置httpd启动脚本
vim httpd
#!/bin/bash
#
# httpd Startup script for the Apache HTTP Server
#
# chkconfig: - 85 15
# description: The Apache HTTP Server is an efficient and extensible \
# server implementing the current HTTP standards.
# processname: httpd
# config: /etc/httpd/conf/httpd.conf
# config: /etc/sysconfig/httpd
# pidfile: /var/run/httpd/httpd.pid
#
### BEGIN INIT INFO
# Provides: httpd
# Required-Start: $local_fs $remote_fs $network $named
# Required-Stop: $local_fs $remote_fs $network
# Should-Start: distcache
# Short-Description: start and stop Apache HTTP Server
# Description: The Apache HTTP Server is an extensible server
# implementing the current HTTP standards.
### END INIT INFO
# Source function library.
. /etc/rc.d/init.d/functions
if [ -f /etc/sysconfig/httpd ]; then
. /etc/sysconfig/httpd
fi
# Start httpd in the C locale by default.
HTTPD_LANG=${HTTPD_LANG-"C"}
# This will prevent initlog from swallowing up a pass-phrase prompt if
# mod_ssl needs a pass-phrase from the user.
INITLOG_ARGS=""
# Set HTTPD=/usr/sbin/httpd.worker in /etc/sysconfig/httpd to use a server
# with the thread-based "worker" MPM; BE WARNED that some modules may not
# work correctly with a thread-based MPM; notably PHP will refuse to start.
# Path to the apachectl script, server binary, and short-form for messages.
apachectl=/usr/local/apache/bin/apachectl
httpd=${HTTPD-/usr/local/apache/bin/httpd}
prog=httpd
pidfile=${PIDFILE-/var/run/httpd/httpd.pid}
lockfile=${LOCKFILE-/var/lock/subsys/httpd}
RETVAL=0
STOP_TIMEOUT=${STOP_TIMEOUT-10}
# The semantics of these two functions differ from the way apachectl does
# things -- attempting to start while running is a failure, and shutdown
# when not running is also a failure. So we just do it the way init scripts
# are expected to behave here.
start() {
echo -n $"Starting $prog: "
LANG=$HTTPD_LANG daemon --pidfile=${pidfile} $httpd $OPTIONS
RETVAL=$?
echo
[ $RETVAL = 0 ] && touch ${lockfile}
return $RETVAL
}
# When stopping httpd, a delay (of default 10 second) is required
# before SIGKILLing the httpd parent; this gives enough time for the
# httpd parent to SIGKILL any errant children.
stop() {
status -p ${pidfile} $httpd > /dev/null
if [[ $? = 0 ]]; then
echo -n $"Stopping $prog: "
killproc -p ${pidfile} -d ${STOP_TIMEOUT} $httpd
else
echo -n $"Stopping $prog: "
success
fi
RETVAL=$?
echo
[ $RETVAL = 0 ] && rm -f ${lockfile} ${pidfile}
}
reload() {
echo -n $"Reloading $prog: "
if ! LANG=$HTTPD_LANG $httpd $OPTIONS -t >&/dev/null; then
RETVAL=6
echo $"not reloading due to configuration syntax error"
failure $"not reloading $httpd due to configuration syntax error"
else
# Force LSB behaviour from killproc
LSB=1 killproc -p ${pidfile} $httpd -HUP
RETVAL=$?
if [ $RETVAL -eq 7 ]; then
failure $"httpd shutdown"
fi
fi
echo
}
# See how we were called.
case "$1" in
start)
start
;;
stop)
stop
;;
status)
status -p ${pidfile} $httpd
RETVAL=$?
;;
restart)
stop
start
;;
condrestart|try-restart)
if status -p ${pidfile} $httpd >&/dev/null; then
stop
start
fi
;;
force-reload|reload)
reload
;;
graceful|help|configtest|fullstatus)
$apachectl [email protected]
RETVAL=$?
;;
*)
echo $"Usage: $prog {start|stop|restart|condrestart|try-restart|force-reload|reload|status|fullstatus|graceful|help|configtest}"
RETVAL=2
esac
exit $RETVAL
6、把apache加为系统服务
chkconfig --add httpd
7、创建使用apache家目录下bin文件里所有程序的环境变量
vim /etc/profile.d/httpd.sh
export PATH=/usr/local/apache/bin:$PATH
8、编辑配置文件,把pid文件的路径加入到配置文件中
vim httpd.conf
PidFile "/var/run/httpd/httpd.pid"
9、启动服务
需要先建/var/run/httpd的储存pid文件的目录
mkdir /var/run/httpd
service httpd start
10、查看进程和端口
[[email protected] ~]# ps -ef| grep httpd
root 52911 1 0 03:18 ? 00:00:00 /usr/local/apache/bin/httpd
daemon 52913 52911 0 03:18 ? 00:00:00 /usr/local/apache/bin/httpd
daemon 52914 52911 0 03:18 ? 00:00:00 /usr/local/apache/bin/httpd
daemon 52915 52911 0 03:18 ? 00:00:00 /usr/local/apache/bin/httpd
root 53009 14683 0 03:21 pts/0 00:00:00 grep httpd
[[email protected] ~]# netstat -tnlp|grep httpd
tcp 0 0 :::80 :::* LISTEN 52911/httpd
11、把apache的头文件链接到系统的头文件上
ln -sv /usr/local/apache/include /usr/include/httpd
三、编译php
这里是php-5.6.11.tar.bz2的版本
1、安装一些php所需依赖的包
yum groupinstall "Desktop Platform Development"
2、要让php支持libmcrypt,需要安装libmcrypt,libmcrypt-devel两个包
yum install libmcrypt libmcrypt-devel
3、需要安装bzip2-devel包
yum install bzip2-devel
4、编译php
tar -xf php-5.6.11.tar.bz2
cd php-5.6.11
./configure --prefix=/usr/local/php --with-mysql=/usr/local/mysql --with-openssl --with-mysqli=/usr/local/mysql/bin/mysql_config --enable-mbstring --with-freetype-dir --with-jpeg-dir --with-png-dir --with-zlib --with-libxml-dir=/usr --enable-xml --enable-sockets --with-apxs2=/usr/local/apache/bin/apxs --with-mcrypt --with-config-file-path=/etc --with-config-file-scan-dir=/etc/php.d --with-bz2 --enable-maintainer-zts
make && make install
5、为php提供配置文件
cd cd php-5.6.11
cp php.ini-production /etc/php.ini
6、配置apache支持php
在apache的主配置文件httpd.conf里,加入下面的内容
AddType application/x-httpd-php .php
AddType application/x-httpd-php-source .phps
DirectoryIndex index.php index.html
7、重启httpd
service httpd restart
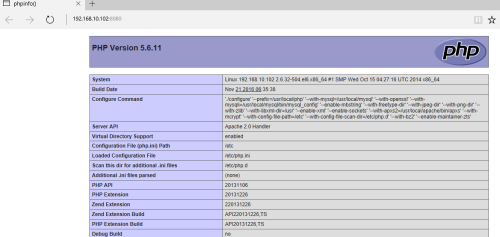
8、验证php是否启动成功
cd /usr/local/apache/htdocs/
mv index.html index.php
vim index.php
<?php
phpinfo();
?>
9、查看页面
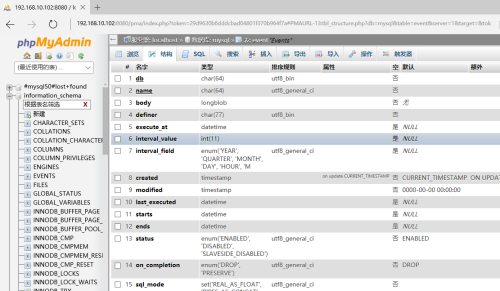
四、使用phpMyadmin
1、解压文件
unzip phpMyAdmin-4.0.10.12-all-languages.zip
mv phpMyAdmin-4.0.10.12-all-languages /usr/local/apache/htdocs/pma
2、打开phpMyadmin
五、做压力测试
先把单个用户可以打开的文件数量改成10240
ulimit -n 10240
1、使用ab命令
[[email protected] ~]# ab -c 10 -n 100 http://192.168.10.102:8080/pma/index.php
This is ApacheBench, Version 2.3 <$Revision: 1663405 $>
Copyright 1996 Adam Twiss, Zeus Technology Ltd, http://www.zeustech.net/
Licensed to The Apache Software Foundation, http://www.apache.org/
Benchmarking 192.168.10.102 (be patient)
apr_socket_recv: Connection reset by peer (21)
本文出自 “服务器运维” 博客,请务必保留此出处http://shamereedwine.blog.51cto.com/5476890/1874869
以上是关于LAMP环境搭建的主要内容,如果未能解决你的问题,请参考以下文章

