Houdini RBD 研究笔记
Posted 鹏_VFX
tags:
篇首语:本文由小常识网(cha138.com)小编为大家整理,主要介绍了Houdini RBD 研究笔记相关的知识,希望对你有一定的参考价值。
intrinsic:packedfulltransform 属性
对于Pack Gemetry会有一些额外的属性。创建一个Grid、Sphere,利用Copy节点把小球copy到Grid上,Copy节点中勾选 Pack Geometry Before Copying, 然后用Edit节点移动某个点,会发现信息存储在 intrinsic:packedfulltransform这个属性(16位矩阵)里。需要注意的是 intrinsic:packedfulltransform 属性是只读的,你不能修改它。但是你可以修改intrinsic:transform (3x3 matrix,控制旋转,缩放,skew)这个属性,移动点的位置(P属性), 这些也会改变intrinsic:packedfulltransform属性的值。
简单的一个小案例: http://pan.baidu.com/s/1kVazAmV (houdini_rbd_intrinsic.hip)
再来一个小例子,在Odforce上看到的,利用Copy 节点Instance 一大堆BOX,注意勾选上Copy节点的Pack Geometry Before Copying参数。然后再接一个Wrangle节点,代码如下:
1 vector scale = fit01(vector(rand(@primnum)), 0.2,1);
2 matrix3 trn = primintrinsic(0, "transform", @primnum);
3 matrix scalem = maketransform(0, 0, {0,0,0}, {0,0,0}, scale, @P);
4 trn *= matrix3(scalem);
5 setprimintrinsic(0, "transform", @primnum, trn);
前后的对比如下:
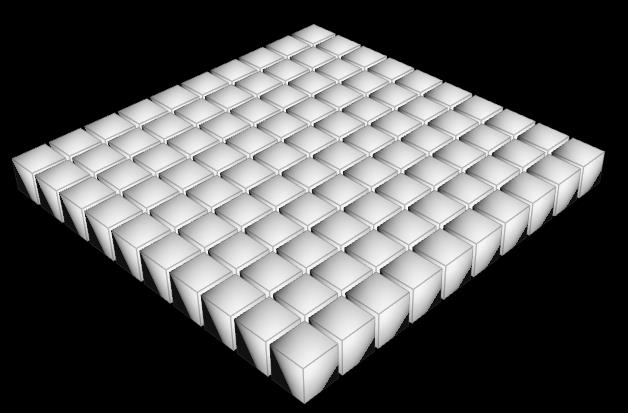
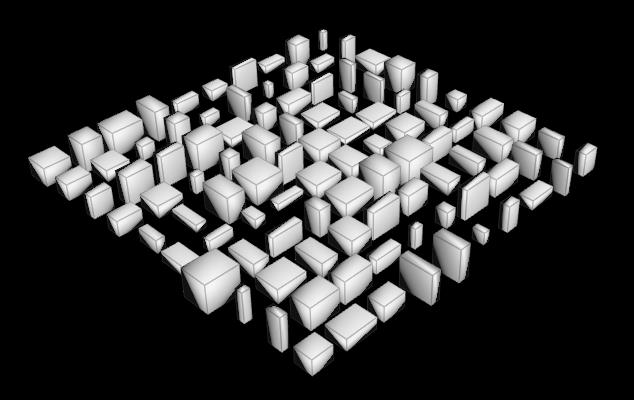
下面的例子(PackedScale_RBDs.hipnc文件)也用到了上面的技术,不同的是是在Dop的RBD解算中,遇到的问题是Pack物体经过缩放后,物体大小发生变化,它碰撞用到的Guide Geometry实际用的还是结算起始帧的Guide Geometry,虽然在RBD Packed Object中勾选Show Guide Geometry后,看到它是随着物体大小变化的,但实际不是这样,看下图:

可以看到最后物体还是悬浮在空中,加两行代码如下:
1 vector scale = chf("scale");
2 matrix3 trn = primintrinsic(0, "transform", @primnum);
3 matrix scalem = maketransform(0, 0, {0,0,0}, {0,0,0}, scale, @P);
4 trn *= matrix3(scalem);
5 setprimintrinsic(0, "transform", @primnum, trn);
6
7 int pts[] = primpoints(0,i@primnum);
8 setpointattrib(0,"id",pts[0],-1);
最后两句强制把ID属性删除(赋值-1),迫使Dop中重新计算碰撞的Guide Geometry。(据Jeff说,这是目前的唯一方法,Jeff是SideFx开发的)结果如下:

最后还有一个案例也用到了intrinsic:transform属性(IntrinsicXformsInSim.hip文件)

Constraint Network 节点
每两个点组成的Polygon构成一个Constraint,每一个点被称作Anchor。
如果Constraint被破坏(比如力足够大使之断掉),那么组成这个Constraint的primitive会被放到一个Primitive的组里,组名:broken。任何在broken组的contraints都会接下来的Constraint Network结算器忽略掉。目前,仅Glue Constraint可以被Bullet结算器打断。
下面是不同约束具有的不同的Primitive属性:
线性约束(linear constraints): force、distance
旋转约束(angular constraints): torque、angle
Glue约束(glue constraints):impact
Anchor 类型
Constraint 几何体中的每一个点代表一个Anchor,每一个Constraint又两个Anchor构成,目前有四种不同类型的Anchor,由name、anchor_type、anchor_id属性指明。
World Space Anchor(世界坐标系Anchor):此类Anchor只有一个点(又P属性指定),被放在世界坐标系的一个静止的位置。如果一个Anchor没有name属性,或者name属性指定不是一个有效的RBD Pack物体,那么这个Anchor就被指定为World Space Anchor
Relative Offset Anchor(相对位移Anchor):这种类型的Anchor放在相对于RBD Pack物体的指定位置,这个Anchor的Position跟RBD Pack物体的初始旋转固定在一起,因此如果物体在结算的时候发生旋转,那么这个Anchor也跟着旋转。如果name属性指定是一个有效的RBD Pack物体,并且anchor_id的属性设置为-1(或者没有定义,没有这个属性),那么这个Anchor就被当作Relative Offset Anchor。
Point Anchor(点Anchor):这种类型的Anchor的位置,跟某个结算的物体上的一个点绑定在一起,如果name属性指定是一个有效的RBD Pack物体,并且anchor_id属性的值也是一个有效的点序号(point index),那么Anchor就会被放在这个指定的点上。另外,如果anchor_type设置为vertex(默认为point),那么Anchor会被放在这样的一个点上,这个点是由anchor_id指定的vertex所对应的点。(如果结算中物体的拓扑结构发生变化,导致点序号变,可以通过添加anchor_pid、anchor_vid属性,具体见Constraint Network节点的帮助)
Agent Anchor(代理Anchor):这种Anchor绑定在一个绑定Agent的transform上。具体见帮助,与绑定有关。
Constraint 属性
condof:点属性,Integer ; 指定Anchor的约束自由度(0-3)
condir:点属性,Vector;如果约束自由度是1,这个值定义了一个法向平面,物体可以在其中旋转,位移。如果约束自由度是2,这个值定义了一个axis(轴向),物体可以绕它位移旋转。
上面两个属性在 Destruction in Houdini 这个教程中粗略的提了一下(constraint_types.hipnc文件)。
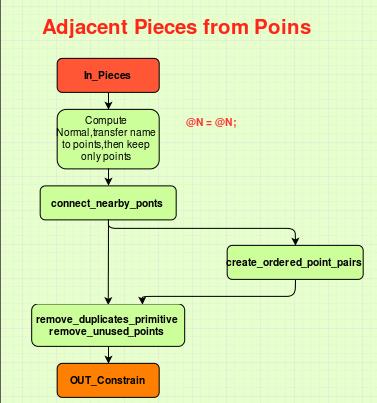
Inside the Connectadjacentpieces
adjacent Pieces from Points 方法
// connect_nearby_points ( point wrangle)
/// Creates a new line between the given point numbers.
void createline(int pt_a; int pt_b)
{
    int prim = addprim(0, "polyline");
    addvertex(0, prim, pt_a);
    addvertex(0, prim, pt_b);
}

/// Returns true if the item is contained in the list.
int contains(string list[]; string item)
{
    foreach(string str; list)
    {
        if (item == str)
            return 1;
    }

    return 0;
}

int handle = pcopen(0, "P", @P, ch("../searchradius"),
                    chi("../maxsearchpoints"));
int max_connections = chi("../maxconnections");
string other_name;
string known_pieces[];
int num_connections = 0;
string my_name = s@name;

while (pciterate(handle) && num_connections < max_connections)
{
    pcimport(handle, "name", other_name);

    // Don\'t create connections to multiple points on the same piece, or
    // to other points on our piece.
    if ((my_name != other_name) &&
        (num_connections == 0 || !contains(known_pieces, other_name)))
    {
        vector other_P;
        pcimport(handle, "P", other_P);

        // Only search in the direction of the point normal.
        if (dot(other_P - @P, @N) >= 0)
        {
            int other_ptnum;
            pcimport(handle, "point:number", other_ptnum);

            createline(@ptnum, other_ptnum);
            ++num_connections;
            if (num_connections < max_connections)
                push(known_pieces, other_name);
        }
    }
}

pcclose(handle);
// create_ordered_point_pairs (Primitie Wrangle)
// Build a string such as "12-54" for use when identifying duplicate connections.
int pt0 = @ptnum;
int pt1 = vertexpoint(0, vertexindex(0, @primnum, 1));
s@point_pairs = sprintf("%s-%s", min(pt0, pt1), max(pt0, pt1));
// remove_duplicates(Primitie Wrangle)
string my_point_pair = prim(1, "point_pairs", @primnum);
int index = findattribval(1, "primitive", "point_pairs", my_point_pair);
// Keep the first match and remove all other duplicates.
if (index != @primnum)
    removeprim(0, @primnum, 0);
流程图
adjacent Pieces from Surface Points 方法
// consolidate_points(Points wrangle)
// Now, we consolidate all of the duplicates to leave a single point
// at the centre of each piece. Using a Fuse SOP doesn\'t quite work, since
// multiple pieces can potentially have the same centroid.
int index = findattribval(0, "point", "name", s@name);
if (@ptnum != index)
{
    // Rewire any vertices that reference this point to
    // instead reference the point we\'re keeping.
    int v = pointvertex(0, @ptnum);
    while (v != -1)
    {
        setprimvertex(0, -1, v, index);
        v = vertexnext(0, v);
    }

    removepoint(0, @ptnum);
}
else
{
    // Move the search points back to the centroid of their piece.
    @P = v@centroid;
}
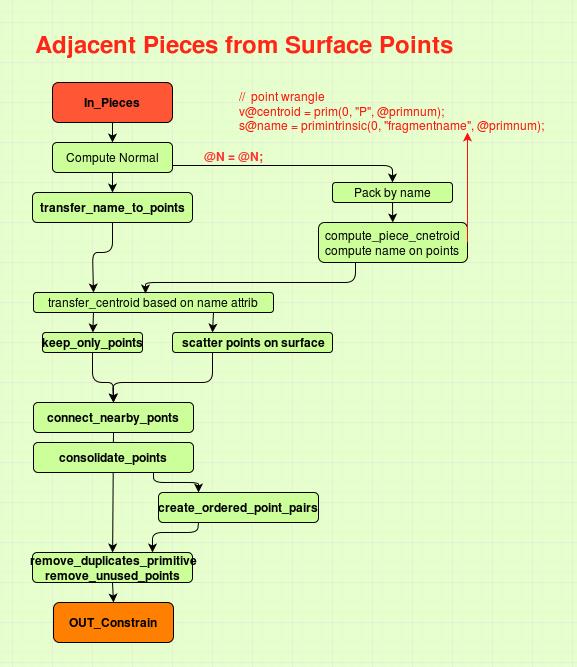
adjacent Points 方法
// create_explicit_lines (point wrangle)
float searchradius = ch("../searchradius");
int haspscale = haspointattrib(0, \'pscale\');

int points[];
float @pscale = 1.0;

if (haspscale && !chi("../uniformradius"))
{
    points = pcfind_radius(0, "P", "pscale", searchradius, @P, searchradius*@pscale, chi("../maxsearchpoints"));
}
else
{
    points = pcfind(0, "P", @P, 2*searchradius*@pscale, chi("../maxsearchpoints"));
}

foreach(int ptj; points)
{
    if(@ptnum == ptj)
        continue;

    // Only connect one direction
    if (ptj < @ptnum)
        continue;

    int prim = addprim(geoself(), "polyline");

    addvertex(geoself(), prim, @ptnum);
    addvertex(geoself(), prim, ptj);
}
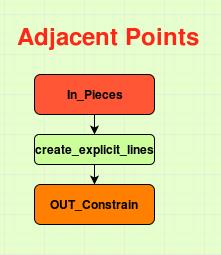
利用vex实现RBD Packed Primitive 在DOP 中转化
#include "math.h"

if(@Frame<15)
{
    float timestep = 1/24.0;

    // \'packedfulltransform\' combines the local transform
    // and the packed primitive\'s intrinsic transform.
    matrix target_xform = primintrinsic(1, "packedfulltransform", @primnum);
    matrix initial_xform = primintrinsic(0, "packedlocaltransform", @primnum);
    matrix cur_xform = primintrinsic(0, "packedfulltransform", @primnum);
    matrix offset = invert(cur_xform) * target_xform;
    matrix total_offset = invert(initial_xform) * target_xform;

    // Adjust the transform of the packed primitive so that the display matches
    // up with the simulation.
    @P *= offset;
    setprimintrinsic(0, "transform", @primnum, matrix3(total_offset));

    // Update the position/orientation of the RBD object.
    vector4 q = quaternion(matrix3(offset));
    p@orient = qmultiply(q, p@orient);
    v@w = 2 / timestep * vector(q);

    vector new_trans = v@trans * offset;
    v@v = (new_trans - v@trans) / timestep;
    v@trans = new_trans;
}
else
{
    i@active = 1;
}
这段代码实在一个破碎教程看到的,作者说这是Sidefx官方的人写的,感觉很有用。这段代码贴在Attribute Wrangle中,第一个输入端输入是Dop Geometry , 第二个输入端是利用Transform在Sop对Pack后的同一个物体进行位移。下面是在帮助中搜刮到的一些有助于理解的解释。
在 hou.PackedPrim 这个Class中,有三个Methods:
transform() → hou.Matrix3
Returns the local 3×3 transform associated with this primitive. The transform doesn’t include the local point transform or any transforms inside the primitive (for example, transforms inside an Alembic file).
fullTransform() → hou.Matrix4
Returns the full 4×4 transform for this primitive’s geometry. This includes translations due to points and any transforms inside the primitive (for example, transforms inside an Alembic file).
setTransform(m4)
Sets this primitive’s local transform. This sets the local 3×3 transform and the translation of the point. This does not affect any transforms inside the primitive (for example, transforms inside an Alembic file).
m4 :A hou.Matrix4 object containing the full transform.
以上是关于Houdini RBD 研究笔记的主要内容,如果未能解决你的问题,请参考以下文章
如何仅使用 Python 源代码编辑器在 Houdini 中创建动画书?