设计模式 之 适配器模式与外观模式
Posted
tags:
篇首语:本文由小常识网(cha138.com)小编为大家整理,主要介绍了设计模式 之 适配器模式与外观模式相关的知识,希望对你有一定的参考价值。
一、适配器模式:
适配器模式,简单的说就是“到什么山,唱什么歌 ”,即它解决的是不兼容、不匹配的问题。先来举个小例子:当我们要把一个三相插头插到一个二相插座中,我们应该怎么做呢?当然是去找一个三相转二相的适配器插座,在这个例子中,适配器插座的作用是为了改变插座的接口,满足三相插头的需要;同样的,在我们接下来要介绍的OO适配器模式中,适配器的作用是将一个接口转换成另一个接口,以满足客户的需要。
下面我们用代码来演示这个例子。我们先贴出PlugOfTwo和PlugOfThree两个接口,表示二相插座和三相插座的宏观抽象,具体的实体类都实现对应的接口(二相插座和三相插座都有插好插头方法plug和开始供电方法offer,但其工作原理不同,所以名字也不同)。代码如下:

1 public interface PlugOfTwo {
2
3     public void plugWithTwo();
4
5     public void offerWithTwo();
6 }

1 public interface PlugOfThree {
2
3     public void plugWithThree();
4
5     public void offerWithThree();
6 }
下面两个类分别是两个接口的实现类,代码如下:

 1 public class TwoPlugEntity implements PlugOfTwo {
 2
 3     public void plugWithTwo() {
 4         System.out.println("二相插座实体已经插好...");
 5     }
 6
 7     public void offerWithTwo() {
 8         System.out.println("二相插座实体开始供电...");
 9     }
10 }

 1 public class ThreePlugEntity implements PlugOfThree {
 2
 3     public void plugWithThree() {
 4         System.out.println("三相插座实体已经插好...");
 5     }
 6
 7     public void offerWithThree() {
 8         System.out.println("三相插座实体开始供电...");
 9     }
10 }
下面我们来测试一下,测试代码如下:

 1 public class MainClass {
 2
 3     public static void main(String[] args) {
 4         // 测试三相插座的工作情况
 5         ThreePlugEntity three = new ThreePlugEntity();
 6         three.plugWithThree();
 7         three.offerWithThree();
 8         // 测试两相插座的工作情况
 9         TwoPlugEntity two = new TwoPlugEntity();
10         two.plugWithTwo();
11         two.offerWithTwo();
12     }
13 }
测试结果如图:
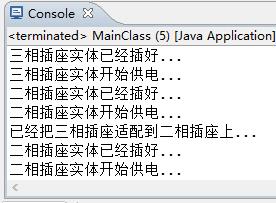
上面的例子中,我们的问题是一个三相的插头要插到二相的插座上,所以我们需要添加一个适配器。适配器的代码如下:

 1 public class TwoToThreeAdapter implements PlugOfThree {
 2     private PlugOfTwo two;
 3
 4     public TwoToThreeAdapter(PlugOfTwo two) {
 5         this.two = two;
 6         System.out.println("已经把三相插座适配到二相插座上...");
 7     }
 8
 9     public void plugWithThree() {
10         two.plugWithTwo();
11     }
12
13     public void offerWithThree() {
14         two.offerWithTwo();
15     }
16 }
第二次测试的代码:

 1 public class MainClass {
 2
 3     public static void main(String[] args) {
 4         // 测试三相插座的工作情况
 5         ThreePlugEntity three = new ThreePlugEntity();
 6         three.plugWithThree();
 7         three.offerWithThree();
 8         // 测试两相插座的工作情况
 9         TwoPlugEntity two = new TwoPlugEntity();
10         two.plugWithTwo();
11         two.offerWithTwo();
12         // 测试添加适配器后插座的工作情况
13         TwoToThreeAdapter adapter = new TwoToThreeAdapter(two);
14         adapter.plugWithThree();
15         adapter.offerWithThree();
16     }
17 }
测试结果如图:
未完待续。。。。。。
以上是关于设计模式 之 适配器模式与外观模式的主要内容,如果未能解决你的问题,请参考以下文章
