UIBezierPath精讲
Posted 紫洁
tags:
篇首语:本文由小常识网(cha138.com)小编为大家整理,主要介绍了UIBezierPath精讲相关的知识,希望对你有一定的参考价值。
参考:http://www.jianshu.com/p/734b34e82135
基础知识
使用UIBezierPath可以创建基于矢量的路径,此类是Core Graphics框架关于路径的封装。使用此类可以定义简单的形状,如椭圆、矩形或者有多个直线和曲线段组成的形状等。
UIBezierPath是CGPathRef数据类型的封装。如果是基于矢量形状的路径,都用直线和曲线去创建。我们使用直线段去创建矩形和多边形,使用曲线去创建圆弧(arc)、圆或者其他复杂的曲线形状。
使用UIBezierPath画图步骤:
- 创建一个
UIBezierPath对象 - 调用
-moveToPoint:设置初始线段的起点 - 添加线或者曲线去定义一个或者多个子路径
- 改变
UIBezierPath对象跟绘图相关的属性。如,我们可以设置画笔的属性、填充样式等
UIBezierPath创建方法介绍
我们先看看UIBezierPath类提供了哪些创建方式,这些都是工厂方法,直接使用即可。
+ (instancetype)bezierPath;
+ (instancetype)bezierPathWithRect:(CGRect)rect;
+ (instancetype)bezierPathWithOvalInRect:(CGRect)rect;
+ (instancetype)bezierPathWithRoundedRect:(CGRect)rect
                            cornerRadius:(CGFloat)cornerRadius;
+ (instancetype)bezierPathWithRoundedRect:(CGRect)rect
                        byRoundingCorners:(UIRectCorner)corners
                              cornerRadii:(CGSize)cornerRadii;
+ (instancetype)bezierPathWithArcCenter:(CGPoint)center
                                 radius:(CGFloat)radius
                             startAngle:(CGFloat)startAngle
                               endAngle:(CGFloat)endAngle
                              clockwise:(BOOL)clockwise;
+ (instancetype)bezierPathWithCGPath:(CGPathRef)CGPath;
下面我们一个一个地介绍其用途。
+ (instancetype)bezierPath;
这个使用比较多,因为这个工厂方法创建的对象,我们可以根据我们的需要任意定制样式,可以画任何我们想画的图形。
+ (instancetype)bezierPathWithRect:(CGRect)rect;
这个工厂方法根据一个矩形画贝塞尔曲线。
+ (instancetype)bezierPathWithOvalInRect:(CGRect)rect;
这个工厂方法根据一个矩形画内切曲线。通常用它来画圆或者椭圆。
+ (instancetype)bezierPathWithRoundedRect:(CGRect)rect
                            cornerRadius:(CGFloat)cornerRadius;
+ (instancetype)bezierPathWithRoundedRect:(CGRect)rect
                        byRoundingCorners:(UIRectCorner)corners
                              cornerRadii:(CGSize)cornerRadii;
第一个工厂方法是画矩形,但是这个矩形是可以画圆角的。第一个参数是矩形,第二个参数是圆角大小。
第二个工厂方法功能是一样的,但是可以指定某一个角画成圆角。像这种我们就可以很容易地给UIView扩展添加圆角的方法了。
+ (instancetype)bezierPathWithArcCenter:(CGPoint)center
                                 radius:(CGFloat)radius
                             startAngle:(CGFloat)startAngle
                               endAngle:(CGFloat)endAngle
                              clockwise:(BOOL)clockwise;
这个工厂方法用于画弧,参数说明如下:center: 弧线中心点的坐标radius: 弧线所在圆的半径startAngle: 弧线开始的角度值endAngle: 弧线结束的角度值clockwise: 是否顺时针画弧线
温馨提示:我们下面的代码都是在自定义的BezierPathView类中的- (void)drawRect:(CGRect)rect方法中调用
画三角形
先看效果图
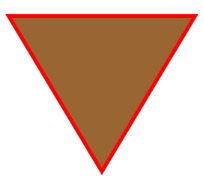
    override func drawRect(rect: CGRect) {

        //  画三角形
        let path = UIBezierPath()

        path.moveToPoint(CGPointMake(40, 80))
        path.addLineToPoint(CGPointMake(100, 180))
        path.addLineToPoint(CGPointMake(160, 80))

        path.closePath()

        path.lineWidth = 5.0

        UIColor.redColor().setStroke()
        path.stroke()

        UIColor.brownColor().setFill()
        path.fill()
    }
画矩形
先看效果图
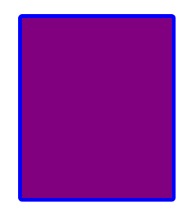
    override func drawRect(rect: CGRect) {

     // 画矩形
        let path = UIBezierPath(rect: CGRectMake(40, 80, 100, 120))

        path.lineWidth = 5.0
        path.lineJoinStyle = .Round    //设置两条线连结点的样式
        path.lineCapStyle = .Square    //设置线条拐角帽的样式

        UIColor.blueColor().setStroke()
        path.stroke()

        UIColor.purpleColor().setFill()
        path.fill()
  }
画圆、椭圆
先看效果图
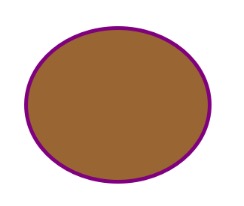
    override func drawRect(rect: CGRect) {

    //画圆、椭圆
        let path = UIBezierPath(ovalInRect: CGRectMake(40, 80, 120, 100))

        path.lineWidth = 5.0

        UIColor.purpleColor().setStroke()
        path.stroke()

        UIColor.brownColor().setFill()
        path.fill()
    }
画带圆角的矩形
先看效果图
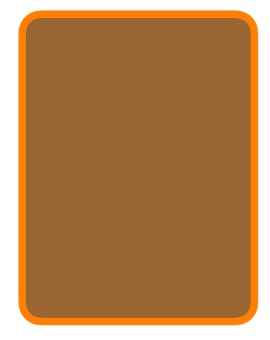
    override func drawRect(rect: CGRect) {

    // 画带圆角的矩形
        let path = UIBezierPath(roundedRect: CGRectMake(40, 80, 150, 200), cornerRadius: 10.0)

        path.lineWidth = 10.0

        UIColor.orangeColor().setStroke()
        path.stroke()

        UIColor.brownColor().setFill()
        path.fill()
  }
可以指定某个角为圆角
先看效果图
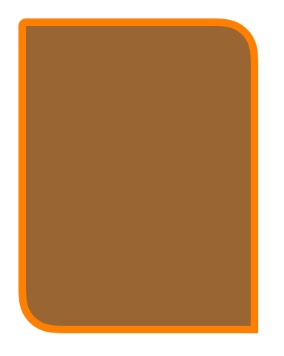
    override func drawRect(rect: CGRect) {

    //可以指定某个角为圆角
        let path = UIBezierPath(roundedRect: CGRectMake(40, 80, 150, 200), byRoundingCorners: [.BottomLeft, .TopRight], cornerRadii: CGSizeMake(20, 20))

        path.lineWidth = 10.0
        path.lineCapStyle = .Round

        UIColor.orangeColor().setStroke()
        path.stroke()

        UIColor.brownColor().setFill()
        path.fill()
    }
画弧
先看效果图

    override func drawRect(rect: CGRect) {

    //画弧
        let path = UIBezierPath(arcCenter: CGPointMake(150, 150), radius: 50, startAngle: CGFloat(M_PI), endAngle: CGFloat(M_PI) * 2, clockwise: true)

        path.lineWidth = 5.0
        path.lineCapStyle = .Round

        UIColor.purpleColor().setStroke()
        path.stroke()
    }
画二次贝塞尔曲线
先看效果图
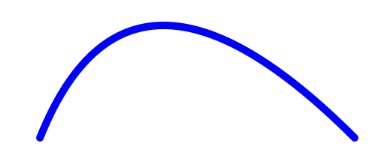
    override func drawRect(rect: CGRect) {

    // 画二次贝塞尔曲线
        let path = UIBezierPath()

        path.moveToPoint(CGPointMake(40, 200))

        path.addQuadCurveToPoint(CGPointMake(250, 200), controlPoint: CGPointMake(100, 50))

        path.lineWidth = 5.0
        path.lineCapStyle = .Round

        UIColor.blueColor().setStroke()
        path.stroke()
  }
画三次贝塞尔曲线
先看效果图
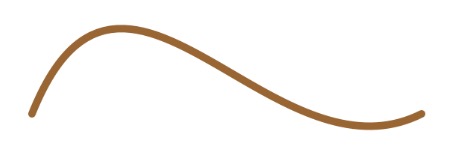
    override func drawRect(rect: CGRect) {

    //画三次贝塞尔曲线
        let path = UIBezierPath()

        path.moveToPoint(CGPointMake(40, 200))

       path.addCurveToPoint(CGPointMake(300, 200), controlPoint1: CGPointMake(100, 50), controlPoint2: CGPointMake(200, 250))

        path.lineWidth = 5.0
        path.lineCapStyle = .Round

        UIColor.brownColor().setStroke()
        path.stroke()
  }
使用路径
先看效果图
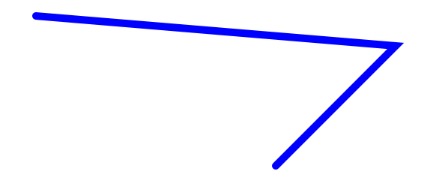
    override func drawRect(rect: CGRect) {//        使用路径
       let path = CGPathCreateMutable()

        CGPathMoveToPoint(path, nil, 40, 100)

        CGPathAddLineToPoint(path, nil, 280, 120)
        CGPathAddLineToPoint(path, nil, 200, 200)

        let bezierPath = UIBezierPath(CGPath: path)

        bezierPath.lineWidth = 5.0
        bezierPath.lineCapStyle = .Round

        UIColor.blueColor().setStroke()
        bezierPath.stroke()

    }
以上是关于UIBezierPath精讲的主要内容,如果未能解决你的问题,请参考以下文章
iOS使用UIBezierPath实现ProgressView