python xlwt 写excel文件
Posted shaomine
tags:
篇首语:本文由小常识网(cha138.com)小编为大家整理,主要介绍了python xlwt 写excel文件相关的知识,希望对你有一定的参考价值。
python 读excel文件,需要xlrd库。下载地址:https://pypi.python.org/pypi/xlrd
python 写excel文件,需要xlwt库。下载地址:https://pypi.python.org/pypi/xlwt/1.1.2
下载后修改扩展名为rar, 解压后安装:

安装成功后就可以引用了。如下代码:
# -*- coding: utf-8 -*-
import os
import xlrd
import xlwt
import datetime
##################读excel文件##############################
#打开Excel文件,参数:excelFile:Excel文件路径
def open_Excel(excelFile):
excelFile = unicode(excelFile, "utf8")
if os.path.isfile(excelFile):
try:
data = xlrd.open_workbook(excelFile)
return data
except Exception,e:
print str(e)
\'\'\'往EXCEl单元格写内容,每次写一行sheet:页签名称;row:行内容列表;rowIndex:行索引;
isBold:true:粗字段,false:普通字体\'\'\'
def WriteSheetRow(sheet,rowValueList,rowIndex,isBold):
i = 0
style = xlwt.easyxf(\'font: bold 1\') #粗字体
#style = xlwt.easyxf(\'font: bold 1, color red;\') #红色字体
for svalue in rowValueList:
strValue = unicode(str(svalue),\'utf-8\')
if isBold:
sheet.write(rowIndex,i,strValue,style)
else:
sheet.write(rowIndex,i,strValue)
i = i + 1
#根据索引获取Excel表格中的数据 参数:excelFile:Excel文件路径 ,by_index:表的索引
def open_Excel_ByIndex(excelFile,sheetIndex):
data = open_Excel(excelFile)
table = data.sheets()[sheetIndex]
nrows = table.nrows #行数
ncols = table.ncols #列数
cursor = getSqlCursor()
for i in xrange(0,nrows):
headCols = table.row_values(i) #某一行数据
for a in headCols:
print a
#测试
open_Excel_ByIndex("D:\\\\test.xlsx",0)
#根据名称获取Excel表格中的数据 参数:excelFile:Excel文件路径
#sheetName:Sheet1名称
def open_Excel_BySheetName(excelFile,sheetName):
sheetName = unicode(sheetName, "utf8")
data = open_Excel(excelFile)
table = data.sheet_by_name(sheetName)
nrows = table.nrows #行数
ncols = table.ncols #列数
cursor = getSqlCursor()
for i in xrange(0,nrows):
headCols = table.row_values(i) #某一行数据
for a in headCols:
print a
#测试
open_Excel_BySheetName("D:\\\\test.xlsx",\'sheet1\')
##################写excel文件##############################
\'\'\'写excel文件\'\'\'
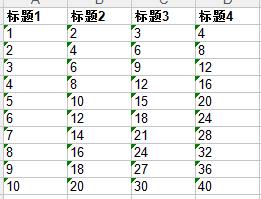
def save_Excel(strFile):
excelFile = unicode(strFile, "utf8")
wbk = xlwt.Workbook()
sheet = wbk.add_sheet(\'sheet1\')
headList = [\'标题1\',\'标题2\',\'标题3\',\'标题4\']
rowIndex = 0
WriteSheetRow(sheet,headList,rowIndex,,True)
for i in xrange(1,11):
rowIndex = rowIndex + 1
valueList = []
for j in xrange(1,5):
valueList.append(j*i)
WriteSheetRow(sheet,valueList,rowIndex,False)
wbk.save(excelFile)
#测试
save_Excel("D:\\\\test.xlsx")
结果如下:

##################单元格常用设置##############################
1、设置超链接
#设置超链接
font = xlwt.Font() # Create Font
font.colour_index = 4 # 蓝色字体
font.underline=True
style = xlwt.XFStyle()
style.font = font
sheet.write(rowIndex,4,xlwt.Formula(\'HYPERLINK("https://www.baidu.com";"baidu")\'),style)
2、设置单元格背景色
#设置单元格背景色
pattern = xlwt.Pattern()
pattern.pattern = xlwt.Pattern.SOLID_PATTERN
pattern.pattern_fore_colour = 5 #黄色
style = xlwt.XFStyle()
style.pattern = pattern
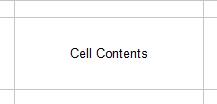
sheet.write(5, 5, \'Cell Contents\', style)
\'\'\' 颜色值
0 = Black, 1 = White, 2 = Red, 3 = Green, 4 = Blue,
5 = Yellow, 6 = Magenta, 7 = Cyan, 16 = Maroon,
17 = Dark Green, 18 = Dark Blue, 19 = Dark Yellow ,
20 = Dark Magenta, 21 = Teal,
22 = Light Gray, 23 = Dark Gray
\'\'\'
3、设置粗字体
style = xlwt.easyxf(\'font: bold 1\')
sheet.write(5, 5, \'Cell Contents\', style)
4、设置字体颜色
style = xlwt.easyxf(\'font: bold 0, color red;\')#红色字体
sheet.write(5, 5, \'Cell Contents\', style)
5、设置列宽带
sheet.col(1).width = 3333 # 3333 = 1" (one inch)
6、设置日期格式
style = xlwt.XFStyle()
style.num_format_str = \'YYYY/MM/DD h:mm:ss\'
sheet.write(5, 5, datetime.datetime.now(), style)

#Other options: D-MMM-YY, D-MMM, MMM-YY, h:mm, h:mm:ss, h:mm, h:mm:ss,
# M/D/YY h:mm, mm:ss, [h]:mm:ss, mm:ss.0
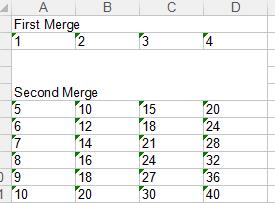
7、合并行和列
sheet.write_merge(0, 0, 0, 3, \'First Merge\')
sheet.write_merge(2, 4, 0, 3, \'Second Merge\')

8、给单元格增加边框
borders = xlwt.Borders() # Create Borders
borders.left = xlwt.Borders.DASHED
# May be: NO_LINE, THIN, MEDIUM, DASHED, DOTTED, THICK, DOUBLE, HAIR, MEDIUM_DASHED, THIN_DASH_DOTTED, #MEDIUM_DASH_DOTTED, THIN_DASH_DOT_DOTTED, MEDIUM_DASH_DOT_DOTTED,
#SLANTED_MEDIUM_DASH_DOTTED, or 0x00 through 0x0D.
borders.right = xlwt.Borders.DASHED
borders.top = xlwt.Borders.DASHED
borders.bottom = xlwt.Borders.DASHED
borders.left_colour = 0x40
borders.right_colour = 0x40
borders.top_colour = 0x40
borders.bottom_colour = 0x40
style = xlwt.XFStyle() # Create Style
style.borders = borders # Add Borders to Style

9、设置单元格中内容中位置,居中,局左右等
alignment = xlwt.Alignment() # Create Alignment
# May be: HORZ_GENERAL, HORZ_LEFT, HORZ_CENTER, HORZ_RIGHT,
#HORZ_FILLED, HORZ_JUSTIFIED, HORZ_CENTER_ACROSS_SEL, HORZ_DISTRIBUTED
alignment.horz = xlwt.Alignment.HORZ_CENTER #水平居中
# May be: VERT_TOP, VERT_CENTER, VERT_BOTTOM, VERT_JUSTIFIED, VERT_DISTRIBUTED
alignment.vert = xlwt.Alignment.VERT_CENTER #垂直居中
style = xlwt.XFStyle() # Create Style
style.alignment = alignment # Add Alignment to Style
sheet.write(5, 5, \'Cell Contents\', style)

以上是关于python xlwt 写excel文件的主要内容,如果未能解决你的问题,请参考以下文章
Python在python中使用xlrd和xlwt读写Excel
Python在python中使用xlrd和xlwt读写Excel