Jquery自定义图片上传插件
Posted
tags:
篇首语:本文由小常识网(cha138.com)小编为大家整理,主要介绍了Jquery自定义图片上传插件相关的知识,希望对你有一定的参考价值。
1 概述
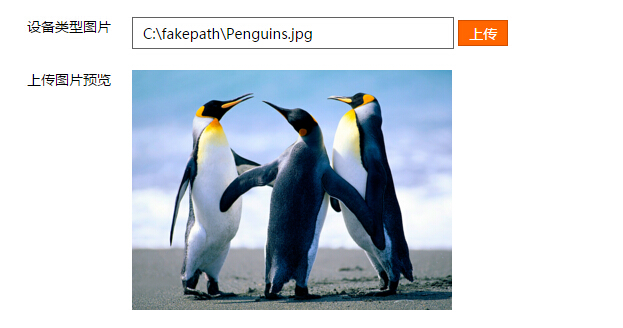
编写后台网站程序大多数用到文件上传,可是传统的文件上传控件不是外观不够优雅,就是性能不太好看,翻阅众多文件上传控件的文章,发现可以这样去定义一个文件上传控件,实现的文件上传的效果图如下:

2、该图片上传插件实现功能如下:
1>能够异步上传,上传成功之后,服务器返回响应结果;能够定义上传前和上传后自定义处理方式;
2>能够实现文件格式判断,过滤非图片文件;
3>服务端能够过滤重复上传的图片;
3、页面代码分析:
1>、Jquery图片上传插件代码如下:
// 选中文件, 提交表单(开始上传)
(function ($) {
    var iframe;
    var form;
    var opeartData=null;

    $.uploadDefault = {
        url: ‘‘,
        fileName: ‘filedata‘,
        dataType: ‘json‘,
        imgshow: ‘‘,
        onSend: function(){ return true; },
        onSubmit: function () { return true; },
        onComplate: function () { return true; }
    };

    $.UpLoadForm = {

        //图片格式验证
        $PicChange: function (obj)
        {
            if (opeartData.imgshow != null && opeartData.imgshow != ‘‘)
            {
                $("#" + opeartData.imgshow).val($(obj).val());
            }
        },

        //判断pic格式是否正确
        $IsPicCheck: function (fileName)
        {
            if (fileName != null && fileName != "") {
                //lastIndexOf如果没有搜索到则返回为-1
                if (fileName.lastIndexOf(".") != -1) {
                    var fileType = (fileName.substring(fileName.lastIndexOf(".") + 1, fileName.length)).toLowerCase();
                    var suppotFile = new Array();
                    suppotFile[0] = "jpg";
                    suppotFile[1] = "gif";
                    suppotFile[2] = "bmp";
                    suppotFile[3] = "png";
                    suppotFile[4] = "jpeg";
                    for (var i = 0; i < suppotFile.length; i++) {
                        if (suppotFile[i] == fileType) {
                            return true;
                        } else {
                            continue;
                        }
                    }
                    return false;
                } else {
                    return false;
                }
            }
        },

        $ImgUpLoad: function () {
            if (opeartData == null)
            {
                //没有选择图片或者图片已经上传
                return;
            }
            opeartData = $.extend($.uploadDefault, opeartData);
            var canSend = opeartData.onSend();
            if (!canSend) {
                return;
            }
            if (!opeartData.onSubmit())//图片验证
            {
                return;
            }
            form.submit();
            iframe.load(function() {
                var contents = $(this).contents().get(0);
                var data = $(contents).find(‘body‘).text();
                if (‘json‘ == opeartData.dataType) {
                    data = window.eval(‘(‘ + data + ‘)‘);
                }
                opeartData.onComplate(data);
                setTimeout(function() {
                    iframe.remove();
                    form.remove();
                    opeartData = null;
                }, 5000);
            });
        },

        $OpenFIle: function (options) {
            opeartData = $.extend($.uploadDefault, options);
            if (opeartData.url == ‘‘) {
                return;
            }
            var frameName = ‘upload_frame_0‘;
            var formName = ‘upload_form_0‘;
            if ($("#" + formName).length > 0) {
                iframe = $("#" + frameName);
                form = $("#" + formName);
            }
            else {
                iframe = $(‘<iframe style="position:absolute;top:-9999px" id="‘ + frameName + ‘" />‘).attr(‘name‘, frameName);
                form = $(‘<form method="post" style="display:none;" id="‘ + formName + ‘" enctype="multipart/form-data" />‘).attr(‘name‘, ‘form_‘ + frameName);
                form.attr("target", frameName).attr(‘action‘, opeartData.url);
                // form中增加数据域
                var formhtml = ‘<input type="file" name="‘ + opeartData.fileName + ‘" onchange="$.UpLoadForm.$PicChange(this)")"/>‘;
                form.append(formHtml);
                iframe.appendTo("body");
                form.appendTo("body");
            }
            var fileInput = $(‘input[type=file][name=‘ + opeartData.fileName + ‘]‘, form);
            fileInput.click();
        }
    }
})(jQuery);
2>前台页面调用代码如下,Jquery插件,别忘记引入Jquery对应js:
<script type="text/javascript">
        $(function () {
            $("#imagetx").bind("click", function () {
                $.UpLoadForm.$OpenFIle({
                    // 上传地址
                    url: ‘../upload/UploadImg‘,
                    // 文件域名字
                    fileName: ‘upimage‘,
                    // 其他表单数据
                    imgshow: ‘imagetx‘,
                    // 上传完成后, 返回json, text
                    dataType: ‘json‘,
                    // 上传之前回调,return true表示可继续上传
                    onSend: function () {
                        $.ShowLoadDialog();
                        return true;
                    },
                    onSubmit: function () {
                        var picpath = $("#imagetx").val();
                        console.log(picpath);
                        if (!$.UpLoadForm.$IsPicCheck(picpath))
                        {
                            $.ShowLoadDialogClose();
                            $TipDialog("图片上传", "请上传jpg、gif、bmp、png、jpeg格式的图片!");
                            return false;
                        }
                        return true;
                    },
                    // 上传之后回调
                    onComplate: function (data) {
                        $.ShowLoadDialogClose();
                        if (data != null)
                        {
                            console.log(data)
                            if (data.errorcode == "200") {
                                $("#showpic").attr("src", data.picurl);
                            }
                            else {
                                $TipDialog("图片上传", "图片上传失败");
                            }
                        }
                    }
                });
            });
            $("#btnupload").bind("click", function () {
                $.UpLoadForm.$ImgUpLoad();
            })

        });
    </script>
3>后台服务器验证:
        [HttpPost]
        public JsonResult UploadImg(HttpPostedFileBase upimage)
        {
            string pic = "", error = "001",pcode="";
            try
            {
                if (upimage != null)
                {
                    string fileName = DateTime.Now.ToString("yyyyMMdd") + System.IO.Path.GetFileName(upimage.FileName);
                    string[] pictext = { ".jpg",".gif",".bmp",".png",".jpeg" };
                    string extenname= System.IO.Path.GetExtension(fileName);
                    if (pictext.Contains(extenname))
                    {
                        string filePhysicalPath = Server.MapPath("~/Upload/Images/" + fileName);
                            upimage.SaveAs(filePhysicalPath);
                            pic = "/Upload/Images/" + fileName;
                        }
                        else
                        {
                            error = "200";
                            pic =pic ;
                        }
                    }
                }
            }
            catch (Exception ex)
            {
                error = ex.Message;
            }
            return Json(new
            {
                errorcode = error,
                picurl = pic,
                piccode = pcode
            });
        }
图片上传也就完成,展示的效果也如上面所示;