Django之AJAX请求
Posted mofujin
tags:
篇首语:本文由小常识网(cha138.com)小编为大家整理,主要介绍了Django之AJAX请求相关的知识,希望对你有一定的参考价值。
---恢复内容开始---
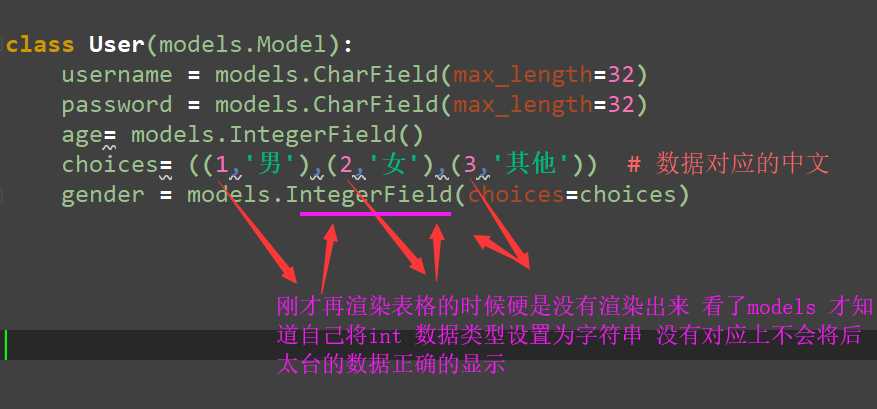
一、choice字段
1.实列
前端代码
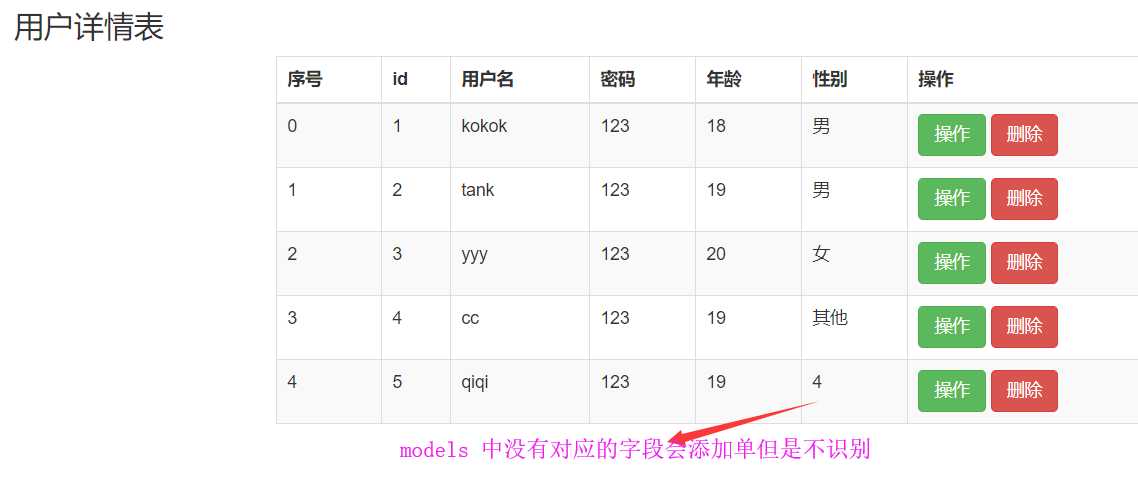
<div class=‘container‘>
    <div class="row">
    <h3>用户详情表</h3>
        <div class="col-md-8 col-md-offset-2">
            <table class="table table-striped table-bordered table-hover">
                <thead>
                    <tr>
                        <th>序号</th>
                        <th>id</th>
                        <th>用户名</th>
                        <th>密码</th>
                        <th>年龄</th>
                        <th>性别</th>
                        <th>操作</th>
                    </tr>
                </thead>
                <tbody>
                    % for user in user_list %
                        <tr>
                            <td> forloop.counter0 </td>
                            <td> user.pk </td>
                            <td> user.username </td>
                            <td> user.password </td>
                            <td> user.age </td>
                            //choice 在前端不需要加括号
                            <td> user.get_gender_display </td>
                            <td>
                                <a href="" class="btn btn-success">操作</a>
                                <a href="" class="btn btn-danger">删除</a>
                            </td>
                        </tr>

                    % endfor %

                </tbody>
            </table>
        </div>
    </div>
</div>
后端代码
def r(request):
    # 献给客户一个get请求页面
    user_list = models.User.objects.all()


    return render(request, ‘reg.html‘,locals())
后端展示
二、前端往后端发送数据的几种方法
1.请求方式 GET POST
2.a标签href属性 GET请求
3.浏览器窗口输入url GET请求
4.form表单 GET/POST
5.ajax GET/POST
三、AJAX 发送数据和文件的传输
1.发送普通键值对的格式
前端有点小问题
<input type="text" id="l1">+<input type="text" id="l2">=<input type="text" id="d3">

<button class="btn btn-success" id="b">提交</button>
<script>
    //绑定点击事件
    $(‘#b‘).on(‘click‘,function ()
        //用AJAX发送数据
        $.ajax(
            //四大参数。。1 》》》 第一种我们正常提交数据默认发送数据的格式urlencode
            url:‘‘, // 不写默认往当前的地址提交
            type:‘post ‘, //传输据的方式
            data:‘l1‘:$(‘#l‘).val(),‘l2‘:$(‘#l2‘),
            #data:JSON.stringify(‘username‘:‘koko‘,‘password‘:‘123 ‘),  //发送字典格式方便我们取值 django 能帮我们识别#
            #contentType:‘application/json‘,  // 告诉你后端我用的json的数据格式#
            success:function (data)

                alert(data);
                $(‘#d3‘).val(data)

        )
    )
后端
def res(request):
    # 献给客户一个get请求页面

    if request.method == ‘POST‘:
        l1 = request.POST.get(‘l1‘)
        l2 = request.POST.get(‘l2‘)
        res = int(l1) + int(l2)
        return HttpResponse(res)
    return render(request, ‘reg.html‘)
bug:
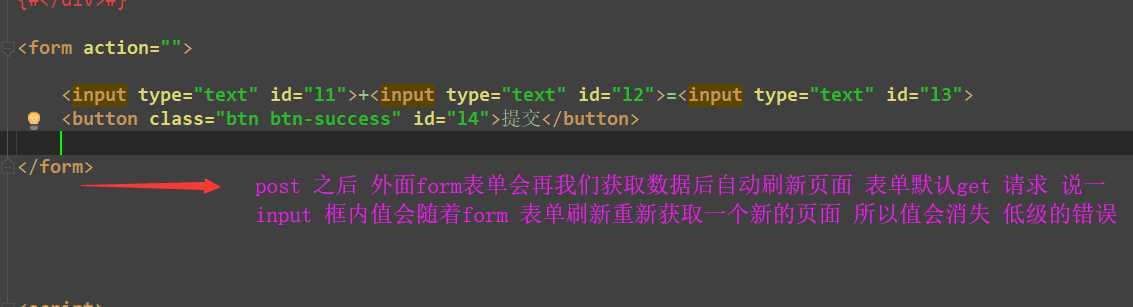
form表单提交后会自动触发页面 所以将数据清除
2.发送json数据格式
后端代码
def test(request):
    if request.method == ‘POST‘:
        import json
        # 将后端ajax 发送的数据格式进行转化
        # 转化成字段返回到前端 封装成字典 方便取值
        back_data = request.body
        # 饭序列化成字符串
        back_str = back_data.decode(‘utf-8‘)
        print(back_str)

        back_dic = json.loads(back_str)
        print(type(back_dic))  # "username":"koo","password":"123" 这才是真正格式的json格式的字典
        # print(request.POST)  # <QueryDict: >
        # print(request.body)  # b‘"username":"koo","password":"123"‘
        return JsonRsponse(back_dic)

    return render(request,‘test.html‘)
前端代码
<head>
    <meta charset="UTF-8">
    <title>Title</title>
    <script src="https://cdn.bootcss.com/jquery/3.4.1/jquery.min.js"></script>
     % load static %
    <link rel="stylesheet" href="% static ‘bootstrap-3.3.7-dist/css/bootstrap.min.css‘ %">
    <script src="% static ‘bootstrap-3.3.7-dist/js/bootstrap.min.js‘ %"></script>
</head>
<body>
<input type="text" id="d1">+<input type="text" id="d2">=<input type="text" id="d3">
<button class="btn btn-success" id="d4">提交</button>

<script>
   $(‘#d4‘).on(‘click‘,function()
       $.ajax(
           // 四大必要参数
           url:‘‘, // 可以不写
           type:‘post‘,
           data:JSON.stringify(‘username‘:‘koo‘,‘password‘:‘123‘),
           contentType:‘application/json‘,
           success:function (data)
               $(‘#d3‘).val(data).val()


       )
   )

</script>
</body>
注意:json格式发送的数据要前后端编码格式一致
data:JSON.stringify(‘username‘:‘koo‘,‘password‘:‘123‘),
contentType:‘application/json‘,
# 如何渲染给前端 >>>回调函数的$(‘‘#d3).val() 是连一起的两个key
三.Ajax发送文件
后端代码
def test(request):

    print(request.is_ajax())  # True
    if request.method == ‘POST‘:
        print(request.POST)  # <QueryDict: >  为空
        print(request.FILES)  # 文件是放再我们Files 里面
        # <MultiValueDict: ‘myfile‘: [<InMemoryUploadedFile:
        # 面试总结.md (application/octet-stream)>]>
    return render(request,‘test.html‘)  #
前端代码
<body>

<input type="text" id="d3">
<input type="file" name="my_files" id="d5">
<button class="btn btn-success" id="d4">提交</button>

<script>
   $(‘#d4‘).on(‘click‘,function()
       // ajax 传文件 建议使用内置对象formdata生成一个自定义对象
       var formData = new FormData();


        // 传文件
        // 如何获取文件标签所存储的文件对象?  固定语法
        // 1.先用jQery查找到存储文件的input标签
        // 2.将jQuery对象转成原生js对象
        // 3.利用原生js对象的方法 .files[0]获取到标签内部存储的文件对象
        // 4.一定要指定两个参数都为false
       // 注意里面有两个参数 第一个为key 第二个文value
        formData.append(‘myfile‘,$(‘#d5‘)[0].files[0]);
       // 指定两个参数为false
       $.ajax(
           //
           url:‘‘,
           type:‘post‘,
           data:formData,
           // 额外指定俩个参数
           processData:false,
           contentType:false,
           success:function (data)
               $(‘#d3‘).val(data)

       );

   )

</script>
</body>
四.批量插入数据
后端代码
def index(request):
    # 批量出入数
    # for i in range(1000):
    #     models.Book.objects.create(title=‘第%s本‘%i)
    #     book_list = models.Book.objects.all()  # 这种方法相对效率比较慢

    l = []
    for i in range(10000):
        l.append(models.Book(title=‘第%s本‘%i))
    models.Book.objects.bulk_create(l)   # 批量插入数据
    book_list = models.Book.objects.all()
    return render(request,‘index.html‘,locals())
前端代码
    <script src="https://cdn.bootcss.com/jquery/3.4.1/jquery.min.js"></script>
     % load static %
    <link rel="stylesheet" href="% static ‘bootstrap-3.3.7-dist/css/bootstrap.min.css‘ %">
    <script src="% static ‘bootstrap-3.3.7-dist/js/bootstrap.min.js‘ %"></script>
</head>
<body>
% for book in book_list %
    <p class="text-center">  book  </p>  直接放书就可以了

% endfor %
五.分页器
执行函数
from app01.utils.mypage import Pagination
def book(request):
    # for i in range(1000):
    #     models.Book.objects.create(title=‘第%s本书‘%i)
    # l = []
    # for i in range(10000):
    #     l.append(models.Book(title=‘第%s本书‘%i))
    # models.Book.objects.bulk_create(l)  # 批量插入数据
    """自己推到的分页器代码"""
    # current_page = request.GET.get("page",1)  # 获取用户想访问的页码  如果没有 默认展示第一页
    #
    # current_page = int(current_page)
    #
    # per_page_num = 10  # 规定每页展示10条数据
    #
    # start_page = (current_page - 1) * per_page_num
    # end_page = current_page * per_page_num
    #
    # book_list = models.Book.objects.all()[start_page:end_page]
    #
    # all_count = models.Book.objects.all().count()
    #
    # page_num,more = divmod(all_count,per_page_num)
    # if more:
    #     page_num += 1
    #
    # # 在后端生成分页器代码 然后传递给前端
    # html = ‘‘
    # xxx = current_page
    # if current_page < 6:
    #     xxx = 6
    # for i in range(xxx-5,xxx+6):
    #     if i == current_page:
    #         html += ‘<li class="active"><a href="?page=%s" >%s</a></li>‘%(i,i)
    #     else:
    #         html += ‘<li><a href="?page=%s">%s</a></li>‘ % (i, i)

    # 使用封装好的自定义分页器
    book_list = models.Book.objects.all()
    current_page = request.GET.get("page",1)
    all_count = book_list.count()
    page_obj = Pagination(current_page=current_page,all_count=all_count,per_page_num=10)
    page_queryset = book_list[page_obj.start:page_obj.end]


    return render(request,‘booklist.html‘,locals())


"""
per_page_num = 10

current_page                start_page                  end_page
    1                           0                           10
    2                           10                          20
    3                           20                          30
    4                           30                          40

per_page_num = 5

current_page                start_page                  end_page
    1                           0                           5
    2                           5                           10
    3                           10                          15
    4                           15                          20

start_page = (current_page - 1) * per_page_num
end_page =  current_page* per_page_num


10000
10


1000


10001
10

1001
导入模块
class Pagination(object):
    def __init__(self, current_page, all_count, per_page_num=2, pager_count=11):
        """
        封装分页相关数据
        :param current_page: 当前页
        :param all_count:    数据库中的数据总条数
        :param per_page_num: 每页显示的数据条数
        :param pager_count:  最多显示的页码个数

        用法:
        queryset = model.objects.all()
        page_obj = Pagination(current_page,all_count)
        page_data = queryset[page_obj.start:page_obj.end]
        获取数据用page_data而不再使用原始的queryset
        获取前端分页样式用page_obj.page_html
        """
        try:
            current_page = int(current_page)
        except Exception as e:
            current_page = 1

        if current_page < 1:
            current_page = 1

        self.current_page = current_page

        self.all_count = all_count
        self.per_page_num = per_page_num

        # 总页码
        all_pager, tmp = divmod(all_count, per_page_num)
        if tmp:
            all_pager += 1
        self.all_pager = all_pager

        self.pager_count = pager_count
        self.pager_count_half = int((pager_count - 1) / 2)

    @property
    def start(self):
        return (self.current_page - 1) * self.per_page_num

    @property
    def end(self):
        return self.current_page * self.per_page_num

    def page_html(self):
        # 如果总页码 < 11个:
        if self.all_pager <= self.pager_count:
            pager_start = 1
            pager_end = self.all_pager + 1
        # 总页码  > 11
        else:
            # 当前页如果<=页面上最多显示11/2个页码
            if self.current_page <= self.pager_count_half:
                pager_start = 1
                pager_end = self.pager_count + 1

            # 当前页大于5
            else:
                # 页码翻到最后
                if (self.current_page + self.pager_count_half) > self.all_pager:
                    pager_end = self.all_pager + 1
                    pager_start = self.all_pager - self.pager_count + 1
                else:
                    pager_start = self.current_page - self.pager_count_half
                    pager_end = self.current_page + self.pager_count_half + 1

        page_html_list = []
        # 添加前面的nav和ul标签
        page_html_list.append(‘‘‘
                    <nav aria-label=‘Page navigation>‘
                    <ul class=‘pagination‘>
                ‘‘‘)
        first_page = ‘<li><a href="?page=%s">首页</a></li>‘ % (1)
        page_html_list.append(first_page)

        if self.current_page <= 1:
            prev_page = ‘<li class="disabled"><a href="#">上一页</a></li>‘
        else:
            prev_page = ‘<li><a href="?page=%s">上一页</a></li>‘ % (self.current_page - 1,)

        page_html_list.append(prev_page)

        for i in range(pager_start, pager_end):
            if i == self.current_page:
                temp = ‘<li class="active"><a href="?page=%s">%s</a></li>‘ % (i, i,)
            else:
                temp = ‘<li><a href="?page=%s">%s</a></li>‘ % (i, i,)
            page_html_list.append(temp)

        if self.current_page >= self.all_pager:
            next_page = ‘<li class="disabled"><a href="#">下一页</a></li>‘
        else:
            next_page = ‘<li><a href="?page=%s">下一页</a></li>‘ % (self.current_page + 1,)
        page_html_list.append(next_page)

        last_page = ‘<li><a href="?page=%s">尾页</a></li>‘ % (self.all_pager,)
        page_html_list.append(last_page)
        # 尾部添加标签
        page_html_list.append(‘‘‘
                                           </nav>
                                           </ul>
                                       ‘‘‘)
        return ‘‘.join(page_html_list)
六.利用sweat 弹框 前后端交互 删除 数据
模态框
图书删除验证
前端代码
<script>
    $(‘.del‘).click(function ()
        // 获取当前标签对象
        var $btnEle = $(this);

        swal(
          title: "你确定要删吗?",
          text: "你要是删了,你就准备跑路吧!",
          type: "warning",
          showCancelButton: true,
          confirmButtonClass: "btn-danger",
          confirmButtonText: "是的,老子就要删!",
          cancelButtonText: "算了,算了!",
          closeOnConfirm: false,
          showLoaderOnConfirm: true
        ,
        function()
            // 朝后端发送ajax请求
            $.ajax(
                url:‘‘,
                type:‘post‘,
                data:‘delete_id‘:$btnEle.attr(‘user_id‘),
                success:function (data)   // 后端发字典过来 前端不需要你手动转 会自动帮你转换成js自定义对象
                    if (data.code == 100)
                        #window.location.href = ‘‘;  // 不写就是条到当前页面#
                        // 通过DOM操作 实时改变页面
                        // 将被点击的删除按钮所在的那一行直接从DOM树中删掉
                        $btnEle.parent().parent().remove();
                        swal("删掉了!", "赶紧回去收拾行李吧,准备跑路!", "success");
                    else
                        swal(‘发生了未知的错误‘,‘估计是有bug了‘,‘info‘)


            );

        );
    )
</script>
后端
def userlist(request):
    if request.is_ajax():
        time.sleep(3)
        """
        一般情况下 针对ajax请求 后端通常都是返回一个字典
        """
        back_dic = ‘code‘:100,‘msg‘:‘‘
        # 直接获取用户想删除的数据的id值
        delete_id = request.POST.get(‘delete_id‘)
        # 直接利用queryset方法 批量删除
        models.User.objects.filter(pk=delete_id).delete()
        # 要给前端ajax返回一个消息(字典)
        back_dic[‘msg‘] = ‘真的删除了!‘
        return JsonResponse(back_dic)


    user_list = models.User.objects.all()
    return render(request,‘userlist.html‘,locals())
以上是关于Django之AJAX请求的主要内容,如果未能解决你的问题,请参考以下文章