RAID&LVM有关磁盘的故障
Posted 1naonao
tags:
篇首语:本文由小常识网(cha138.com)小编为大家整理,主要介绍了RAID&LVM有关磁盘的故障相关的知识,希望对你有一定的参考价值。
RAID&LVM有关磁盘的故障
RAID
好处:1.更多的容量
? 2.得到更多的冗余
? 3.得到更高的性能
RAID的运行方式


软raid(了解)
硬raid(视屏)
https://www.bilibili.com/video/av46656120?from=search&seid=8213679239129642497
RAID级别
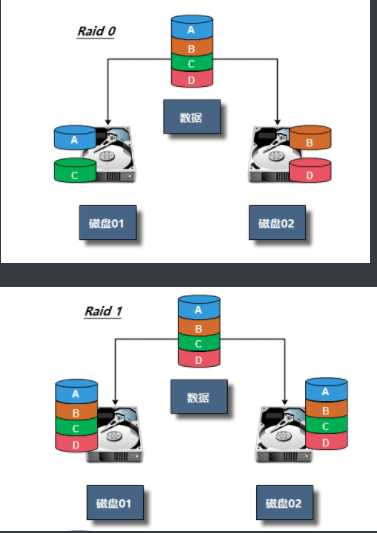
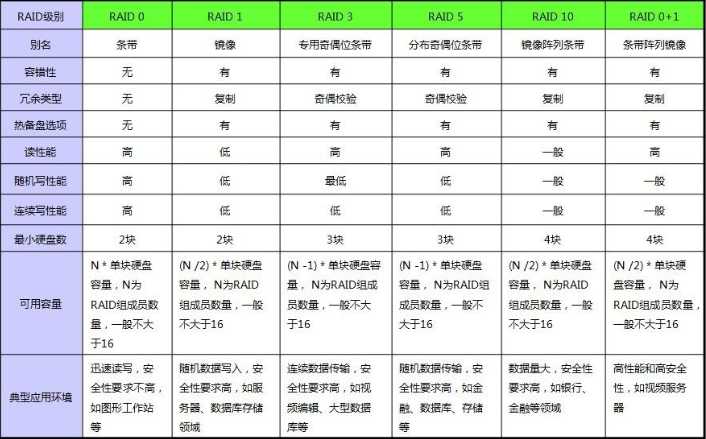
RAID0 条带卷,容量最大。单块容量*N,读写最快。没有容错机制。理论是2块硬盘
RAID1 镜像卷,50%容量,读一般,写特慢。有50%容错机制。只能是两块。
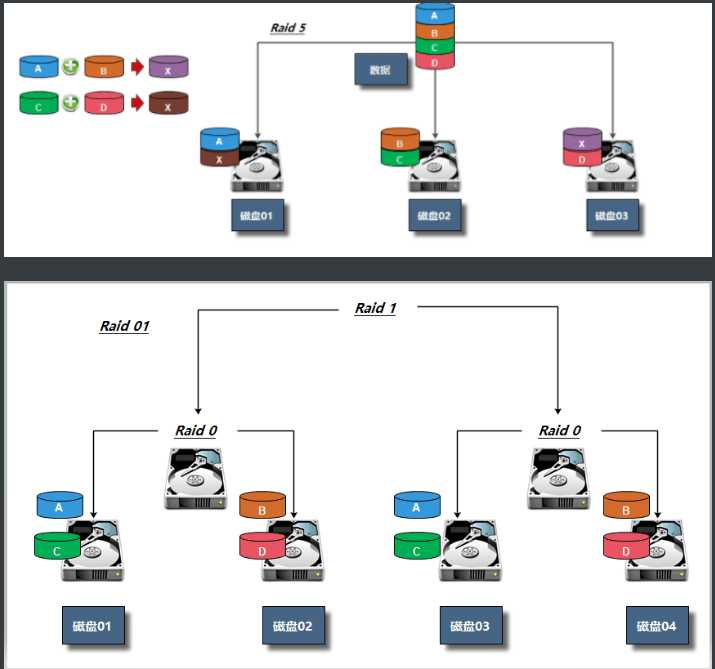
RAID5 检验卷,总容量的三分之二。读写稍快。容错机制,可以损坏三分之一。最低三块
RAID10 1 0 损失一半。读写快。容错50%。只能四块。
性能:RAID0》RAID10》RAID5》RAID1
安全:RAID1》RAID10》RAID5》RAID0
价格:RAID10》RAID1》RAID5》RAID0

注意:RAID硬盘失效处理——热备和热拔插
RAID实战
软RAID
1.mdadm安装
[[email protected] ~]# yum install -y mdadmmdadm命令常见选项解释:
-A      #激活磁盘阵列
-C      #建立一个新阵列
-D      #打印阵列设备的信息
-G      #改变阵列大小或形态
-S      #停止阵列
-r      #移除设备
-l      #设定磁盘阵列的级别
-n      #指定阵列磁盘的数量
-x      #指定阵列中备用盘的数量
-f      #将设备状态定为故障
-a      #添加设备到阵列
-v      #显示详细信息软RAID:通过操作系统实现
2.创建RAID实验环境
Raid种类   磁盘      热备盘
Raid0     sdb、sdc   (sdd)
3.创建磁盘阵列
[[email protected] ~]# mdadm  -C -v /dev/md0 -l 0 -n 2   /dev/sdb /dev/sdc
mdadm: chunk size defaults to 512K               #-x /dev/sd[b,c,d]
mdadm: Defaulting to version 1.2 metadata
mdadm: array /dev/md0 started.
4.查看RAID阵列
[[email protected] ~]# mdadm -D /dev/md05.将信息写入到配置文件中
[[email protected] ~]# mdadm -Ds >/etc/mdadm.conf #可以追加进去6.挂载使用
[[email protected] ~]# mdadm  -Ds  >/etc/mdadm.conf
[[email protected] ~]# mkfs.xfs   /dev/md0
meta-data=/dev/md0               isize=512    agcount=16, agsize=654720 blks
         =                       sectsz=512   attr=2, projid32bit=1
         =                       crc=1        finobt=0, sparse=0
data     =                       bsize=4096   blocks=10475520, imaxpct=25
         =                       sunit=128    swidth=256 blks
naming   =version 2              bsize=4096   ascii-ci=0 ftype=1
log      =internal log           bsize=4096   blocks=5120, version=2
         =                       sectsz=512   sunit=8 blks, lazy-count=1
realtime =none                   extsz=4096   blocks=0, rtextents=0
[[email protected] ~]# mkdir  /raid0
[[email protected] ~]# mount /dev/md0  /raid0
[[email protected] ~]# df -h |grep /dev/md0
/dev/md0         40G   33M   40G   1% /raid0
[[email protected] ~]# cp /etc/services  /raid0/
7.指定一块盘故障
[[email protected] ~]# mdadm -f /dev/md1 /dev/sdc #指定热备盘看不出效果8.检查数据有没有丢失
[[email protected] ~]# ll /raid0
total 656
-rw-r--r--. 1 root root 670293 Jul 18 18:47 services
9.移除损坏的盘
[[email protected] ~]# mdadm  -r  /dev/md1 /dev/sdc
mdadm: hot removed /dev/sde from /dev/md1
10.添加一块盘
[[email protected] ~]# mdadm -a /dev/md1 /dev/sdc要求:1)使用三块盘创建RAID5, 使用-x添加1个热备盘
2)模拟损坏一块磁盘,然后备用盘自动顶上,只能顶一次
3)在模拟损坏,检测数据是否丢失,如果没有再次模拟损坏.
注意:创建RAID10实验环境:也可以指定分区
LVM介绍
物理卷(PV):(physical volume),把常规的磁盘设备通过pvcreate命令对其进行初始化,形成了物理卷。其实就是硬盘或分区。(面粉)
卷组(VG):(volume group),把多个物理卷组成一个逻辑的整体,这样卷组的大小就是多个硬盘之和。或者理解就是由一个或多个PV组成的整体。(面团)
逻辑卷(LV):(logical volume),从卷组中划分需要的空间大小出来。用户仅需对其格式化然后即可挂载使用。从VG中切割出的空间用于创建文件系统。(切成馒头)
基本单元(PE):(physical extend),分配的逻辑大小的最小单元,默认为4MB的基本块。(假设分配100MB逻辑空间,则需要创建25个PE)
LVM实战
1)创建物理卷,将普通磁盘转换为物理卷。
2)创建卷组,将物理卷加入到卷组中。
3)在卷组中划分逻辑卷,然后挂载使用。
1.下载安装软件包
[[email protected] ~]# yum install lvm2 -y2.将/dev/sdb创建为物理卷
[[email protected] ~]# pvcreate  /dev/sdb
Physical volume "/dev/sdb" successfully created.
3.创建卷组,并将物理卷加入进去
[[email protected] ~]# vgcreate lvm_test /dev/sdb4.检查
[[email protected] ~]# vgs
[[email protected] ~]# pvs
5.创建一个逻辑卷
[[email protected] ~]# lvcreate -L 1G -n lv1 lvm_test6.检查
[[email protected] ~]# vgs
  VG       #PV #LV #SN Attr   VSize   VFree
  lvm_test   1   1   0 wz--n- <20.00g <19.00g
[[email protected] ~]# pvs
  PV         VG       Fmt  Attr PSize   PFree
  /dev/sdb   lvm_test lvm2 a--  <20.00g <19.00g
[[email protected] ~]# lvs
  LV   VG       Attr       LSize Pool Origin Data%  Meta%  Move Log Cpy%Sync Convert
  lv1  lvm_test -wi-a----- 1.00g
[[email protected] ~]# lsblk
NAME           MAJ:MIN RM  SIZE RO TYPE MOUNTPOINT
sda              8:0    0   50G  0 disk
├─sda1           8:1    0  200M  0 part /boot
├─sda2           8:2    0    2G  0 part [SWAP]
└─sda3           8:3    0 47.8G  0 part /
sdb              8:16   0   20G  0 disk
└─lvm_test-lv1 253:0    0    1G  0 lvm
7.格式化
[[email protected] ~]# mkfs.xfs /dev/lvm_test/lv1 8.挂载使用
[[email protected] ~]# mkdir   /lv1
[[email protected] ~]# mount  /dev/lvm_test/lv1   /lv1
[[email protected] ~]# df -h |grep lv1
/dev/mapper/lvm_test-lv1 1014M   33M  982M   4% /lv1
[[email protected] ~]# cp /etc/services  /lv1
[[email protected] ~]# ll /lv1
total 656
-rw-r--r--. 1 root root 670293 Jul 18 19:59 services
一,卷组管理,如何扩展卷组大小,如何删除卷组
1.将sdc指定为物理卷
[[email protected] ~]# pvcreate  /dev/sdc
Physical volume "/dev/sdc" successfully created.
2.添加到卷组中
[[email protected] ~]# vgextend  lvm_test  /dev/sdc
Volume group "lvm_test" successfully extended
3.检查
[[email protected] ~]# vgs
  VG       #PV #LV #SN Attr   VSize  VFree
  lvm_test   2   1   0 wz--n- 39.99g 38.99g
[[email protected] ~]# pvs
  PV         VG       Fmt  Attr PSize   PFree
  /dev/sdb   lvm_test lvm2 a--  <20.00g <19.00g
  /dev/sdc   lvm_test lvm2 a--  <20.00g <20.00g
4.将逻辑卷移动到sdc上面
[[email protected] ~]# pvmove   /dev/sdb  /dev/sdc
  /dev/sdb: Moved: 1.95%
  /dev/sdb: Moved: 100.00%
[[email protected] ~]# pvs
  PV         VG       Fmt  Attr PSize   PFree
  /dev/sdb   lvm_test lvm2 a--  <20.00g <20.00g
  /dev/sdc   lvm_test lvm2 a--  <20.00g <19.00g
5.缩减卷组大小
[[email protected] ~]# vgreduce   lvm_test  /dev/sdb
Removed "/dev/sdb" from volume group "lvm_test"
6.检查
[[email protected] ~]# vgs
  VG       #PV #LV #SN Attr   VSize   VFree
  lvm_test   1   1   0 wz--n- <20.00g <19.00g
[[email protected] ~]# pvs
  PV         VG       Fmt  Attr PSize   PFree
  /dev/sdb            lvm2 ---   20.00g  20.00g
  /dev/sdc   lvm_test lvm2 a--  <20.00g <19.00g
二,添加逻辑卷的大小
方法一:
1.添加
[[email protected] ~]# lvextend  -L +1G  /dev/lvm_test/lv1       #(写加号和不写加号的区别)
  Size of logical volume lvm_test/lv1 changed from 1.00 GiB (256 extents) to 2.00 GiB (512 extents).
  Logical volume lvm_test/lv1 successfully resized.
2.检查
[[email protected] ~]# vgs
  VG       #PV #LV #SN Attr   VSize   VFree
  lvm_test   1   1   0 wz--n- <20.00g <18.00g
[[email protected] ~]# lsblk
NAME           MAJ:MIN RM  SIZE RO TYPE MOUNTPOINT
sda              8:0    0   50G  0 disk
├─sda1           8:1    0  200M  0 part /boot
├─sda2           8:2    0    2G  0 part [SWAP]
└─sda3           8:3    0 47.8G  0 part /
sdb              8:16   0   20G  0 disk
sdc              8:32   0   20G  0 disk
└─lvm_test-lv1 253:0    0    2G  0 lvm  /lv1
3.更新新添加的逻辑卷的文件系统
[[email protected] ~]# xfs_growfs  /dev/lvm_test/lv1
meta-data=/dev/mapper/lvm_test-lv1 isize=512    agcount=4, agsize=65536 blks
         =                       sectsz=512   attr=2, projid32bit=1
         =                       crc=1        finobt=0 spinodes=0
data     =                       bsize=4096   blocks=262144, imaxpct=25
         =                       sunit=0      swidth=0 blks
naming   =version 2              bsize=4096   ascii-ci=0 ftype=1
log      =internal               bsize=4096   blocks=2560, version=2
         =                       sectsz=512   sunit=0 blks, lazy-count=1
realtime =none                   extsz=4096   blocks=0, rtextents=0
data blocks changed from 262144 to 524288
方法二:
1.按照百分比增加大小
[[email protected] ~]# lvextend  -l 20%FREE  /dev/lvm_test/lv1
  Size of logical volume lvm_test/lv1 changed from 2.00 GiB (512 extents) to 3.60 GiB (922 extents).
  Logical volume lvm_test/lv1 successfully resized.
2.更新文件系统
[[email protected] ~]# xfs_growfs /dev/lvm_test/lv1 注意:缩减逻辑卷大小,企业不会去缩减,一般直接删除
怎样删除:
1.首先卸载
[[email protected] ~]# umount  /lv1
[[email protected] ~]# df -h
Filesystem      Size  Used Avail Use% Mounted on
/dev/sda3        48G  2.9G   45G   7% /
devtmpfs        980M     0  980M   0% /dev
tmpfs           991M     0  991M   0% /dev/shm
tmpfs           991M  9.7M  981M   1% /run
tmpfs           991M     0  991M   0% /sys/fs/cgroup
/dev/sda1       197M  105M   93M  54% /boot
tmpfs           199M     0  199M   0% /run/user/0
2.移除
[[email protected] ~]# lvremove  /dev/lvm_test/lv1
Do you really want to remove active logical volume lvm_test/lv1? [y/n]: y   #是否确认
  Logical volume "lv1" successfully removed
3.检查
[[email protected] ~]# lsblk
NAME   MAJ:MIN RM  SIZE RO TYPE MOUNTPOINT
sda      8:0    0   50G  0 disk
├─sda1   8:1    0  200M  0 part /boot
├─sda2   8:2    0    2G  0 part [SWAP]
└─sda3   8:3    0 47.8G  0 part /
sdb      8:16   0   20G  0 disk
sdc      8:32   0   20G  0 disk
注意:注意:LVM如果有一个磁盘损坏,整个lvm都坏了, lvm只有动态扩展作用,底层用RAID + 上层LVM = 既有冗余又有动态扩展
磁盘故障
一,block(数据满了)
1.环境准备
先创建一个1G分区,并挂在使用
2.创建大文件,模拟磁盘空间满
[[email protected] ~]# dd if=/dev/zero of=/test/test.log  bs=100M count=11
dd: error writing ‘/test/test.log’: No space left on device
10+0 records in
9+0 records out
1026621440 bytes (1.0 GB) copied, 18.7358 s, 54.8 MB/s
[[email protected] ~]# df -h |grep test
/dev/sde1      1014M 1012M  2.8M 100% /test


 #报错No space left on device
[[email protected] ~]# cp  services  /test/
cp: error writing ‘/test/services’: No space left on device
cp: failed to extend ‘/test/services’: No space left on device
3.检查磁盘
[[email protected] ~]# df -h
Filesystem      Size  Used Avail Use% Mounted on
/dev/sda3        48G  2.9G   45G   7% /
devtmpfs        980M     0  980M   0% /dev
tmpfs           991M     0  991M   0% /dev/shm
tmpfs           991M  9.7M  981M   1% /run
tmpfs           991M     0  991M   0% /sys/fs/cgroup
/dev/sda1       197M  105M   93M  54% /boot
tmpfs           199M     0  199M   0% /run/user/0
/dev/sde1      1014M 1014M   32K 100% /test
4.查找大文件,依次往下查找,直到找到大文件为止
[[email protected] ~]# du  -sh  /test/*

#找到之后,先确认是否可以删除。
rm  -f

#删除之后,磁盘还是满的,先确认是否有硬链接。
二,inode故障(小文件太多)
  [[email protected] ~]# touch  /test/123
  touch: cannot touch ‘/test/123’: No space left on device
1.检查磁盘
[[email protected] ~]# df -h
Filesystem      Size  Used Avail Use% Mounted on
/dev/sda3        48G  2.9G   45G   7% /
devtmpfs        980M     0  980M   0% /dev
tmpfs           991M     0  991M   0% /dev/shm
tmpfs           991M  9.7M  981M   1% /run
tmpfs           991M     0  991M   0% /sys/fs/cgroup
/dev/sda1       197M  105M   93M  54% /boot
tmpfs           199M     0  199M   0% /run/user/0
/dev/sde1      1014M  308M  707M  31% /test
[[email protected] ~]# df -i
Filesystem       Inodes  IUsed    IFree IUse% Mounted on
/dev/sda3      25062912  93030 24969882    1% /
devtmpfs         250786    465   250321    1% /dev
tmpfs            253511      1   253510    1% /dev/shm
tmpfs            253511    819   252692    1% /run
tmpfs            253511     16   253495    1% /sys/fs/cgroup
/dev/sda1        102400    326   102074    1% /boot
tmpfs            253511      1   253510    1% /run/user/0
/dev/sde1        524288 524288        0  100% /test
2.解决
#找到存放大量小文件的目录
[[email protected] ~]# find  /test  -type d  -size  +1M   |xargs  ls -lhd
drwxr-xr-x. 3 root root 2.4M Jul 18 20:39 /test/data
drwxr-xr-x. 3 root root 1.2M Jul 18 20:38 /test/data/test
drwxr-xr-x. 2 root root 1.2M Jul 18 20:38 /test/data/test/data
drwxr-xr-x. 3 root root 4.7M Jul 18 20:40 /test/oldboy
drwxr-xr-x. 2 root root 2.9M Jul 18 20:41 /test/oldboy/oldgirl


#找到之后,先确认是否可以删除。

#千万不要直接查看目录内容
[[email protected] ~]# ll  /test/data |wc -l

#按照类型去删
[[email protected] ~]# find /test  -type f  -name "*.txt"  -delete
[[email protected] ~]# find /test  -type f  -name "*.log"  -delete
[[email protected] ~]# find /test  -type f  -name "*.sh"  -delete
[[email protected] ~]# find /test  -type f  -name "*.conf"  -delete
[[email protected] ~]# df -i
Filesystem       Inodes IUsed    IFree IUse% Mounted on
/dev/sda3      25062912 93030 24969882    1% /
devtmpfs         250786   465   250321    1% /dev
tmpfs            253511     1   253510    1% /dev/shm
tmpfs            253511   819   252692    1% /run
tmpfs            253511    16   253495    1% /sys/fs/cgroup
/dev/sda1        102400   326   102074    1% /boot
tmpfs            253511     1   253510    1% /run/user/0
/dev/sde1        524352     8   524344    1% /test
以上是关于RAID&LVM有关磁盘的故障的主要内容,如果未能解决你的问题,请参考以下文章
服务器数据恢复raid5崩溃导致lvm信息和VXFS文件系统损坏的数据恢复案例