1第一个SpringMVC程序
Posted 红酒人生
tags:
篇首语:本文由小常识网(cha138.com)小编为大家整理,主要介绍了1第一个SpringMVC程序相关的知识,希望对你有一定的参考价值。
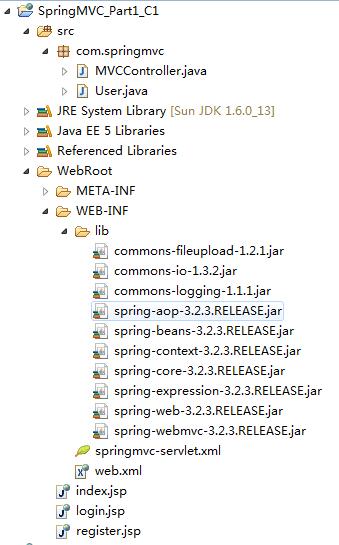
1、创建如下项目结构

2、在src下的com.springmvc下创建User.java

 1 package com.springmvc;
 2
 3 public class User {
 4     private String uname;
 5
 6     public String getUname() {
 7         return uname;
 8     }
 9
10     public void setUname(String uname) {
11         this.uname = uname;
12     }
13
14     @Override
15     public String toString() {
16         return "User [uname=" + uname + "]";
17     }
18
19
20 }
3、在src下的com.springmvc下创建MVCController.java

 1 package com.springmvc;
 2
 3 import java.io.IOException;
 4
 5 import javax.servlet.http.HttpServletRequest;
 6 import javax.servlet.http.HttpServletResponse;
 7
 8 import org.springframework.stereotype.Controller;
 9 import org.springframework.web.bind.annotation.RequestMapping;
10
11
12 /**
13  * @Controller 标注控制类,负责注册一个bean到spring上下文中
14  * @RequestMapping 注解为控制器指定可以处理哪些 URL 请求
15  * http://MVCController/hello
16  *
17  */
18 @Controller
19 public class MVCController {
20     /*所有方法的return 返回的是页面视图的名称*/
21
22     //1.自动匹配参数
23     @RequestMapping("/hello.do")
24     public String hello(HttpServletRequest request,HttpServletResponse response) throws IOException{
25         //跳转页面
26         return "/index.jsp";
27     }
28     //2.自动匹配参数,传递一个参数
29     @RequestMapping("/login.do")
30     public void login(HttpServletResponse response,String uname) throws IOException{
31         //login的页面,uname是表单的name属性名
32         System.out.println("登录通过String参数接用户名:"+uname);
33         //跳转方式1:
34             response.sendRedirect("index.jsp");
35     }
36     //2.自动匹配参数
37     @RequestMapping("/register.do")
38     public void test(HttpServletResponse response,User user) throws IOException{
39         //register页面的name属性名只要和User类的属性名保持一致,这里参数拿对象接就好,
40         //这里register页面的name属性名中不用写user.属性名,不能像stuts2注入对象一样
41         System.out.println("登录通过User对象参数接用户名:"+user);
42         //跳转方式1:
43         response.sendRedirect("index.jsp");
44     }
45
46
47 }
4、在WebRoot下的WEB-INF下创建springmvc-servlet.xml

 1 <?xml version="1.0" encoding="UTF-8"?>
 2 <beans xmlns="http://www.springframework.org/schema/beans"
 3 xmlns:aop="http://www.springframework.org/schema/aop"
 4 xmlns:context="http://www.springframework.org/schema/context"
 5 xmlns:tx="http://www.springframework.org/schema/tx"
 6 xmlns:mvc="http://www.springframework.org/schema/mvc"
 7 xmlns:xsi="http://www.w3.org/2001/XMLSchema-instance"
 8 xsi:schemaLocation="http://www.springframework.org/schema/beans
 9 http://www.springframework.org/schema/beans/spring-beans.xsd
10 http://www.springframework.org/schema/aop
11 http://www.springframework.org/schema/aop/spring-aop.xsd
12 http://www.springframework.org/schema/context
13 http://www.springframework.org/schema/context/spring-context.xsd
14 http://www.springframework.org/schema/tx
15 http://www.springframework.org/schema/tx/spring-tx.xsd
16 http://www.springframework.org/schema/mvc
17 http://www.springframework.org/schema/mvc/spring-mvc.xsd ">
18   <!--  1.配置要自动扫描的包 -->
19   <context:component-scan base-package="com.springmvc"/>
20
21   <!-- 2.支持spingmmvc注解,自动匹配 -->
22   <mvc:annotation-driven/>
23
24   <!-- 3.如果当前请求为“/”时,则转发到“mvc/hello” 也就是默认首启项的设置,web.xml欢迎页面节点可以啥也不写-->
25   <!-- <mvc:view-controller path="/" view-name="forward:/mvc/hello"/> -->
26
27
28
29 </beans>
5、编辑WebRoot下的WEB-INF下的web.xml

 1 <?xml version="1.0" encoding="UTF-8"?>
 2 <web-app version="2.5"
 3     xmlns="http://java.sun.com/xml/ns/javaee"
 4     xmlns:xsi="http://www.w3.org/2001/XMLSchema-instance"
 5     xsi:schemaLocation="http://java.sun.com/xml/ns/javaee
 6     http://java.sun.com/xml/ns/javaee/web-app_2_5.xsd">
 7     <!-- SpringMVC的配置 -->
 8     <servlet>
 9       <servlet-name>springmvc</servlet-name>
10
11       <!-- DispatcherServlet是前置控制器,配置在web.xml文件中的。拦截匹配的请求,
12       Servlet拦截匹配规则要自已定义,把拦截下来的请求,依据相应的规则分发到目标Controller来处理, -->
13       <servlet-class>org.springframework.web.servlet.DispatcherServlet</servlet-class>
14     </servlet>
15     <servlet-mapping>
16       <servlet-name>springmvc</servlet-name>
17       <url-pattern>*.do</url-pattern>
18     </servlet-mapping>
19
20     <welcome-file-list>
21       <welcome-file></welcome-file>
22     </welcome-file-list>
23 </web-app>
6、在WebRoot下创建login.jsp

 1 <%@ page language="java" import="java.util.*" pageEncoding="ISO-8859-1"%>
 2 <%
 3 String path = request.getContextPath();
 4 String basePath = request.getScheme()+"://"+request.getServerName()+":"+request.getServerPort()+path+"/";
 5 %>
 6
 7 <!DOCTYPE html PUBLIC "-//W3C//DTD HTML 4.01 Transitional//EN">
 8 <html>
 9   <head>
10     <base href="<%=basePath%>">
11
12     <title>My JSP \'index.jsp\' starting page</title>
13     <meta http-equiv="pragma" content="no-cache">
14     <meta http-equiv="cache-control" content="no-cache">
15     <meta http-equiv="expires" content="0">
16     <meta http-equiv="keywords" content="keyword1,keyword2,keyword3">
17     <meta http-equiv="description" content="This is my page">
18     <!--
19     <link rel="stylesheet" type="text/css" href="styles.css">
20     -->
21   </head>
22
23   <body>
24      <form action="login.do" method="post">
25        user:<input type="text" name="uname"/>
26        <input type="submit" value="ok"/>
27      </form>
28   </body>
29 </html>
7、在WebRoot下创建register.jsp

 1 <%@ page language="java" import="java.util.*" pageEncoding="ISO-8859-1"%>
 2 <%
 3 String path = request.getContextPath();
 4 String basePath = request.getScheme()+"://"+request.getServerName()+":"+request.getServerPort()+path+"/";
 5 %>
 6
 7 <!DOCTYPE HTML PUBLIC "-//W3C//DTD HTML 4.01 Transitional//EN">
 8 <html>
 9   <head>
10     <base href="<%=basePath%>">
11
12     <title>My JSP \'index.jsp\' starting page</title>
13     <meta http-equiv="pragma" content="no-cache">
14     <meta http-equiv="cache-control" content="no-cache">
15     <meta http-equiv="expires" content="0">
16     <meta http-equiv="keywords" content="keyword1,keyword2,keyword3">
17     <meta http-equiv="description" content="This is my page">
18     <!--
19     <link rel="stylesheet" type="text/css" href="styles.css">
20     -->
21   </head>
22
23   <body>
24      <form action="register.do" method="post">
25        user:<input type="text" name="uname"/>
26        <input type="submit" value="ok"/>
27      </form>
28   </body>
29 </html>
8、在WebRoot下创建index.jsp

 1 <%@ page language="java" import="java.util.*" pageEncoding="UTF-8"%>
 2 <%
 3 String path = request.getContextPath();
 4 String basePath = request.getScheme()+"://"+request.getServerName()+":"+request.getServerPort()+path+"/";
 5 %>
 6
 7 <!DOCTYPE HTML PUBLIC "-//W3C//DTD HTML 4.01 Transitional//EN">
 8 <html>
 9   <head>
10     <base href="<%=basePath%>">
11
12     <title>My JSP \'login.jsp\' starting page</title>
13
14     <meta http-equiv="pragma" content="no-cache">
15     <meta http-equiv="cache-control" content="no-cache">
16     <meta http-equiv="expires" content="0">
17     <meta http-equiv="keywords" content="keyword1,keyword2,keyword3">
18     <meta http-equiv="description" content="This is my page">
19     <!--
20     <link rel="stylesheet" type="text/css" href="styles.css">
21     -->
22
23   </head>
24
25   <body>
26      操作成功!
27   </body>
28 </html>
9、运行效果如下
(1)直接通过浏览器访问hello.do


(2)登录时,后台用String参数名接值


(3)注册时,后台用User对象参数接值


以上是关于1第一个SpringMVC程序的主要内容,如果未能解决你的问题,请参考以下文章
