(转)vmware下给linux虚拟机扩容
Posted 吱吱吱 (piperck) XD
tags:
篇首语:本文由小常识网(cha138.com)小编为大家整理,主要介绍了(转)vmware下给linux虚拟机扩容相关的知识,希望对你有一定的参考价值。
“Well, here’s another fine mess you’ve gotten me into”
Let us pretend that you have an Ubuntu Server which has been running for several years and it has been doing it’s assigned task(s) nicely, until one day you make a change to your methodology/assumptions/workflow/tasks therefore the allocated Virtual Hard Drive (VHD) size is no longer sufficient. There are many reasons for this, but I ran into this issue twice in one weekended because I enabled a JDS as a Distribution Point (thus mysql was eating needing a lot of space) and wanting to test multiple NetBoot NBI sources (because 10.10.2 seems to be causing imaging troubles). I need to increase the size of two different VHDs, however if you setup your Ubuntu Server via “Easy Install Mode” enlarging the VHD is not that strait forward.
Doing a quick search to see what VMware has to say about this issue returns less than helpful information for Ubuntu Servers by stating man fdisk. Google searching throws a lot of ideas, therefore I’m providing what I’ve learned from a couple of hours of research.
Increase size? I don’t think that word means what you think it means
First lets get a baseline of a default “Easy Install” of Ubuntu Server. We can see that we have a 20GB VHD by several ways:
- Looking at our VMware Fusion Setup
- Running
sudo fdisk -l - Running
df -H
Here is my test VM as it stands right now. You can see the VHD settings are for 20GB (really 21.5, guessing there is a rounding error somewhere), and that our primary partition is /dev/sda1 with 19GB drive.
[email protected]:~$ sudo fdisk -l

Disk /dev/sda: 21.5 GB, 21474836480 bytes
255 heads, 63 sectors/track, 2610 cylinders, total 41943040 sectors
Units = sectors of 1 * 512 = 512 bytes
Sector size (logical/physical): 512 bytes / 512 bytes
I/O size (minimum/optimal): 512 bytes / 512 bytes
Disk identifier: 0x0001bae9

   Device Boot      Start         End      Blocks   Id  System
/dev/sda1   *        2048    37750783    18874368   83  Linux
/dev/sda2        37752830    41940991     2094081    5  Extended
/dev/sda5        37752832    41940991     2094080   82  Linux swap / Solaris

[email protected]:~$ df -H | grep sda
/dev/sda1        19G  1.4G   17G   8% /
Now it would be really nice if VMware Fusion’s tools to increase the VHD worked as expected. If we could just simply move our slider (or type in a new value) for our desired HD space that would actually increase our storage space, that would be perfect!
 Result VMware Fusion VHD setting after adjusting from 20GB to 30GB.
We start our Ubuntu Server to verify that our new drive is now 30GB of storage, however what we see is the Virtual Environment believes we have 30GB (32.2 specifically) but our /dev/sda1 partition is still at 19GBs?!
[email protected]:~$ sudo fdisk -l

Disk /dev/sda: 32.2 GB, 32212254720 bytes
255 heads, 63 sectors/track, 3916 cylinders, total 62914560 sectors
Units = sectors of 1 * 512 = 512 bytes
Sector size (logical/physical): 512 bytes / 512 bytes
I/O size (minimum/optimal): 512 bytes / 512 bytes
Disk identifier: 0x0001bae9

   Device Boot      Start         End      Blocks   Id  System
/dev/sda1   *        2048    37750783    18874368   83  Linux
/dev/sda2        37752830    41940991     2094081    5  Extended
/dev/sda5        37752832    41940991     2094080   82  Linux swap / Solaris

[email protected]:~$ df -H | grep sda
/dev/sda1        19G  1.4G   17G   8% /
What we have done is expanded the allowable space to be used, but we didn’t actually adjust the partition size. We need to do that with some more awesome open source tools.
Steps to Increase your VMware Fusion partition
First we are going to use a Linux Live CD called GParted. Download their 234MB ISO to your VMware Fusion host so you can attached the ISO to the CD/DVD drive. Once attached, use the Startup Disk options in VMware Fusion to select the CD/DVD drive.

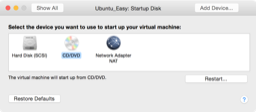 GParted attached as a CD/DVD drive, then booting from that drive.
Assuming you are a native English speaking individual and that you have a “US” keyboard setup, you can safely hit the Enter key for a couple of times to get to the GParted application. GParted will show you some critical information that we must overcome:
- Our original partition of 20GB is at the beginning
- Our swap space is in the middle
- Our extra space is at the end
Unfortunately with this GUI application you cannot just “drag” or “move” the extra space next to our original drive to expand your partition. Instead, we have to methodically move things around so everything lines up in the proper order. To do this we’ll perform the following steps in order:
- Enlarge the “extended” space to take over our unallocated area
- Move our swap space from the beginning to the end of our “extended” space
- Truncate the “extended” space to only focus on the swap space
- Enlarge our primary partition to use the new unallocated area
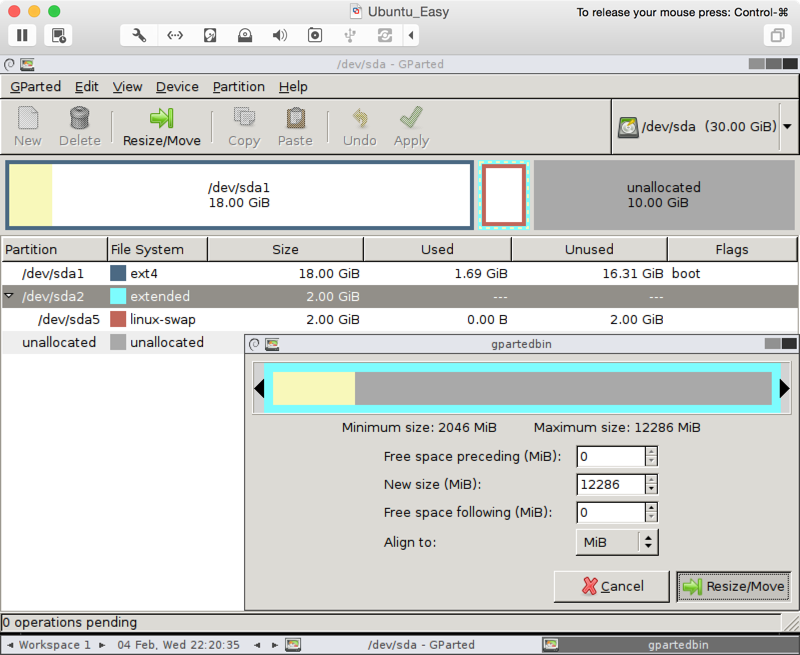 Select the /dev/sda2 "extended" and Resize/Move to take over the unallocated area, and hit apply.
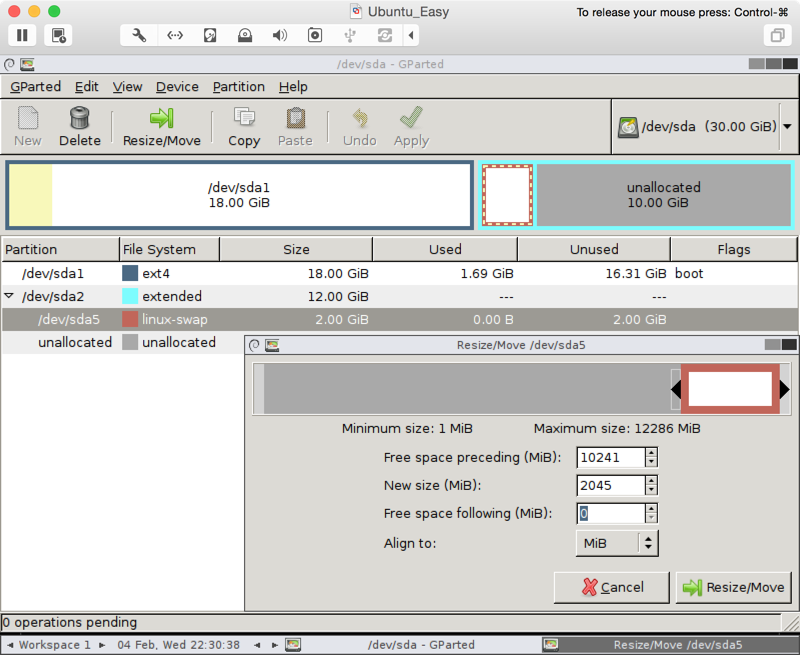 Select the /dev/sda5 "linux-swap" and Resize/Move to the end of our extended area, and hit apply.
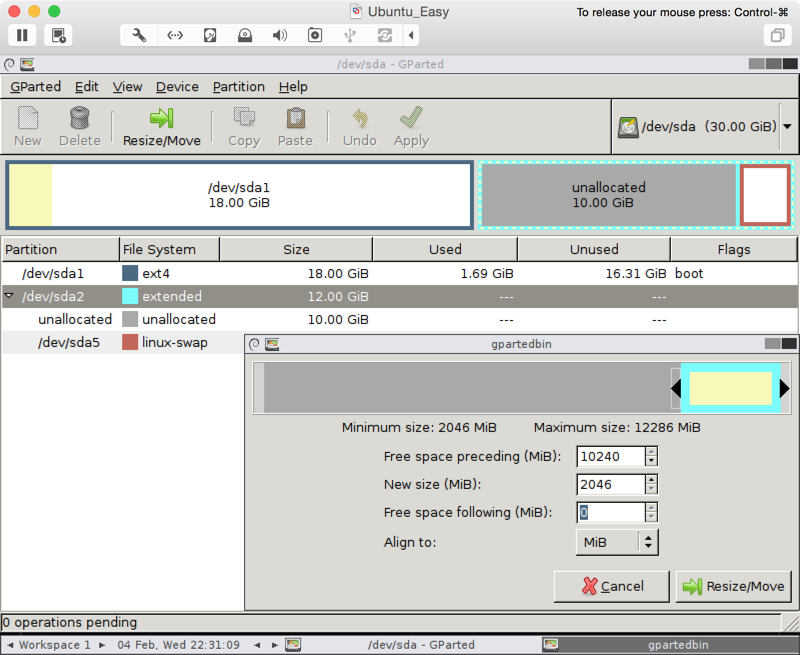 Select the /dev/sda2 "extended" to create new unallocated space preceding the "linux-swap" space.
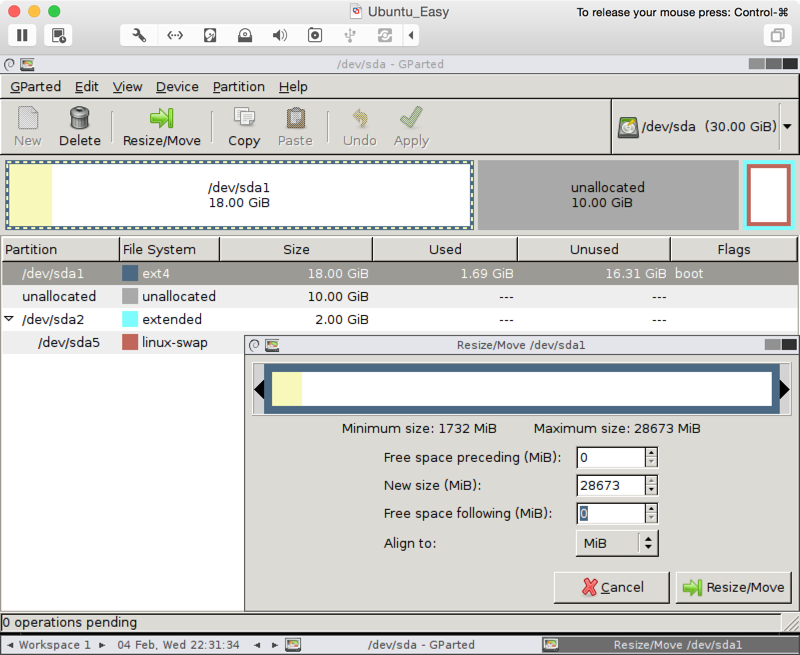 Select the /dev/sda1 and Resize/Move to take over our new unallocated area.
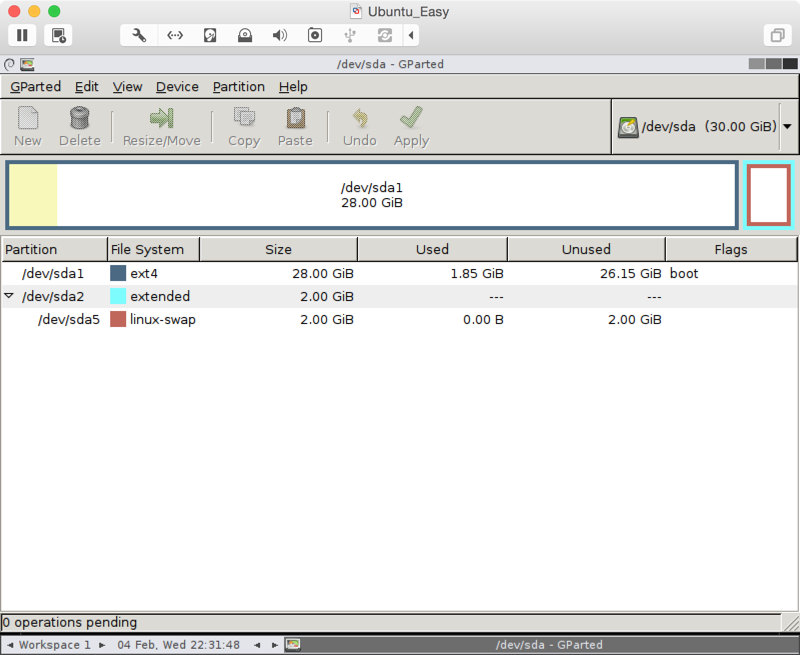 Verify our primary partition now has the 30GB storage (minus 2GB for swap in this example).
To verify everything is running again, change your startup disk back to your Hard Drive in VMware Fusion, restart your VM and run the same commands from the beginning.
[email protected]:~$ sudo fdisk -l

Disk /dev/sda: 32.2 GB, 32212254720 bytes
255 heads, 63 sectors/track, 3916 cylinders, total 62914560 sectors
Units = sectors of 1 * 512 = 512 bytes
Sector size (logical/physical): 512 bytes / 512 bytes
I/O size (minimum/optimal): 512 bytes / 512 bytes
Disk identifier: 0x000752bd

   Device Boot      Start         End      Blocks   Id  System
/dev/sda1   *        2048    58724351    29361152   83  Linux
/dev/sda2        58724352    62914559     2095104    5  Extended
/dev/sda5        58726400    62914559     2094080   82  Linux swap / Solaris

[email protected]:~$ df -H | grep sda
/dev/sda1        30G  1.4G   27G   5% /
reference:
https://www.justinrummel.com/resizing-a-vmware-fusion-ubuntu-server-virtual-hard-drive-via-easy-mode/
以上是关于(转)vmware下给linux虚拟机扩容的主要内容,如果未能解决你的问题,请参考以下文章