MongoDB高可用模式部署
Posted
tags:
篇首语:本文由小常识网(cha138.com)小编为大家整理,主要介绍了MongoDB高可用模式部署相关的知识,希望对你有一定的参考价值。
首先准备机器,我这里是在公司云平台创建了三台DB server,ip分别是10.199.144.84,10.199.144.89,10.199.144.90。
分别安装mongodb最新稳定版本:
wget https://fastdl.mongodb.org/linux/mongodb-linux-x86_64-2.4.12.tgz
tar -xzvf mongodb-linux-x86_64-2.4.12.tgz
mv mongodb-linux-x86_64-2.4.12 /usr/lib
做个软连接或者按照官方的做法把mongo shell都添加到环境变量:
ln -s /usr/lib/mongodb-linux-x86_64-2.4.12/bin/mongo /usr/bin/mongo
ln -s /usr/lib/mongodb-linux-x86_64-2.4.12/bin/mongos /usr/bin/mongos
ln -s /usr/lib/mongodb-linux-x86_64-2.4.12/bin/mongod /usr/bin/mongod
分别创建存储数据的目录:
mkdir -p /data/mongodb && cd /data/mongodb/ && mkdir -p conf/data conf/log mongos/log shard{1..3}/data shard{1..3}/log
分别配置启动config服务器:
mongod --configsvr --dbpath /data/mongodb/conf/data --port 27100 --logpath /data/mongodb/conf/confdb.log --fork --directoryperdb
确保config服务都启动之后,启动路由服务器(mongos):
mongos --configdb 10.199.144.84:27100,10.199.144.89:27100,10.199.144.90:27100 --port 27000 --logpath /data/mongodb/mongos/mongos.log --fork
分别配置启动各个分片副本集,这里副本集名分别叫shard1,shard2,shard3:
mongod --shardsvr --replSet shard1 --port 27001 --dbpath /data/mongodb/shard1/data --logpath /data/mongodb/shard1/log/shard1.log --directoryperdb --fork

mongod --shardsvr --replSet shard2 --port 27002 --dbpath /data/mongodb/shard2/data --logpath /data/mongodb/shard2/log/shard2.log --directoryperdb --fork

mongod --shardsvr --replSet shard3 --port 27003 --dbpath /data/mongodb/shard3/data --logpath /data/mongodb/shard3/log/shard3.log --directoryperdb --fork
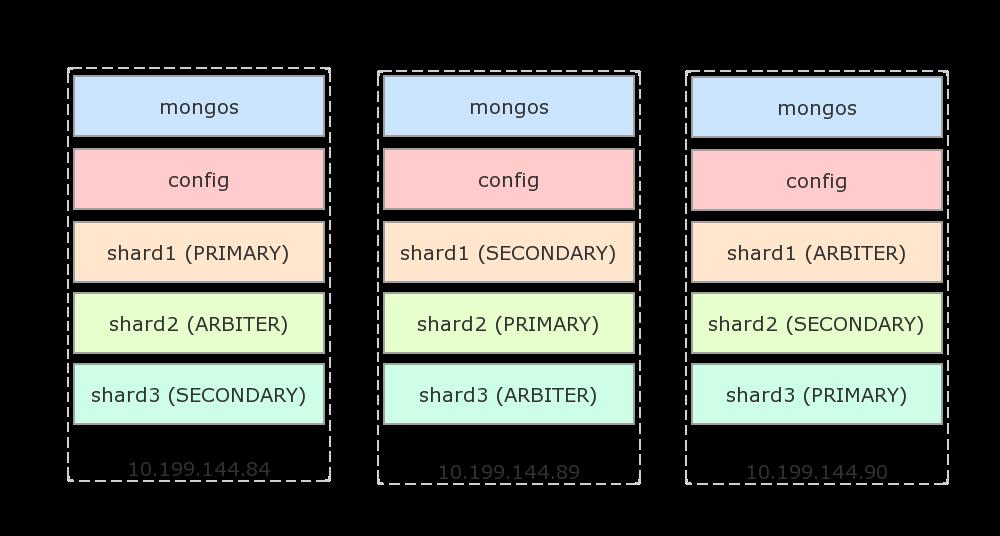
接下来配置副本集,假设使用如下的架构,每台物理机都有一个主节点,一个副本节点和一个仲裁节点:
配置shard1(登陆84,没有显式指定主节点时,会选择登陆的机器为主节点):
mongo --port 27001
use admin
rs.initiate({
    _id: ‘shard1‘,
    members: [
        {_id: 84, host: ‘10.199.144.84:27001‘},
        {_id: 89, host: ‘10.199.144.89:27001‘},
        {_id: 90, host: ‘10.199.144.90:27001‘, arbiterOnly: true}
    ]
});
配置shard2(登陆89):
mongo --port 27001
use admin
rs.initiate({
    _id: ‘shard2‘,
    members: [
        {_id: 84, host: ‘10.199.144.84:27002‘, arbiterOnly: true},
        {_id: 89, host: ‘10.199.144.89:27002‘},
        {_id: 90, host: ‘10.199.144.90:27002‘}
    ]
});
配置shard3(登陆90):
mongo --port 27001
use admin
rs.initiate({
    _id: ‘shard3‘,
    members: [
        {_id: 84, host: ‘10.199.144.84:27002‘},
        {_id: 89, host: ‘10.199.144.89:27002‘, arbiterOnly: true},
        {_id: 90, host: ‘10.199.144.90:27002‘}
    ]
});
下面设置路由到分片集群配置,随便登陆一台机器,假设是84:
mongo --port 27000
use admin
db.runCommand({addShard: ‘shard1/10.199.144.84:27001,10.199.144.89:27001,10.199.144.90:27001‘});
db.runCommand({addShard: ‘shard2/10.199.144.84:27002,10.199.144.89:27002,10.199.144.90:27002‘});
db.runCommand({addShard: ‘shard3/10.199.144.84:27003,10.199.144.89:27003,10.199.144.90:27003‘});
查看配置好的shard:
mongo --port 27000
use admin
db.runCommand({listshards: 1});
结果:
{
    "shards" : [
        {
            "_id" : "shard1",
            "host" : "shard1/10.199.144.84:27001,10.199.144.89:27001"
        },
        {
            "_id" : "shard2",
            "host" : "shard2/10.199.144.89:27002,10.199.144.90:27002"
        },
        {
            "_id" : "shard3",
            "host" : "shard3/10.199.144.90:27003,10.199.144.84:27003"
        }
    ],
    "ok" : 1
}
其中仲裁(ARBITER)节点没有列出来。
下面测试分片:
mongo --port 27000
use admin
db.runCommand({enablesharding: ‘dbtest‘});
db.runCommand({shardcollection: ‘dbtest.coll1‘, key: {id: 1}});
use dbtest;
for(var i=0; i<10000; i++) db.coll1.insert({id: i, s: ‘str_‘ + i});
如果dbtest已经存在,需要确保它已经以id建立了索引!
过上一段时间之后,运行db.coll1.stats()显式分片状态:
{
    "sharded" : true,
    "ns" : "dbtest.coll1",
    "count" : 10000,
    ...
    "shards" : {
        "shard1" : {
            "ns" : "dbtest.coll1",
            "count" : 0,
            "size" : 0,
            ...
        },
        "shard2" : {
            "ns" : "dbtest.coll1",
            "count" : 10000,
            "size" : 559200,
            ...
        }
    }
    ...
}
可以看到,这里分片已经生效,只是分配不均匀,所有的数据都存在了shard2中了。分片key的选择策略可以参考官方文档。在2.4版本中,使用hashed shard key算法保证文档均匀分布:
mongo --port 27000
use admin
sh.shardCollection(‘dbtest.coll1‘, {id: ‘hashed‘});
使用hashed算法之后,做同样的测试,插入的数据基本均匀分布:
{
    "sharded" : true,
    "ns" : "dbtest.coll1",
    "count" : 10000,
    ...
    "shards" : {
        "shard1" : {
            "ns" : "dbtest.coll1",
            "count" : 3285,
            "size" : 183672,
            ...
        },
        "shard2" : {
            "ns" : "dbtest.coll1",
            "count" : 3349,
            "size" : 187360,
            ...
        },
        "shard3" : {
            "ns" : "dbtest.coll1",
            "count" : 3366,
            "size" : 188168,
            ...
        }
    }
}
更多资料,请参考MongoDB Sharding。
在应用程序里,使用MongoClient创建db连接:
MongoClient.connect(‘mongodb://10.199.144.84:27000,10.199.144.89:27000,10.199.144.90:27000/dbtest?w=1‘, function(err, db) {
    ;
});
以上是关于MongoDB高可用模式部署的主要内容,如果未能解决你的问题,请参考以下文章