测试工程师进阶,从0-1学习Cucumber之基于behave框架自动化测试教程
Posted 虫兵
tags:
篇首语:本文由小常识网(cha138.com)小编为大家整理,主要介绍了测试工程师进阶,从0-1学习Cucumber之基于behave框架自动化测试教程相关的知识,希望对你有一定的参考价值。
目录
demo two:如何在feature的step中传入大批量文本参数
demo three:如何在feature的step中传入表格参数
❤ 大家好!我是虫兵 ❤~
一个资深测试开发工程师,
坚持为应届毕业生提供简历指导及职业规划建议!
坚持无偿为初中级测试工程师提供问题解答!
让分享成为一种美德!
❤ 此系列文章敢说全网最干最全的 behave 教程文章,跟下来必有所得!❤
做最干的测试公众号之一,关注就一定有收获,让我们一起持续学习!

以后的文章增加 Python 小知识环节,因为 Python 我觉得对测试同学实在是太友好了。
Python小知识- python 之父
吉多·范罗苏姆(荷兰语:Guido van Rossum,1956年1月31日-),生于荷兰哈勒姆,计算机程序员,为Python程序设计语言的最初设计者及主要架构师。在Python社区,吉多·范罗苏姆被人们认为是终身仁慈独裁者(BDFL),意思是他仍然关注Python的开发进程,并在必要的时刻做出决定。2018年7月12日,他宣布不再担任Python社区的BDFL。随后Python社群为了往后编程语言发展决策规划了掌控委员会(英语:Steering Council),吉多·范罗苏姆被选为2019年度五位委员会成员之一[3],他退出了2020年度掌控委员会选举提名,退休后再就职,目前就职于微软。

前情提要
测试工程师进阶,从0-1学习Cucumber之基于behave自动化测试教程(二)
上集内容我们主要讲了,Gherkin 自然语言是如何描述的以及它的一些描述规则,及关键字的定义和用法。那么今天我们就要正式进入真正的 behave 学习了, Let`s go !!!!!!!!!!!
环境搭建前
因为我们是从0-1的教程,考虑到一些初级测试工程师,我们稍微细一点,但也不会太细。有些东西我觉得是作为测试同学的必备技能包。首先你应该具备什么?
-
本地 Python 环境 (推荐3.7+)
-
有 Python 基础 (如果还没有代码基础的测试同学你要对自己要求高一点了,必须得掌握一门开发语言,否则这行业混下去太难了!)
-
ide: PyCharm
OK!以上没问题那就开始 behave 的环境搭建。
behave 环境搭建
-
直接执行 pip 安装命令:pip install behave , 如果你已经有behave 环境更新可以通过: pip install -U behave
-
也可以通过备选方法:easy_install behave || easy_install -U behave
安装完成后可以查看下 behave 版本,如图:behave -version

目前 behave 稳定版本是1.2.6 (2018年发布),最新版:1.2.7 也不知道啥时候发布..........
如果你非要尝试用一下1.2.7 也可以直接通过以下明略安装:
pip install git+https://github.com/behave/behave@<tag> 通过指定源仓库的tag 版本。
-
在 Pycharm 中安装 Gherkin 语言插件
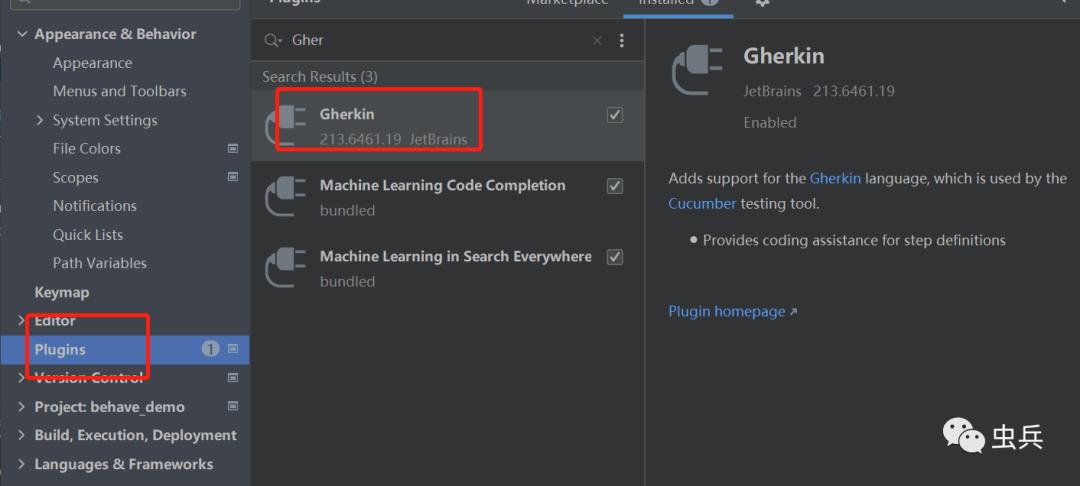
到此为止,准备工作完毕
开启 behave 之旅
在pycahrm ide 中创建一个demo,如图:
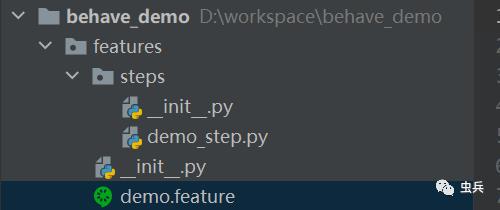
-
features 名字不是必须但是建议就叫这个吧,features 一般就放我们用自然语言描述的case
-
里面必须包含一个叫steps 的文件夹,否则会报错,step是目录一般就放我们的解析.py 脚本:
-
你的 demo.feature 有黄瓜绿点标识,代表上面的 Gherkin 安装成功,ide PyCharm 就可以正常识别此文件类型。
然后 在 demo_step.py 和 demo.feature 中,增加如下demo 内容
demo.feature:
Feature: 这是一个测试的 demo featureScenario: 运行一个例子Given 当我安装了behaveWhen 实现一个step方法Then 完成了此demo演示目的
demo_step.py:
from behave import step@step('当我安装了behave') # @Given('')def step_impl(context):pass@step('实现一个step方法') # @When('')def step_impl(context):pass@step('完成了此demo演示目的')# @Then ('')def step_impl(context):assert context.faild is False
这里@step 也可以替换成对应关键词,比如 @When @Griven , 包括 step_impl() 也可以自定义别的名字,但是behave 也支持都用@step 关键字代替,看个人习惯吧,我基本都是全用@step 和默认的 step_impl() 方法。
然后运行即可:
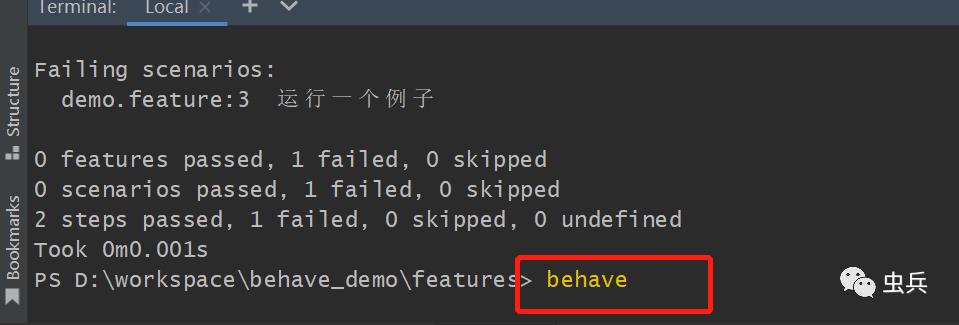
behave 没有提供main方法运行方式,需要执行behave 命令直接运行。这里注意,应该在当前工程目录下运行,否则会报错为找不到 features 文件。
你可能想加一些,print 语句发现打印不出来,这是因为,behave 会自动把print log 这些日志给捕获了,默认是没有输出。只有报错的时候才会有,这里下一章会说。
除以上最基本的demo下面我们直接以一些常用例子 介绍 behave 常用一些基本用法
behave 常见用法demo
demo one:如何在feature的step中传入参数
case 给脚本传递参数可以能在正常不过了。如下:
feature:
Feature: 这是一个测试的 demo featureScenario: 接口测试demo# 传入参数:https://www.baidu.com/When 测试接口,输入接口URL"https://www.baidu.com/"Then 返回码等于"200"
step.py
from behave import stepimport requests# api_url 自定义命名变量 加不加 “” 都可以。但必须是 变量 写法@step('测试接口,输入接口URL"api_url"')def step_impl(context, api_url):res = requests.get(api_url)context.res = res.status_code # 可以通过 context 传递变量@step('返回码等于"status_code"') # 变量传递def step_impl(context, status_code):assert int(status_code) == context.res
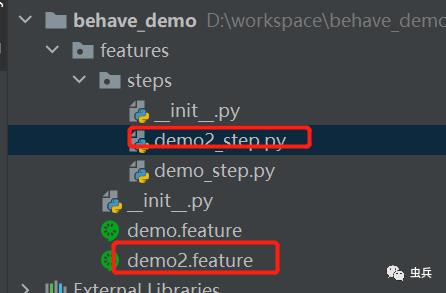
执行命令: behave features\\demo2.feature ,如果你直接执行 behave 默认behave 会遍历所有的 feature,
知识点:
-
这里我们可以看到:两个 step 之间传递变量可以通过 context ,behave 框架执行是从上到下按顺序执行;
-
feature 传递过来的参数 status_code 默认都是string 类型。我们按需要是否类型转换。
demo two:如何在feature的step中传入大批量文本参数
有时我们的参数可能需要传递很厂的文本,用 demo one 例子可能不是很方便,behave 支持如下:
feature:
Feature: 这是一个测试的 demo featureScenario: 长文本测试demo# 长文本参数使用 """ """ 定义。When 传递一个长文本参数"""hello, 大家好,我是虫兵,一个资深测试开发工程师!这里将分享测试开发技术,职场人生,认知感悟!做全网最干的公众号之一,拒绝 “just food” !让我们一起学习,自我提升,当海浪来临时,以至于我们可以不被掀翻(毕业)!坚持无偿为应届毕业生提供简历 review ,职场答疑!坚持无偿为初中级测试工程答疑解惑!做一点力所能及回报测试行业的事!赠人玫瑰,手留余香,让分享成为一种美德!"""Then 输出打印
step.py
from behave import stepimport requests@step('传递一个长文本参数')def step_impl(context):context.res = context.text # 长文本参数获取需要 .text 属性 ;context.text@step('输出打印')def step_impl(context):print("*****************************************")print(context.res)
输出结果:
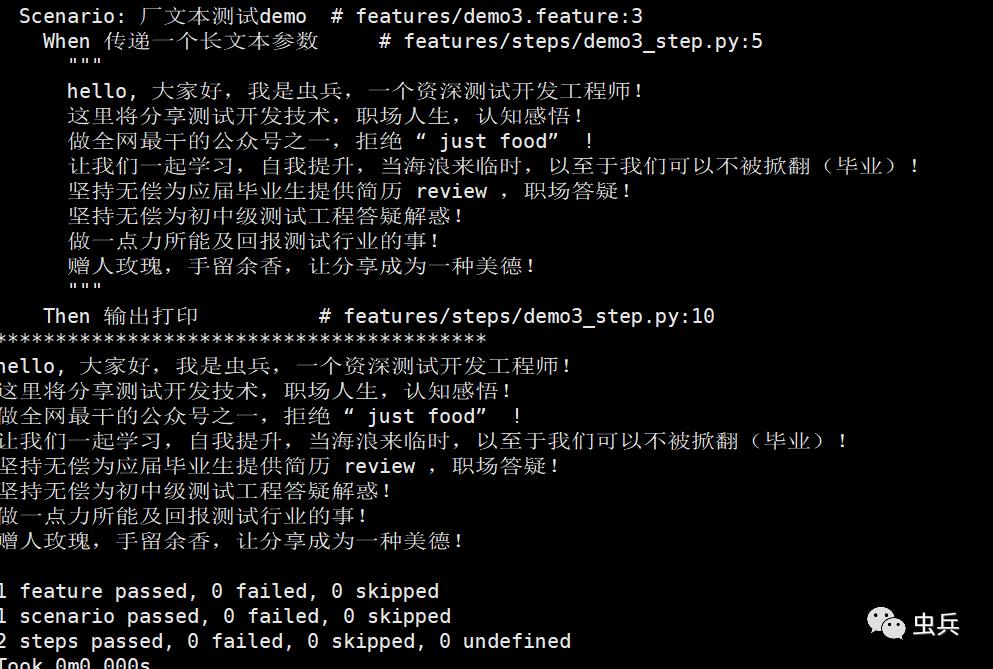
这里执行命令用的是:behave features\\demo3.feature --no-capture ,加 --no-capture 参数后意味着框架不捕获输出,我们的print 就可以生效了!
知识点: 这里长文本输出 需要调用,context.text 获取。feature 中用 “”“ ”“” ,标记
demo three:如何在feature的step中传入表格参数
表格参数,是 Gherkin 支持的一种复杂类型参数传递的方式,可以联想为 Excel 表格。
feature:
Feature: 这是一个测试的 demo featureScenario: 表格参数测试demoWhen 设置多个用户| name | age || zhangsan | 18 || lisi | 28 || wangsu | 38 |Then 找到名字为"zhangsan"的人#第二种表格写法Scenario Outline: 表格参数测试Scenario Outline 方式 demo,# 这种写法上一章讲过 相当于执行了2个Scenario 每个场景对应一行参数Then 请求接口get"https://api.github.com/repos/<owner>/<repo_name>" 返回仓库名称等于 <repo_name>Examples:| owner | repo_name | repo_name || xA11en | flog4p | flog4p| xA11en | solarized | solarized|
step.py
from behave import stepimport requestsclass HttpClient:"""http 接口工具类 """@staticmethoddef do_get(url=None, headers='content-type': 'application/json'):try:response = requests.get(url, headers=headers)response_context_json = response.json()except Exception as e:raise Exception("接口请求异常!")return response_context_json@staticmethoddef do_post(url=None, data=None, headers='content-type': 'application/json'):try:response = requests.post(url, json=data, headers=headers)response_context_json = response.json()except Exception as e:raise Exception("接口请求异常!")return response_context_json#@step('设置多个用户')def step_impl(context):# 通过 context.table 获取表格数据if context.table is not None:context.name_list = [row['name'] for row in context.table]@step('找到名字为"name"的人')def step_impl(context, name):assert name in context.name_list@step('请求接口get"api_url" 返回仓库名称等于 repo_name')def step_impl(context, api_url, repo_name):res = HttpClient.do_get(api_url, headers='Authorization': 'token ghp_m2IasdsdduB3ePzxnsHPqIGFR3B8')assert res['name'] == repo_name
Scenario outline 搭载 examples 这种写法上一章也说过,相当于执行了2个 Scenario 场景。
demo Four:有依赖关系的 step 如何处理
这个有点类似我一个接口依赖另一个接口的返回值该怎么办?,demo 如下
feature:
Feature: 这是一个测试的 demo feature

  Scenario:  被依赖接口执行方式
    When 被依赖接口
  Scenario: 依赖的Scenario
    When 优先执行依赖STEP"When 被依赖接口"
step.py
from behave import stepimport requestsfrom behave.model import Step, Featureclass HttpClient:"""http 接口工具类 """@staticmethoddef do_get(url=None, headers='content-type': 'application/json'):try:response = requests.get(url, headers=headers)response_context_json = response.json()except Exception as e:raise Exception("接口请求异常!")return response_context_json@staticmethoddef do_post(url=None, data=None, headers='content-type': 'application/json'):try:response = requests.post(url, json=data, headers=headers)response_context_json = response.json()except Exception as e:raise Exception("接口请求异常!")return response_context_json#@step('被依赖接口')def step_impl(context):res = HttpClient.do_get \\('https://api.github.com/repos/xA11en/flog4p',headers='Authorization': 'token ghp_m2IaHsUssssssssPqIGFR3AlYc1fmSB8')context.res = res@step('优先执行依赖STEP"before_step"')def step_impl(context, before_step):context.execute_steps(before_step)res2 = HttpClient.do_get \\(context.res['owner']['followers_url'],headers='Authorization': 'token ghp_m2IaHsUvNuB3esssssIGFR3AlYc1fmSB8')assert res2 is not None
执行:behave features\\demo_4.feature
demo Five:自定义参数解析器
behave 还提供了一些高级用法比如定义一个参数解析器如下:
feature:
Feature: 这是一个测试的 demo feature

  Scenario:  自定义参数解析器
    Given 我想提取数字123321
step.py
import behave
from behave import step
import requests
from behave.model import Step, Feature

from behave import register_type, given
import parse

 #定义一个函数传入正则表达式参数的
@parse.with_pattern(r"\\d+")
def parse_number(text):
    return int(text)


# 注册这个自定义的 函数解析器, par_number: 解析器名子自定义
register_type(par_number=parse_number)
 # step 中变量写法变为变量名: 解析器名子
@given('我想提取数字amount:par_number')
def step_impl(context, amount):
    assert isinstance(amount, int)
执行:behave features\\demo_6.feature
结果,amount=123321,就是通过正则表达式提取出来的数字 ,但目前我也没有啥场景用到这种自定义解析器。
总结知识点
-
以上就是behave 的最常用的用法demo , 其中自定义参数解析器属于一些高级用法,暂时也没场景用到,剩下用法就靠大家灵活掌握,仔细品味BDD 这种框架的好处。这种模式使框架 和 case 可以有个清晰的分层。
-
context 是一个上下文关键字,传递变量都依靠它了, 主要属性包括,context.text(获取长文本),context.table(获取表格数据),context.execute_steps(),执行一个step,
往期内容:
测试工程师进阶,从0-1学习Cucumber之基于behave自动化测试教程(二)
关于作者
-
一个 “千人斩“ 面试官
-
一个混迹过各大小厂的测试开发工程师
-
写最干的文章,做最干的公众号,前提是你真的想学习。
-
坚持无偿为应届毕业生提供简历指导及职业规划建议!
-
坚持无偿为初中级测试工程师提供问题解答!
-
赠人玫瑰、手留余香!
以上是关于测试工程师进阶,从0-1学习Cucumber之基于behave框架自动化测试教程的主要内容,如果未能解决你的问题,请参考以下文章
测试工程师进阶,从0-1学习Cucumber之基于behave框架自动化测试教程
测试工程师进阶,从0-1学习Cucumber之基于behave框架自动化测试教程
测试工程师进阶,从0-1学习Cucumber之基于behave自动化测试教程
测试工程师进阶,从0-1学习Cucumber之基于behave自动化测试教程