Netty入门——ByteBuf
Posted 小志的博客
tags:
篇首语:本文由小常识网(cha138.com)小编为大家整理,主要介绍了Netty入门——ByteBuf相关的知识,希望对你有一定的参考价值。
目录
一、ByteBuf的概述
- ByteBuf是对字节数据的封装。
二、ByteBuf的创建
2.1、创建一个带有初始容量的ByteBuf代码示例
-
代码示例
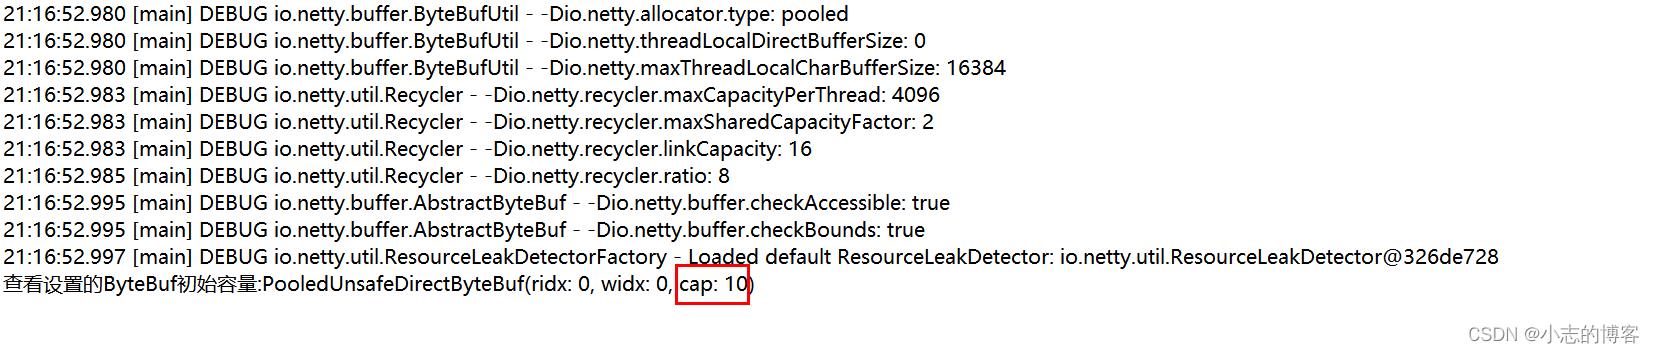
import io.netty.buffer.ByteBuf; import io.netty.buffer.ByteBufAllocator; import static io.netty.buffer.ByteBufUtil.appendPrettyHexDump; import static io.netty.util.internal.StringUtil.NEWLINE; /** * @description: ByteBuf(创建) * @author: xz */ public class ByteBufTest public static void main(String[] args) //createByteBuf1(); /** * 创建了一个初始容量是 10 的ByteBuf * */ public static void createByteBuf1() //创建了一个默认的 ByteBuf(池化基于直接内存的 ByteBuf),初始容量是 10 ByteBuf buf = ByteBufAllocator.DEFAULT.buffer(10); System.out.println("查看设置的ByteBuf初始容量:"+buf); /** * 输出ByteBuf的工具类 * */ public static void log(ByteBuf buffer) int length = buffer.readableBytes(); int rows = length / 16 + (length % 15 == 0 ? 0 : 1) + 4; StringBuilder buf = new StringBuilder(rows * 80 * 2) .append("read index:").append(buffer.readerIndex()) .append(" write index:").append(buffer.writerIndex()) .append(" capacity:").append(buffer.capacity()) .append(NEWLINE); appendPrettyHexDump(buf, buffer); System.out.println(buf.toString()); -
输出结果
2.2、查看ByteBuf最大容量的代码示例
-
代码示例
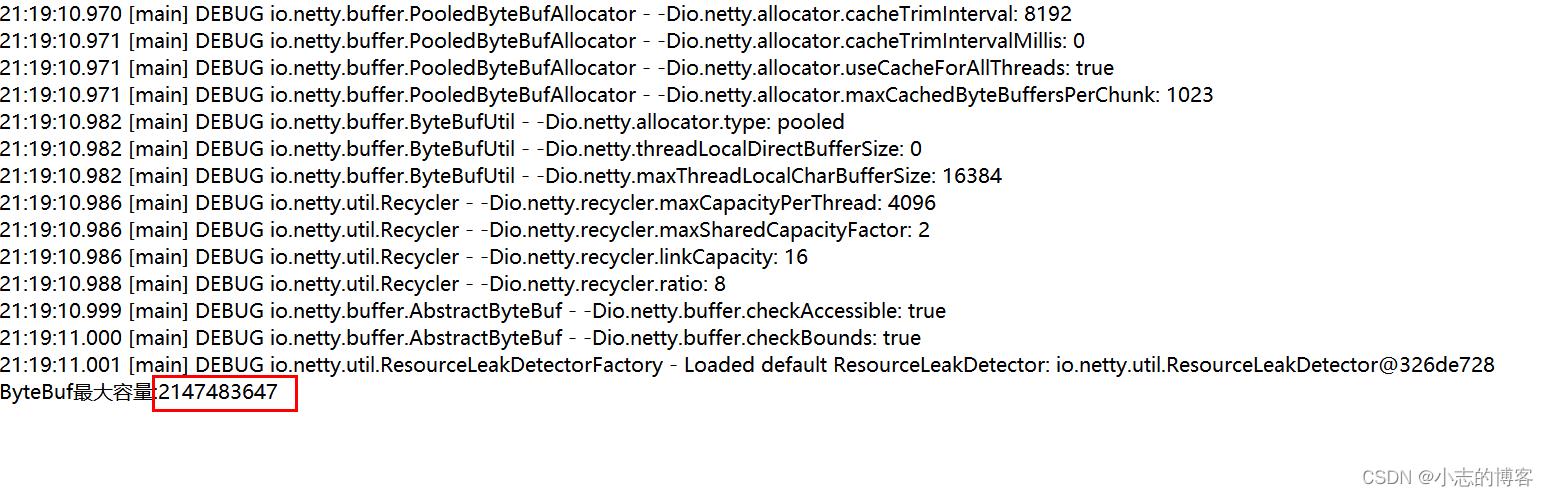
import io.netty.buffer.ByteBuf; import io.netty.buffer.ByteBufAllocator; import static io.netty.buffer.ByteBufUtil.appendPrettyHexDump; import static io.netty.util.internal.StringUtil.NEWLINE; /** * @description: ByteBuf(创建) * @author: xz */ public class ByteBufTest public static void main(String[] args) createByteBuf2(); /** * 查看ByteBuf最大容量 * */ public static void createByteBuf2() //创建了一个默认的 ByteBuf(池化基于直接内存的 ByteBuf) ByteBuf buf = ByteBufAllocator.DEFAULT.buffer(); //查看ByteBuf最大容量 System.out.println("ByteBuf最大容量:"+buf.maxCapacity()); /** * 输出ByteBuf的工具类 * */ public static void log(ByteBuf buffer) int length = buffer.readableBytes(); int rows = length / 16 + (length % 15 == 0 ? 0 : 1) + 4; StringBuilder buf = new StringBuilder(rows * 80 * 2) .append("read index:").append(buffer.readerIndex()) .append(" write index:").append(buffer.writerIndex()) .append(" capacity:").append(buffer.capacity()) .append(NEWLINE); appendPrettyHexDump(buf, buffer); System.out.println(buf.toString()); -
输出结果
2.3、查看ByteBuf最大容量及扩容后最大容量的代码示例
-
代码示例
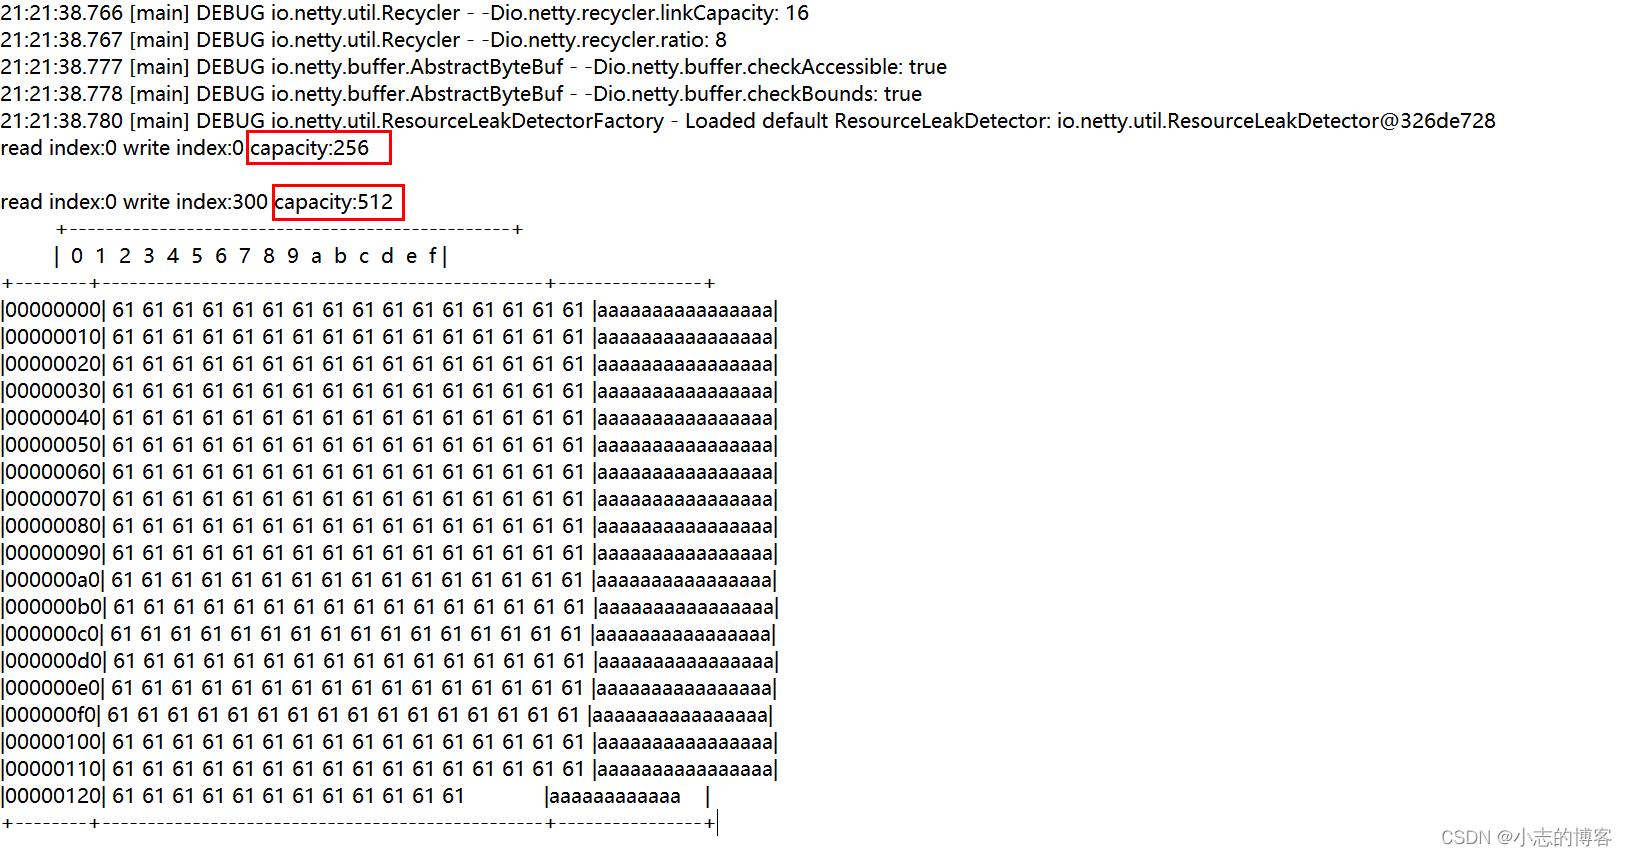
import io.netty.buffer.ByteBuf; import io.netty.buffer.ByteBufAllocator; import static io.netty.buffer.ByteBufUtil.appendPrettyHexDump; import static io.netty.util.internal.StringUtil.NEWLINE; /** * @description: ByteBuf(创建) * @author: xz */ public class ByteBufTest public static void main(String[] args) createByteBuf3(); /** * 查看ByteBuf最大容量及扩容后的最大容量 * */ public static void createByteBuf3() //1、创建了一个默认的 ByteBuf(池化基于直接内存的 ByteBuf),最大容量256 ByteBuf buf = ByteBufAllocator.DEFAULT.buffer(); //调用输出ByteBuf的工具类 log(buf); //2、创建长度为300的字符串写入ByteBuf,查看扩容后的最大容量 StringBuilder sb = new StringBuilder(); for (int i = 0; i < 300; i++) sb.append("a"); buf.writeBytes(sb.toString().getBytes()); //调用输出ByteBuf的工具类 log(buf); /** * 输出ByteBuf的工具类 * */ public static void log(ByteBuf buffer) int length = buffer.readableBytes(); int rows = length / 16 + (length % 15 == 0 ? 0 : 1) + 4; StringBuilder buf = new StringBuilder(rows * 80 * 2) .append("read index:").append(buffer.readerIndex()) .append(" write index:").append(buffer.writerIndex()) .append(" capacity:").append(buffer.capacity()) .append(NEWLINE); appendPrettyHexDump(buf, buffer); System.out.println(buf.toString()); -
输出结果
三、ByteBuf (直接内存 vs 堆内存)
3.1、创建池化基于堆的ByteBuf 代码示例
-
代码示例
import io.netty.buffer.ByteBuf; import io.netty.buffer.ByteBufAllocator; import static io.netty.buffer.ByteBufUtil.appendPrettyHexDump; import static io.netty.util.internal.StringUtil.NEWLINE; /** * @description: ByteBuf (直接内存 vs 堆内存) * @author: xz */ public class ByteBufTest2 public static void main(String[] args) //创建了一个默认的 ByteBuf(创建池化基于堆的 ByteBuf),初始容量是 10 ByteBuf buf1 = ByteBufAllocator.DEFAULT.heapBuffer(10); //通过输出类信息PooledUnsafeHeapByteBuf可知,采用的是池化基于堆内存 System.out.println(buf1.getClass());//输出class io.netty.buffer.PooledUnsafeHeapByteBuf //输出容量 log(buf1); /** * 输出ByteBuf的工具类 * */ public static void log(ByteBuf buffer) int length = buffer.readableBytes(); int rows = length / 16 + (length % 15 == 0 ? 0 : 1) + 4; StringBuilder buf = new StringBuilder(rows * 80 * 2) .append("read index:").append(buffer.readerIndex()) .append(" write index:").append(buffer.writerIndex()) .append(" capacity:").append(buffer.capacity()) .append(NEWLINE); appendPrettyHexDump(buf, buffer); System.out.println(buf.toString()); -
输出结果

3.2、创建池化基于直接内存的ByteBuf 代码示例
-
代码示例
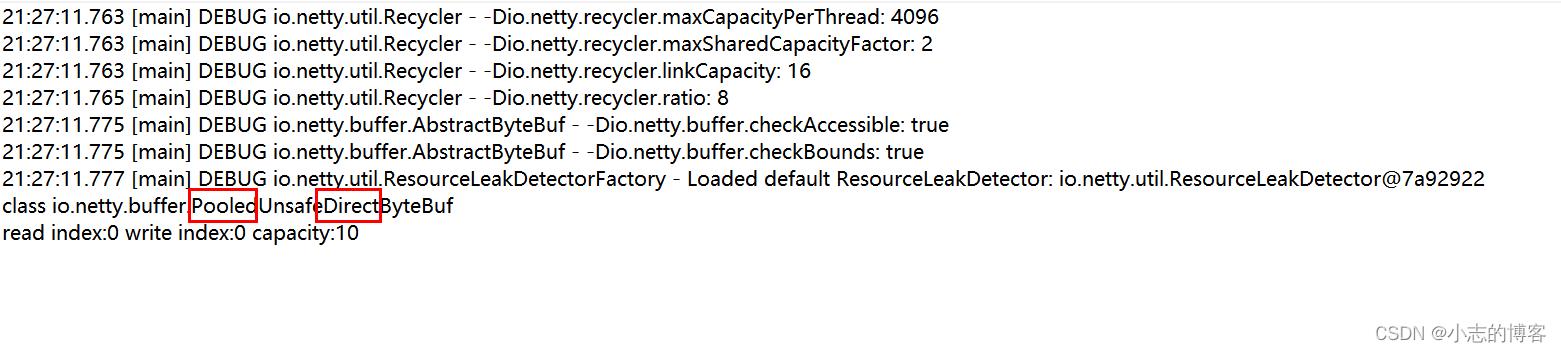
import io.netty.buffer.ByteBuf; import io.netty.buffer.ByteBufAllocator; import static io.netty.buffer.ByteBufUtil.appendPrettyHexDump; import static io.netty.util.internal.StringUtil.NEWLINE; /** * @description: ByteBuf (直接内存 vs 堆内存) * @author: xz */ public class ByteBufTest2 public static void main(String[] args) //创建了一个默认的 ByteBuf(创建池化基于直接内存的 ByteBuf),初始容量是 10 ByteBuf buf2 = ByteBufAllocator.DEFAULT.directBuffer(10); //通过输出类信息PooledUnsafeDirectByteBuf可知,采用的是池化基于直接内存 System.out.println(buf2.getClass());//输出class io.netty.buffer.PooledUnsafeDirectByteBuf //输出容量 log(buf2); /** * 输出ByteBuf的工具类 * */ public static void log(ByteBuf buffer) int length = buffer.readableBytes(); int rows = length / 16 + (length % 15 == 0 ? 0 : 1) + 4; StringBuilder buf = new StringBuilder(rows * 80 * 2) .append("read index:").append(buffer.readerIndex()) .append(" write index:").append(buffer.writerIndex()) .append(" capacity:").append(buffer.capacity()) .append(NEWLINE); appendPrettyHexDump(buf, buffer); System.out.println(buf.toString()); -
输出结果
四、ByteBuf (池化 vs 非池化)
4.1、默认采用的是池化基于直接内存的 代码示例
-
代码示例
import io.netty.buffer.ByteBuf; import io.netty.buffer.ByteBufAllocator; /** * @description: ByteBuf (池化 vs 非池化) * @author: xz */ public class ByteBufTest3 public static void main(String[] args) getPooledByteBuf(); /** * 默认采用的是池化基于直接内存 * */ public static void getPooledByteBuf() //创建了一个默认的 ByteBuf(创建池化基于直接内存的 ByteBuf) ByteBuf buf1 = ByteBufAllocator.DEFAULT.buffer(); //通过输出类信息PooledUnsafeDirectByteBuf可知,采用的是池化基于直接内存 System.out.println(buf1.getClass());//输出class io.netty.buffer.PooledUnsafeDirectByteBuf -
输出结果

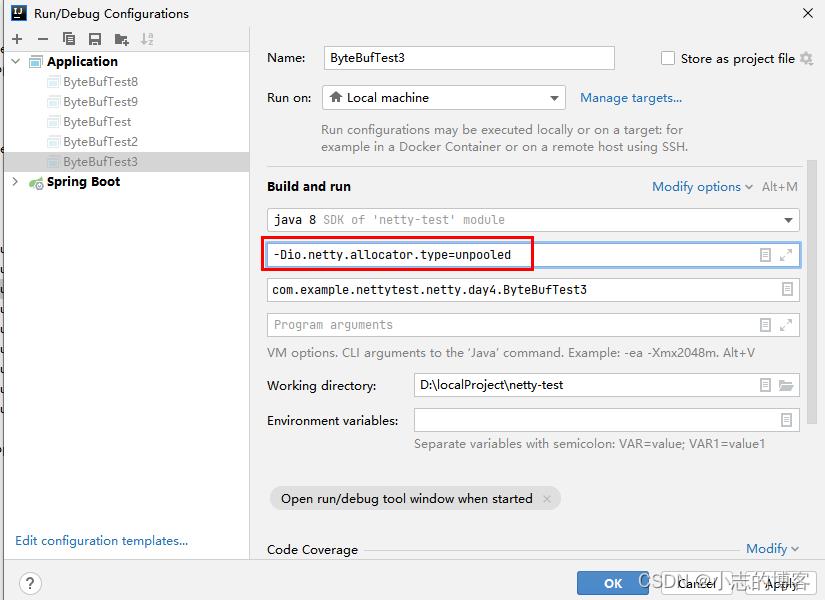
4.1、设置vm参数采用非池化基于直接内存的 代码示例
-
代码示例
import io.netty.buffer.ByteBuf; import io.netty.buffer.ByteBufAllocator; /** * @description: ByteBuf (池化 vs 非池化) * @author: xz */ public class ByteBufTest3 public static void main(String[] args) getUnPooledByteBuf(); /** * 通过设置vm参数 -Dio.netty.allocator.type=unpooled之后, * 采用的是非池化基于直接内存 * */ public static void getUnPooledByteBuf() //创建了一个默认的 ByteBuf(创建非池化基于直接内存的 ByteBuf) ByteBuf buf1 = ByteBufAllocator.DEFAULT.buffer(); //通过输出类信息UnpooledByteBufAllocator可知,采用的是非池化基于直接内存 System.out.println(buf1.getClass());//输出class io.netty.buffer.UnpooledByteBufAllocator$InstrumentedUnpooledUnsafeNoCleanerDirectByteBuf -
通过设置vm参数 -Dio.netty.allocator.type=unpooled之后,采用非池化基于直接内存。
-
输出结果

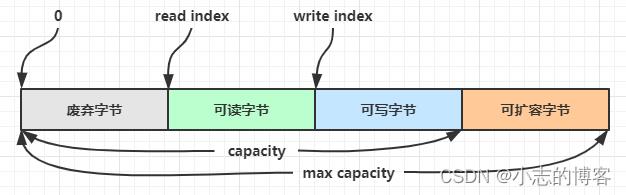
五、ByteBuf 组成
- ByteBuf 由四部分组成,最开始读写指针都在 0 位置。
六、ByteBuf 写入
6.1、ByteBuf 写入方法
-
ByteBuf 写入方法列表,省略一些不重要的方法
方法签名 含义 备注 writeBoolean(boolean value) 写入 boolean 值 用一字节 01|00 代表 true|false writeByte(int value) 写入 byte 值 writeShort(int value) 写入 short 值 writeInt(int value) 写入 int 值 Big Endian,即 0x250,写入后 00 00 02 50,先写高位在写低位 writeIntLE(int value) 写入 int 值 Little Endian,即 0x250,写入后 50 02 00 00,先写低位在写高位 writeLong(long value) 写入 long 值 writeChar(int value) 写入 char 值 writeFloat(float value) 写入 float 值 writeDouble(double value) 写入 double 值 writeBytes(ByteBuf src) 写入 netty 的 ByteBuf writeBytes(byte[] src) 写入 byte[] writeBytes(ByteBuffer src) 写入 nio 的 ByteBuffer int writeCharSequence(CharSequence sequence, Charset charset) 写入字符串
6.2、ByteBuf 写入的 代码示例
-
代码示例
import io.netty.buffer.ByteBuf; import io.netty.buffer.ByteBufAllocator; import static io.netty.buffer.ByteBufUtil.appendPrettyHexDump; import static io.netty.util.internal.StringUtil.NEWLINE; /** * @description: ByteBuf (写入) * @author: xz */ public class ByteBufTest4 public static void main(String[] args) getWriteBytes(); public static void getWriteBytes() //创建了一个默认的 ByteBuf(池化基于直接内存的 ByteBuf),初始容量是 10 ByteBuf buf1 = ByteBufAllocator.DEFAULT.buffer(10); //1、先写入 4 个字节 buf1.writeBytes(new byte[]1, 2, 3, 4); log(buf1); //2、再写入一个 int 整数,也是 4 个字节 buf1.writeInt(5); log(buf1); /** * 输出ByteBuf的工具类 * */ public static void log(ByteBuf buffer) int length = buffer.readableBytes(); int rows 以上是关于Netty入门——ByteBuf的主要内容,如果未能解决你的问题,请参考以下文章