netty4.x ByteBuf 基本机制及其骨架实现
Posted cafebean
tags:
篇首语:本文由小常识网(cha138.com)小编为大家整理,主要介绍了netty4.x ByteBuf 基本机制及其骨架实现相关的知识,希望对你有一定的参考价值。
# 概述
# ByteBuffer 的忏悔
对于 BIO 来说,大多数时候,这个容器就是一个字节数组
byte[] buf = new byte[8196];int cnt = 0;while ((cnt = input.read(buf)) != -1) {//......}
在这里,容器就是指 buf 这个字节数组。而在 NIO 中,容器是指 ByteBuffer,由于 NIO 编程的复杂性,需要解决类似于 TCP 半包问题等,因此对这个容器的要求不仅仅是“存储数据”那么简单,还希望这个容器能提供另外的功能,这是 ByteBuffer 存在的原因,它提供了一些方便的 API,让开发者操作底层的字节数组。
然而 ByteBuffer 存在几个不得人心的缺点:
API 功能有限
长度固定
读写时的手工操作
从 ByteBuffer 的源码里可以看到,它用 4 个下标来辅助管理自己身上的数据,参见它的父类 java.nio.Buffer
capacity 是 ByteBuffer 的总容量,一旦设定不能改变,就像一个水缸一样,水缸的大小永远是你看到它的时候那么大,它不会变大也不会变小,最多能装多少水是确定的;

因此,在读的时候,读取 position 到 limit 之间的数据,就能读到上一次写入的数据。但不得不说,这种方法显得有点笨拙,不太人性化,这意味着在编写代码的时候,要时刻谨记写完数据后,读数据之前,要先调用 flip 方法,这种“不著名”的潜规则,容易让开发者趟坑。
# ByteBuf 让人耳目一新
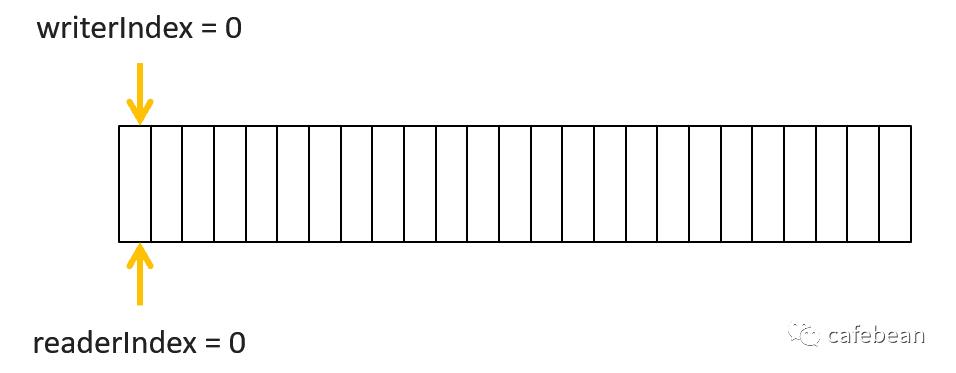
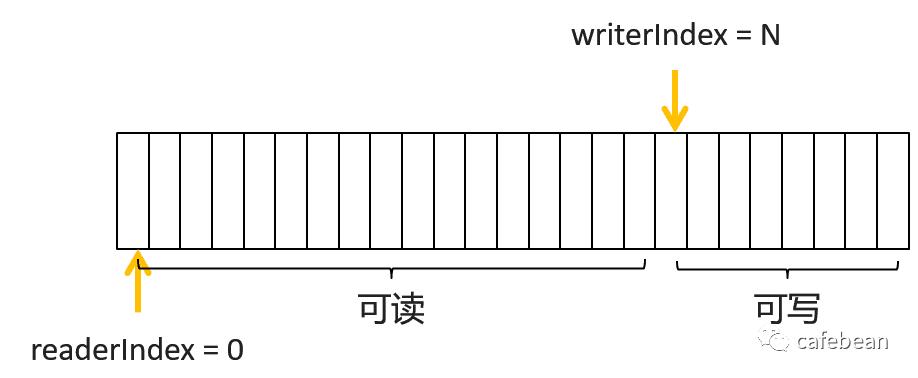
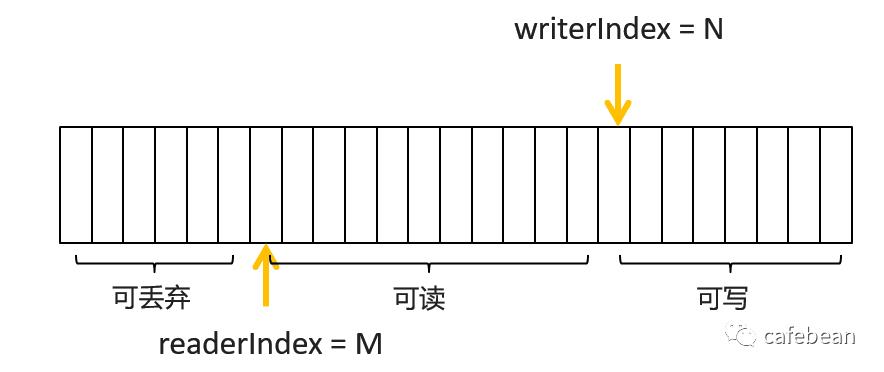
netty 中的 ByteBuf 采用了新的做法,只用两个下标来辅助管理数据,分别是 readerIndex 和 writerIndex


我们不再需要那笨拙的 flip 方法了,只需要关注 readerIndex 与 writerIndex。
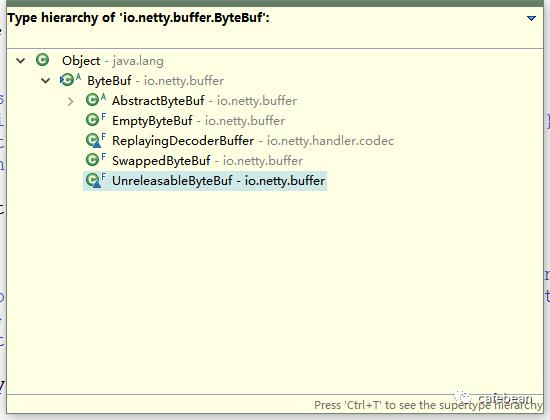
# ByteBuf 谱系
在 netty4.x 中,ByteBuf 是一个抽象类,但它也是在十分抽象,因为它定义的所有方法都是抽象方法,如果换我来想,我会想怎么不定义为一个 Interface 呢,ByteBuf 类也加了一个注解
@SuppressWarnings("ClassMayBeInterface")
# 特殊作用的类
## 字节序
-
小端就是低位字节排放在内存的低地址端,高位字节排放在内存的高地址端 -
大端就是高位字节排放在内存的低地址端,低位字节排放在内存的高地址端
以数字 0x12 34 56 78为例,在大端模式下,其存储的形式为:
低地址 -----------------> 高地址0x12 | 0x34 | 0x56 | 0x78
低地址 ------------------> 高地址0x78 | 0x56 | 0x34 | 0x12
一般情况下,基于 TCP 的网络通信约定采用大端字节序,而机器 CPU 的字节序则各有各的不同。
## SwappedByteBuf 与字节序
public abstract ByteBuf order(ByteOrder endianness);@Overridepublic ByteBuf order(ByteOrder endianness) {if (endianness == null) {throw new NullPointerException("endianness");}if (endianness == order()) {return this;}SwappedByteBuf swappedBuf = this.swappedBuf;if (swappedBuf == null) {this.swappedBuf = swappedBuf = new SwappedByteBuf(this);}return swappedBuf;}
public final class SwappedByteBuf extends ByteBuf {private final ByteBuf buf;private final ByteOrder order;public SwappedByteBuf(ByteBuf buf) {if (buf == null) {throw new NullPointerException("buf");}this.buf = buf;if (buf.order() == ByteOrder.BIG_ENDIAN) {order = ByteOrder.LITTLE_ENDIAN;} else {order = ByteOrder.BIG_ENDIAN;}}......}
@Overridepublic int capacity() {return buf.capacity();}
@Overridepublic ByteBuf writeInt(int value) {buf.writeInt(ByteBufUtil.swapInt(value));return this;}
/*** Toggles the endianness of the specified 32-bit integer.*/public static int swapInt(int value) {return Integer.reverseBytes(value);}
同样,除了写数据相关的方法,读数据相关的方法也是这么处理的。
## 引用计数
netty 中 ByteBuf 用来作为数据的容器,是一种频繁被创建和销毁的对象,ByteBuf 需要的内存空间,可以在 JVM Heap 中申请分配,也可以在 Direct Memory 中申请,其中在 Direct Memory 中分配的 ByteBuf,其创建和销毁的代价比在 JVM Heap 中的更高,但抛开哪个代价高哪个代价低不说,光是频繁创建和频繁销毁这一点,就已奠定了效率不高的基调。
netty 中支持 ByteBuf 的池化,而引用计数就是实现池化的关键技术点,不过并非只有池化的 ByteBuf 才有引用计数,非池化的也会有引用计数。
ByteBuf 类实现了 ReferenceCounted 接口,该接口标记一个类是一个引用计数管理对象。
public abstract class ByteBuf implements ReferenceCounted, Comparable<ByteBuf>public interface ReferenceCounted {int refCnt();ReferenceCounted retain();ReferenceCounted retain(int increment);boolean release();boolean release(int decrement);}
每一个引用计数对象,都维护了自身的引用计数,当第一次被创建时,引用计数为1,通过 refCnt() 方法可以得到当前的引用计数,retain() retain(int increment) 增加自身的引用计数,而 release() 和 release(int increment) 则减少当前的引用计数,如果引用计数达到 0,并且当前的 ByteBuf 被释放成功,那这两个方法的返回值为 true。需要注意的是,各种不同类型的 ByteBuf 自己决定机子的释放方式,如果是池化的 ByteBuf,那么就会进池子,如果不是池化的,则销毁底层的字节数组引用或者释放对应的堆外内存。
通过 AbstractReferenceCountedByteBuf 这个类的 release 方法实现,可以看出大概的执行逻辑:
@Overridepublic final boolean release() {for (;;) {int refCnt = this.refCnt;if (refCnt == 0) {throw new IllegalReferenceCountException(0, -1);}if (refCntUpdater.compareAndSet(this, refCnt, refCnt - 1)) {if (refCnt == 1) {deallocate();return true;}return false;}}}
@Overrideprotected void deallocate() {array = null;}
@Overrideprotected void deallocate() {ByteBuffer buffer = this.buffer;if (buffer == null) {return;}this.buffer = null;if (!doNotFree) {PlatformDependent.freeDirectBuffer(buffer);}if (leak != null) {leak.close();}}
@Overrideprotected final void deallocate() {if (handle >= 0) {final long handle = this.handle;this.handle = -1;memory = null;chunk.arena.free(chunk, handle);if (leak != null) {leak.close();} else {recycle();}}}
## UnreleasableByteBuf 与引用计数
顾名思义,这个类就是不可释放的 ByteBuf,它也是一个包装器模式的引用,被它包装的 ByteBuf 不会受引用计数的影响,不会被释放,它对 ReferenceCounted 接口的实现如下所示:
@Overridepublic ByteBuf retain(int increment) {return this;}@Overridepublic ByteBuf retain() {return this;}@Overridepublic boolean isReadable(int size) {return buf.isReadable(size);}@Overridepublic boolean isWritable(int size) {return buf.isWritable(size);}@Overridepublic int refCnt() {return buf.refCnt();}
可见它直接忽略了对 retain 和 release 方法的调用效果,这种“不可释放的 ByteBuf”在什么情况下会用到呢,在一些静态的具有固定内容并且内容不改变的 ByteBuf 时候会用到,因为非常常用,所以不需要释放,会更有效率。例如在处理 HTTP 协议时候,经常需要返回带有回车换行的数据,这里回车换行就可以定义为一个静态的 ByteBuf,并且不允许释放。这有点类似于设计模式中单例模式的那个“单例”。
## EmptyByteBuf
## ReplayingDecoderBuffer
# ByteBuf 骨架实现
## setter 与 getter
为了实践面向对象封装的特性,见过太多类在定义其变量的 setter 和 getter 方法时,清一色地使用 setXXX(int xxx)和 getXXX()。不过 netty 的编码风格中,它的 setter 和 getter 方法是这样的:
public ByteBuf readerIndex(int readerIndex); // setterpublic int readerIndex(); //getter
方法名同名,但参数列表和返回值不一样。并且对于 setter 类方法来说,它支持更加 modern 的做法,那就是方法的链式调用,setter 后返回自身,立马可以进行下一次方法调用。
但在 AbstractByteBuf 中还是有以 set 开头的的方法的,比如说:
@Overridepublic ByteBuf setIndex(int readerIndex, int writerIndex) {if (readerIndex < 0 || readerIndex > writerIndex || writerIndex > capacity()) {throw new IndexOutOfBoundsException(String.format("readerIndex: %d, writerIndex: %d (expected: 0 <= readerIndex <= writerIndex <= capacity(%d))",readerIndex, writerIndex, capacity()));}this.readerIndex = readerIndex;this.writerIndex = writerIndex;return this;}
public ByteBuf setByte(int index, int value);## 读取数据
@Overridepublic int getInt(int index) {checkIndex(index, 4);return _getInt(index);}protected final void checkIndex(int index, int fieldLength) {ensureAccessible();if (fieldLength < 0) {throw new IllegalArgumentException("length: " + fieldLength + " (expected: >= 0)");}if (index < 0 || index > capacity() - fieldLength) {throw new IndexOutOfBoundsException(String.format("index: %d, length: %d (expected: range(0, %d))", index, fieldLength, capacity()));}}@Overridepublic int readInt() {checkReadableBytes(4);int v = _getInt(readerIndex);readerIndex += 4;return v;}protected final void checkReadableBytes(int minimumReadableBytes) {ensureAccessible();if (minimumReadableBytes < 0) {throw new IllegalArgumentException("minimumReadableBytes: " + minimumReadableBytes + " (expected: >= 0)");}if (readerIndex > writerIndex - minimumReadableBytes) {throw new IndexOutOfBoundsException(String.format("readerIndex(%d) + length(%d) exceeds writerIndex(%d): %s",readerIndex, minimumReadableBytes, writerIndex, this));}}
protected final void ensureAccessible() {if (refCnt() == 0) {throw new IllegalReferenceCountException(0);}}
同样,并非只有读取数据才会判断引用计数,写入数据的时候也会判断引用计数。
真正读取数据的方法,定义成了抽象方法,供不同的实现者去实现,例如 _getInt() 方法,Heap ByteBuf 的实现是直接读取底层的数组:
@Overrideprotected int _getInt(int index) {return (array[index] & 0xff) << 24 |(array[index + 1] & 0xff) << 16 |(array[index + 2] & 0xff) << 8 |array[index + 3] & 0xff;}
@Overrideprotected int _getInt(int index) {return buffer.getInt(index);}
## 写入数据
与读取数据一样,写入数据也分为改变 writerIndex 和不改变 writerIndex 的方法,分别是 write 开头和 set 开头。其中 set 开头的方法和读取数据时的 get 开头的方法一样,都只是检查一下有没有超过 capacity,并不会去检查 writerIndex 或者是 readerIndex,相当于说这些方法可以在任意一个地方写入数据,只要不超过 capacity,如下所示:
@Overridepublic ByteBuf setInt(int index, int value) {checkIndex(index, 4);_setInt(index, value);return this;}
@Overridepublic ByteBuf writeInt(int value) {ensureWritable(4);_setInt(writerIndex, value);writerIndex += 4;return this;}
注意在这里,写入操作还伴随着对是否有足够的空间写入的确定,继而伴随着 ByteBuf 的动态扩容。
## ByteBuf 动态扩容机制
如果当前没有足够的空间写入数据了,ByteBuffer 会直接报错,而 ByteBuf 则会进行动态扩容,其扩容的主要逻辑在以下的方法里:
@Overridepublic ByteBuf ensureWritable(int minWritableBytes) {if (minWritableBytes < 0) {throw new IllegalArgumentException(String.format("minWritableBytes: %d (expected: >= 0)", minWritableBytes));}if (minWritableBytes <= writableBytes()) {return this;}if (minWritableBytes > maxCapacity - writerIndex) {throw new IndexOutOfBoundsException(String.format("writerIndex(%d) + minWritableBytes(%d) exceeds maxCapacity(%d): %s",writerIndex, minWritableBytes, maxCapacity, this));}// Normalize the current capacity to the power of 2.int newCapacity = calculateNewCapacity(writerIndex + minWritableBytes);// Adjust to the new capacity.capacity(newCapacity);return this;}
-
计算新的容量 -
扩展至新容量
计算新容量的方法如下所示:
private int calculateNewCapacity(int minNewCapacity) {final int maxCapacity = this.maxCapacity;final int threshold = 1048576 * 4; // 4 MiB pageif (minNewCapacity == threshold) {return threshold;}// If over threshold, do not double but just increase by threshold.if (minNewCapacity > threshold) {int newCapacity = minNewCapacity / threshold * threshold;if (newCapacity > maxCapacity - threshold) {newCapacity = maxCapacity;} else {newCapacity += threshold;}return newCapacity;}// Not over threshold. Double up to 4 MiB, starting from 64.int newCapacity = 64;while (newCapacity < minNewCapacity) {newCapacity <<= 1;}return Math.min(newCapacity, maxCapacity);}
计算新容量的逻辑很简单,如果期望的新容量不超过 4MB,则从 64 字节开始,一直翻倍,直到超过期望的新容量,此时新的容量不大于 4MB,并且是 64 的倍数。如果期望的新容量已经超过了 4MB,那么就再增加 4 MB 的倍数,至于是1倍还是2倍还是N倍,由期望的容量决定。
计算完新的容量,接下来就需要把 ByteBuf 的容量扩展至新的容量,扩展容量对于不同类型的 ByteBuf 来说,其实现方式也不一样,例如对于 Heap ByteBuf 来说,扩容就意味着数组拷贝,如下所示:
@Overridepublic ByteBuf capacity(int newCapacity) {ensureAccessible();if (newCapacity < 0 || newCapacity > maxCapacity()) {throw new IllegalArgumentException("newCapacity: " + newCapacity);}int oldCapacity = array.length;if (newCapacity > oldCapacity) {byte[] newArray = new byte[newCapacity];System.arraycopy(array, readerIndex(), newArray, readerIndex(), readableBytes());setArray(newArray);} else if (newCapacity < oldCapacity) {byte[] newArray = new byte[newCapacity];int readerIndex = readerIndex();if (readerIndex < newCapacity) {int writerIndex = writerIndex();if (writerIndex > newCapacity) {writerIndex(writerIndex = newCapacity);}System.arraycopy(array, readerIndex, newArray, readerIndex, writerIndex - readerIndex);} else {setIndex(newCapacity, newCapacity);}setArray(newArray);}return this;}
这是 ByteBuf 比 ByteBuffer 更好的一个地方,既有 maxCapacity 防止无限扩容,又能在允许的范围内动态扩展容量,开发者无须关心。至于扩展的梯段为什么是 4MB,还没办法知道这个值是怎么来的,应该是经过大量的测试或者以经验来判断的。
## 丢弃一部分数据
前面提到一张图,当写入数据后读取一部分数据,被读取后的那一部分,实际上就变成了可以丢弃的数据了,否则就会有一种“占着茅坑不拉shi”的感觉了,白白占用了大量的空间
@Overridepublic ByteBuf discardReadBytes() {ensureAccessible();if (readerIndex == 0) {return this;}if (readerIndex != writerIndex) {setBytes(0, this, readerIndex, writerIndex - readerIndex);writerIndex -= readerIndex;adjustMarkers(readerIndex);readerIndex = 0;} else {adjustMarkers(readerIndex);writerIndex = readerIndex = 0;}return this;}
通常,数组拷贝是一个关于性能的敏感词,过多的数组拷贝,意味着效率低,因此除非能确认可以丢弃的数据占整个 ByteBuf 的大部分,否则不要轻易去显式丢弃那些已经读取的数据。
以上是关于netty4.x ByteBuf 基本机制及其骨架实现的主要内容,如果未能解决你的问题,请参考以下文章