ImageView的源码解读,以及几种ScaleType的分析
Posted carbs_wang
tags:
篇首语:本文由小常识网(cha138.com)小编为大家整理,主要介绍了ImageView的源码解读,以及几种ScaleType的分析相关的知识,希望对你有一定的参考价值。
前言
ImageView是android开发中非常常用的一种控件,在显示图片时,我们可以直接拿来用,也可以根据使用场景,结合几种不同的显示方式ScaleType,来对显示的图片进行图片缩放规则的定制。
实例分析ScaleType可见文章后半部分
源码分析
ImageView直接继承于View,路径是android.widget.ImageView。
构造函数如下:
public ImageView(Context context, @Nullable AttributeSet attrs, int defStyleAttr,
        int defStyleRes)
    super(context, attrs, defStyleAttr, defStyleRes);

    initImageView();

    //省略部分属性初始化代码

    final int index = a.getInt(com.android.internal.R.styleable.ImageView_scaleType, -1);
    if (index >= 0)
        setScaleType(sScaleTypeArray[index]);


    //省略部分代码,tint相关

    applyImageTint();

    //省略部分属性初始化代码

    a.recycle();
构造函数中使用initImageView( )初始化mMatrix 和 mScaleType ,applyImageTint( )设置着色,同时对一些属性进行初始化。initImageView( )方法如下:
private void initImageView()
    mMatrix     = new Matrix();
    mScaleType  = ScaleType.FIT_CENTER;
    mAdjustViewBoundsCompat = mContext.getApplicationInfo().targetSdkVersion <=
            Build.VERSION_CODES.JELLY_BEAN_MR1;
ImageView中根据不同的ScaleType模式,使用Matrix进行图像变换,其中mMatrix 是动态设置的Matrix,而mDrawMatrix是最终应用到图像中的matrix。
这里详细说明一下ScaleType,ScaleType是ImageView的内部枚举类,其功能是为ImageView提供8中图片显示方式,在ImageView的 configureBounds( ) 方法使用了ScaleType作为”标志位”来更改matrix,并在onDraw()中调用canvas.concat(mDrawMatrix)最终将matrix应用到canvas上。
ScaleType 源码:
/**
 * Options for scaling the bounds of an image to the bounds of this view.
 */
public enum ScaleType
    /**
     * Scale using the image matrix when drawing. The image matrix can be set using
     * @link ImageView#setImageMatrix(Matrix). From XML, use this syntax:
     * <code>android:scaleType="matrix"</code>.
     */
    MATRIX      (0),
    /**
     * Scale the image using @link Matrix.ScaleToFit#FILL.
     * From XML, use this syntax: <code>android:scaleType="fitXY"</code>.
     */
    FIT_XY      (1),
    /**
     * Scale the image using @link Matrix.ScaleToFit#START.
     * From XML, use this syntax: <code>android:scaleType="fitStart"</code>.
     */
    FIT_START   (2),
    /**
     * Scale the image using @link Matrix.ScaleToFit#CENTER.
     * From XML, use this syntax:
     * <code>android:scaleType="fitCenter"</code>.
     */
    FIT_CENTER  (3),
    /**
     * Scale the image using @link Matrix.ScaleToFit#END.
     * From XML, use this syntax: <code>android:scaleType="fitEnd"</code>.
     */
    FIT_END     (4),
    /**
     * Center the image in the view, but perform no scaling.
     * From XML, use this syntax: <code>android:scaleType="center"</code>.
     */
    CENTER      (5),
    /**
     * Scale the image uniformly (maintain the image's aspect ratio) so
     * that both dimensions (width and height) of the image will be equal
     * to or larger than the corresponding dimension of the view
     * (minus padding). The image is then centered in the view.
     * From XML, use this syntax: <code>android:scaleType="centerCrop"</code>.
     */
    CENTER_CROP (6),
    /**
     * Scale the image uniformly (maintain the image's aspect ratio) so
     * that both dimensions (width and height) of the image will be equal
     * to or less than the corresponding dimension of the view
     * (minus padding). The image is then centered in the view.
     * From XML, use this syntax: <code>android:scaleType="centerInside"</code>.
     */
    CENTER_INSIDE (7);

    ScaleType(int ni)
        nativeInt = ni;

    final int nativeInt;
configureBounds( )函数源码及注释:
private void configureBounds()
    if (mDrawable == null || !mHaveFrame)
        return;


    int dwidth = mDrawableWidth;
    int dheight = mDrawableHeight;

    int vwidth = getWidth() - mPaddingLeft - mPaddingRight;
    int vheight = getHeight() - mPaddingTop - mPaddingBottom;

    boolean fits = (dwidth < 0 || vwidth == dwidth) &&
                   (dheight < 0 || vheight == dheight);

    if (dwidth <= 0 || dheight <= 0 || ScaleType.FIT_XY == mScaleType)
        /* If the drawable has no intrinsic size, or we're told to
            scaletofit, then we just fill our entire view.
        */
        mDrawable.setBounds(0, 0, vwidth, vheight);
        mDrawMatrix = null;
     else
        // We need to do the scaling ourself, so have the drawable
        // use its native size.
        mDrawable.setBounds(0, 0, dwidth, dheight);

          //如果ScaleType 是MATRIX 类型
        if (ScaleType.MATRIX == mScaleType)
            // Use the specified matrix as-is.
            if (mMatrix.isIdentity())
            //如果mMatrix是单位矩阵,即矩阵的左上-右下对角线上的值为1,其它值均为0
            //这说明矩阵为初始化时的矩阵,应用到canvas上将没有任何变化。
                mDrawMatrix = null;
             else
            //mMatrix非单位矩阵,需要将其应用到canvas上
                mDrawMatrix = mMatrix;

         else if (fits)
            //如果ScaleType 不是MATRIX 类型 ,并且图片大小和imageView正好相同,那么也不需要做matrix变换
            // The bitmap fits exactly, no transform needed.
            mDrawMatrix = null;
         else if (ScaleType.CENTER == mScaleType)
            //如果ScaleType是CENTER类型,图片不进行放大缩小,只将图片中心与ImageView中心重合
            // Center bitmap in view, no scaling.
            mDrawMatrix = mMatrix;
           //默认从ImageView的(0,0)点开始画,
           //现在将其向右移动(ImageView宽-图片宽)/2的距离,向下移动(ImageView高-图片高)/2的距离
            mDrawMatrix.setTranslate(Math.round((vwidth - dwidth) * 0.5f),
                                     Math.round((vheight - dheight) * 0.5f));
         else if (ScaleType.CENTER_CROP == mScaleType)
            //如果是CENTER_CROP类型,也就是中心重合,并将图片裁剪,图片宽高伸缩相同比例
            mDrawMatrix = mMatrix;

            float scale;
            float dx = 0, dy = 0;
            //这里是通过(dwidth/dheight > vwidth/vheight)变换而来的,可将其理解为:
            //如果(图片的宽:图像的高 > ImageView的宽:ImageView的高),则根据(ImageView的高:图片的高)的值来对图像的宽和高一起缩放。
            //这里如果不好理解,可以画图来琢磨一下其中的原理。
            if (dwidth * vheight > vwidth * dheight)
                //图片宽高的缩放尺寸(宽高缩放尺寸相同)
                scale = (float) vheight / (float) dheight;
                //图片的水平平移,此尺寸是按照放大后的尺寸来计算的
                dx = (vwidth - dwidth * scale) * 0.5f;
             else //else同理,不多讲了
                scale = (float) vwidth / (float) dwidth;
                dy = (vheight - dheight * scale) * 0.5f;

          //先进行放大
            mDrawMatrix.setScale(scale, scale);
          //再进行平移
            mDrawMatrix.postTranslate(Math.round(dx), Math.round(dy));
          //知乎、一览等app开场动画是一张图片居中显示,并将其缓缓放大,这种动画的实现原理就是上述这种方式,具体可看我做的一个view
         else if (ScaleType.CENTER_INSIDE == mScaleType)
        //图片居中,并完全显示在内部,这种模式下,图片将完全显示,不会被“裁剪”,且宽高保持原始比例

            mDrawMatrix = mMatrix;
            float scale;
            float dx;
            float dy;

            if (dwidth <= vwidth && dheight <= vheight)
               //如果图片宽高均小于ImageView的宽高,则放大尺寸为1
                scale = 1.0f;
             else
                //如果图片宽高原始尺寸有一个超出了ImageView的范围,
                //则将按照(ImageView宽:图片宽)与(ImageView高:图片高)的最小值进行缩放,使图片充满ImageView。
                //换句话说,如果(ImageView宽:图片宽) < (ImageView高:图片高),
                //那么以(ImageView宽:图片宽)比例同时伸缩图片,并居中显示,
                //效果就是图片上下留白,左右充满ImageView。反之同理。
               scale = Math.min((float) vwidth / (float) dwidth,
                        (float) vheight / (float) dheight);


            //计算平移距离,用以居中
            dx = Math.round((vwidth - dwidth * scale) * 0.5f);
            dy = Math.round((vheight - dheight * scale) * 0.5f);
            //缩放比例
            mDrawMatrix.setScale(scale, scale);
            //居中显示
            mDrawMatrix.postTranslate(dx, dy);
         else
            // Generate the required transform.
            mTempSrc.set(0, 0, dwidth, dheight);
            mTempDst.set(0, 0, vwidth, vheight);

            mDrawMatrix = mMatrix;
            mDrawMatrix.setRectToRect(mTempSrc, mTempDst, scaleTypeToScaleToFit(mScaleType));
onDraw()函数的源码如下:
@Override
protected void onDraw(Canvas canvas)
    super.onDraw(canvas);

    if (mDrawable == null)
        return; // couldn't resolve the URI


    if (mDrawableWidth == 0 || mDrawableHeight == 0)
        return;     // nothing to draw (empty bounds)


    if (mDrawMatrix == null && mPaddingTop == 0 && mPaddingLeft == 0)
        mDrawable.draw(canvas);
     else
        int saveCount = canvas.getSaveCount();
        canvas.save();

        if (mCropToPadding)
            final int scrollX = mScrollX;
            final int scrollY = mScrollY;
            canvas.clipRect(scrollX + mPaddingLeft, scrollY + mPaddingTop,
                    scrollX + mRight - mLeft - mPaddingRight,
                    scrollY + mBottom - mTop - mPaddingBottom);


        canvas.translate(mPaddingLeft, mPaddingTop);

        if (mDrawMatrix != null)
            //将mDrawMatrix矩阵通过preConcat的方式应用到canvas上
            canvas.concat(mDrawMatrix);

        mDrawable.draw(canvas);
        canvas.restoreToCount(saveCount);
示例总结ScaleType的几种模式
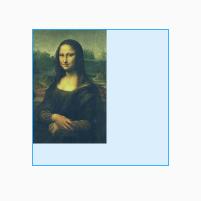
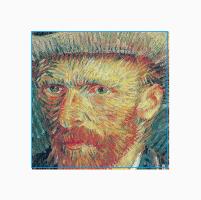
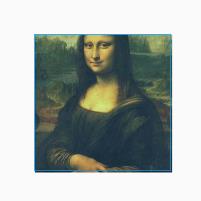
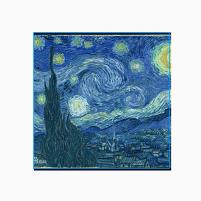
说明:使用两张图片作为示例,其中,
- ImageView的大小为 500x500
- 图片蒙娜丽莎的大小为 268x413
- 图片星空的大小为 751x600
- 蓝色边框为ImageView区域
0.Matrix
矩阵模式,在这种模式下,可以在外部设置ImageView的matrix显示效果,matrix是3x3的矩阵,可以通过matrix.setValues(float[] value)传入一个长度为9的float数组为Matrix进行赋值,其中:
(1)value[0]为x方向的放大系数,1为原始尺寸。
(2)value[4]为y方向的放大系数,1为原始尺寸。
(3)value[2]是x轴方向的位移,当其小于0时,代表将图片相对于ImageView本身向右移动,也就是显示图片偏右的内容,value[2]的数值以原图实际大小*value[0]后的数值作为参照。
(4)value[5]是y轴方向的位移,当其小于0时,代表将图片相对于ImageView本身向上移动,也就是显示图片偏下的内容,value[5]的数值以原图实际大小*value[4]后的数值作为参照。
0. Matrix模式,默认显示位置。默认图像未被拉伸缩放
1.FIT_XY
将图片拉伸/缩放至充满ImageView的模式,即使得图片的宽高等于ImageView的宽高,如果ImageView与图片的宽高比例不同,则图片不会保持原宽高比例,一般在项目中很少使用。
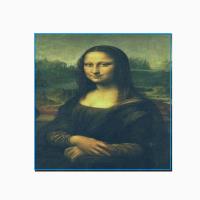
1. fit_xy模式,ImageView:500x500 Bitmap:268x413
2.FIT_START
将图片拉伸/缩放,图片保持原宽高比例:
(1)如果(图片宽:高 < ImageView宽:高),则使其图片的高度等同于ImageView的高度,图片显示在ImageView的左部;
(2)如果(图片宽:高 > ImageView宽:高),则使其图片的宽度等同于ImageView的宽度,图片显示在ImageView的上部;
2.1 图片宽:高 < ImageView宽:高,靠左显示
2.2 图片宽:高 > ImageView宽:高,靠上显示
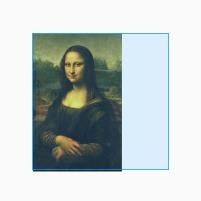
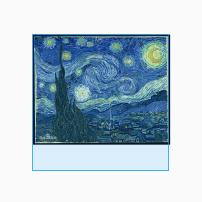
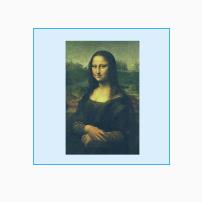
3.FIT_CENTER
将图片拉伸/缩放,图片保持原宽高比例:
(1)如果(图片宽:高 < ImageView宽:高),则使其图片的高度等同于ImageView的高度,图片显示在ImageView的中部;
(2)如果(图片宽:高 > ImageView宽:高),则使其图片的宽度等同于ImageView的宽度,图片显示在ImageView的中部;
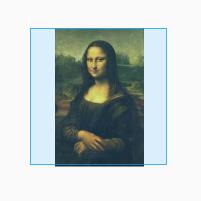
3.1 图片宽:高 < ImageView宽:高 Y轴方向充满ImageView

3.2 图片宽:高 > ImageView宽:高 X轴方向充满ImageView
4.FIT_END
将图片拉伸/缩放,图片保持原宽高比例:
(1)如果(图片宽:高 < ImageView宽:高),则使其图片的高度等同于ImageView的高度,图片显示在ImageView的右部;
(2)如果(图片宽:高 > ImageView宽:高),则使其图片的宽度等同于ImageView的宽度,图片显示在ImageView的底部;
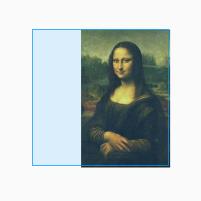
4.1 图片宽:高 < ImageView宽:高
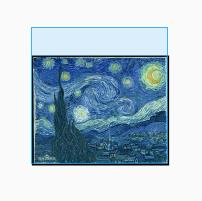
4.2 图片宽:高 > ImageView宽:高
5.CENTER
不对图片进行任何拉伸缩放:图片的中心点与ImageView的中心点重合,因此图片有可能显示不完全。
5.1 center效果,图片尺寸小于ImageView
5.2 center效果,图片尺寸大于ImageView,超出的部分无法显示
6.CENTER_CROP
图片的中心点与ImageView的中心点重合。如有必要,将对图片进行拉伸/缩放,并进行中心裁剪:
(1)如果(图片宽:高 < ImageView宽:高),则按照(ImageView的宽度 : 图片的宽度)的比例,同等缩放图片宽高,且使图片中心显示,最终效果是,图片Y轴方向两边“被裁剪”,X轴方向完全显示;X轴、Y轴方向均充满整个ImageView.
(2)如果(图片宽:高 > ImageView宽:高),则按照(ImageView的高度 : 图片的高度)的比例,同等缩放图片宽高,且使图片中心显示,最终效果是,图片X轴方向两边“被裁剪”,Y轴方向完全显示;X轴、Y轴方向均充满整个ImageView.
6.1图片宽:高 < ImageView宽:高,X轴方向充满屏幕
6.2图片宽:高 > ImageView宽:高,Y轴方向充满屏幕
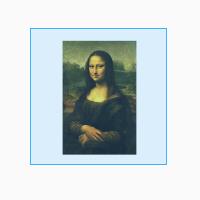
7.CENTER_INSIDE
图片的中心点与ImageView的中心点重合,并保持图片完整显示。如有必要,将对图片进行遵循图片原宽高比的拉伸/缩放。
(0)如果图片原始尺寸宽高均不大于ImageView,那么将直接居中显示图片。
(1)如果(图片宽:高 < ImageView宽:高):
(1.1)如果图片高度>ImageView高度,则按照(ImageView的高度:图片的高度)的比例,同等缩放图片宽高,使其缩小,并使图片中心显示,因此此种情况下,图片完整显示在ImageView中心,左右两边显示ImageView的Background;
(1.2)如果图片高度<=ImageView高度,不进行缩放,使图片居中显示,此种情况下,图片完整显示在ImageView中心,左右两边显示ImageView的Background。
(2)如果(图片宽:高 > ImageView宽:高):
(2.1)如果图片宽度>ImageView宽度,则按照(ImageView的宽度:图片的宽度)的比例,同等缩放图片宽高,使其缩小,并使图片中心显示,因此此种情况下,图片完整显示在ImageView中心,上下两边显示ImageView的Background;
(2.2)如果图片宽度<=ImageView宽度,不进行缩放,使图片居中显示,此种情况下,图片完整显示在ImageView中心,上下两边显示ImageView的Background。
7.1 图片宽:高 < ImageView宽:高,并且图片宽高小于ImageView的宽高
最后
最后分享一个我通过变换矩阵来达到图片居中显示并且具有放大动画效果的AutoZoomInImageView,可以实现知乎等app的开场动画
Github:
AutoZoomInImageView
以上是关于ImageView的源码解读,以及几种ScaleType的分析的主要内容,如果未能解决你的问题,请参考以下文章
springboot自动配置源码解读以及jdbc和redis配置原理小点
11.Spark Streaming源码解读之Driver中的ReceiverTracker架构设计以及具体实现彻底研究