UE4 接入 Protobuf(C++ 层)
Posted 河乐不为
tags:
篇首语:本文由小常识网(cha138.com)小编为大家整理,主要介绍了UE4 接入 Protobuf(C++ 层)相关的知识,希望对你有一定的参考价值。
引言
在网络游戏开发中,我们通常使用 Google Protobuf 作为网络协议定制的格式,那么在 UE4 中如何集成 Protobuf 是我们接下来要做的事情。
开源示例
看过很多篇文章,但这篇是写的最详细的 在UnrealEngine4中使用Google Protobuf ,对应的 Github 工程 jashking/UE4Protobuf
基本步骤
1. 库文件导入
直接从下面下载的 jashking/UE4Protobuf 这个 demo 工程中复制即可:
-
将
Source/Protobuf库当做一个模块引入到自己的 UE4 工程中,放在工程目录下的Source/Protobuf目录 -
在工程的
工程名称.Build.cs中添加该模块的引用:PrivateDependencyModuleNames.AddRange(new string[] ... "Protobuf" );同时还需要添加一些预防 Protobuf 内容引入导致报错的配置:
// Protobuf source integrationg bEnableShadowVariableWarnings = false; bEnableUndefinedIdentifierWarnings = false; bEnableExceptions = true; if (Target.Platform == UnrealTargetPlatform.Win32 || Target.Platform == UnrealTargetPlatform.Win64) Definitions.Add("_CRT_SECURE_NO_WARNINGS");
2. 协议转化
这里我简单编写了一个可以自动转化协议文件的批处理(BAT)工具脚本:
-
复制并使用
Source/Protobuf/bin目录中的protoc.exe工具,将改工具放在协议同级目录下; -
然后,遍历所有的协议文件,将每个
.proto协议文件转为对应的.cc和.h脚本,使用一个自动化脚本(如:BAT批处理)set PROTO_PATH=.\\Protocol set STEP1_PROTO2CPP_PATH=.\\step1_proto2cpp cd %STEP1_PROTO2CPP_PATH% dir ..\\%PROTO_PATH%\\*.proto /b > protolist.txt for /f "delims=." %%i in (protolist.txt) do protoc --cpp_out=. --proto_path=..\\%PROTO_PATH% ..\\%PROTO_PATH%\\%%i.proto每个
.proto文件会生成.pb.cc和.pb.h文件 -
然后都复制到工程模块中,其中 .cc 复制到
Private目录(顺便修改后缀名为 .cpp),.h 复制到Public目录:set OUT_PATH=..\\Source set CPP_DEST=ThirdParty\\Protobuf\\Private set HEAD_DEST=ThirdParty\\Protobuf\\Public copy %STEP1_PROTO2CPP_PATH%\\*.pb.cc %OUT_PATH%\\%CPP_DEST%\\*.pb.cpp copy %STEP1_PROTO2CPP_PATH%\\*.pb.h %OUT_PATH%\\%HEAD_DEST%\\*.pb.h -
在需要使用的地方,除了协议对应的头文件外,还需要引入两个额外的头文件
#include "协议文件.pb.h"
测试实例
1. 定义协议文件
测试 login.proto :
syntax = "proto3";
package csprotos;
//登陆
message LoginReq
optional uint32 AppID = 10;
optional string UserName = 11;
按照上述,使用自动化工具将 .proto 文件转化生成 .cpp 和 .h 。
2. 创建测试脚本
这里我们直接创建一个自定义的 GameInstance 类作为测试脚本,步骤如下:
-
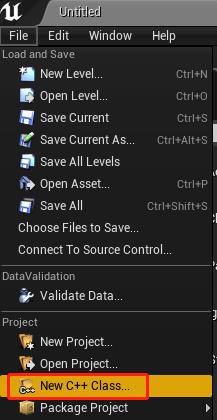
在菜单
File—>New C++ Class...

-
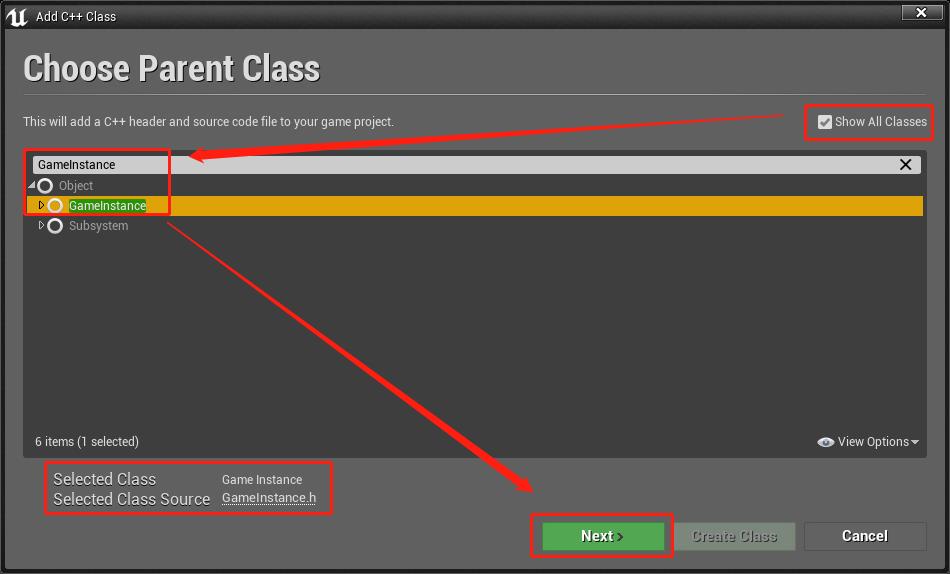
勾选
Show All Classes,搜索GameInstance,即可自定义一个继承自 GameInstance 的类 MyCustomGameInstance

编写如下测试代码:
-
MyCustomGameInstance.h
// Fill out your copyright notice in the Description page of Project Settings. #pragma once #include "CoreMinimal.h" #include "Engine/GameInstance.h" #include "MyCustomGameInstance.generated.h" /** * */ UCLASS() class BLUEEMPTY_API UMyCustomGameInstance : public UGameInstance GENERATED_BODY() public: UMyCustomGameInstance(); ; -
MyCustomGameInstance.cpp
// Fill out your copyright notice in the Description page of Project Settings. #include "MyCustomGameInstance.h" #include "BlueEmpty.h" #include "ProtocolGen/login.pb.h" // 与 proto 中定义的 package 对应 using namespace csprotos; UMyCustomGameInstance::UMyCustomGameInstance() UE_LOG(LogTemp, Display, TEXT("--------------- Protobuf Test")); LoginReq req; req.set_appid(666); req.set_username("linsh"); // 序列化 const std::string msg = req.SerializeAsString(); // 反序列化 LoginReq req1; req1.ParseFromString(msg); FString nameAsFString = req1.username().c_str(); UE_LOG(LogTemp, Display, TEXT("----- req1: appid = %d, username = %s"), req1.appid(), *nameAsFString);
编写完代码后回到 UE4 中,点击 Compile 按钮编译新增的代码,然后在 Project Settings 中指定自定义的 MyCustomGameInstance 类作为工程的 GameInstance 类:
-
打开项目设置界面:Settings—>Project Settings
-
选择
Project\\Maps & Modes设置项,滚动至最底部就是 GameInstance 类的设置项:

运行结果
然后运行,在输出日志窗口中可以看到如下输出:
LogTemp: Display: --------------- Protobuf Test
LogTemp: Display: ----- req1: appid = 666, username = linsh
注意,不能用 UE_LOG 指定打印 std::string 类型的字符串,需要先通过
c_str()接口转为 FString 类型再进行打印
打开输出日志窗口
假如日志窗口未打开,可以通过菜单 Window —> Developer Tools —> Output Log 打开
小结
以这种方式接入 Protobuf 的话,协议文件无法通过热更进行修改,后面打算接入腾讯开源的 UnLua ,然后在 Lua 层接入 Protobuf ,从而达到热更协议的目的。
参考
以上是关于UE4 接入 Protobuf(C++ 层)的主要内容,如果未能解决你的问题,请参考以下文章