5.Libgdx扩展学习之Box2D_刚体的运动和贴图
Posted zqiang_55
tags:
篇首语:本文由小常识网(cha138.com)小编为大家整理,主要介绍了5.Libgdx扩展学习之Box2D_刚体的运动和贴图相关的知识,希望对你有一定的参考价值。
主要根据这2篇文章来写的:
1. http://bbs.9ria.com/thread-135588-1-1.html
2. http://bbs.9ria.com/thread-137127-1-1.html
到现在我们已经初步的认识了Box2D, 但是我们创建的刚体,还总是在原地不断的蹦来蹦去,那么现在让刚体动起来吧!
1. 给物体一个力– ApplyForce
ApplyForce方法会在刚体上施加一个力,更进牛顿定律: F=ma,有了力就有了加速度,物体就会有速度,就会逐渐运动起来。如果我们一直给物体一个力,那么物体的速度就会不断的增加。
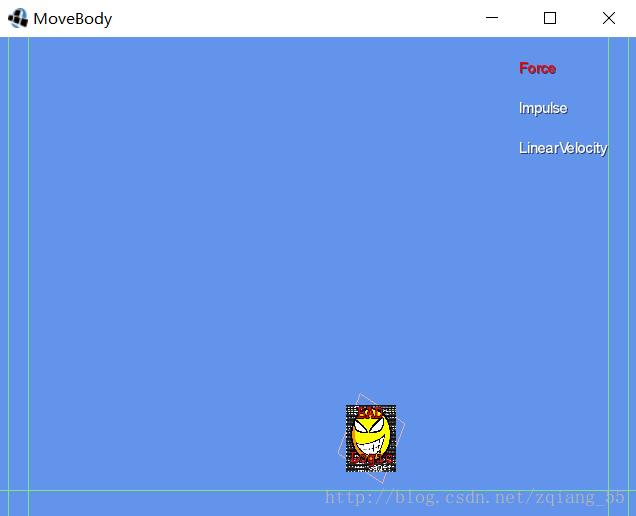
示例中点击按钮只是给物体施加了一个顺时力,由于设置摩擦力=0,那么物体就会保持匀速运动。
2. 速度的叠加– ApplyImpulse
与ApplyForce不同, ApplyImpulse不会产生力,而是直接影响刚体的速度。通过ApplyImpulse方法添加的速度会与刚体原来的速度叠加,产生新的速度。
3. 立马运动– SetLinearVelocity
SetLinearVelocity直接影响刚体的速度。与ApplyImpulse不同,setLinearVelocity设置的速度会直接替换刚体原来的速度。
刚体贴图
到现在我们所有的示例程序都是光秃秃的线条,以后也会是。不过Body给我们提供了方法 public void setUserData (Object userData)来设置贴图。从上面可以知道贴图可以是任何的Object(Image, Sprite )。
下面让我们来看示例代码
public class MoveBody extends ApplicationAdapter

    World world;
    Box2DDebugRenderer box2DDebugRenderer;
    Body body;
    OrthographicCamera camera;

    float scene_width = 12.8f;
    float scene_height = 7.2f;

    Stage stage;
    SpriteBatch batch;
    Label forceLabel, impulseLabel, velocityLabel;
    Image image;
    BitmapFont font;

    @Override
    public void create()
        world = new World(new Vector2(0.0f, -9.8f), true);
        box2DDebugRenderer = new Box2DDebugRenderer();

        image = new Image(new Texture("badlogic.jpg"));
        image.setSize(1.0f, 1.0f);
//        image.setOrigin(image.getWidth() / 2.0f, image.getHeight() / 2.0f);

        BodyDef bodyDef = new BodyDef();
        bodyDef.type = BodyDef.BodyType.DynamicBody;
        bodyDef.position.set(3, 3);
        body = world.createBody(bodyDef);
        body.setUserData(image);

        PolygonShape polygonShape = new PolygonShape();
        polygonShape.setAsBox(0.5f, 0.5f);

        FixtureDef fixtureDef = new FixtureDef();
        fixtureDef.shape = polygonShape;
        fixtureDef.density = 1.0f;
        fixtureDef.restitution = 1.0f;
        fixtureDef.friction = 0.0f;
        body.createFixture(fixtureDef);
        polygonShape.dispose();

        createGround();

        camera = new OrthographicCamera(scene_width, scene_height);
        camera.position.set(scene_width / 2, scene_height / 2, 0);
        camera.update();

        initStageUI();


    @Override
    public void resize(int width, int height)


    private void initStageUI()
        stage = new Stage();
        batch = new SpriteBatch();
        font = new BitmapFont();

        Label.LabelStyle style = new Label.LabelStyle();
        style.font = font;
        forceLabel = new Label("Force",style);
        forceLabel.setPosition(520, 440);
        impulseLabel = new Label("Impulse", style);
        impulseLabel.setPosition(520, 400);
        velocityLabel = new Label("LinearVelocity", style);
        velocityLabel.setPosition(520, 360);

        forceLabel.addListener(new ClickListener()
            @Override
            public void clicked(InputEvent event, float x, float y)
                forceLabel.setColor(Color.RED);
                impulseLabel.setColor(Color.WHITE);
                velocityLabel.setColor(Color.WHITE);
                // 给物理施加100N的力
                body.applyForceToCenter(new Vector2(100f, 0), true);

        );
        impulseLabel.addListener(new ClickListener()
            @Override
            public void clicked(InputEvent event, float x, float y)
                impulseLabel.setColor(Color.RED);
                forceLabel.setColor(Color.WHITE);
                velocityLabel.setColor(Color.WHITE);
                body.applyLinearImpulse(new Vector2(0.8f, 0), body.getWorldCenter(), true);

        );
        velocityLabel.addListener(new ClickListener()
            @Override
            public void clicked(InputEvent event, float x, float y)
                velocityLabel.setColor(Color.RED);
                forceLabel.setColor(Color.WHITE);
                impulseLabel.setColor(Color.WHITE);
                // 设置线性速度
                body.setLinearVelocity(new Vector2(1.2f, 0));

        );

        stage.addActor(forceLabel);
        stage.addActor(impulseLabel);
        stage.addActor(velocityLabel);

        Gdx.input.setInputProcessor(stage);


    @Override
    public void render()
        world.step( 1/ 60f, 6, 2);

        Gdx.gl.glClearColor(0.39f, 0.58f, 0.92f, 1.0f);
        Gdx.gl.glClear(GL20.GL_COLOR_BUFFER_BIT);

        box2DDebugRenderer.render(world, camera.combined);

        batch.setProjectionMatrix(camera.combined);
        // Image的开始坐标和Body的坐标原点不一样,需要手动调整一下
        image.setPosition(body.getPosition().x - image.getWidth() * 0.5f,
                    body.getPosition().y - image.getHeight() * 0.5f);

        batch.begin();
        image.draw(batch, 1.0f);
        batch.end();

        stage.act();
        stage.draw();

        Gdx.app.log("MoveBody", "Velocity.x=" + body.getLinearVelocity().x);


    @Override
    public void dispose()
        batch.dispose();
        stage.dispose();
        font.dispose();
        world.dispose();
        box2DDebugRenderer.dispose();


    private void createGround()
        BodyDef bodyDef = new BodyDef();
        bodyDef.position.set(scene_width * 0.5f, 0.2f);
        Body body1 = world.createBody(bodyDef);

        PolygonShape polygonShape = new PolygonShape();
        polygonShape.setAsBox(scene_width * 0.5f, 0.2f);
        body1.createFixture(polygonShape, 0.0f);

        bodyDef.position.set(0.4f, scene_height * 0.5f);
        Body body2 = world.createBody(bodyDef);

        polygonShape.setAsBox(0.2f, scene_height * 0.5f);
        body2.createFixture(polygonShape, 0);

        bodyDef.position.set(12.4f, scene_height * 0.5f);
        Body body3 = world.createBody(bodyDef);

        polygonShape.setAsBox(0.2f, scene_height * 0.5f);
        body3.createFixture(polygonShape, 0);

以上是关于5.Libgdx扩展学习之Box2D_刚体的运动和贴图的主要内容,如果未能解决你的问题,请参考以下文章