Ubuntu20.04下使用cpolar配置公网域名访问个人电脑
Posted 高桐@BILL
tags:
篇首语:本文由小常识网(cha138.com)小编为大家整理,主要介绍了Ubuntu20.04下使用cpolar配置公网域名访问个人电脑相关的知识,希望对你有一定的参考价值。
写在前面
常常需要使用代码搜索引擎搭建代码搜索服务器,并为开源代码如AOSP创建索引,以方便查找,提高编码效率。但是往往由于公司网络限制,无法在公司内网搭建服务器;而在个人电脑上搭建的服务器又无法在公司内网访问。
那这个时候,常常希望自己的个人电脑能够加入公网进行访问有多方便。当然也可以购买域名,并购买云服务器满足实际需求。
这里还有一个底层本的快捷建站方法,通过cpolar免费将个人电脑加入公网,供个人随时随地访问,下面给大家分享下;
最重要的是,免费(个人打算试用一段时间,升级付费。毕竟现在是付费时代,有好东西要支持一下。);
一、注册cpolar
官网地址如下:
二、下载cpolar
https://www.cpolar.com/static/downloads/releases/latest/cpolar-stable-linux-amd64.zip
并解压,命令如下:
unzip /path/to/cpolar.zip
2.1 使用curl命令安装
也可以使用命令来安装,如下:
curl -L https://www.cpolar.com/static/downloads/install-release-cpolar.sh | sudo bash
安装过程如下:
bill@BILL:~/02_tools$ curl -L https://www.cpolar.com/static/downloads/install-release-cpolar.sh | sudo bash
  % Total    % Received % Xferd  Average Speed   Time    Time     Time  Current
                                 Dload  Upload   Total   Spent    Left  Speed
100 21836  100 21836    0     0  11050      0  0:00:01  0:00:01 --:--:-- 11045
info: Installing Cpolar 3.2.86.16 for x86_64
Downloading Cpolar archive: http://static.cpolar.com/downloads/releases/3.2.86.16/cpolar-stable-linux-amd64.zip
  % Total    % Received % Xferd  Average Speed   Time    Time     Time  Current
                                 Dload  Upload   Total   Spent    Left  Speed
100 7242k  100 7242k    0     0  2879k      0  0:00:02  0:00:02 --:--:-- 2879k
info: Extract the Cpolar package to /tmp/tmp.Lagy5F3OGX and prepare it for installation.
Downloading Cpolar demo config file: http://static.cpolar.com/downloads/cpolar.demo.yml
  % Total    % Received % Xferd  Average Speed   Time    Time     Time  Current
                                 Dload  Upload   Total   Spent    Left  Speed
100   186  100   186    0     0   4043      0 --:--:-- --:--:-- --:--:--  4043
Downloading Cpolar service config file: http://static.cpolar.com/downloads/cpolar.service
  % Total    % Received % Xferd  Average Speed   Time    Time     Time  Current
                                 Dload  Upload   Total   Spent    Left  Speed
100   384  100   384    0     0   6193      0 --:--:-- --:--:-- --:--:--  6193
Downloading Cpolar service@ config file: http://static.cpolar.com/downloads/cpolar@.service
  % Total    % Received % Xferd  Average Speed   Time    Time     Time  Current
                                 Dload  Upload   Total   Spent    Left  Speed
100   380  100   380    0     0   8837      0 --:--:-- --:--:-- --:--:--  8837
rm: cannot remove '/etc/systemd/system/cpolar.service.d/10-donot_touch_multi_conf.conf': No such file or directory
rm: cannot remove '/etc/systemd/system/cpolar@.service.d/10-donot_touch_multi_conf.conf': No such file or directory
info: Systemd service files have been installed successfully!
warning: The following are the actual parameters for the cpolar service startup.
warning: Please make sure the configuration file path is correctly set.
# /etc/systemd/system/cpolar.service
[Unit]
Description=Cpolar Service
Documentation=https://www.cpolar.com/docs
After=network.target nss-lookup.target

[Service]
User=nobody
NoNewPrivileges=true
ExecStart=/usr/local/bin/cpolar start-all -dashboard=on -daemon=on -config=/usr/local/etc/cpolar/cpolar.yml -log=/var/log/cpolar/access.log
Restart=on-failure
RestartPreventExitStatus=23

[Install]
WantedBy=multi-user.target

installed: /usr/local/bin/cpolar
installed link: /usr/bin/cpolar
installed: /usr/local/etc/cpolar/cpolar.yml
installed: /var/log/cpolar/
installed: /var/log/cpolar/access.log
installed: /var/log/cpolar/error.log
installed: /etc/systemd/system/cpolar.service
installed: /etc/systemd/system/cpolar@.service
removed: /tmp/tmp.Lagy5F3OGX
info: Cpolar 3.2.86.16 is installed.
You may need to execute a command to remove dependent software: apt purge curl unzip
Please execute the command: systemctl enable cpolar; systemctl start cpolar
三、连接您的帐户
./cpolar authtoken xxxxxxxxxxxxxxxxx
运行此命令会将您帐户的authtoken添加到您的cpolar.yml文件中。 这将为您提供更多功能,所有打开的隧道将在此处的仪表板中列出。
命令执行结果如下:
bill@BILL:~/02_tools$ cpolar authtoken xxxxxxxxxx
Authtoken saved to configuration file: /usr/local/etc/cpolar/cpolar.yml
四、启动HTTP隧道
要在端口8080上启动HTTP隧道,请运行以下命令(端口号根据你的web站点端口来设置):
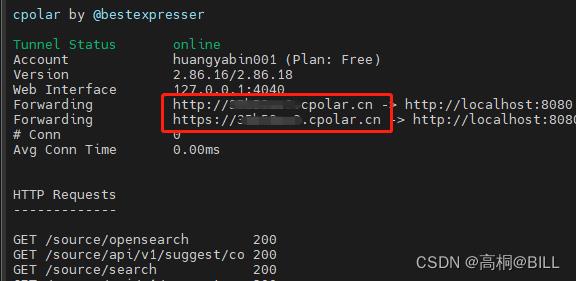
./cpolar http 8080
输出如下:

4.1 systemctl启动cpolar
如果是使用“curl -L https://www.cpolar.com/static/downloads/install-release-cpolar.sh | sudo bash”命令安装,在执行第三节(连接您的账户)后,可以通过下面的方式启动:
sudo systemctl start cpolar
五、查看连接状态

接下来直接在手机浏览器,电脑浏览器地址栏输入上面|“在线隧道”中URL的域名,就可以在任何地方随时随地访问你的个人电脑中的站点了。
六、FAQ
6.1 使用curl下载cpolar提示“curl: (7) Failed to connect to 127.0.0.1 port 1085: Connection refused”
问题分析:因为1085是我设置的代理的端口,因此认为是与代理有关。
执行“export | grep -i proxy”命令查看代理,结果如下:
bill@BILL:~/02_tools$ export | grep -i proxy
declare -x http_proxy="http://127.0.0.1:1085"
declare -x https_proxy="http://127.0.0.1:1085"
解决方法:
关闭代理命令如下:
bill@BILL:~/02_tools$ unset http_proxy
bill@BILL:~/02_tools$ unset https_proxy
bill@BILL:~/02_tools$ unset ftp_proxy
以上是关于Ubuntu20.04下使用cpolar配置公网域名访问个人电脑的主要内容,如果未能解决你的问题,请参考以下文章
ubuntu20.04安装教程TLS,ubuntu安装教程20.04