WPF动态加载样式文件
Posted lonelyxmas
tags:
篇首语:本文由小常识网(cha138.com)小编为大家整理,主要介绍了WPF动态加载样式文件相关的知识,希望对你有一定的参考价值。
原文:WPF动态加载样式文件
WPF的资源加载方式有多种,可以写在App.xaml文件下面的Application.Resources节点下面。也可以自定义一个*.xaml文件存放。今天介绍一下自定义xaml文件存放。
我们新建的WPF项目,默认是采用App.xaml文件进行启动的,在这个文件里面有个StartupUri节点,可以指定启动那个窗口。我们可以将样式写在该文件对应节点下面,但这种启动方式并不灵活,不利于我们在程序启动的时候干点我们想要干的事。所以实际项目中,我通常采用第二种方式。好,废话不多说,进入正题。
一、第一步,新建MineStyles.xaml文件,定义好的样式,下面定义一个Button样式:

 1 <ResourceDictionary xmlns="http://schemas.microsoft.com/winfx/2006/xaml/presentation"
 2                     xmlns:x="http://schemas.microsoft.com/winfx/2006/xaml">
 3   <Style TargetType="Button" x:Key="cbtn">
 4     <Setter Property="Background" Value="#555" />
 5     <Setter Property="BorderThickness" Value="2" />
 6     <Setter Property="BorderBrush" Value="#FBA234" />
 7     <Setter Property="Foreground" Value="#FBA234" />
 8     <Setter Property="FontSize" Value="20" />
 9     <Setter Property="Width" Value="100" />
10     <Setter Property="Height" Value="40" />
11     <Setter Property="HorizontalAlignment" Value="Right" />
12     <Setter Property="Template">
13       <Setter.Value>
14         <ControlTemplate TargetType="{x:Type Button}">
15           <Border x:Name="Back" CornerRadius="5" BorderThickness="2"
16                                       Background="{TemplateBinding Background}"
17                                       BorderBrush="{TemplateBinding BorderBrush}">
18             <Grid>
19               <ContentPresenter Margin="2"  HorizontalAlignment="Center" VerticalAlignment="Center"/>
20             </Grid>
21           </Border>
22           <ControlTemplate.Triggers>
23             <Trigger Property="IsMouseOver" Value="True">
24               <Setter Property="Background" Value="#FFCC33"/>
25               <Setter Property="BorderBrush" Value="#FFCC33"/>
26               <Setter Property="Foreground" Value="White" />
27             </Trigger>
28           </ControlTemplate.Triggers>
29         </ControlTemplate>
30       </Setter.Value>
31     </Setter>
32   </Style>
33 </ResourceDictionary>
二、第二步,继承System.Windows.Application类型,并向Resources.MergedDictionaries字典里面添加资源文件:

using System;
using System.Collections.Generic;
using System.Linq;
using System.Text;
using System.Threading.Tasks;
using System.Windows;

namespace Day2
{
    public class MineApplicatioin : Application
    {
        public MineApplicatioin()
        {
            ResourceDictionary resource = (ResourceDictionary)LoadComponent(new Uri("/Styles/MineStyles.xaml", UriKind.Relative));
            this.Resources.MergedDictionaries.Clear();
            this.Resources.MergedDictionaries.Add(resource);
        }
    }
}
三、第三步,添加一个新窗口,代码如下:

<Window x:Class="Day2.AppWindow"
        xmlns="http://schemas.microsoft.com/winfx/2006/xaml/presentation"
        xmlns:x="http://schemas.microsoft.com/winfx/2006/xaml"
        xmlns:d="http://schemas.microsoft.com/expression/blend/2008"
        xmlns:mc="http://schemas.openxmlformats.org/markup-compatibility/2006"
        xmlns:local="clr-namespace:Day2"
        mc:Ignorable="d"
        Title="AppWindow" Height="450" Width="800">
    <Grid>
        <Grid.RowDefinitions>
            <RowDefinition></RowDefinition>
            <RowDefinition></RowDefinition>
            <RowDefinition></RowDefinition>
        </Grid.RowDefinitions>
        <Grid.ColumnDefinitions>
            <ColumnDefinition Width="1*"></ColumnDefinition>
            <ColumnDefinition Width="1*"></ColumnDefinition>
            <ColumnDefinition Width="1*"></ColumnDefinition>
        </Grid.ColumnDefinitions>
        <Button Grid.Column="1" Grid.Row="1" Height="35" Width="100" Content="这是按钮" Style="{DynamicResource ResourceKey=cbtn}"></Button>
    </Grid>
</Window>
四、第四步,删除App.xaml文件,添加一个Program.cs文件,代码如下:

using System;
using System.Collections.Generic;
using System.Linq;
using System.Text;
using System.Threading.Tasks;

namespace Day2
{
    class Program
    {
        [STAThread]
        static void Main(string[] args)
        {
            MineApplicatioin app = new MineApplicatioin();
            AppWindow window = new AppWindow();
            app.Run(window);
        }
    }
}
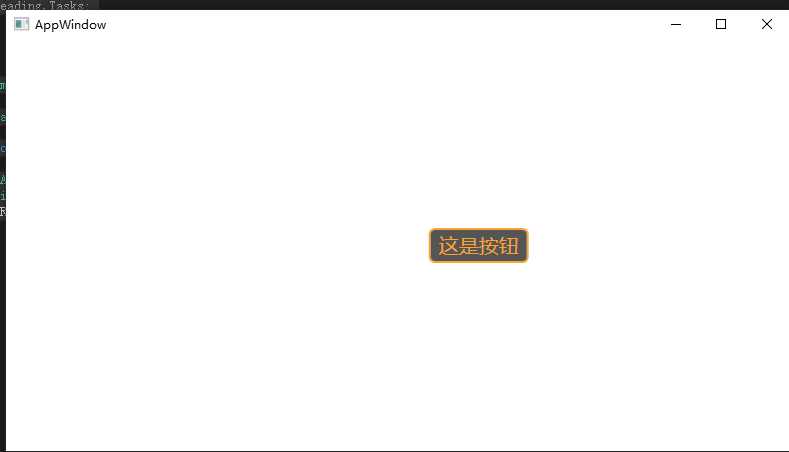
好了,准备工作已经ok,我们看看效果,首先是光标没有在按钮上面的效果图:

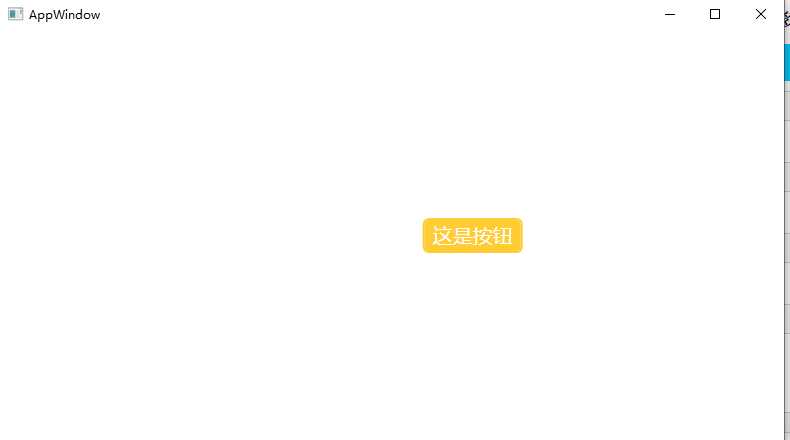
光标经过的效果图:

总结:动态加载资源的方式,对于开发的时候查看设计窗口的效果预览图并没有作用,可以在开发的时候把对应样式写在窗口的xaml文件里面,调好之后,再放到styles.xaml文件里面。
至此,完毕。
以上是关于WPF动态加载样式文件的主要内容,如果未能解决你的问题,请参考以下文章
WPF/Silverlight的问题:在后台代码动态生成的控件,怎么设置动态样式 Style="DynamicResource sbStyle

