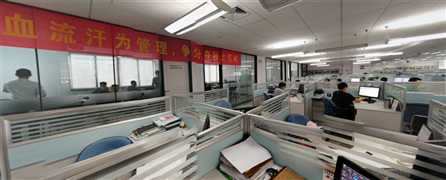
PCB 全景图技术实现
Posted pcbren
tags:
篇首语:本文由小常识网(cha138.com)小编为大家整理,主要介绍了PCB 全景图技术实现相关的知识,希望对你有一定的参考价值。
为了对3D模型理解更透,这里采用threejs(WebGL第三方库)实现,刚开始学习入门,为了能看明白基本都注释清楚.
如果仅仅是为了实现全景图,可以用photo-sphere-viewer.js更方便(它也是基于threejs基础上重新封装的)移动端也支持。
由于拍照稳定性原因,导致图片偏位,后面准备买支架拍图就完美了,
这里是展示网址: http://pcbren.cn/3dfp/ (由于阿里云仅1M带宽,用的低清图),内网用的高清与低清混合图
全景截图

实现代码:
<!DOCTYPE html>
<html lang="en">
    <head>
        <title>3DFP</title>
        <meta charset="utf-8">
        <meta name="viewport" content="width=device-width, user-scalable=no, minimum-scale=1.0, maximum-scale=1.0">
        <style>
            body {
                background-color: #000000;
                margin: 0px;
                overflow: hidden;
            }
            #info {
                position: absolute;
                top: 0px; width: 100%;
                color: #ffffff;
                padding: 5px;
                font-family:Monospace;
                font-size:13px;
                font-weight: bold;
                text-align:center;
            }
            a {
                color: #ffffff;
            }
        </style>
    </head>
    <body>

        <div id="container"></div>
        <div id="info">
            <a href="http://threejs.org" target="_blank">three.js webgl</a>
             3DFP
        </div>
        <script src="build/three.js"></script>
        <script>
            var camera, scene, renderer;//相机 场景 渲染器
            var isUserInteracting = false,  //是否鼠标按下
            onPointerDownPointerX = 0,      //鼠标按下坐标X
            onPointerDownPointerY = 0,      //鼠标按下坐标Y
            onPointerDownLon = 0,           //鼠标按下的Lon值
            lon = 0,                        //鼠标移动Lon值
            onPointerDownLat = 0,            //鼠标按下的lat值
            lat = 0,                        //鼠标移动lat值
            phi = 0,                        //lat角度 -->  theta弧度
            theta = 0;                      //lon角度 -->  theta弧度
            init();                         //初使化
            animate();                      //渲染图形
            function init() {
                var container, mesh;
                container = document.getElementById( ‘container‘ ); //全景图加于DIV容器中
                camera = new THREE.PerspectiveCamera( 75, window.innerWidth / window.innerHeight, 1, 1100 );//透视投影照相机
                camera.target = new THREE.Vector3( 0, 0, 0 );//设置相机所看的位置
                scene = new THREE.Scene();//场景
                var geometry = new THREE.SphereGeometry( 500, 60, 40 );//SphereGeometry用来在三维空间内创建一个球体对象.
                geometry.scale( - 1, 1, 1 );
                var material = new THREE.MeshBasicMaterial( { //使用基本材质(BasicMaterial)的物体,渲染后物体的颜色始终为该材质的颜色,不会由于光照产生明暗、阴影效果
                    map: new THREE.TextureLoader().load( ‘sushe.jpg‘ ) //***********将全景图地址写入此处 **********
                } );
                mesh = new THREE.Mesh( geometry, material );//Mesh(图元装配函数)   生成三维物体
                scene.add( mesh );//网格添加到场景中
                renderer = new THREE.WebGLRenderer();//定义渲染器
                renderer.setPixelRatio( window.devicePixelRatio );
                renderer.setSize( window.innerWidth, window.innerHeight );//设定尺寸
                container.appendChild( renderer.domElement );//将场景加入到画面
                //事件绑定
                document.addEventListener( ‘mousedown‘, onDocumentMouseDown, false );
                document.addEventListener( ‘mousemove‘, onDocumentMouseMove, false );
                document.addEventListener( ‘mouseup‘, onDocumentMouseUp, false );
                document.addEventListener( ‘wheel‘, onDocumentMouseWheel, false );
                window.addEventListener( ‘resize‘, onWindowResize, false );
            }
            function onWindowResize() {

                camera.aspect = window.innerWidth / window.innerHeight;
                camera.updateProjectionMatrix();
                renderer.setSize( window.innerWidth, window.innerHeight );
            }
            function onDocumentMouseDown( event ) {
                event.preventDefault();
                isUserInteracting = true;
                onPointerDownPointerX = event.clientX;
                onPointerDownPointerY = event.clientY;
                onPointerDownLon = lon;
                onPointerDownLat = lat;
            }
            function onDocumentMouseMove( event ) {
                if ( isUserInteracting === true ) {
                    lon = ( onPointerDownPointerX - event.clientX ) * 0.1 + onPointerDownLon;
                    lat = ( event.clientY - onPointerDownPointerY ) * 0.1 + onPointerDownLat;
                }
            }
            function onDocumentMouseUp( event ) {
                isUserInteracting = false;
            }

            function onDocumentMouseWheel( event ) {
                camera.fov += event.deltaY * 0.05;  //滚动缩放  图像放大缩小在此处更改值大小
                camera.updateProjectionMatrix();
            }


            //重复渲染图形
            function animate() {
                requestAnimationFrame( animate );
                update();
            }

            //相机(朝向坐标)调整 与 渲染
            function update() {
                 //自动轨道调整
                if ( isUserInteracting === false ) {
                    lon += 0.1;
                }
                //轨道调整
                lat = Math.max( - 85, Math.min( 85, lat ) );
                phi = THREE.Math.degToRad( 90 - lat );  //角度转弧度
                theta = THREE.Math.degToRad( lon );     //角度转弧度
                //相机朝向坐标
                camera.target.x = 500 * Math.sin( phi ) * Math.cos( theta );
                camera.target.y = 500 * Math.cos( phi );
                camera.target.z = 500 * Math.sin( phi ) * Math.sin( theta );
                camera.lookAt( camera.target );
                //渲染器--渲染
                renderer.render( scene, camera );
            }
        </script>
    </body>
</html>
以上是关于PCB 全景图技术实现的主要内容,如果未能解决你的问题,请参考以下文章