DevOps-3:Jenkins使用的Groovy语言介绍
Posted 北亮bl
tags:
篇首语:本文由小常识网(cha138.com)小编为大家整理,主要介绍了DevOps-3:Jenkins使用的Groovy语言介绍相关的知识,希望对你有一定的参考价值。
Jenkins的构建过程,支持使用Groovy语言做开发,包括构建前的环境变量设置、构建过程中的本地文件操作/网络请求/远程部署、构建结束的消息通知等等,都支持自定义代码操作。
因此很有必要了解一下Groovy这门语言。
Groovy介绍
参考百度百科
Groovy是一种基于JVM(Java虚拟机)的敏捷开发语言,它结合了Python、Ruby和Smalltalk的许多强大的特性,Groovy 代码能够与 Java 代码很好地结合,也能用于扩展现有代码。由于其运行在 JVM 上的特性,Groovy也可以使用其他非Java语言编写的库。
简单学习,可以去这里:https://www.w3cschool.cn/groovy/
不过,有Java基础的话,直接上手编码也是很快的。
Jenkins集成Groovy
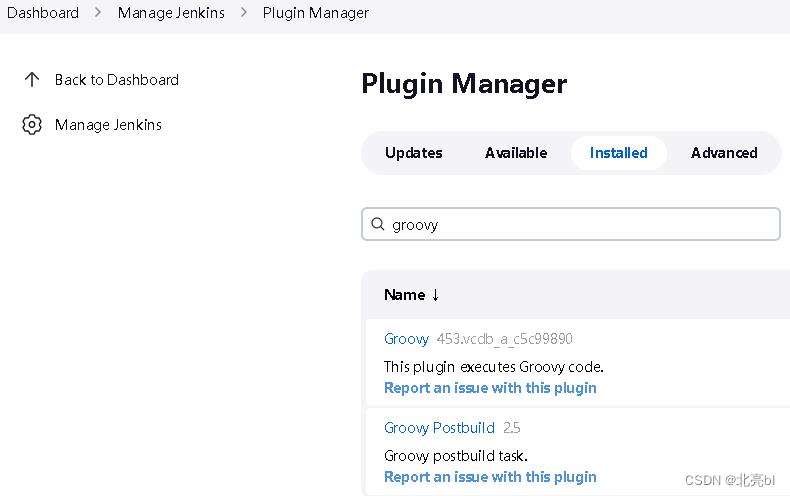
登录Jenkins,进入Manage Jenkins=>Plugin Manager,找到Groovy 和 Groovy Postbuild这2个插件安装即可:
我安装的版本是(Jenkins 2.361.2):
Groovy: 453.vcdb_a_c5c99890
Groovy Postbuild: 2.5

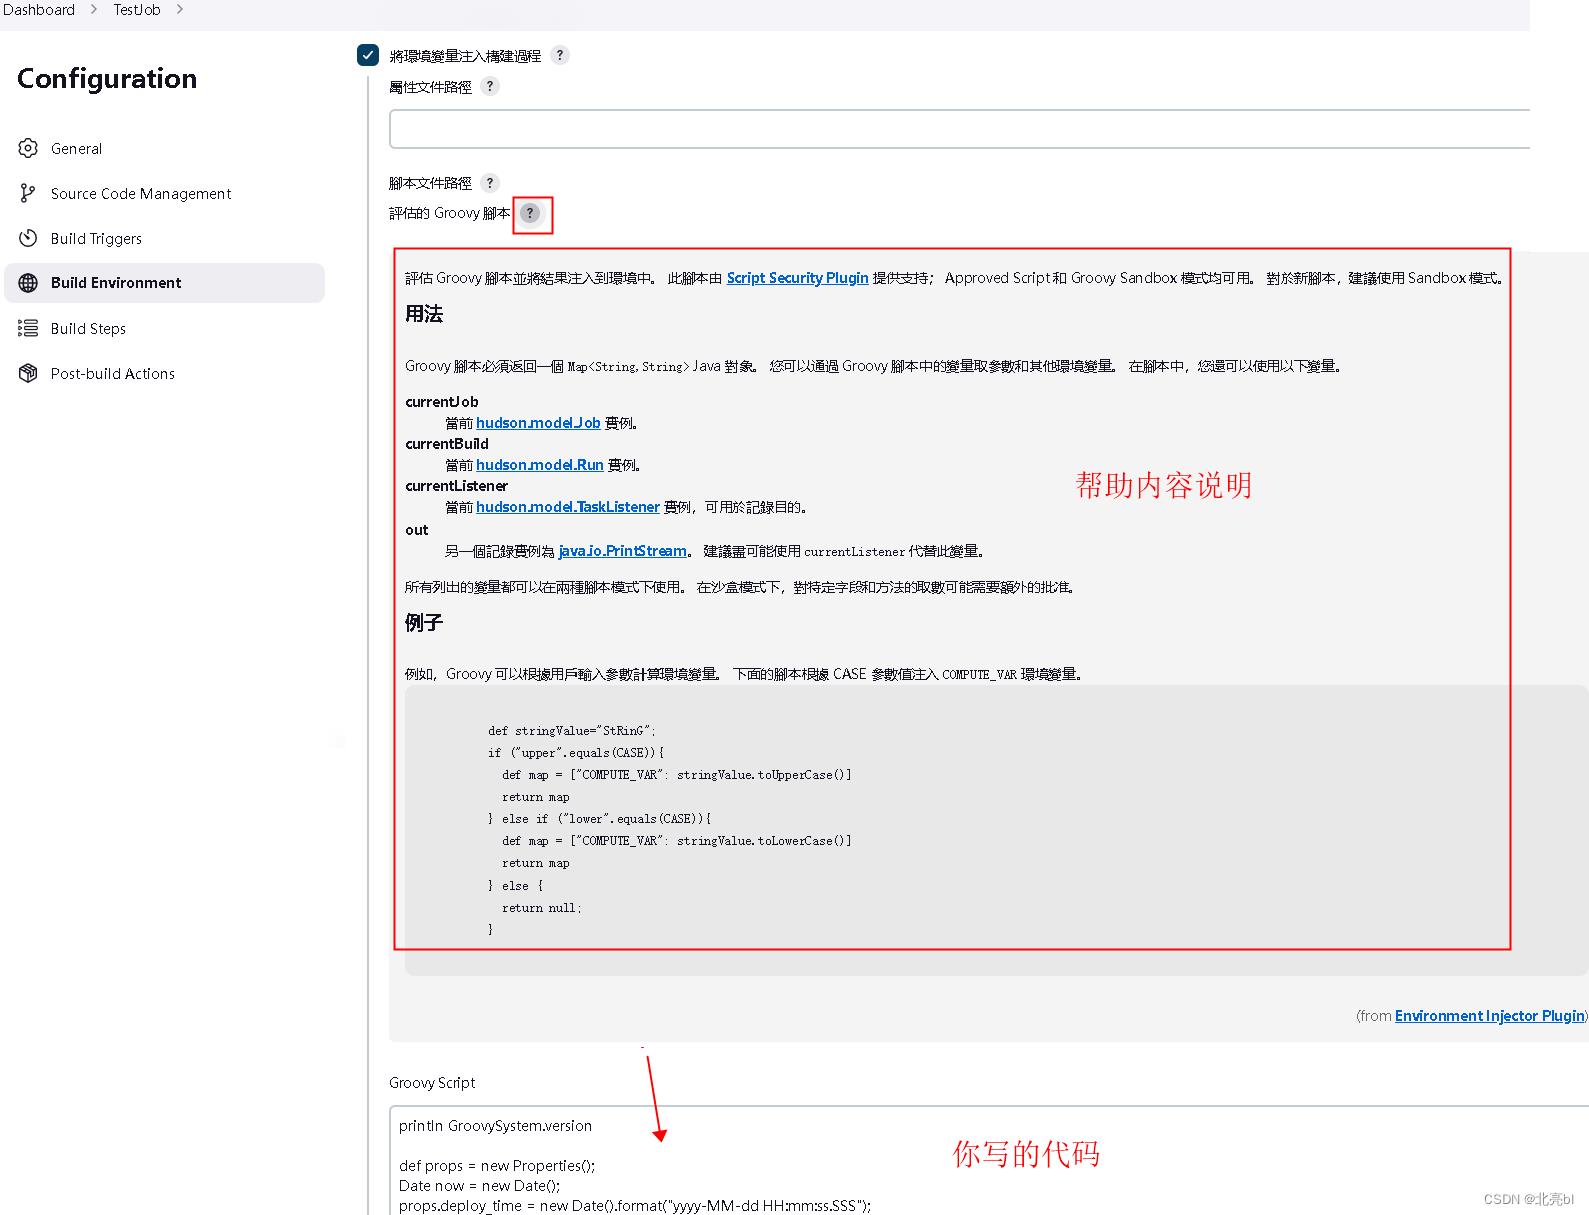
安装完插件,并重启Jenkins后,可以在新建的Job里,看到Groovy的选项:
- 这是构建开始前,注入环境变量的Groovy代码配置,可以加载一些网络配置、本地文件数据等等:

- 这是构建步骤里,书写的Groovy代码配置,这里也可以做网络操作、文件操作,甚至手工启动maven、msbuild等命令:

注:构建步骤里有2种脚本选择Execute Groovy script和Execute system Groovy script
它俩的区别,前者权限比较小,后者以管理员权限运行,详细可以参考官方插件说明文档:
Groovy Script vs System Groovy Script
The plain “Groovy Script” is run in a forked JVM, on the slave where the build is run. It’s the basically the same as running the “groovy” command and pass in the script.
The system Groovy script on the other hand runs inside the Jenkins master’s JVM. Thus it will have access to all the internal objects of Jenkins, so you can use this to alter the state of Jenkins. It is similar to the Jenkins Script Console functionality.
Security
System groovy jobs has access to whole Jenkins, therefore only users with admin rights can add system Groovy build step and configure the system Groovy script. Permissions are not checked when the build is triggered (i.e. also uses without admin rights can also run the script). The idea is to allow users run some well defined (defined by admin) system tasks when they need it (e.g. put slave offline/online, when user wants to start some debugging on slave). To have Jenkins instance secure, the support for Token macro plugin has to be switched off, see section below.
Jenkins的Job配置,各部分的Groovy使用
General里勾选准备运行环境
这里可以初始化一些键值对,注入到环境变量,供后续的步骤使用,
这边可以写Groovy脚本,需要返回一个HashMap类型:
- 读取环境变量:
this.binding.variables.get('变量名') - 演示代码:
import groovy.json.JsonOutput;

def env = binding.variables;
if(!env.containsKey('BUILD_NUMBER'))
    return null;

def buildNum = env.get('BUILD_NUMBER');
def ret = ['newKey' : 'newVal' + buildNum];
println(ret.getClass());
println(JsonOutput.toJson(ret));
return ret;
加了这段代码,在构建完成后,可以在构建结果的Environment Variables里看到注入的newKey
Build Environment里勾选將環境變量注入構建過程
这里跟上一步的功能一样,也是初始化一些键值对,注入到环境变量,供后续的步骤使用,
这边的Groovy脚本定义跟上一步一样,需要返回一个HashMap类型:
- 读取环境变量:
this.binding.variables.get('变量名') - 演示代码:
import groovy.json.JsonOutput;

def env = binding.variables;
if(!env.containsKey('BUILD_NUMBER'))
    return null;

def buildNum = env.get('BUILD_NUMBER');
def ret = ['newKey2' : 'newVal2' + buildNum];
println(ret.getClass());
println(JsonOutput.toJson(ret));
return ret;
加了这段代码,在构建完成后,可以在构建结果的Environment Variables里看到注入的newKey2
Build Steps里添加步骤Execute system Groovy script
这里的Groovy脚本不需要返回值,纯粹就是一段代码进行执行:
- 读取环境变量:
this.build.getEnvironment(this.listener).get('变量名') - 演示代码:
import groovy.json.JsonOutput;

println('Build Steps-脚本开始');
def env = this.build.getEnvironment(this.listener);
if(!env.containsKey('BUILD_NUMBER'))
    return null;

def buildNum = env.get('BUILD_NUMBER');
def ret = ['newKey' : 'newVal' + buildNum];
println(ret.getClass());
// 写文件
new File('d:/abc.txt').write(JsonOutput.toJson(ret));
sleep(5000);
// 读文件
println(new File('d:/abc.txt').text);
加了这段代码,在构建完成后,可以在D盘看到abc.txt文件
Post-build Actions里添加步骤Groovy Postbuild
这里的Groovy脚本也不需要返回值,纯粹就是一段代码进行执行:
- 读取环境变量:
this.manager.envVars.get('变量名') - 演示代码:
def env = this.manager.envVars;
def buildNum = env.get("BUILD_NUMBER");

// 注意不能直接用 println,参考 https://plugins.jenkins.io/groovy-postbuild/
def logger = manager.listener.logger;
logger.println '构建序列号' + buildNum;
加了这段代码,在构建完成后,可以在控制台看到输出的序列号
本地开发Groovy
在Jenkins里,编写Groovy脚本,相当于使用记事本编写,没有语法提示,无法运行和调试(当然需要环境上下文里,还是只能在Jenkins里测试)。
因此,我选择使用Jetbrains的IDEA来编写Groovy代码。
1、下载Groovy的SDK
去这里下载Groovy2.4.21版本的SDK.
注:我在Jenkins站点,和插件介绍里,都没有找到内置的Groovy版本说明,后面是自己去Jenkins的job执行一段代码,得到2.4.21这个版本号,代码如下: println GroovySystem.version
另外,我去上面那个网站下载时,比如下载:https://groovy.jfrog.io/ui/native/dist-release-local/groovy-zips/apache-groovy-binary-2.4.21.zip
它老是跳转到jfrog的登录页,关键是那个页面还没有注册选项,乱点一通,再点浏览器的后退,突然就能下载了,神奇的网站……
2、下载后,解压到任意目录,比如:C:\\groovy-2.4.21
3、新建项目
运行IDEA(我的版本是2022.2.3),点新建项目,选择左侧的New Project,在右边的Language选择Groovy,
下面的Groovy SDK,选择Specify Groovy SDK home,再选择上一步的C:\\groovy-2.4.21,然后点Create

注1:在网上搜索到的使用IDEA创建Groovy项目,包括Jetbrains官方文档 都是直接在新建项目的左侧菜单列表里,就有Groovy这一项,我的IDEA就是没有,还到处搜索资料和插件,偶然才发现在New Project里,坑啊……
注2:也可以跳过上一步的下载SDK,在新建项目里直接选择版本号,IDEA会自动下载,但是在我的机器上始终下载失败,没办法,只能手工下载。
4、OK,项目应该就成功创建了,结构和运行结果如下图:

代码示例
文章最后,贴一段我在用的Groovy代码,大体功能逻辑是:
- 下载n个模块的zip升级包,在zip包里添加一个版本信息文件,然后拷贝到一个目录下
- 后续的构建步骤,就是调用msbuild,把这n个模块的zip包,打成一个Setup.exe安装文件,并上传和发布
import javax.net.ssl.HostnameVerifier;
import javax.net.ssl.HttpsURLConnection;
import javax.net.ssl.SSLContext;
import javax.net.ssl.TrustManager;
import javax.net.ssl.X509TrustManager;
import groovy.json.JsonOutput;
import groovy.json.JsonSlurper;
import java.nio.charset.StandardCharsets
import java.nio.file.FileSystems
import java.nio.file.Files
import java.nio.file.Path
import java.nio.file.Paths
import java.nio.file.StandardOpenOption

// 以下几行代码,用于忽略https证书校验,请自行注意安全
def nullTrustManager = [
    checkClientTrusted:  chain, authType ->  ,
    checkServerTrusted:  chain, authType ->  ,
    getAcceptedIssuers:  null
];
def nullHostnameVerifier = [
    verify:  hostname, session -> true
];
SSLContext sc = SSLContext.getInstance("SSL");
sc.init(null, [nullTrustManager as X509TrustManager] as TrustManager[], null);
HttpsURLConnection.setDefaultSSLSocketFactory(sc.getSocketFactory());
HttpsURLConnection.setDefaultHostnameVerifier(nullHostnameVerifier as HostnameVerifier);

// 发送POST请求
def httpPost(String url, Object body)
    def http = null;
    try
        http = new URL(url).openConnection() as HttpURLConnection;
        http.setRequestMethod('POST');
        http.setRequestProperty('Content-Type', 'application/json;charset=UTF-8');
        http.setRequestProperty('simple-auth', 'vps-executor:zx2021RpaScheduler');
        http.setDoOutput(true);
        if(body != null)
            http.outputStream.write(JsonOutput.toJson(body).getBytes('UTF-8'));
        http.connect();// if (http.responseCode == 200)
        return http.inputStream.getText('UTF-8');
     catch (Exception e)
        return e.toString();
     finally
        if(http != null)
            http.disconnect();


// 根据应用标识,获取最新版本信息
def getLatestVersion(String identify)
    // POST
    def url = 'https://aaa.bbb.com/version/latest';
    def message = [identify: identify];
    def response = new JsonSlurper().parseText(httpPost(url, message));
    if(response.data == null || response.data.url == null)
        //throw new Exception(identify + ' 未找到最新版本');
        return null;

    return response.data;


// 下载新版本
def downloadFile(Object item, String targetDir)
    def dir = targetDir + '/' + item.identify;
    def dirObj = new File(dir);
    if(!dirObj.exists())
        dirObj.mkdirs();

    def fileName = dir + '/' + item.version + '.zip';
    def fileObj = new File(fileName);
    if(fileObj.exists())
        println '文件已存在,跳过下载: ' + fileName;
        return fileName;


    println '文件开始下载: ' + fileName;
    try
        // 下载文件
        fileObj << new URL(item.url).openStream();
        println '下载完成: ' + fileName;

        // 把版本号信息文件,写入zip包
        addVersionTxtToFile(fileName, item.version);
     catch(Exception exp)
        if(fileObj.exists())
            fileObj.delete(); // 下载失败要删除

        throw exp;

    return fileName;


// 往已存在的zip文件里,追加文件
def addVersionTxtToFile(String filepath, String version)
    // 版本号写入文件
    def verFile = new File(filepath).getParent() + '/version.txt';
    new File(verFile) << version;

    def exe7z = 'D:/JenkinsWorkspace/7z/7z.exe';
    // a表示增加文件
    def command = exe7z + ' a "' + filepath + '" "' + verFile + '"';

    // 执行shell命令
    def procOut = new StringBuilder(), procErr = new StringBuilder();
    def proc = command.execute();
    proc.consumeProcessOutput(procOut, procErr);
    proc.waitForOrKill(10000);
    if(procErr.length() > 0)
        throw new Exception("加版本出错了:输出: $procOut  错误信息: $procErr");


    // 以下代码,java里测试正常,Jenkins里测试就是不行
    //Map<String, String> env = new HashMap<>();
    //env.put("create", "true");
    //def path = Paths.get(filepath);
    //def uri = URI.create("jar:" + path.toUri());
    //println uri.toString()
    //def fs = FileSystems.newFileSystem(uri, env);
    //def nf = fs.getPath("version.txt"); // 要追加的文件名,只支持根目录或存在的子目录
    //def writer = null;
    //try
    //    writer = Files.newBufferedWriter(nf, StandardCharsets.UTF_8, StandardOpenOption.CREATE);
    //    writer.write(version);
    //catch(java.nio.file.FileSystemAlreadyExistsException exp)
    //    // 忽略文件存在的错误
    //finally
    //    if(writer != null)
    //        writer.close();
    //    if(fs != null)
    //        fs.close();
    //
    println '版本号文件追加成功:' + filepath;


// 拷贝文件
def copyFile(String sourceFile, String targetFile)
    if (sourceFile == null || sourceFile.length() == 0 || targetFile == null || targetFile.length() == 0)
        throw new Exception('参数不能为空');
    def sourceObj = new File(sourceFile);
    if (!sourceObj.exists())
        throw new Exception('源文件不存在:' + sourceFile);
    def targetObj = new File(targetFile);
    def targetDir = new File(targetObj.getParent());
    if(!targetDir.exists())
        targetDir.mkdirs();
    sourceObj.withDataInputStream  input ->
        targetObj.withDataOutputStream  output -> output << input
    ;


// 代码块开始
def env = build.getEnvironment(listener);
def all_modules = env.get('all_modules'); // 读取环境变量里配置的模块列表
if(all_modules == null)
    throw new Exception('模块数组为空');

def newVerResult = [];
def arrModules = all_modules.split(',');
// 获取每个模块的最新版本信息
for(item in arrModules)
    def identifyAndDir = item.split(':');
    def newVersion = getLatestVersion(identifyAndDir[0]);
    if(newVersion != null)
        newVersion.put('zipDir', identifyAndDir[1]);
        newVerResult.add(newVersion);


// 下载下来的文件目录
def targetDir = 'D:/JenkinsWorkspace/AllArchives/' + env.get('JOB_NAME');
// 拼接完整包的key,并逐一下载(存在就不下了)
def fullFileKey = '';
for(item in newVerResult)
    fullFileKey += item.identify + ':' + item.version + ';';

    // 下载文件,并把版本号写入zip包
    def downloadFilePath = downloadFile(item, targetDir);
    item.put('filename', downloadFilePath);


// 计算完整串的hash值,作为标志文件名,避免重复打完整包
def sha256 = org.apache.commons.codec.digest.DigestUtils.sha256Hex(fullFileKey);
println '完整包key: ' + fullFileKey;

def targetDirObj = new File(targetDir);
if(!targetDirObj.exists())
    targetDirObj.mkdirs();
def fullFileName = targetDir + '/' + sha256 + '.txt';
def fullFileObj = new File(fullFileName);
def forcePack = env.get('force_package');
if(forcePack != null && forcePack == 'false' && fullFileObj.exists())
    throw new Exception(fullFileName + ' 已存在,无须重新打包');
    //build.result = hudson.model.Result.ABORTED;
    //build.getExecutor().interrupt(hudson.model.Result.SUCCESS);
    //error("stoped");
    //sleep(2000)
    return;

println(fullFileName + ' 不存在,需要重新打包');
// 无法传递到下一个步骤
// env.put('abcd', 'dafsdasdfasd')

// 打包信息写入文件
fullFileObj.write(fullFileKey,'UTF-8');

try
    def compileTargetDir = env.get('WORKSPACE') + '/' + env.get('archive_paths');
    def compileCodeDir = new File(compileTargetDir).getParent() + '/Res';

    // 复制到构建目录下
    for(item in newVerResult)
        def targetFile = compileCodeDir + '/' + item.zipDir + '.zip';
        println '复制' + item.filename + ' 到 ' + targetFile;
        copyFile(item.filename, targetFile);

catch(Exception exp)
    fullFileObj.delete();
    throw exp;
以上是关于DevOps-3:Jenkins使用的Groovy语言介绍的主要内容,如果未能解决你的问题,请参考以下文章
错误记录Groovy工程中的文件查找策略 ( main 函数中需要使用 src/main/groovy/Script.groovy | Groovy 脚本直接使用代码相对路径 )