利用python画出动态高优先权优先调度
Posted 爱记笔记的小王同学
tags:
篇首语:本文由小常识网(cha138.com)小编为大家整理,主要介绍了利用python画出动态高优先权优先调度相关的知识,希望对你有一定的参考价值。
之前写过一个文章。
动态高度优先权优先调度
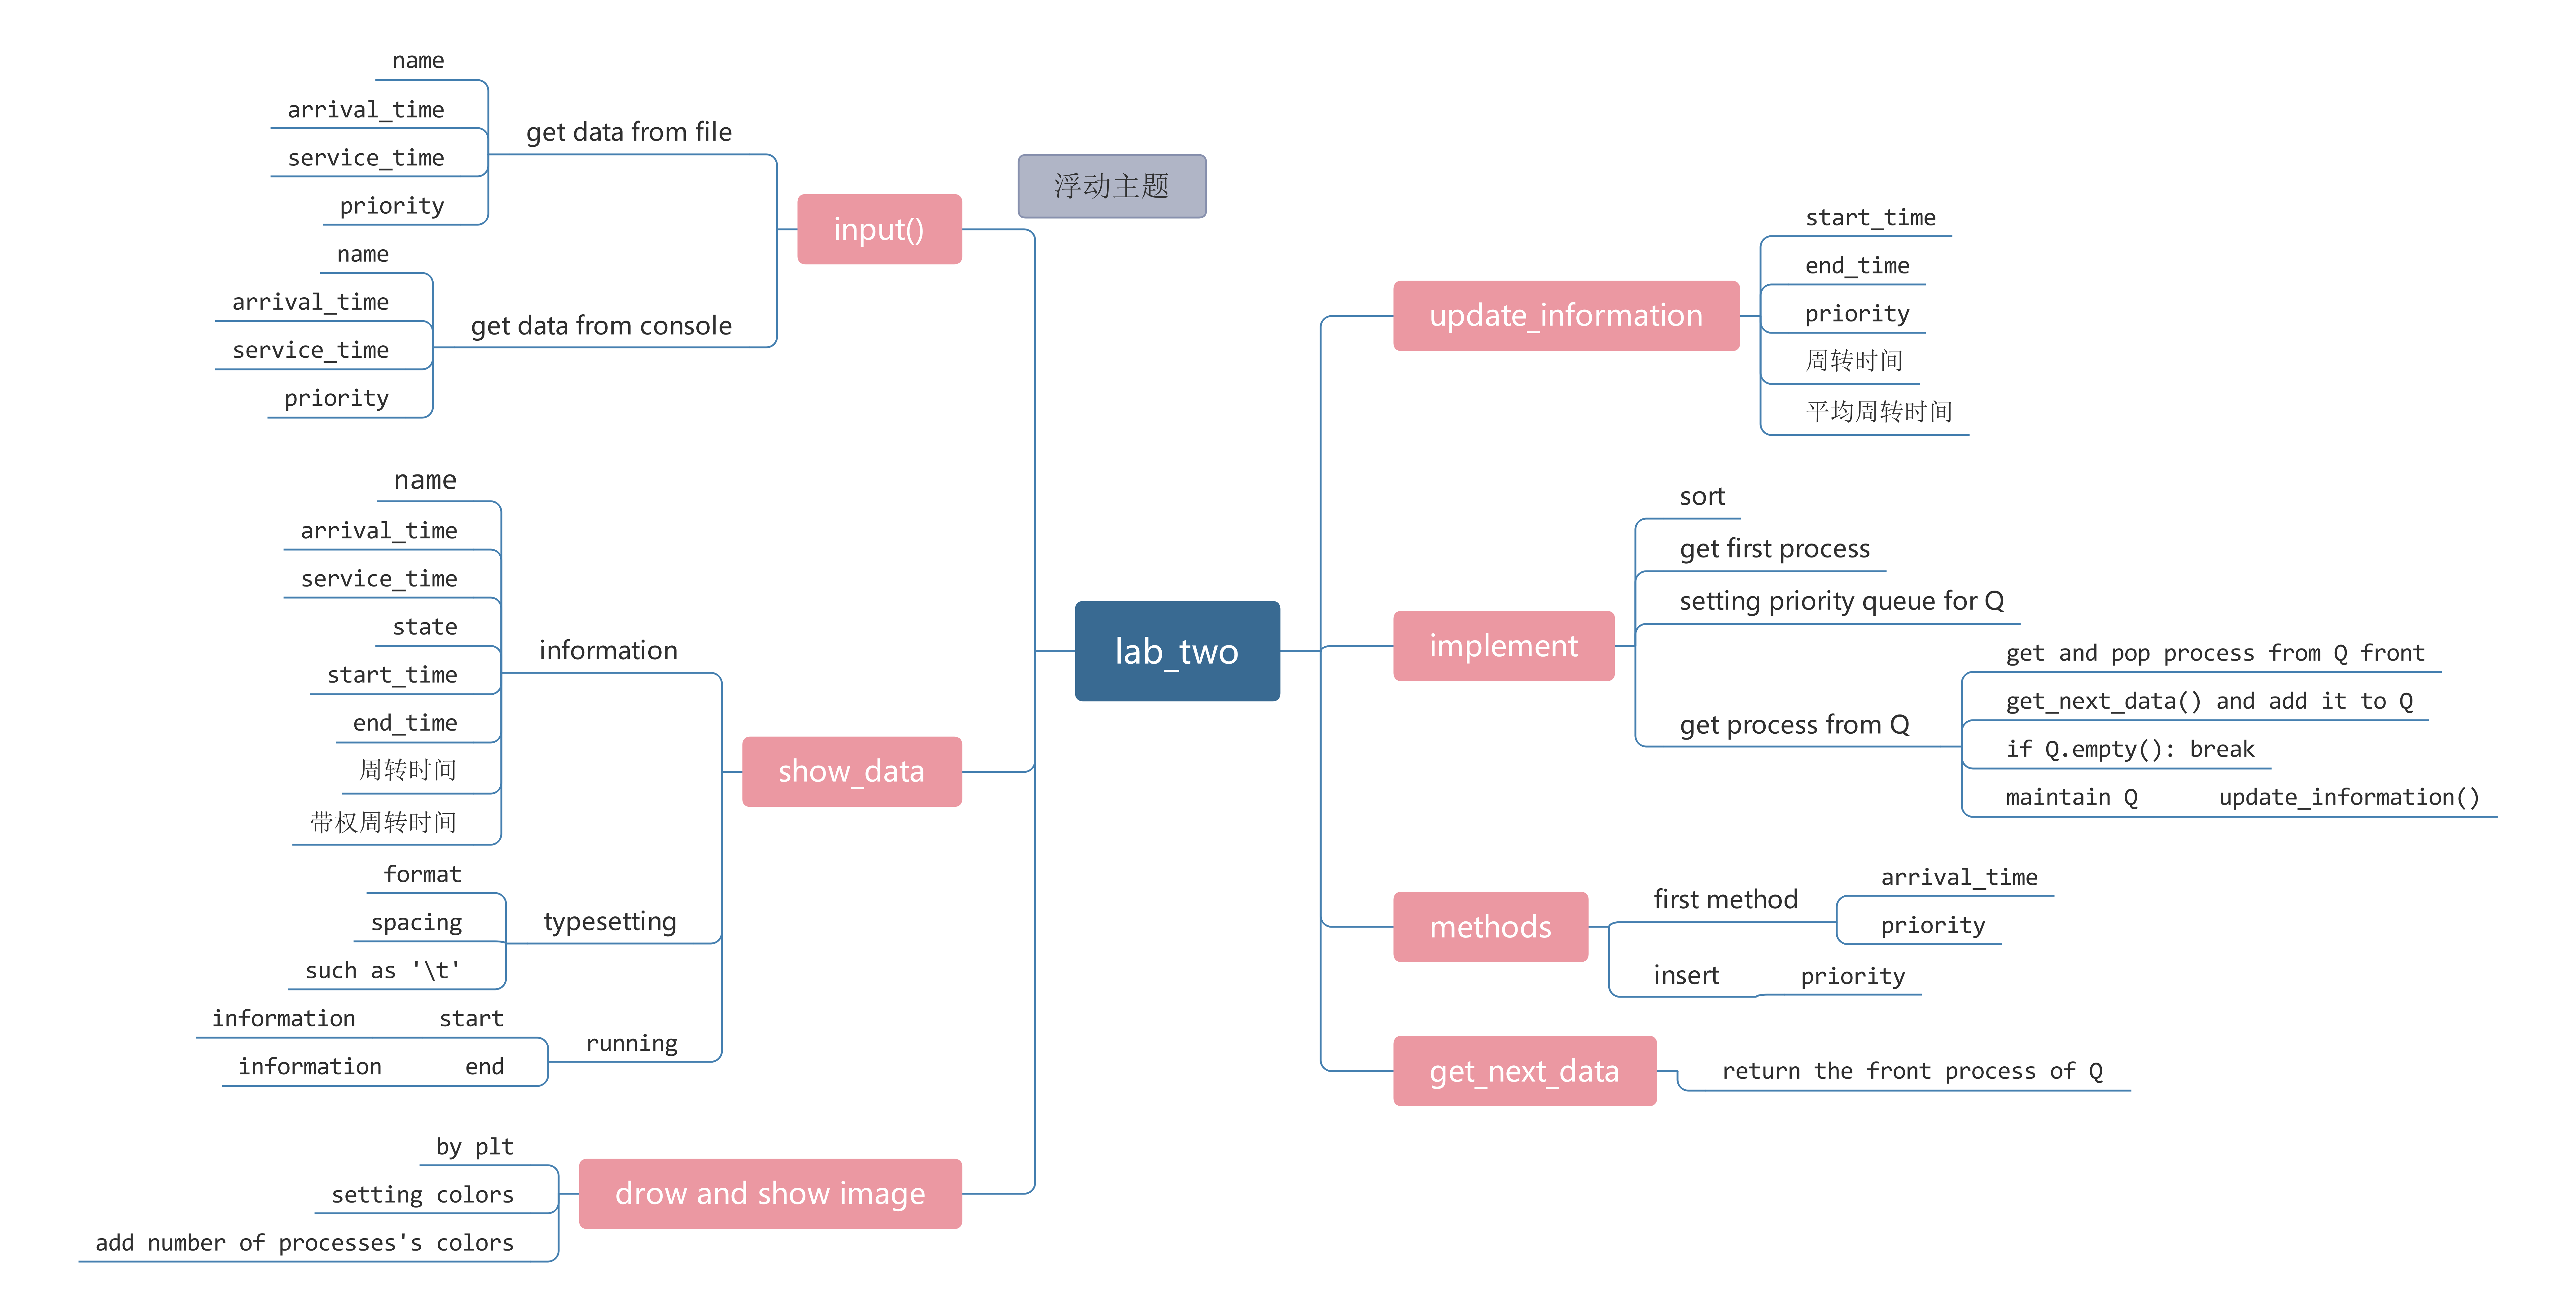
动态优先权调度算法,以就绪队列中各个进程的优先权作为进程调度的依据。各个进程的优先权在创建进程时所赋予,随着进程的推进或其等待时间的增加而改变。进程的优先权利用某一范围内的整数来表示。有的系统数值越小优先权越高,如Unix系统,有的系统则反之。采用该算法时,每次总是在就绪队列中选择一个优先权最高的进程进行调度,并将处理机分配给该进程。动态优先权调度算法又分为抢占式和非抢占式两种。
调度结果:
 img
img
调度数据
A 0 5 3
B 1 3 5
C 2 1 3
D 3 1 4
E 4 2 2
 img
img
算法流程图
 img
img
类初始化
本来想要在SJF调度的基础上修改的,也就是继承,可是发现了问题,只能重新修改类了。
| self.data = [] | 存储进程 |
|---|---|
| self.name = ‘‘ | 进程名字 |
| self.service_time = 0 | 服务时间 |
| self.arrival_time = 0 | 到达时间 |
| self.state = ‘‘ | 初始状态 |
| self.number = 0 | 进程数量 |
| self.timeout = 0 | 超时限定 |
| self.start = 0 | 开始时间 |
| self.end = 0 | 结束时间 |
| self.n | 动态优先权的变化大小 |
获取数据:
获取数据可以从文件(如.txt)中读入,亦可以从console读入。这里要求一个地方,就是数据的格式,名字,到达时间,服务时间。中间用空格分开。如下面表格:
| name | arrival_time | service_time | 优先权 |
|---|---|---|---|
| A | 0 | 5 | 3 |
| B | 1 | 3 | 5 |
| C | 2 | 1 | 3 |
| D | 3 | 1 | 4 |
| E | 4 | 4 | 4 |
def get_data_file(self):
        with open(‘data2.txt‘, "r", encoding="utf-8") as file:
            for line in file.read().splitlines():
                name, arrival_time, service_time, priority = line.split()
                # insert the process
                self.insert_data(name, arrival_time, service_time, priority)
        file.close()
        # initial queue
        # sort first arrival_time and second service_time
        self.data.sort(key=lambda x: (x[‘arrival_time‘], x[‘priority‘]))
        # update and recode id
        for i in range(self.number):
            self.data[i][‘index‘] = i

    def get_data_input(self):
        print(‘How many processes do you want input?‘)
        processes_number = int(input(‘Please enter an integer of type int:‘))
        print(‘name and arrival_time and service_time and priority of process‘)
        print(‘such as:A 0 5 3‘)
        for _ in range(processes_number):
            name, arrival_time, service_time, priority = input(
                ‘Please enter
‘).split()
            self.insert_data(name, arrival_time, service_time, priority)
        # initial queue
        # sort first arrival_time and second service_time
        self.data.sort(key=lambda x: (x[‘arrival_time‘], x[‘priority‘]))
        # update and recode id
        for i in range(self.number):
            self.data[i][‘index‘] = i
进行调度
调度的过程就是队列,每次取已经到达的进程优先权高的,如果优先权相同,则调度时间片早到达队列的。
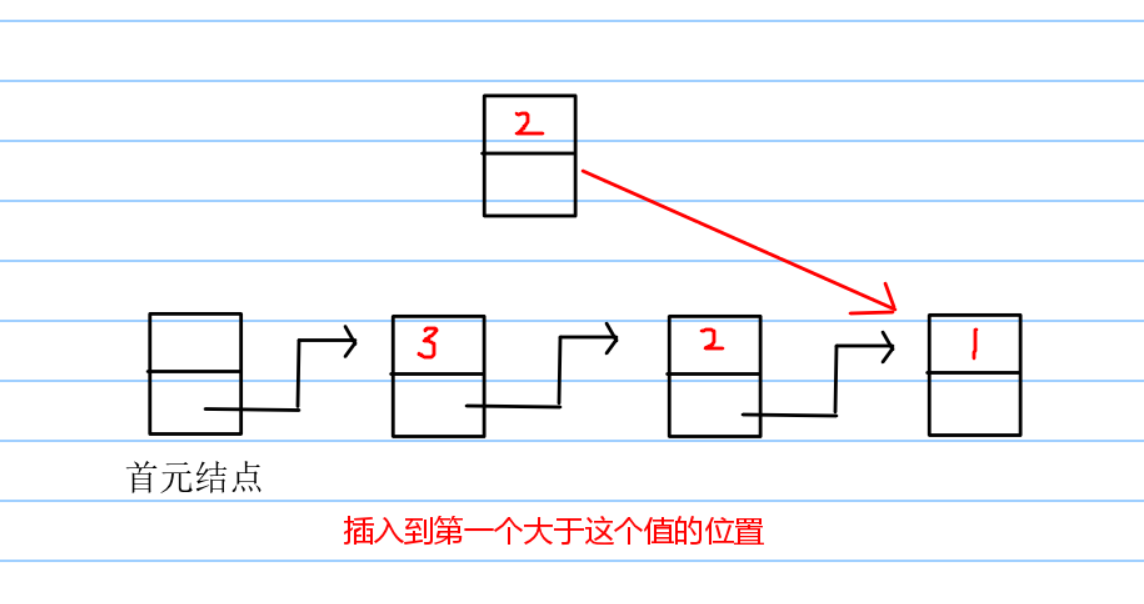
这个地方有一个小提示:使用队列,并不一定用到队列。队列可以是逻辑结构。这个算法的基本思想就是,在已经到达的进程中,执行优先权高的进程,执行一个时间片,优先权减少n,如果同优先权的情况下,排在队列之前的优先。针对这个问题的队列我们可以设计三种方法:优先队列,排序维护,插队。优先队列没什么好说的,C++里面的内容,只要定义得对,结构体重载写正确,那就很容易实现。另外一个就是当没有优先队列的时候,我们可以用排序来维护或者达到这个效果,是这个队首元素是我们想要的。另外一种方法就是直接插入元素。
 img
img  img
img 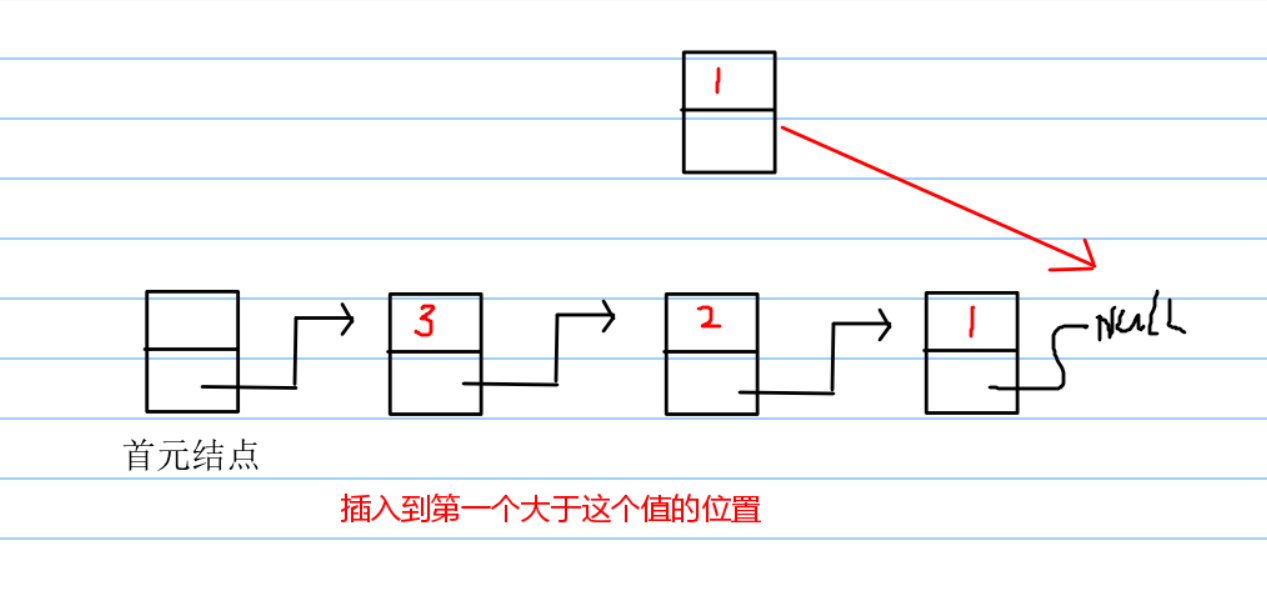 img
img
入队的过程可以简化成这样的方式,这样操作即可以保证了队列的有序,又可以保证,同优先级的先后问题。这样的方法比排序快,而且容易理解。
这个插入的方法呢,python列表直接就有,参数为index和value,直接遍历进行插入进程就可以。
def to_get_index(self, data, process):
        for i in range(len(data)):
            if process[‘priority‘] > data[i][‘priority‘]:
                return i
        return len(data)

    def get_next_data(self, index,  data):
        # get processes from the beginning to the end of the current process
        result = [x for x in self.data if x[‘arrival_time‘] <=
                  self.end and x[‘state‘] == ‘w‘ and x not in data]
        if result or data:
            # maintain the queue
            for process in result:
                data.insert(self.to_get_index(data, process), process)
            return data
        # no processes entered at current time
        for process in self.data:
            if process[‘state‘] == ‘w‘:
                self.start = self.end = process[‘arrival_time‘]
                return [process]
        return []

    def implement(self):
        ‘‘‘start algorithm‘‘‘
        # get first process
        data = [self.data[0]]
        # update the time of start
        self.start = self.end = data[0][‘arrival_time‘]
        while data:
            # update information
            self.update_information(
                data[0][‘index‘], self.end, self.end + 1, data)
            # get next process or processes
            data = self.get_next_data(data.pop(0)[‘index‘], data)
        self.data.sort(key=lambda x: x[‘id‘])
数据更新
数据更新就是更新原始的数据,包括计算状态,开始时间,结束时间,周转时间,平均周转时间等等。
def update_information(self, index, start, end, data):
        self.data[index][‘state‘] = ‘R‘
        print(‘-‘*40)
        # print("running order is:", *[i[‘name‘] for i in data], sep=‘->‘)
        print("from {:} to {:}".format(start, end))
        print("the running order is :")
        self.show_data_running(start, end, data)
        self.data[index][‘start‘].append(start)
        self.data[index][‘end‘].append(end)
        # had finished
        self.data[index][‘state‘] = ‘w‘
        if len(self.data[index][‘end‘]) == self.data[index][‘service_time‘]:
            self.data[index][‘state‘] = ‘f‘
            self.data[index][‘turnaround_time‘] = end -
                self.data[index][‘arrival_time‘]
            self.data[index][‘authorized_turnover_time‘] = self.data[index][‘turnaround_time‘] /
                self.data[index][‘service_time‘]
        else:
            self.data[index][‘priority‘] -= self.n
        self.start = start
        self.end = end
        # self.show_data()
        print("the finish status is :")
        self.show_data_running(start, end, data)
绘制图形
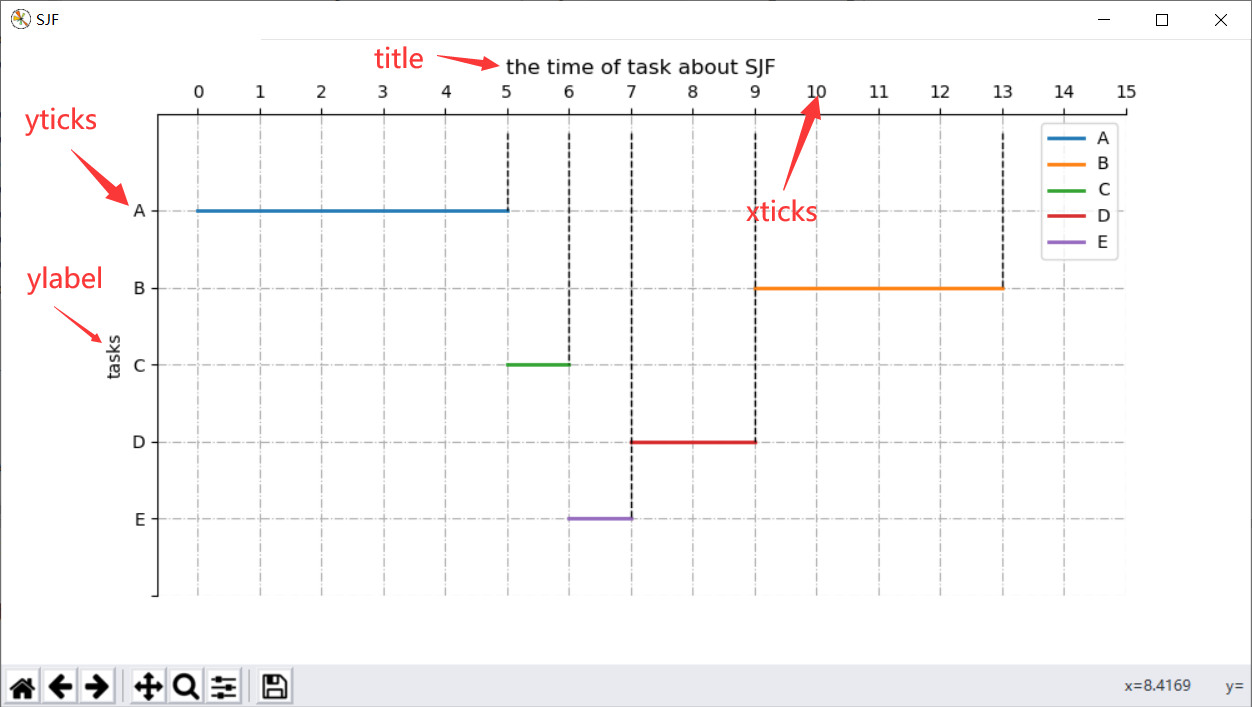
利用python的第三方库,根据数据进行绘图,然后展示出好看的图片。
这里引用上次博客的图形。
def init_image(self):
        # size = 1000 * 500
        plt.figure(‘SJF‘, figsize=(10, 5))
        self.drow_image()
        # setting xticks for 0 to self.end + 2
        plt.xticks([i for i in range(self.end + 3)])
        # setting title
        plt.title(‘the time of process about this‘)

        plt.xlabel(‘‘)
        plt.ylabel(‘processes‘)
        # setting yticks.such as A == 0
        plt.yticks(self.get_y_ticks()[0], self.get_y_ticks()[1])
这里引用上次的博客的图形。
 img
img
这里引用上次的博客的图形。
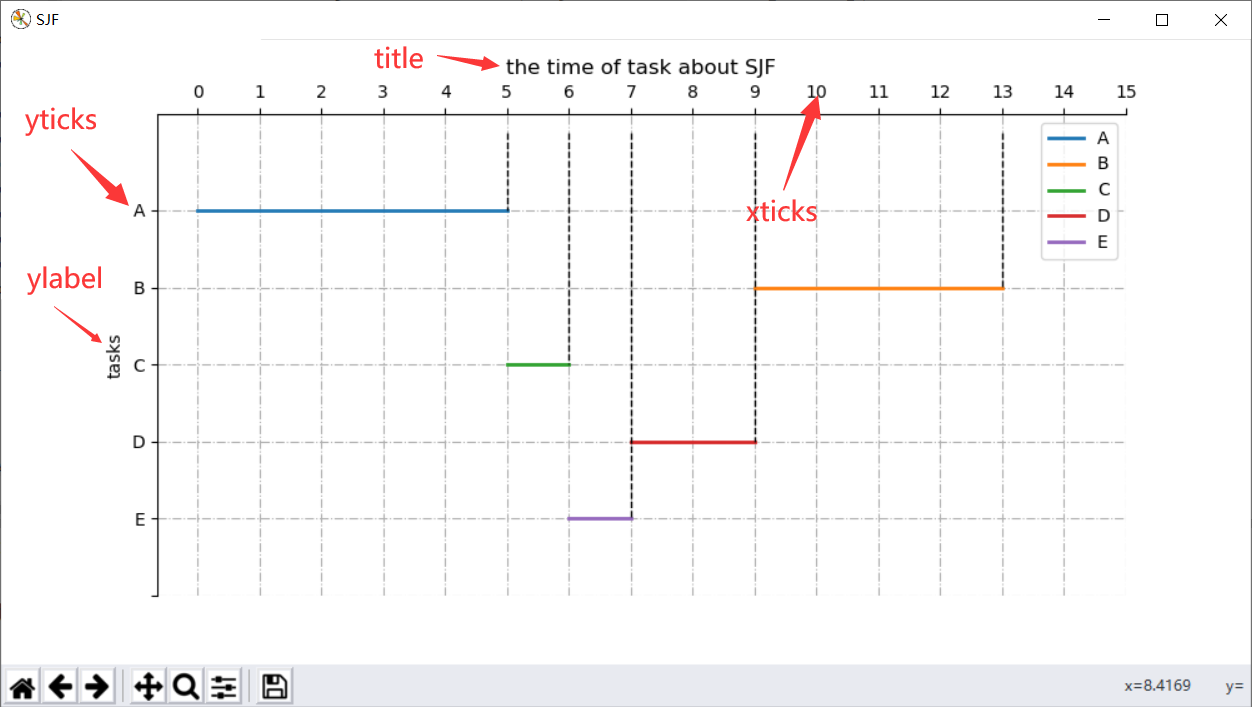 img
img
这里引用上次的博客的图形。
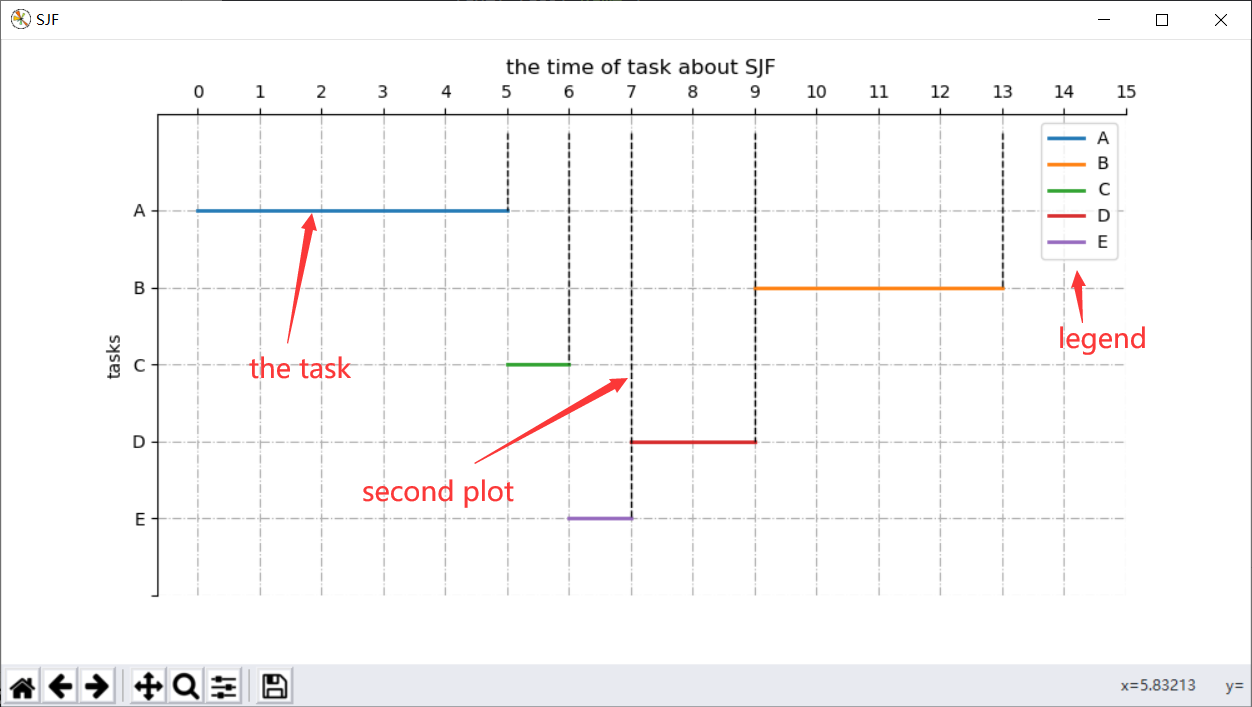 img
img  img
img
def set_ax(self):
        ax = plt.gca()  # 获取到当前坐标轴信息
        ax.spines[‘right‘].set_color(‘none‘)
        ax.spines[‘bottom‘].set_color(‘none‘)
        ax.xaxis.set_ticks_position(‘top‘)   # 将X坐标轴移到上面
        ax.invert_yaxis()  # 反转Y坐标轴
        ax.grid(True, linestyle=‘-.‘)  # 网格
def show_image(self):
        self.init_image()
        self.set_ax()
        plt.savefig(‘result.png‘, dpi=300)
        plt.show()
通过之前可以看出,都没有变化,那么我们绘图可以直接调用之前的数据吗?
当然不行,否则绘制的直线会错乱:
如下图:
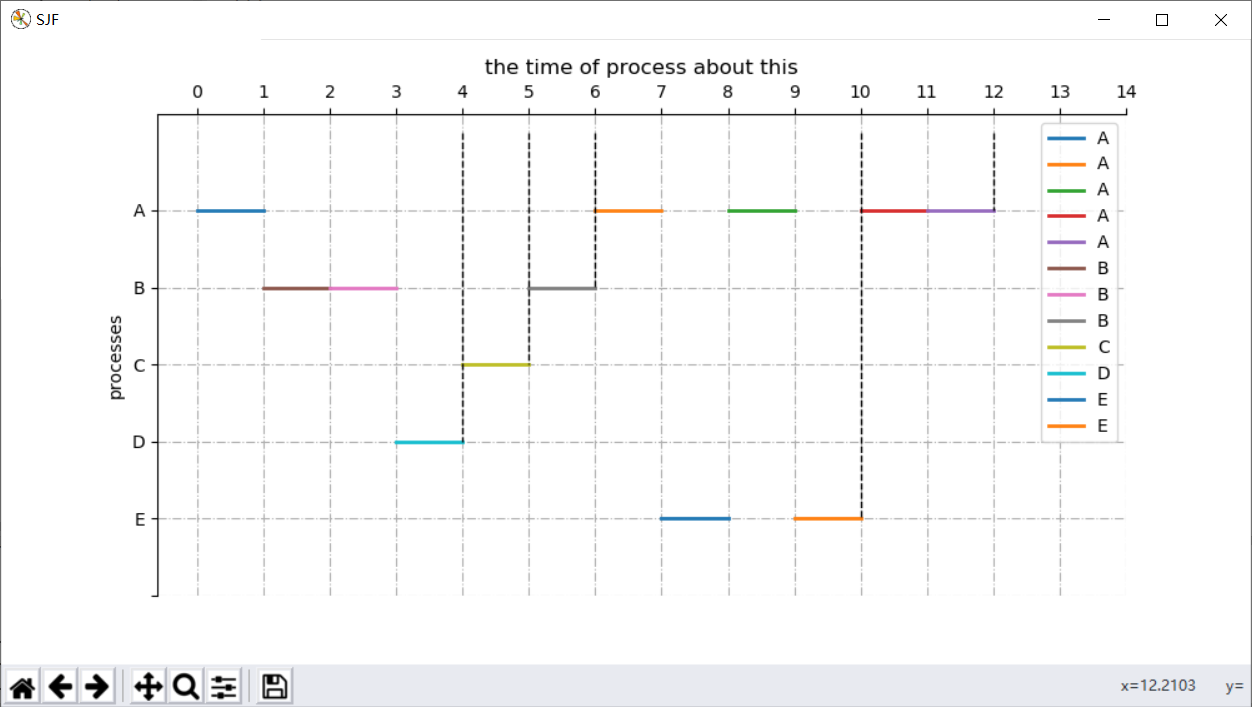 img
img  img
img
我们想要得到的结果就是所有的A标签一个颜色,所有的B标签一个颜色,所以我们需要自己设定颜色。
def drow_image(self):
        colormap = plt.cm.gist_ncar  # nipy_spectral, Set1,Paired
        colors = [‘r‘, ‘g‘, ‘b‘, ‘c‘, ‘m‘, ‘y‘, ‘k‘] +
            [colormap(random.random()) for i in range(len(self.data) + 1)]
        for i in range(len(self.data)):
            # the time line of process from start to end
            process = self.data[i]
            plt.plot([process[‘start‘][0], process[‘end‘][0]],
                     [process[‘id‘], process[‘id‘]],
                     label=process[‘name‘],
                     color=colors[i],
                     lw=2)
            for x1, x2 in zip(process[‘start‘][1:], process[‘end‘][1:]):
                plt.plot([x1, x2],
                         [process[‘id‘], process[‘id‘]],
                         color=colors[i],
                         lw=2)
            # annotation of the key point
            plt.plot([process[‘end‘][-1], process[‘end‘][-1]],
                     [-1, process[‘id‘]],
                     ‘k--‘,
                     lw=1)
        # legend
        plt.legend(loc=‘best‘)
运行结果如图:
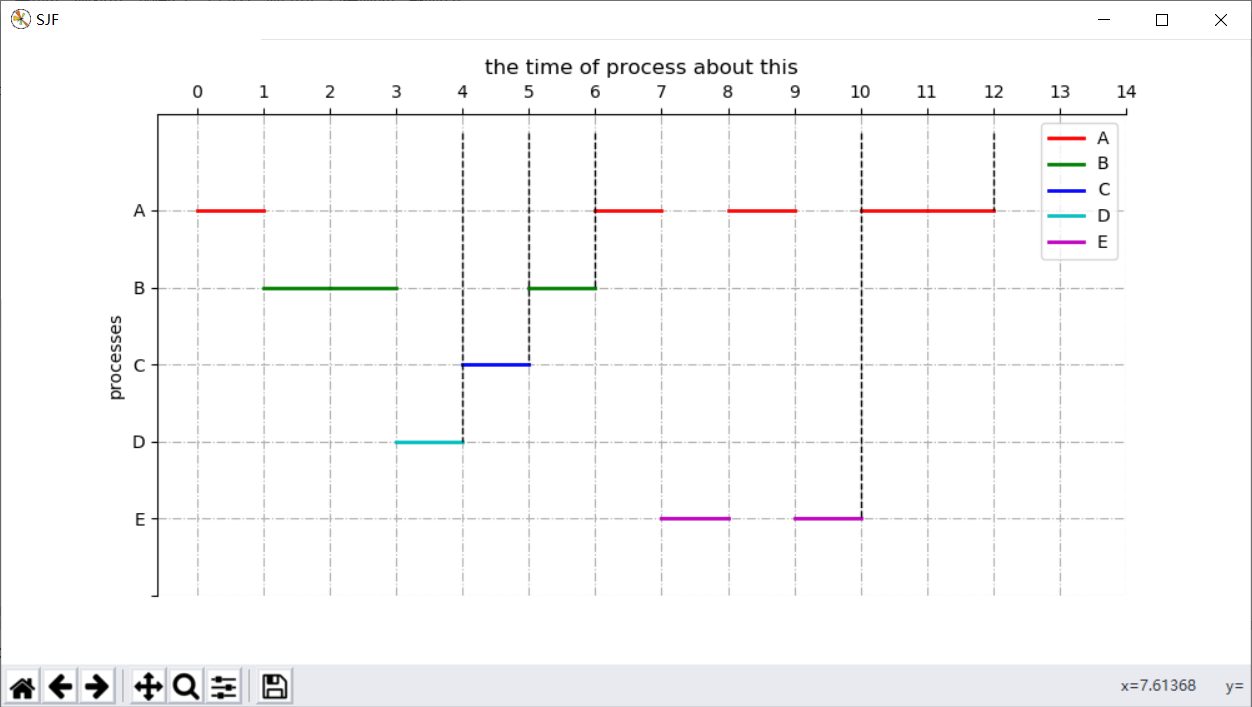 img
img
这样达到了我们的基本要求。
后记
按照开始的设想,实验二应该直接就是继承实验1,然后修改方法就行了,可是实际的操作过程中遇到了很多问题,比如改某个方法,其它的方法页需要更改,不够既然用类写了,最大的好处就是清晰直观。其实这两个实验把我带进了误区,满脑子都是排序,队列,维护一类的词语,从而忘记了最最简单的方法,直接一个循环,然后依次遍历取最优解就行,时间复杂度和空间复杂度都是最低的。还有可惜的就是,没有优化自己的代码,写的太难看了,运用到的方法也不太好。关于代码没有注释的问题,其实是有注释的,实验报告中为了减少篇幅,所以删去了,代码的详细情况和解释,包括一些独特的用法,都记录在了我的博客中。
最最重要的一件事情,就是,至今还没有实现动态的绘制直线,我知道有这个方法,却不是太懂,看了很多资料,也没有一个最合理的解释。这一个地方就有机会在实现。
代码的风格:参照的是PEP8。
最后,这两个调度的实验结束了,最开始自己想要用python动态绘制调度图的想法也落实了一半,但是会不会实现就不好说了,估计也没有这个时候写实验的冲劲了。但是有一点,python挺好玩的,也挺喜欢这种实践与理论结合的方式,下一次的实验,用plt显然是不可以的了,实现的方式和是否可视化展示,还没想好,反正路在脚下,走就完事。
完整代码
# -*- coding: utf-8 -*-
# @Author: wfy
# @Date:   2020-04-10 15:31:44
# @Last Modified by:   wfy
# @Last Modified time: 2020-04-19 10:06:13
import random
import matplotlib.pyplot as plt


class Solution():
    """to achieve SJF"""

    def __init__(self):
        super(Solution, self).__init__()
        # save processes
        self.data = []
        self.name = ‘‘
        self.service_time = 0
        self.arrival_time = 0
        self.priority = 0
        self.state = ‘‘
        self.number = 0
        self.timeout = 0
        self.start = 0
        self.end = 0
        self.n = 1

    def insert_data(self, name, arrival_time, service_time, priority):
        self.data.append({
            ‘id‘: self.number,
            ‘name‘: name,
            ‘arrival_time‘: int(arrival_time),
            ‘service_time‘: int(service_time),
            ‘priority‘: int(priority),
            ‘state‘: ‘w‘,
            ‘turnaround_time‘: 0,
            ‘authorized_turnover_time‘: 0,
            ‘start‘: [],
            ‘end‘: [],
        })
        self.timeout = max(self.timeout, int(arrival_time))
        self.number += 1

    def get_data_file(self):
        with open(‘data2.txt‘, "r", encoding="utf-8") as file:
            for line in file.read().splitlines():
                name, arrival_time, service_time, priority = line.split()
                # insert the process
                self.insert_data(name, arrival_time, service_time, priority)
        file.close()
        # initial queue
        # sort first arrival_time and second service_time
        self.data.sort(key=lambda x: (x[‘arrival_time‘], x[‘priority‘]))
        # update and recode id
        for i in range(self.number):
            self.data[i][‘index‘] = i

    def get_data_input(self):
        print(‘How many processes do you want input?‘)
        processes_number = int(input(‘Please enter an integer of type int:‘))
        print(‘name and arrival_time and service_time and priority of process‘)
        print(‘such as:A 0 5 3‘)
        for _ in range(processes_number):
            name, arrival_time, service_time, priority = input(
                ‘Please enter
‘).split()
            self.insert_data(name, arrival_time, service_time, priority)
        # initial queue
        # sort first arrival_time and second service_time
        self.data.sort(key=lambda x: (x[‘arrival_time‘], x[‘priority‘]))
        # update and recode id
        for i in range(self.number):
            self.data[i][‘index‘] = i

    def show_data_running(self, start, end, data):
        print("name	state	priority")
        for process in data:
            print("{:<7}	{:6}	{}".format(
                process[‘name‘], process[‘state‘], process[‘priority‘]))

    def show_data(self):
        print("{:<6}{:<10}{:<10}{:<10}{:<6}{:<8}{:<7}{:<6}".format(
            ‘name‘, ‘arr_time‘, ‘ser_time‘, ‘priority‘, ‘周转时间‘, ‘带权周转时间‘, ‘start‘, ‘end‘))
        for process in sorted(self.data, key=lambda x: x[‘id‘]):
            print("{:<6}{:<10}{:<10}{:<10}{:<10}{:<14.2f}{}{}".format(
                process[‘name‘],
                process[‘arrival_time‘],
                process[‘service_time‘],
                process[‘priority‘],
                process[‘turnaround_time‘],
                process[‘authorized_turnover_time‘],
                process[‘start‘],
                process[‘end‘]))

    def update_information(self, index, start, end, data):
        self.data[index][‘state‘] = ‘R‘
        print(‘-‘*40)
        # print("running order is:", *[i[‘name‘] for i in data], sep=‘->‘)
        print("from {:} to {:}".format(start, end))
        print("the running order is :")
        self.show_data_running(start, end, data)
        self.data[index][‘start‘].append(start)
        self.data[index][‘end‘].append(end)
        # had finished
        self.data[index][‘state‘] = ‘w‘
        if len(self.data[index][‘end‘]) == self.data[index][‘service_time‘]:
            self.data[index][‘state‘] = ‘f‘
            self.data[index][‘turnaround_time‘] = end -
                self.data[index][‘arrival_time‘]
            self.data[index][‘authorized_turnover_time‘] = self.data[index][‘turnaround_time‘] /
                self.data[index][‘service_time‘]
        else:
            self.data[index][‘priority‘] -= self.n
        self.start = start
        self.end = end
        # self.show_data()
        print("the finish status is :")
        self.show_data_running(start, end, data)

    def to_get_index(self, data, process):
        for i in range(len(data)):
            if process[‘priority‘] > data[i][‘priority‘]:
                return i
        return len(data)

    def get_next_data(self, index,  data):
        # get processes from the beginning to the end of the current process
        result = [x for x in self.data if x[‘arrival_time‘] <=
                  self.end and x[‘state‘] == ‘w‘ and x not in data]
        if result or data:
            # maintain the queue
            for process in result:
                data.insert(self.to_get_index(data, process), process)
            return data
        # no processes entered at current time
        for process in self.data:
            if process[‘state‘] == ‘w‘:
                self.start = self.end = process[‘arrival_time‘]
                return [process]
        return []

    def implement(self):
        ‘‘‘start algorithm‘‘‘
        # get first process
        data = [self.data[0]]
        # update the time of start
        self.start = self.end = data[0][‘arrival_time‘]
        while data:
            # update information
            self.update_information(
                data[0][‘index‘], self.end, self.end + 1, data)
            # get next process or processes
            data = self.get_next_data(data.pop(0)[‘index‘], data)
        self.data.sort(key=lambda x: x[‘id‘])

    def get_y_ticks(self):
        return [x[‘id‘] for x in self.data] + [self.data[-1][‘id‘] + 1], [x[‘name‘] for x in self.data] + [‘‘]

    def init_image(self):
        # size = 1000 * 500
        plt.figure(‘SJF‘, figsize=(10, 5))
        self.drow_image()
        # setting xticks for 0 to self.end + 2
        plt.xticks([i for i in range(self.end + 3)])
        # setting title
        plt.title(‘the time of process about this‘)

        plt.xlabel(‘‘)
        plt.ylabel(‘processes‘)
        # setting yticks.such as A == 0
        plt.yticks(self.get_y_ticks()[0], self.get_y_ticks()[1])

    def drow_image(self):
        colormap = plt.cm.gist_ncar  # nipy_spectral, Set1,Paired
        colors = [‘r‘, ‘g‘, ‘b‘, ‘c‘, ‘m‘, ‘y‘, ‘k‘] +
            [colormap(random.random()) for i in range(len(self.data) + 1)]
        for i in range(len(self.data)):
            # the time line of process from start to end
            process = self.data[i]
            plt.plot([process[‘start‘][0], process[‘end‘][0]],
                     [process[‘id‘], process[‘id‘]],
                     label=process[‘name‘],
                     color=colors[i],
                     lw=2)
            for x1, x2 in zip(process[‘start‘][1:], process[‘end‘][1:]):
                plt.plot([x1, x2],
                         [process[‘id‘], process[‘id‘]],
                         color=colors[i],
                         lw=2)
            # annotation of the key point
            plt.plot([process[‘end‘][-1], process[‘end‘][-1]],
                     [-1, process[‘id‘]],
                     ‘k--‘,
                     lw=1)
        # legend
        plt.legend(loc=‘best‘)

    def set_ax(self):
        ax = plt.gca()  # 获取到当前坐标轴信息
        ax.spines[‘right‘].set_color(‘none‘)
        ax.spines[‘bottom‘].set_color(‘none‘)
        ax.xaxis.set_ticks_position(‘top‘)   # 将X坐标轴移到上面
        ax.invert_yaxis()  # 反转Y坐标轴
        ax.grid(True, linestyle=‘-.‘)  # 网格

    def show_image(self):
        self.init_image()
        self.set_ax()
        plt.savefig(‘result.png‘, dpi=300)
        plt.show()

    def main(self):
        self.get_data_file()
        self.show_data()
        self.implement()
        self.show_data()
        self.show_image()


if __name__ == ‘__main__‘:
    try:
        Solution().main()
    except Exception as e:
        print(‘发生异常‘, e)
    else:
        print("end")
    finally:
        print("finally")
以上是关于利用python画出动态高优先权优先调度的主要内容,如果未能解决你的问题,请参考以下文章
openEuler资源利用率提升之道06:虚拟机混部OpenStack调度