自动化运维Python系列之Django进阶操作
Posted
tags:
篇首语:本文由小常识网(cha138.com)小编为大家整理,主要介绍了自动化运维Python系列之Django进阶操作相关的知识,希望对你有一定的参考价值。
FBV && CBV
FBV、CBV是Django视图路由处理模型,当用户请求送达路由系统URL后,由其转发给视图view来分析并处理
// FBV    function base views
// CBV    class base views
区别就是一个直接用函数驱动,一个用类驱动,两者在使用上存在一些区别
1)FBV
URL中根据路由匹配直接转发给视图中的某一个处理函数
urlpatterns = [
    url(r‘^home/‘, views.home),
]
视图函数接受到请求后需要我们人为判定请求类别,默认都是以GET请求
from django.shortcuts import HttpResponse
def home(request):
    if request.method == "POST":
        pass
return render(request, ‘home.html‘)
    if if request.method == "GET":
pass
return render(request, ‘home.html‘)
2)CBV
CBV路由要对应写成如下形式
urlpatterns = [
    url(r‘^home/‘, views.Home.as_view()),
]
视图模块中要导入固定View模块并且Home类要继承View
form django.views import View
class Home(View):
     # 自定义CBV最大的好处就是能够在处理请求之前或者之后做一些我们自定义操作
     # dispatch是Django中处理请求方法 相当于定制了dispatch(原理是通过反射)
     def dispatch(self, request, *args, **kwargs):
               printf(‘before‘)
               # 调用父类方法
               result = super(Home, self).dispatch(request, *args, **kwargs)
               printf(‘after‘)
               return result

     # 这里我们就不需要自己判断请求类型了 Django自动执行对应方法
     def get(self,request):
               printf(request.method)
               return render(request, ‘home.html‘)

     def post(self,request):
               print(request.method)
               return render(request, ‘home.html‘)
HTTP请求处理
在Django视图模块Views中,除了处理GET、POST请求外,还可能要处理HTTP请求头中包含的其他一些客户端数据,比如匹配客户端浏览器类型等;
我们处理的常见请求
// GET请求
request.GET
// POST请求
request.POST
// 处理文件上传请求
request.FILES
// 处理如checkbox等多选 接受列表
request.getlist
// 查看请求类型
request.method
// 查看请求源地址
request.path_info
request.FILES文件上传
由于request.FILES比较特殊,在文件上传后,通过Django的request.POST.get()取到的只是文件名字符串,我们可以自定义一个文件上传方法
1)在form表单属性里面加enctype属性
<form action="/login/" method="POST" enctype="multipart/form-data"></form>
<input type="file" name="a_file"></input>
2)Views中自定义上传
import os
obj = request.FILES.get("a_file")
printf(obj)
# 在Django工作目录新建upload存放文件
file_path = os.path.join(‘upload‘, obj.name)
f = open(obj.name, mode="wb")
# chunks()方法是Django内部处理文件上传的一个产生器 负责将数据分块
for i in obj.chunks():
     f.write(i)
f.closer()
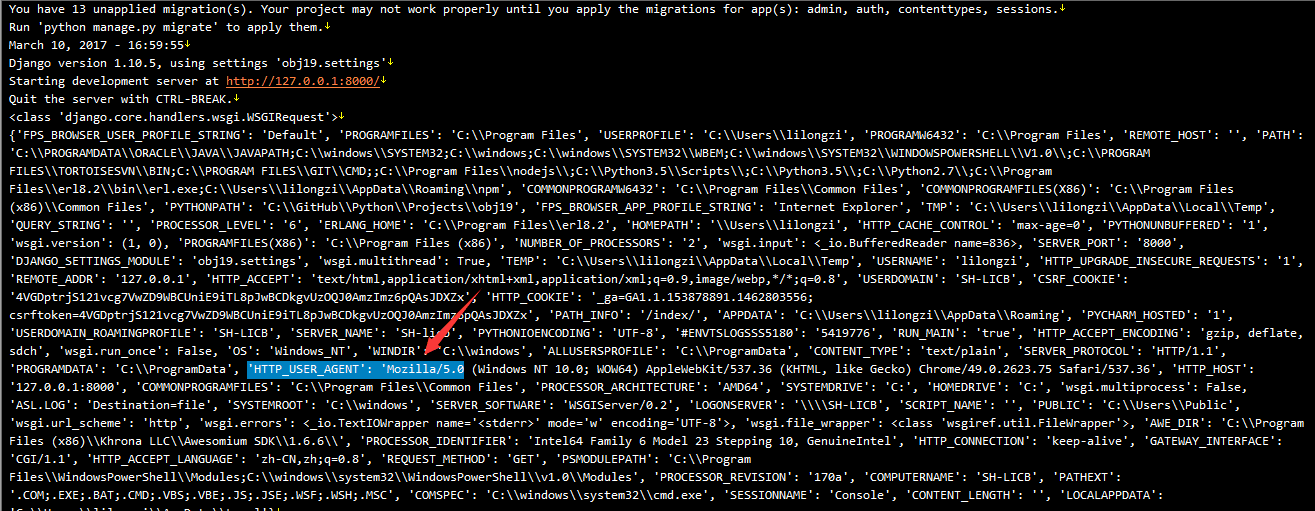
HTTP_USER_AGENT
我们以‘HTTP_USER_AGENT‘为例来看看Django怎么处理HTTP请求头中某个有用的数据
from django.core.handlers.wsgi import WSGIRequest

# request中封装了所有请求信息,但是我们怎么得到其中的数据?
def index(request):
    print(type(request))
    print(request.environ)
    return render(request, ‘index.html‘)
request中就有我们想要的数据,request是某个类的实例化,所以我们可以去创建他的类里面看看,得到
<class ‘django.core.handlers.wsgi.WSGIRequest‘>
导入该WSGIReques模块,查看源代码很容易就发现了environ变量,该变量中就有我们需要查看的数据
打印出来,下面就是所有的客户请求数据了
找出来,做可以做相应处理了
from django.core.handlers.wsgi import WSGIRequest
printf(type(request))
printf(‘request.environ‘)
for k,v in environ.items()
    printf(k,v)
printf(request.environ[‘HTTP_USER_AGENT‘])
Cookie
Cookie用来验证用户身份信息,在Django中cookie使用要注意的就是cookie的获取和设置,还有就是salt的对cookie加密功能
设置cookie
当在视图函数里面给客户端返回数据时添加cookie信息
def login(request):

    if request.method == "POST":
        u = request.POST.get(‘username‘)
        p = request.POST.get(‘pwd‘)
        dic = user_info.get(u)
        if not dic:
            return render(request,‘login.html‘)
        if dic[‘pwd‘] == p:
res = redirect(‘/index/‘)
// 或者 render(request...)
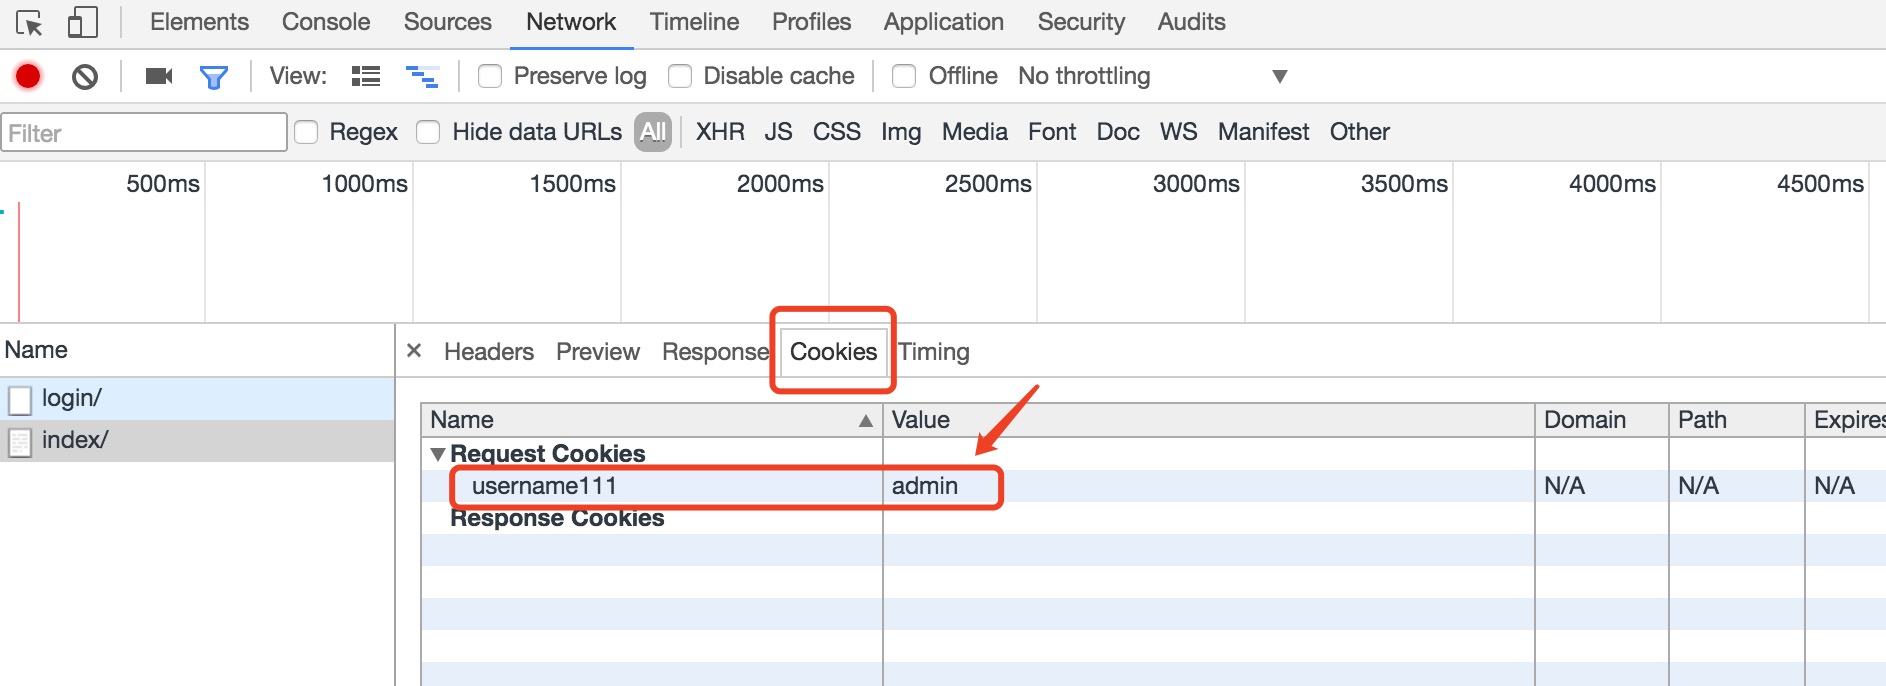
res.set_cookie(‘username111‘,u)
return res
当用户成功登陆后,以后每次访问都会带cookie请求
设置cookie参数
rep.set_cookie(key,value,...)
rep.set_signed_cookie(key,value,salt=‘加密‘,...)
    参数:
        key,              键
        value=‘‘,         值
        max_age=None,     超时时间
        expires=None,     超时时间(IE requires expires, so set it if hasn‘t been already.)
        path=‘/‘,         Cookie生效的路径,/ 表示根路径,特殊的:跟路径的cookie可以被任何url的页面访问
        domain=None,      Cookie生效的域名
        secure=False,     https传输
        httponly=False    只能http协议传输,无法被JavaScript获取(不是绝对,底层抓包可以获取到也可以被覆盖)

response = render(request,‘index.html‘)
response = redirect(‘/index/‘)
// 设置cookie,关闭浏览器失效
response.set_cookie(‘key‘,"value")
// 设置cookie, N秒只有失效
response.set_cookie(‘username111‘,"value",max_age=10)
// 设置cookie, 截止时间失效
import datetime
current_date = datetime.datetime.utcnow()
current_date = current_date + datetime.timedelta(seconds=5)
response.set_cookie(‘username111‘,"value",expires=current_date)
response.set_cookie(‘username111‘,"value",max_age=10)
获取cookie
request.get_signed_cookie(key, default=RAISE_ERROR, salt=‘‘, max_age=None)
    参数:
        default: 默认值
           salt: 加密盐
        max_age: 后台控制过期时间
我们还可以通过j s控制cookie,实现一个控制页面自定义分页数的功能
<div>
    <select id="ps" onchange="changePageSize(this)">
        <option value="10">10</option>
        <option value="30">30</option>
        <option value="50">50</option>
        <option value="100">100</option>
    </select>
</div>
<div class="pagination">
    {{ page_str }}
</div>
// 直接在js中操作cookie需要使用到jquery.cookie插件
<script src="/static/jquery-1.12.4.js"></script>
<script src="/static/jquery.cookie.js"></script>
<script>
    $(function(){
            // path 控制cookie参数生效页面范围
            var v = $.cookie(‘per_page_count‘, {‘path‘: "/user_list/`"});
            $(‘#ps‘).val(v);
    });
    function changePageSize(ths){
        var v = $(ths).val();
        console.log(v);
        $.cookie(‘per_page_count‘,v, {‘path‘: "/user_list/"});
        location.reload();
    }
</script>
用户登录验证
对于FBV 我们可以直接使用python的装饰器进行函数装饰
def auth(func):
    def inner(reqeust,*args,**kwargs):
        v = reqeust.COOKIES.get(‘username111‘)
        if not v:
            return redirect(‘/login/‘)
        return func(reqeust, *args,**kwargs)
    return inner

@auth
def index(reqeust):
    # 获取当前已经登录的用户
    v = reqeust.COOKIES.get(‘username111‘)
    return render(reqeust,‘index.html‘,{‘current_user‘: v})
对于CBV 我们可以通过控制dispath函数来达到控制请求处理
// 使用ethod_decorator进行装饰 name参数表示控制的具体方法
@method_decorator(auth,name=‘dispatch‘)
class Order(views.View):

    // 也可以在类内部操作
    # @method_decorator(auth)
    # def dispatch(self, request, *args, **kwargs):
    #     return super(Order,self).dispatch(request, *args, **kwargs)

    // 对方法一个个装饰一般不太推荐
    # @method_decorator(auth)
    def get(self,reqeust):
        v = reqeust.COOKIES.get(‘username111‘)
        return render(reqeust,‘index.html‘,{‘current_user‘: v})

    def post(self,reqeust):
        v = reqeust.COOKIES.get(‘username111‘)
        return render(reqeust,‘index.html‘,{‘current_user‘: v})
本文出自 “改变从每一天开始” 博客,请务必保留此出处http://lilongzi.blog.51cto.com/5519072/1905302
以上是关于自动化运维Python系列之Django进阶操作的主要内容,如果未能解决你的问题,请参考以下文章
自动化运维Python系列之Django CSRF跨站请求伪造中间件
自动化运维Python系列之Django路由系统Ajax请求


